Art teacher Denise Warf surprised me recently when she showed up at that Andy Warhol's Flowers workshop in her finished apron! I love the Dia de los Muertos fabric she picked out, it has mini-Frida heads on it! Of course I demanded we get a twinsies apron pic together. Because I'm 12. You look adorbs, Denise!
Hello, y'all! I'm excited to share with you the fruits of our Apron-Sew Alongin' labor. Not too long ago, I threw the idea of a sew along out there to Facebookland and I was thrilled when many of your responded. And I'm even more thrilled (does that make me thrill-ier?) that y'all were able to follow my crazy directions and goofball vid clips (you can visit here for Part 1 and here for Part 2 for those sew along directions) to create your own masterpiece. Or is it an Apron-piece? Whatever you call it, it's simply Apron-tastic.
Now, for those of you that are still game but have fallen a pinch behind, no worries! You just keep on emailing me those super cute aprons (you can chat me up at cassieart75@gmail.com) and I'll keep sharing 'em here. In the meantime, I am currently dreaming up our next sew along, if you're game. I'll be sharing that idea with ya's soon.
So, without further jibber-jabber, check out these lovely ladies in their awesome aprons, why dontcha?!
Daw, look at how cute Nic Hahn is, would ya? She's the super amazing art teacher behind one of your fave blogs, Mini Matisse. If you've never met Nic, lemme tell ya, she's one of the sweetest ladies around. And super cute in that apron, riiiight? She went with an Amy Butler pattern for her apron and wisely only used fabric currently in her stash (if only I had that kind of self-control). You can read all about her stitchin' experience here. Thanks for joining the fun, Nic!
Can you believe this apron that art teacher Kerry Bevers made?! She scored that bargain ant fabric and stitched up this apron for her first grader's insect unit. I know the kids were just ant-sy over it (bwahah, sorry. I just had to).
The pocket detail is my fave. Kerry said the reverse side of her apron is heart-themed in honor of the artist Jim Dine. I love that her apron ties in with her themes! Thanks for sharing your ant-astic apron, Kerry!
Wait a Monet...er, minute. Is this lovely lady covered in Monet paintings? Your eyes do not deceive you, y'all.
Art teacher Christy Rasmussen is just a walking Monet-masterpiece, doncha think? I love that her apron is reversible so she can showcase all several of Monet's paintings. I know her students will remember this artist and their awesome art teacher who wore his paintings on an apron. Way to go, Christy!
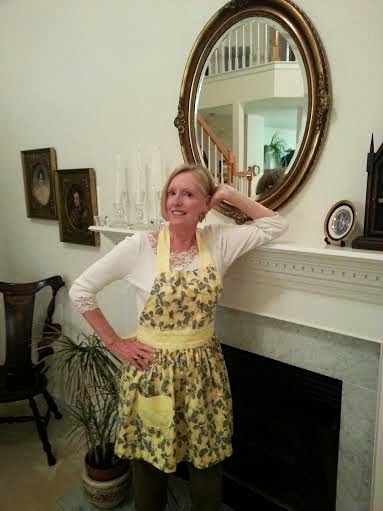
If this beautiful lady looks relaxed to you, that's because newly retired art teacher! Which you'd never guess because my friend Ginny Guiffre only looks like she's 33. I love so many things about this picture: that lemon-y fabric, that gathered apron, that mirror (which has nothing to do with the apron but still, I loves it!). Thank you, Ginny, for sharing your lemon-y fresh adorable self!
I'm so glad I can call Leslyn Rushing, who is also the Kentucky Elementary Art Educator of the Year (way to go, Leslyn!), my friend as she is simply amazing. And this super adorbs apron (I am in love with that rainbow-ribbon-tie-thangie!) is just the tip of her awesome-ness iceberg. Last year she took a thrifted wedding dress and transformed it into this fantabulous peacock gown. A gown, I tell you! Thanks for stitching with us, Leslyn!
What was that? Did I just hear a collective "awwwwwww"? I know, right? I know, I too am smitten with this reversible artsy fabric apron. Meet art teacher outta Long Island, Kelly Ryan. After wearing her apron in art class, she wrote me the following: I wore my apron this week when I had the 4th grade because we are painting, and the one class especially FLIPPED OUT over it! They thought it was just pretty cool in general, and then when I said I made it, they absolutely could not believe it! They talked about it the entire period. I’m from Long Island, and I would say the thought to sew things ourselves is pretty much dead here, as far as I can tell. The only fabric store I know of is JoAnns, and it’s kind of gross in there. So to think that people can actually sew clothes is probably a very foreign concept to the kids. The teachers all really love it too! I can’t wait to make something else! Such a great story and what an impact Kelly made with her apron. I'm so glad you sewed along with us, Kelly!
So if I saw art teacher Jenny Knappenberger's apron for sale in a boutique, I'd totally throw my credit card down. I mean, how cute is that apron?! And I most def wouldn't wear it in the art room for fear that some crazed kiddo would get their grubby mitts on it (today's convo: Kindergartener, while tapping my arm, "Hey! I have paint on me!" Me, looking down at the painted taps on my arm, "Great! Now I do too"). That tiered skirt portion is amazzzzzzinggggg.
And woulda look at that! A Warhol-tastic apron. So bloomin' clever, Jenny! Thank you so much for sharing. By the way, Jenny has a super amazing blog that you gotta check out! Go here.
Leah Keller's apron is so stinkin' adrobs, y'all. From the pom-pom'ed bottom and the flowery accent to the two pockets and the scrunchie neck strap, it's just top-to-bottom, front-to-back super cuteness!
I really loved how she played with pattern, one of my fave things to do when I'm stitching. Her fabric choices are so happy -- and I love that one side of the apron is so different than the other. Way to go, Leah!
Meet my amazing art teacher friend, Hilda Thomas. I absolutely love that she used denim because it's the perfect fabric for an art room apron. It's super thick so no paint/ink/clay/whateverness can soak through and totes durable. But my fave part is that tie-dyed fabric. I love that she used it again for the waist tie. Doncha love Hilda's "I Am Art Teacher, Hear Me Roar" stance? She's the bomb squad, y'all.
Lucy Zucaro's apron has my retro-loving/sailor-themed heart. All the sweet details she added to her apron are so sweet. I'm a huge fan of rickrack and I love that she used it at the top, middle and bottom bringing the cute thing together. And the buttons at the top! I die! Congrats on your retro-tastic apron, Lucy!
Art teacher Amber Dow's apron is so rosy and romantic. I feel like it would be just the perfect thing to wear when making a cuppa tea and biscuits, doncha think? I'm a sucker for florals so I adore this super sweet apron.
Judy Harney's reversible apron showcases her interest in photography. That camera fabric has been in my virtual shopping cart many a time, I just love it so! And that mod face fabric on the reverse side pocket is just so awesome. I like how she used that band of fabric at the top of the pocket to bring both aprons together.
I know y'all know Phyl who blogs at the always amazing There's a Dragon in My Art Room (one of my go-to/omg, I-need-a-lesson-stat! blogs) but you might not know Violetta. She's the lovely mannequin that Phyl created (yes, she MADE that mannequin! She wrote a blog post all about it here). I love the fabric Phyl picked out for her apron, it's so stinkin' fun.
I mean, look! Yoga frogs! Her apron is just as fun as she is. You can read all about Phyl's apron stitching adventures here.
I love Laura's apron...but I might be a lil biased. I have a thang for Don't Let the Pigeon Drive the Bus! The book is hilarious and the colors in the pattern are so cool and retro. Which is why I love that she created a half apron and that it's gathered. I do love me a gathered apron. Way to go, Laura!
Art teacher Amanda Kaiser's apron is covered in paint! Well, paint trays, anyway. This fabric is one of my fave art teacher-y fabrics and I'm so glad Amanda used it for her apron. What I really like is that she added a green trim and matching pocket. Her apron is so flattering. I know her students must love it!
Leah Klimet wrote, "My apron is done! After a little disagreement between me and a bobbin (which I won after a long battle), I am finally done!" And looking super cute, I might add. I love that color palette of gray, yellow and green, it's one of my faves. I'm so glad she was able to show that bobbin who's boss. I wonder if she could talk to my husband...
If y'all don't know this hilarious art teacher then allow me introduce ya. This is Lisa Beynon, super stitcher, blogger and art teacher. If she looks a pinch familiar, you might recognize her from this post or from her always fun blog.
Lisa is some kind of awesome. She's a big thrift shopper who transforms frumpy dresses into fabulous fashion. AND she's hilarious. So there's that. Thank you so much for keepin' us in stitches, Lisa. Like, literally!
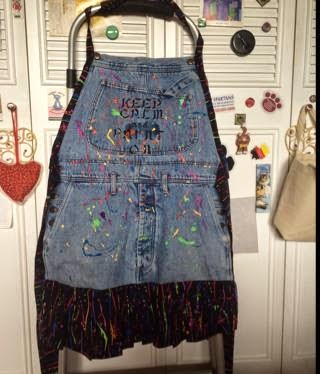
Deborah FitzGerald should win the prize for Most Art Teacher-y Apron. Or maybe Most Upcycled Art Teacher-y Apron. I love how she transformed a pair of overalls into something splatter-tasticy super (can I say "super" any more in the post? What can I say, I am in love with all of these super stitchin' aprons!). I gotta get my mitts on some of that spluttery fabric, I just love it. Looks awesome, Deborah!
Speaking of prizes, if I were given' 'em out, Lisa Anderson would win Most Stitched Aprons as she's sewn up four now (maybe even more at this point). Each and everyone is so adorable that I feel like I need all of 'em in my closet. I mean, a heart-shaped bodice?! I. Die.
And angled pockets with lacy detail?! Be still my heart.
But this one just might be my fave...or, wait...
Doggone, Lisa! You are amazing, I love 'em all!
Rebekah Cohen's apron features some of my fave fabric (that may be sitting in my sewing room as I type just waiting to be stitched up). My fave part about this apron is that pop of blue. It's so perfect with the rest of the colors in the apron.
Here's Rebekah's daughter modeling the reverse side of the apron. I love how she used the blue again as the background and added those sweet fabrics for the pocket and the boarder. Her daughter looks adorbs!
Like our super stitcher, Lisa, Julie Fouts made more than one apron, she made two and a matching one for her mini-me. Two things: 1. Isn't that little girl precious?! 2. Could she be more excited about her apron?! That face is priceless!
Here's the reverse of Julie's apron. I am loving those rounded chevron pockets, girl!
Julie's third apron was one made from fabric from Ghana. Um, like, that's cool! I love African print fabric (I've got just a pinch in my stash) and I'm so glad to see this bold and unique apron. It's so fun, thanks for sharing, Julie!
So I pretty much squealed out loud when I saw Emily Gau's apron. I mean, it's got all of my fave things: polka dots upon polka dots (yes!) and a red/turquoise combo. Which is pretty much perfection in my book. So glad you joined the fun, Emily!
And here's the reverse side of our aprons seen in the first photo. Can you tell by the look on my face that I was a pinch pleased that Denise wore her apron? Gah, crazy much? By the way, don't you love that sweet bird fabric on Denise's apron? So cute and goes so well with the Frida fabric on the reverse.
And there you have it, friends! Thank you so much for sewing along with me, I had a blast! Remember, you can keep emailing me your aprons as you finish 'em. AND stay tuned for our next sew along...I think you'll really like it. Chat soon!
Okay, that man who lives in my house and eats my burnt banana bread makes fun of me because every one of my lil vid clips starts with a "hey, guys." I honestly tried to spice it up with something else ("hey, my b%tches" just didn't feel right) but I'm from the Midwest, what can I say? So "hey, guys" it is.
I'm so glad you are here, kids, I cannot wait to see the apron you create! Now, just to make it clear, you can sew any kind of apron you want (that's right, I bolded and italicized that bit. That's when you know I'm for serious). Whether it be bedazzled or ruffled, I say go crazy and make it your own. I've decided to show you how to stitch a simple reversible apron with nice deep pockets (because an apron without pockets is, like, absurd in my book. Which is titled Aprons Without Pockets is Absurd. It's a working title.) I thought by keeping it simple and giving you lots of options, we'd all come up with something a lil different. So, without further jibber-jabber, let's chat about what we'll be working on this week...
* Washing and drying out fabric to remove that weird sizing.
* Creating pattern pieces outta wrapping paper or whatever else you've got large sheets of.
* Stitching a two-ply double pocket that can either be solid or patchworked (I lost you didn't I? Just keep reading, you'll get it).
* Cutting out our apron shape.
* Stitching our pocket to our apron!
So by week's end, you should have something like this! More than likely, you'll have something even better.
Let's chat about fabric before we go any further. I had so much fun throwing fabric all over the floor of my sewing room to see what would work together. Here's what I've come up with for the front of my apron. That orange chevron is going to be used for the ties and the neck strap...so I had to be certain I liked it with both aprons fabrics.
Because I wanted to mix things up a bit, I decided to have a solid pattern pocket on this side with a strip of polka dot at the bottom. I'll tell ya how I did that here shortly. First, let's talk pockets.
I opted to make one large rectangular pocket with a stitch down the center. I thought this kind of pocket would be more useful than a single one. To create this, I simply cut out a piece of super cute kitten wrapping paper to 10" X 16". If you listen to the video clip, I'll walk you through pocket making. I've also written out the steps for you to follow that way as well. I do hope it makes a smidge of sense. Cuz that's really all I got. Just a smidge.
Told ya.
Okay, so I totes know my pocket's a lil crooked. But I'm not fixing it. This thing is about to be covered in all things art room so a slightly off-kilter pocket ain't nuthin. Now let's chat about the making of this pocket.
To make your pocket two-ply, take your pocket fabric and fold in half. Pin your pattern piece to the fabric along the fold. Cut out everything except that folded edge. Remove your pins. Now put the pins back on the fabric but just along the sides. When you stitch, you will only sew the sides. The top should be folded and the bottom should be open.
Stitch along the sides. Trim that seam close to your stitches and angle cut those corners there the folded edge and your stitched edge meet. Flip inside out and iron.
Flip the bottom raw edge inside an inch so that the pocket is now 9" in height. Iron.
Now let's chat about that patchwork pocket. I love it on this wild and crazy fabric!
Make two pattern pieces one that is 7" X 16" (which you'll cut one) and one that is 8" X 16" (that you'll cut two).
Pin the pattern pieces to your fabric and cut out. Remember, for the top band, you'll only need to cut out one piece; bottom band, two pieces.
To create, remove your pattern pieces. pin the long edges with right sides together and stitch.
Iron open your seam. Now repeat these same steps on the other side so that you have, basically, a fabric sandwich with your smaller band of fabric in the middle.
Again, press open those seams. To turn this into a pocket, you are going to follow those same steps as above. this time your "folded edge" will be that middle band of fabric. Stitch the sides, remove pins, trim seam and flip inside out. Fold in the open bottom portion and iron.
In this clip, I'll walk you through creating your apron pattern piece.
For your apron, cut out a piece of fabric that is a 31" X 18" rectangle.
You are creating half of an apron pattern, not the whole thing. Because your apron will be symmetrical, you are going to simply fold your fabric in half, place that pattern piece along the folded edge and cut as you see below. But first, we need to create that curved side so you won't be walking around wearing a rectangle. To create that curved edge, I measured 7" from the lefthand side and made a small mark. Then I measured 16" from the top of the right hand side and made another mark. I connected the two dots with a large curved line. If you are not sure about your curved-line drawing skills, no worries. Maybe you have a large round lid you can trace for the curve.
Again, pin the long edge along your folded edge of fabric and cut.
Now, I did make my apron pretty long because I'm on the tall side. If you cut your apron out and hold it up to you and it touches your toes than you might wanna shorten it. Or grow a coupla inches. For a shorter apron, you might wanna start with a rectangle that is 28" X 18".
Because I wanted a little band of accent fabric at the bottom of my superhero side, I decided to cut the apron to that short size. Then I cut out a rectangle of my contrasting fabric in the remaining about which I think was 3" X 18". Don't forget that this fabric will also need to be folded in half to give you the correct width.
If you are adding that band of fabric to the bottom, pin the right side of your contrasting fabric to the right side of your apron and stitch. Iron you seam out flat.
Now, let's add that pocket to your apron! To do this, I folded my apron in half along that long line. I measured 17" down from the top of the apron. With my pocket also folded in half (so to center my pocket along the middle), I pinned it down. Then I flipped my apron over and pinned down the other side of the pocket. Using a piece of chalk and a ruler, I drew that middle vertical line. That's the line I stitched first. Don't forget to back stitch. For added strength, I also went back and did a zig zag stitch. I don't want my apron pocket to pull off my apron. After stitching the middle line, I stitched along the bottom edge.
Now, to make sure that your hands can fit in your pockets, remove your pins and slide your hand inside your pocket. Now pin that pocket down with that little added space and stitch along those side seams. Again, backstitch and add that zigzag for reinforcement.
If you look below, you'll see that my pockets look a little baggy. That's because of that little bit of space I accounted for. I have big mannish hands, they need all the space they can get.
And there you have it! Pattern pieces created (I've labeled and saved mine for future apron reference), pockets created, aprons cut out and pockets attached! Whew! That outta keep you busy for a week, amirite?!
Pretty please leave any questions you might have (because I did a lousy job of 'splainin') in the comments and I'll be certain to get back attcha. Also! I'd love to see your progress on the Apron Sew-Along Facebook page! Thanks for joinin' in, y'all. Happy stitchin'!