Hey, y'all! A while back, I shared with you some of my Art Teacherin' Resolutions for the Brand Spankin' New Year (that post is jam-packed with resources from all over the place so if you've not checked it out, do it. I spent, like, foreverness on it. That's right, I be guilt-trippin' you into reading that post). So far, I'm loving almost all of the new thingies I've introduced to the kids (one is getting tweaked, deets to come!) and I thought I'd do a Part 2 because, let's face it, there's a whole lotta things that need to be resolved in my art room, y'all. But first, this just in!
This silliness of a blog has been nominated for AOE's Blog o' the Year Contest! I'd love y'all to throw a vote my way but, more importantly, go and check out all of the incredible blogs nominated! There are some new ones for me and I cannot wait to spend my snow day checking them out (okay, we've not gotten the "snow-yay phone call YET...I'm using the Power of Positive Thinkerin').
Art Room Jobs: Okay, so speaking of AOE, I have a girl-crush on one of their writers, Alecia Eggers. She is THE MOST organized art teacher on the planet, y'all! I want her to come, organize my art room, my life and, finally become my life coach. I learn so much from her posts and videos on AOE. However, because I am such a hot mess, I always have to put her tips and tricks into a Cassie-Fur-Realz context. I get all excited when I see her ideas but then I take a deep breath and say, "Cassie, fur realz? Is this something you can maintain?" Well, with my spin on Alecia's clean-up jobs, I think I can! I have the jobs you see above posted in two places in my art room. One under the large telly in the top photo (it's small but big enough for the kids to view when they sit on the floor) and the other is Large Marge on my white board (shown above).
Because my tables are covered in paper and my chairs get moved around so much, I decided to color code the table legs! I used stickers but they were pretty lame at sticking so I ultimately put clear tape over them. Which means I coulda just used cut pieces of construction paper. Le sigh. Now, my tables seat four children...but most seats are not taken. So the kids know they must do their job and the job of an empty seat beside them. Let's talk jobs!
TABLE TIDIER: So, like, make the table tidy. Like how you found it. Only better. Hence make it tidy-errrr. Which means supplies put back...
Scissors and pencils in their lil orange caddy, table top trash can emptied (which is just a Folder's coffee can with a laminated Warhol print wrapped around it) and drawers of art supplies organized and closed.
Speaking of, I've not really thought through my drawers yet (uh, that didn't sound quite right). I know glue in various forms will go in the top drawer (glue sticks, glue sponges and glue cups) but the lower drawers are pretty much empty. I'm thinking eventually our everyday-ish supplies will go there like oil pastels, colored pencils, you get the idea. I'd love to print up some pretty labels too...but that's on the back burner with everything else.
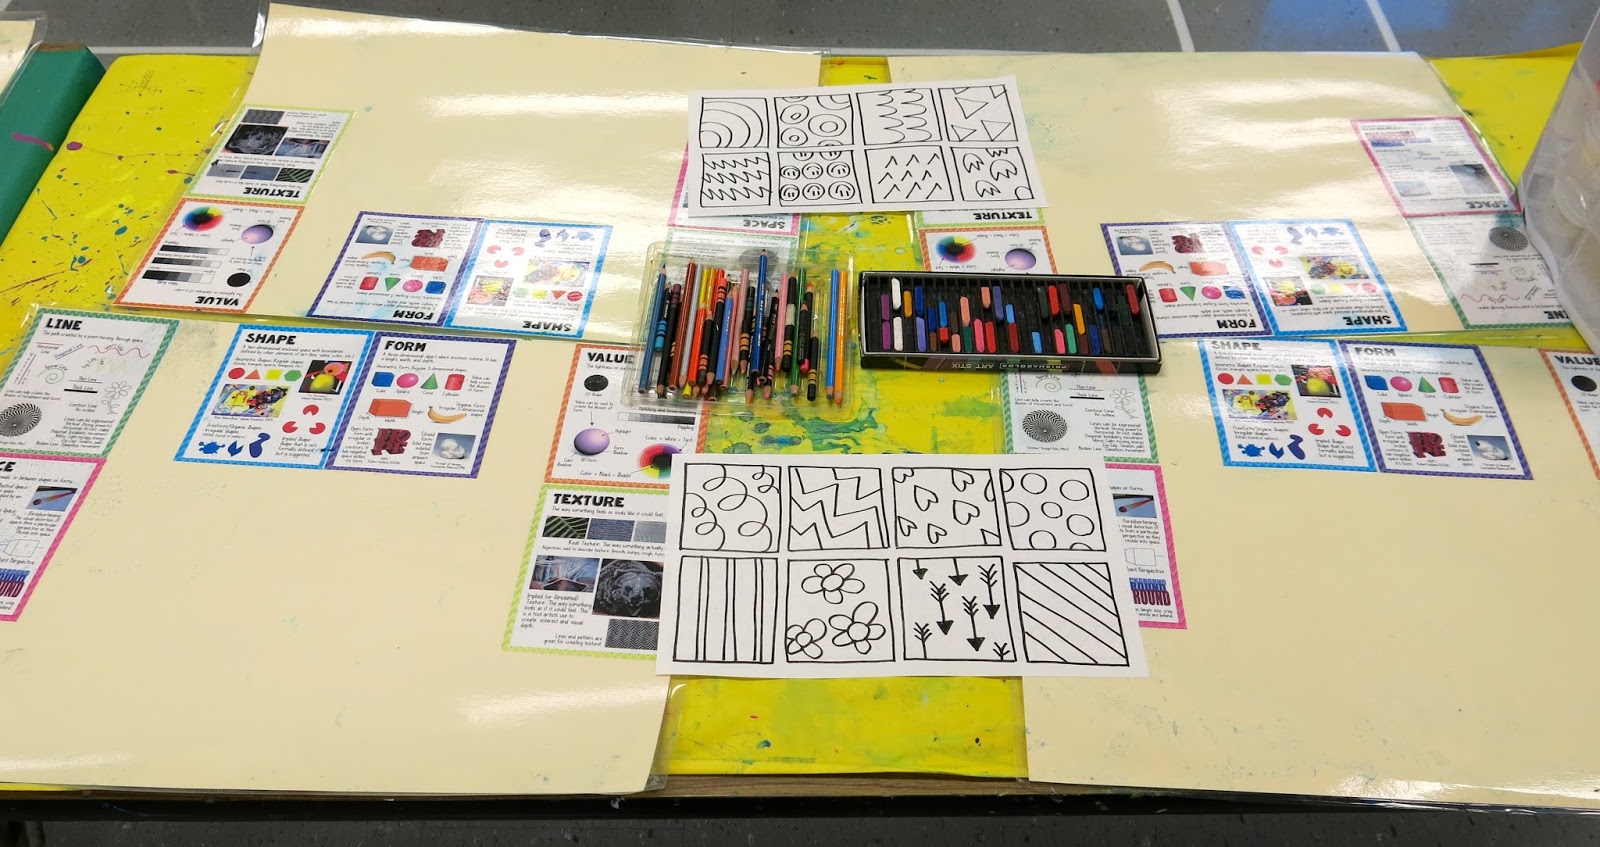
MESSY MAT MOPPER: Did y'all notice my laminated and ART-ucational messy mats?! You don't even know how happy these guys make me! But more on that in a minute. The job of the mopper is to use a pre-dampened sponge to wipe down the mats on their table. This job is a favorite currently. Because kids are weird.
MATERIALS MASTER: These dudes and dudettes are in charge of, you guester, materials. They have to get out the special supplies for their class and put them back at the end of class. In my Barbie Art Teacherin' Dream World, I'd have my counters labeled and all that jazz. But, look, I'm no Alecia Eggers, okay?! SOUND SILENCER: Ya know. They get to shush the above-a-whisperin' kids. This job is also a fave...unless the SS is a known chatter-box. Which leads to self-shushing. Always fun to observe.
Art-U-cational Messy Mats!: All my classroom teacher friends have these awesome things taped to student desks. The alphabet. A number chart. Other stuff. For years I've wanted to do something similar but I couldn't figure out why/how/spaghetti (ADHD. The struggle is I LOVE PIZZA real). Then I started buying things off TPT like it was going outta style and one of them was this fab-o Elements of Art purchase by Mrs. Nguyen (also a Blogger of the Year contender, go girl!!).
For the reverse side of the mat, I found a free color wheel and color mixing chart on the interwebs.
The kids have LOVED seeing the recipes on their mats! One first grader even thanked me and some kindergarteners were excited to see that what they were painting was correct according to the mat. It was a chore to make these (I had my fab friend Carol give a girl a hand, thank you, Carol!) and it did take us about 2 hours to cut, glue and laminate 25. But I think they will last a good long time.
Relocated "I Can" Wall: Previously this was located by my telly but it often was blocked by an easel. And then I would forget to update it and refer to it. Like, seriously, that's bad, y'all! (please ignore the HAWT MESS EXPRESS under my demo table. ALECIA! CLEAN UP IN AISLE 13!)
Of course the I CAN's include an I CAN DANCE TO OLD 70'S RECORDS. Which wouldn't be complete without a disco ball, y'all.
The "I Can's" are divided by grade level and by "Today, I Can...", "So That I Can..." and "I Know I've GOT IT When...". I also used these awesome magnetic strips I found at the Parent/Teacher Store to divide up my board.
Filmed Sub Plans!: If y'all were here 10 minutes ago, you know I filmed my latest sub plan (go here, kids). I remember reading about how Ron Clark does this and thinking, that is GENIUS. Well now that I'm out for several days for jury duty, I thought I'd give it a shot. I went to school this morning to prep and I met my sub. I could tell she was a little nervous about the whole thing (she had an understandable technology aversion of which I can relate) but at the end of the day, when I dropped by, I heard she LOVED it! And look!
I just grabbed a couple of fourth grade and second grade pieces, put them together and let out a squeal! They did fab-o! I'll share the finished mural soon. This has made jury duty and missing teaching the kids a little less painful. Alrightie! That's all the Art Teacherin' Resolutions for 2016! Here's to stickin' to 'em. Cheers!
Monday, You Ain't Right: I have a super hilarious coworker who loves to tell me, "Stephens, you ain't right!". To give her credit, this was after I explained to her that, no, my stockings were not purchased this way but created with a little creative tucking. It's no wonder that I usually get a side-eye and a head-shake from my work budz. crayon hair clip: made by me, DIY here; crazy sweater: vintage; dotted dress and tights: Target; flats: Payless; shoe clips: made by me, DIY here
So a while back, I got a big thick envelope in the mail. The return address looked boring and official so I threw it on the dining room table where it sat for more days than I'm willing to admit. "You better open that letter soon," el hubbo warned, "It looks pretty important."
Turns out it was. I've been summoned for el jury duty-o.
Looks like I'll be outta the art room for five days spread across two weeks. Now, I've slapped together I'm-so-sick/night-before/please-don't-vomit-on-these sub plans before but that was when I was in a pinch and knew I'd prolly only be out for a day. However, knowing that I'd be missing this much time with the kids, I really didn't want to deprive them of a fun and art-ucational experience. So, my Friday afternoon looked a lil like this:
If you follow me on Instagrammerz, you already know that I decided to create a video'ed sub plan! I've been showing my students videos of myself lately which has been super awesome because 1. it allows me time to prep; 2. it allows me not to forget anything that I'm supposed to say; 3. [truth be told] it allows me to kick back and drink my fourth cup of coffee. There. Cat's outs the bag. After sharing this photo, I had a lotta questions about what the lesson entailed, which, fingers crossed, will be a Romero Britto-inspired Pattern-tastic Heart Mural Collaborative! So I thought I'd share it with y'all! PLEASE keep in mind that this is me addressing my first through fourth grade students. I promise I don't talk to adults this way (well, okay. I do. And, for that, I apologize).
Now. I've never done this before. I do plan to go in every morning of my JD to prep the technology. Thankfully, the courthouse is just a couple blocks away from my school so I have the luxury of popping in and doing a little prep. I also created a two minute video of myself chatting with the sub so he/she knows what our routines are and some housekeeping biz. I'll be sure to keep y'all posted on how it goes. Until then, back to the What the Art Teacher Wore (or shoved in her hair) show!
When I shared this DIY with y'all a while back, my sweater got more interest than my hair clips! It was quite the conversation starer with the kids as well. One said, "it's like you have crayon worms crawling all over you!" Yikes, kid. That's the stuff of nightmares.
I actually have a wee shoe clip problem. And a love for making stuff outta Sculpey. You can see this DIY here.
Thank You for Being a Friend, Tuesday: Thank y'all so much for the very positive feedback on my art teacherin' videos! My goal is to share more videos weekly so if you wanna stay in the loop, you might wanna subscribe to my channel as my videos go up before they appear here. Smooches! sweater: thrifted; eyeball top: Urban Outfitters; scissor skirt: Modcloth; tights: Target; shoes: Dolls by Nina
#OnWednesdaysWeWearArt: Y'all check out my awesome "I like to ARTY hard" shirt? It was created by artist My Friend Court (Courtney Pilgrim). Court is a former art teacher turned full time artist. Her work is as happy, bright and colorful as she is (if you don't believe me, just scroll thru this Instagram account, kids). Each Wednesday, Courtney does a lil #OnWednesdaysWeWearArt where we can dress with an artist in mind, snap a photo and use that hashtag on ole Insta. I decided that Court was my muse by wearing her shirt! top: My Friend Court; skirt and belt: PinUp Girl Clothing; dotted tights: Target?; shoes: Sofft
But What Will You Wear?! Thursday: So, I've been letting my classes know about my upcoming absences. Which led to a nice chat about jury duty and civic duties. I could tell I was making real headway when I was asked, "But what if they find you guilty?!" Once that issue was resolved, ahem, this convo went down:
Kid: What will you wear?
Me: what do you mean?
Kid: uh. Like. Will you be dressing like how you always do? Like (with a wave of the hand) that?!
Kid 2: She only has crazy clothes, what do you think?!
Couldn't have said it better. sweater and dress: thrifted and vintage
Gone Cuckoo Friday: Anytime I've procrastinated the daylights outta my life, which always means my Fridays are a mess, I go a lil cuckoo. So what better day to wear this number, eh? sweater and tights: Target; boots: Anthro; belt and crinoline: Amazon; cuckoo dress: made by me, DIY here
Thank you so much for the positive feedback on the printmaking videos, y'all! I'm so glad you liked them, found them helpful and, most importantly, had tips and tricks of your own to add. I love our great, big, fat hairy art teacherin' sharing-is-caring community! To keep up with more videos, feel free to subscribe here. Today my first grade students wrapped up their printmaking adventure with these LOVE-ly lil Robert Indiana-inspired printed and collaged pieces.
Y'all. It's January. I cannot even believe that I've gotten a Valentines-esque project knocked out already. I know some folks are all, "I don't do holiday themed projects" and I usually go ahead and nod my head but not cuz I agree (honestly, Ima go all Switzerland on that debate and stay neutral)...but cuz I can NEVER get my act together early enough to have anything ready! I mean, 'member that big We Have Heart mural we made last year? Dudes. We, like, started that on Feb 10th. But not this time...
CONFESSION: I had no idea what the kids were going to do with the piles of prints they were making...until seeing this piece again recently. And then I was all, yaaaazzzzz! Which, by the way, is the new Eureka!
It's gotten around the school that the firsties have been printing maniacs in the art room. We spent two 30 minute art classes making at least 4 printed pieces. One day we worked with blue inks and the following, yellow and red.
I told the kids "at least" because some of them just enjoyed the printing process so much that they wanted to print again and again. It's so magical! Others were well over it after the fourth print on the second day and they moved on to greener, less print-ier, pastures.
Now, I will say, I hustled today to get the prints to the point that they could be created into these collages. I have jury duty for the next two weeks (can you hear the excitement in my typed voice? Me neither) and I didn't want any UFO's lingering around for me to return to (UFO: Un-Finished Objects). So today I trimmed all the prints at the paper cutter, organized them by kiddo and prepped the LOVE letters...
Normally I wouldn't do that much work on behalf of the kids (and my sanity...right now is the first time I've sat down all day) but, like I said, I don't like me no UFO's. To prep the letters, I made them in such a way that the kids would have minimal amount of cutting (thirty minutes, people. Thirty. Minutes). I wrote the letters in reverse so the kids could cut along those lines...but put the glue on the back (we did a little ditty: The Lines are in Black and That's the Back!). The reason behind this was I didn't want the black lines to show...but clean, crisp white letters.
The kids also had to hustle. They had to lay out their prints and decide upon a good design, glue those down, cut out their letters and glue that as well. We might have been 3 minutes late to P.E. (sorry, ladies!).
But, oohhhhhh, the results. I mean, is it just me or are these not the most swoon-worthy thing ever?
(Shhh, don't tell: this is my personal fave). And now I can go off on my jury duty adventure knowing that I don't have any UFO's in first grade floating around! Love to hear about your printmaking adventures, y'all!
Hey, y'all! It's Printmaking Season in my art room currently and it's been a big fat hairy success. Mostly because, let's face it, printmaking is super mysterious, magical and mega-awesome. The kids are always surprised and thrilled by their result and pulled prints always elicit the biggest oooohhh's and ahhhhh's.
BUT. There is the Dark Side of printing as well. Y'all know what I'm talking about. Poorly inked plates. Smeary prints. An inked and printed on body part (um, that was today, in fact. See below). However, I think I've got some tipz -n- trickz for y'all that might make life in Printmaking Town a lil easier. So click the sideways triangle below and I'll walk y'all thru some steps!
By the way, since my room tour video, I've seen a nice jump in my youtube channel subscribers. Thanks, y'all! My goal is to share more videos like the one above and the instructional videos I create for the kids. If you are interested, please feel free to subscribe, I'd love to have ya!
So, those marker prints...where have they been all my life?! They are super fun, easy to do and a great way to introduce kids to the magic of printmaking. I got the idea from one of my fave art ed bloggers, Don Masse (thanks, bruh!). You can find his awesomeness here.
During the next two thirty minute art classes, the first graders printed with ink. Each student made a minimum of 5 prints which will be used in an upcoming project. By the end of the printing process, they were experts at covering their plates completely and pulling clean-ish prints. I mean, their fingerprints all over the background are prints as well, right?! Just say yes, there's no point in arguing with me. Give that paper a back rub, kid.
Pulling only part of the way up and checking the print was encouraged. This way the kids could lay the paper back down and rub some more if need be.
I have found that printing on copy paper works the best. I also have the kids use Speedball washable ink. Names are written on the back of the paper before printing is started.
The kids were allowed to go to another table to use more ink. However, this will result in blended colors...which is cool if you use analogous colors. We had red and yellow out which created these lovely blended prints.
Love how it pops on this blue paper!
The kids really enjoyed these prints!
Printing limbs was not encouraged...but super funny when it happens. This sweet girl leaned onto her plate accidentally and did a lil body printing. It's a new trend. She's totes cutting edge.
Y'all saw these last week. These were created by my third grade after watching my lil demo video...
This week they'll watch this video. I hope it is as successful at explaining the process as the first one!
I'd love to hear your printing tips and tricks, y'all! Please feel free to share 'em in the comments. Until next time...