Last week, my first graders, who I see for 30 minutes twice a week, spent one class learning as much as they could about Wassily Kandinsky, abstract art, non-objective vs. objective and painting to music...all in 30 minutes. Whew! It was fast and furious. Here's a peak into our lesson and time together.
My students absolutely LOVED this lesson and I cannot wait to share with you what our plan is for our paintings. In the meantime, I've been asked a lot what supplies we used for this lesson. Let's start with the paper. I ALWAYS buy 80lbs paper because it's the best paper for everything: watercolor paint, tempera, collage, you name it. I purchase about 4 reams a year for my 350 students.
My go-to watercolor pan watercolor is Crayola's Mixing Colors. I only order the refill sets, never new sets. I order the following colors: magenta, red, red-orange, yellow, green, turquoise, blue, blue-violet and purple.
My VERY favorite oil pastels for resist are the florescent oil pastels by Sargent. All of the supplies mentioned can be found in your art supply catalog.
If you watch my video, you'll notice I do A LOT of call and response. It's my number one teaching tool...I probably use it to a fault! However, it's a great way for me to keep my students attention, teach vocabulary and have them retain information and directions. It also WORKS WONDERS for my English language learners...they LOVE repeating after me!
Also...can we talk about what amazing abstract artists these guys are?! Holy cats! I am seriously thinking of printing their paintings on some fabric. I need these masterpieces as a dress, y'all!
I'm so excited to share with you what the master plan is for these...so be sure and stay tuned!
What are your favorite ways to teach kiddos about abstract painting? Do you have a favorite artist that you like to introduce your students to? I'd love to know!
Thank you for letting me share these amazing abstract masterpiece by first grade with y'all. I hope they make you as happy as they make me!
This summer, I had a wonderful chance to meet and hang out with the artist Becca Jane Koehler. I initially met her at our local HUGE craft show where she was a standout (and recognized) for unique pieces. I chatted with her a bit at the show and managed to grab a card...I knew she would be a wonderful artist to share with my students. On my YouTube channel, I have a playlist titled Field Trip! which is where I seek out and interview artists who share their process with me. I've filmed folk artists, painters, ceramicists, printmakers and now, Becca Jane! Here's the video:
I share these videos with my students either as inspiration for an upcoming project...or simply for them to get a peak behind the art makin' curtain. You are more than welcome to use them in your art teacherin' world!
You can see more of Becca Jane's work on her website. Personally, I love following her on IG because she's got a style that I really love. I also think my students will love her work and her process as well.
Before meeting her, I had no idea that many of her pieces were made with slabs of clay. I can totally see using this method with my students. I'm excited about the idea of creating my own plaster molds to use in the art room. Have y'all ever done that? I'd love to hear details!
In the video, I mention the co-op where Becca Jane creates. It's the Clay Lady Campus and it's simply AMAZING. If you are in Nashville and never been, you gotta go. And if you are ever passing through the area, be sure and drop by, it's worth the trip. The Campus has an art gallery where the artists who create in the space sell their wares. The prices are very reasonable and I always find myself walking out with a bag of ceramic treasures.
While you are there, an artist will pop up and volunteer to give you a tour of the campus. Be sure to take them up on the offer! Becca Jane gave me a tour after our filming and I met so many amazing artists...and got a chance to see their creative space.
Danielle McDaniel, aka The Clay Lady, is super awesome. I met her years ago and she seriously taught me everything I know about kiln fire clay. Be sure and check her out, even if you are not local...her books and resources are priceless!
I am loving the sgraffito method that Becca Jane uses. I did this method with my students years ago...and now I'm inspired to bring it back.
Isn't it amazing, watching an artist create? It always looks so easy. Even as a person who creates, I'm always enthralled when I watch others paint, draw, thrown on the wheel. Mostly because I know it's not easy and hasn't come without a lot of work and patience.
Loving that green!
Big thanks to Becca Jane for sharing the magic of her creative process with us!
Why, howdy art teacherin' partners! I hope all y'all are having a relaxing weekend and bracing yourself as this coming week is FULL.MOON.WEEK. The one week a month that I believe we should have off. Call it mental health days. Call it "for the safety of the children" days...cuz the gone be a lil cray...and Ima hafta be a lil crazier. Which isn't all that hard to do, let's be honest. A couple of weeks ago, I shared with y'all a post titled Early Finishers, Part 1. This year, with my larger classes, I have noticed a huge difference between my students' work time. I've got some that finish in no time at all and do a fabulous job...and others that work at a snail's pace. I'm a snail's pace artist myself so I totally feel for those kiddos. I never want to rush them...but I also don't want my other students who are finished to simply have blocks, free draw or dry erase boards as their options. So I spent a LONG time thinking about this and crafting a system that I'm hoping works for me and my students. I'm also hoping this system allows for me to continue to teach the lessons and curriculum I do while allowing the kids time to explore other areas of art. Call it a directed art/choice-based art combo...or just call it doin' what works. Cuz that's what we do all day long. So, how does this work? Well, I created a video to explain it to my students. It's SUPER long-winded (there's so much to cover!) that I will definitely be sharing it in two parts. But, basically, the run down is all spelled out on the poster above (which I HAVE GOT to figure out how to make a downloadable PDF for y'all! I messed up on this post and need to fix it...and want to do the same for this poster. I'll try to have that done this coming week).
It's long...but I ALWAYS have so much to say (story of my LIFE!).
When kids are finished they are #1: NOT YELL OUT "I'M DONE!" Because me no likey. The first thing they have to do is clean their area. I've noticed that many times, when I make things available to the kids who finish early, they just stop, drop and go. Then I'm left being a naggy-nag callin' so-n-so back to their seat to clean their spot. No more. If you fail to clean then, sorry(not sorry), all options are removed and you are left with a dry erase board.
After their spot is cleaned, I'm requesting the kids write an exit slip...which we've only done a handful of times because I.SUCK. Seriously. I will sometimes do what you see above: quiz the kids as we are standing in line and jot down what they've learned. But now, I'm putting the ball back in their court. I'm simply asking for one sentence. That's not too much to ask...right?! (insert wink-y face emoji). By the way, if you wanna see what my room USED to look like before I went bonkers and tore everything off the walls this summer, check out this blog post.
If all of this is sounding vaguely familiar, that might be because I recently chatted about my early finishers in a podcast. BTW, did you know I have a podcast?! I DO! It's called Everyday Art Room and you can take a listen here.
SIDE NOTE: I got new flooring this week! YES, I'm so excited! When I shared the photo on my IG, many folks asked me where the flooring is from...right here. I also was asked how I was able to afford such flooring. Well, first of all, the flooring was about $120 so SUPER reasonable. Much cheaper and more sanitary than a rug. I do have some extra cash because of the fundraiser I do called Artome.
Okay, now that I've explained the first half of my poster, let's talk about the whole "check time and clips" dealio.
Okay...so my biggest struggle with early finishers is that there are some who literally have 2 minutes left of art class and will bust open the blocks, grab a piece of free draw and/or get a dry erase board only for me to be like: DUDE. YOU HAVE 2 MINUTES LEFT. They've got no concept of time based on my wall clock. But they do understand my timer...so I'm hoping this method of having the clocks on the bins works. An incentive for good behaviors is telling them how many clips they must have. I explained my clip system in this blog post and on this podcast. Fewer clips means fewer options.
I decided to limit the blocks/building area to 8 kids because the floor space doesn't comfortably allow for many more kids then that. I also decided to move the drawing supplies to the other side of this cabinet. This way, the kids who wanna draw, aren't stepping over the kids who are building. I'm fortunate that my art room used to be the school library: it's big and has wonderful shelving like this!
(Please try to ignore the bloodshed...I had a red paint bottle EXPLODE this summer and leave behind this mess. And, yeah, I've yet to clean it up. Raise your hand if you're surprised.) So now the kids have LOTS of drawing options: free draw, how to draw books, idea stick, Fashion Plates, stencils and observational stuff. For observation, I've got mannequins, blocks, dinosaurs, mirrors and vases with flowers.
Last option: the light table! My kids REALLY love this. Next up: I will share a follow up post to let you know how all this shakes out. I'm planning to add more: origami, fibers, collage...and maybe build in more time for these areas and not limit it to just early finishers. How do y'all handle those rascally early finishers?! I'd love to hear!
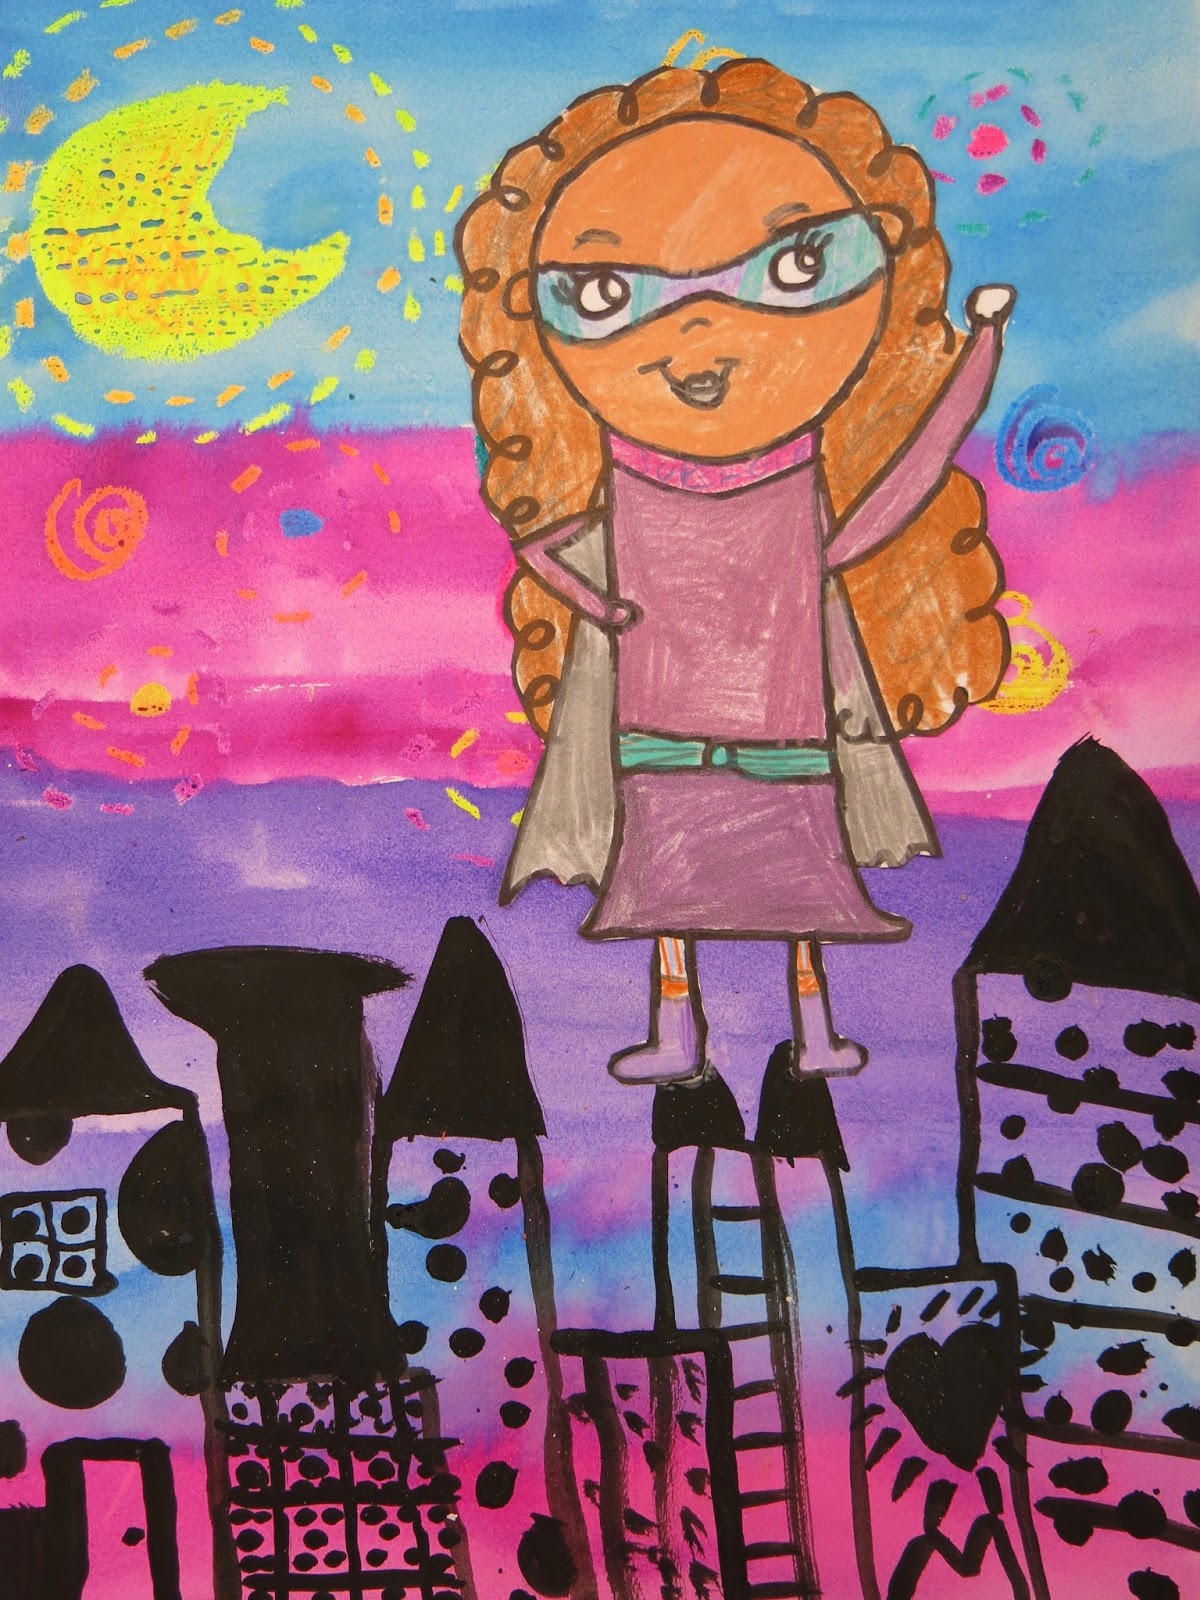
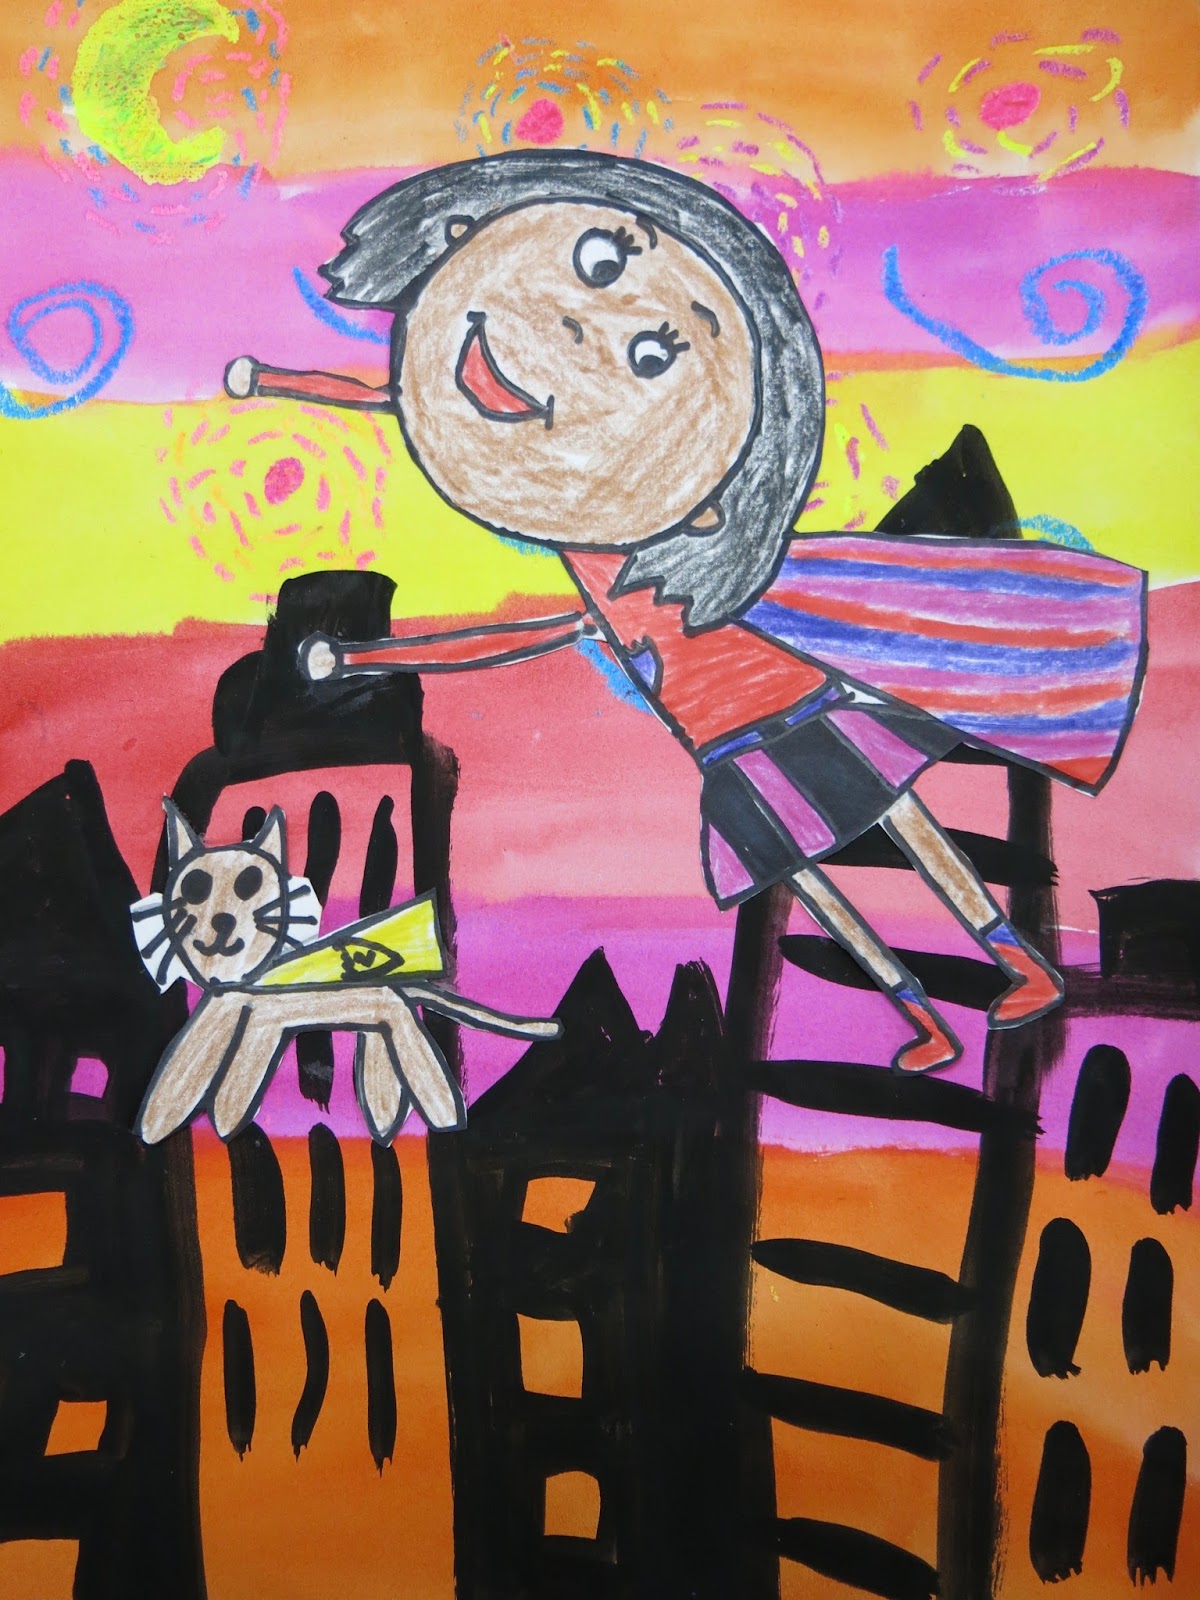
My second grade kiddos just finished up their Super Hero Selfies for their Artome art show! These 12" X 9" works of art were so much fun to make...and to see the finished result. I thought I'd share the process with y'all!
We began by chatting about Vincent van Gogh and looking at Starry Night. From there, we used our paper and my VERY favorite oil pastels (Sargent's florescent brand!) and created our skies. Because I have 30 minute art classes, that took one art class. The following art class, we added either all warm or all cool watercolor to our skies:
Y'all might have heard: I LOVE me some Crayola watercolor paint. I order the following and place them in each watercolor pan: magenta, red, red-orange, yellow, green, turquoise, blue-violet and violet. I place them in that order so the kiddos know what colors they can use as far as warm/cool colors go. The following day, I busted out the tiny brushes and India ink for some cityscape painting:
We started by painting simple rectangle shapes. Then we added shapes on top of those like triangles, rectangles and squares. From there, windows were added. They really rocked these!
Many of my students sketched their cities out on dry erase boards first. This really helped them get comfortable with their ideas before attacking their paper. It did mean that some kids took two 30 minute art classes to complete their cities...I was okay with that. I never mind the kids going slower if it means they do their best and are proud of their work.
Once the paintings were complete, we could start creating our Super Hero Selfie! The kids were given a circle template...simply so we didn't end up with tiny little folks. The template really helped them gauge size and get a jump start. I did a quick demo on how to create a body by using shapes like a rectangle for the torso. I showed them how to draw stick arms and legs and turn them into THICK arms and legs. Some of us are still pretty skinny tho, ha!
LOTS of kids wanted to add their pets or their siblings as their sidekick...how cute! After drawing with pencil, tracing with Sharpie, the kids added color with color pencils. In all, that process took about two art classes as well.
Then the CAREFUL cutting began. Not gonna lie: some of us may have cut off limbs. No biggie, we simply glued them back in when we glued ourselves onto the background.
When coloring, we did talk quite a bit about color schemes. We chatted about the colors of Superman and Spiderman, Wonder Woman and the rest...they have about three specific colors. The kids were tasked with picking out 2-4 colors for their hero.
Weapons were not approved but shields were, of course!
And capes!
And disguises!
One thing that really helped was giving the kids an About Me super hero sheet. They had to come up with a name for their hero, what their special power was and how they make the world a better place. On that same sheet, they had to create a sketch of themselves as well as a sidekick.
I'm really excited about these and cannot wait to see them at our art show!
I don't often repeat projects but this one was a winner with the kids and parents last year.
Last year, I had the kids paint a black silhouette of the city and add the windows with paper. I didn't love that as much...the paper didn't really stick well to the ink and the kids didn't really rock those windows. You can see it here.
I'm IN LOVE with the designs on her buildings. Second grade, y'all!