This year marks our fifth to do the chalked ceiling tiles with second grade. I can't believe it's been five years...and I'm happy to say that this year's was by far the easiest and least stressful. I guess I've finally learn a thing or two after all these years! In case you aren't familiar with this project that we do, it's a legacy piece that my second grade students create on the back side of a ceiling tile. We use chalk and have a different theme each year. This year, we created tigers because we are the Johnson Tigers! I always get a ton of questions when I share this project on my social media platforms. I thought I'd try and answer them here and also share the last four legacy projects we've created. Be sure and click on the link as many have instructional videos!
Why do you use chalk and not paint? We use chalk because of the history of how we came to doing these tiles. You see, this was an accidental project. Initially, we were going to do a sidewalk chalk project with a visiting artist (more here). But on the day of the event, thunderstorms were predicted. I was at a loss of what we would do until I remembered that my principal had been asking me to have our students decorate ceiling tiles. So I got one and drew on it with the chalk...we had all the chalk prepped and ready for the sidewalk chalk event, so I was determined to use it. The problem was, the chalk didn't work well on the front of the tile. So I flipped it over and, what do you know, it worked perfectly...just like a sidewalk. And that's how the whole thing got started.
Why do you use the back and not the front? I found the front didn't take to the chalk as well...but the back is perfect. There are numbers on the back but the chalk covers it up.
What brand of chalk do you use? Doesn't it get everywhere? I really like Faber-Castell chalk and Sargent chalk. We do a lot of coloring with the side of the chalk, not holding it like a crayon. This helps fill in large spaces. These two brands make very vibrant chalk colors. Yes, it's super messy...especially since we work on the floor. I tell the kids to wear their play clothes and come ready to make a mess. But, honestly, look at that floor! It's not even that bad. Having a paper banner under their work really helps.
So...how does this work? How do you teach this? On the day of the event, I have all of my second grade classes come to the multipurpose room. I lead all of then in this activity. I don't ask for additional help or teachers to be in the room...I'm kind of a solo act. This year, I did things in a way that I think worked the best: I had my classes all in rows, by class. Each had an assigned spot to cut down on any behavioral issues. Then I lead them, guided drawing style, in the creation of their own unique tiger. It took us an hour and a half. I happened to have a plan period so this worked out well and my other classes still had their art time.
How do you seal the chalked piece when it's finished? I just use hairspray. Yes, some of the chalk smears when it's placed in the ceiling...but not enough to tell.
Do you do a different theme for the chalked drawing every year? If so, how do you decide what to do? Yes, I do a different theme. It's sometimes based on what the kids are learning about (butterflies) or I also take requests. For example, the cafeteria manager wanted healthy foods, so last year we created fruit tiles. This year, we did tigers as that's our mascot.
What will you do when you run out of ceiling space? Retire. Below is a sampling of what the kids have created over the last 5 years...the links have videos too, including clips of the set up and kids working if you are interested.
I just wrapped up a super fun and VERY COLORFUL Fauve-inspired self-portrait lesson with my fourth grade kiddos. This lesson included so many things: drawing a cartoon or caricature version of ourselves, using chalk pastel in an unusual way, creating pattern and design with oil pastel for a watercolor resist. It was mixed-media to the max with beautiful results. Here's a quickie lesson I put together just for you and your kiddos:
Lemme just say this: I DO NOT enjoy teaching self-portrait drawing to my older kids. They are so stinkin' hard on them selves that it is painful to watch. We will do a more in depth selfie drawing later this year (if time allows) but for now, this was a fun way to ease in to it. These works of art will be featured in our Artome Art Show and therefore have to be 9" X 12"...I really think this would be a great lesson on a bigger scale as the kids could achieve more detail.
Normally, my lesson for fourth grade and Artome is this Romero Britto one. While I love that lesson, it does take forever. Also...I have a group of kiddos this year that would just be frustrated with that lesson. I decided to create a lesson based around their interests (working big and bold!) and their attention span (I know my people, what can I say) and this proved to be it. Each kiddo was super proud and successful.
Day One: Each kiddo had a bingo dauber filled with slightly diluted India ink. After doing some quiet sketching for the first five minutes, we gathered and chatted about creating simple selfies on our paper. Because of the large line of the dauber and the small size of the paper, the kids learned quickly that they had to work big and without tiny details. They also were not to use pencil first but to just GO FOR IT. I only had one rule: YOU CAN MAKE AS MANY AS YOU LIKE...but if you start a selfie, even if you think it is a "mess up", you must finish it. Each kid ended up with between 3- 5 to choose from for the next class. Extras will be used in upcoming projects.
The following art class, we started using chalk and "elephant snot" or liquid starch. I get my Sta-Flo liquid starch from Walmart. The best chalk pastels I have found are made by Faber-Castell. The colors are just so bright!
Day Two: Chalk and starch those bad boys! If they finished one, many kids asked to work on their other drawings. I was totes cool with that!
Day Three: Create a background! Using our Sargent bright oil pastels, we drew patterns all over the background of our selfies. Then we used liquid watercolor over that. Each is just as beautiful as the next! I cannot wait to see these at our art show. Will keep you posted on what the other kiddos are creating!
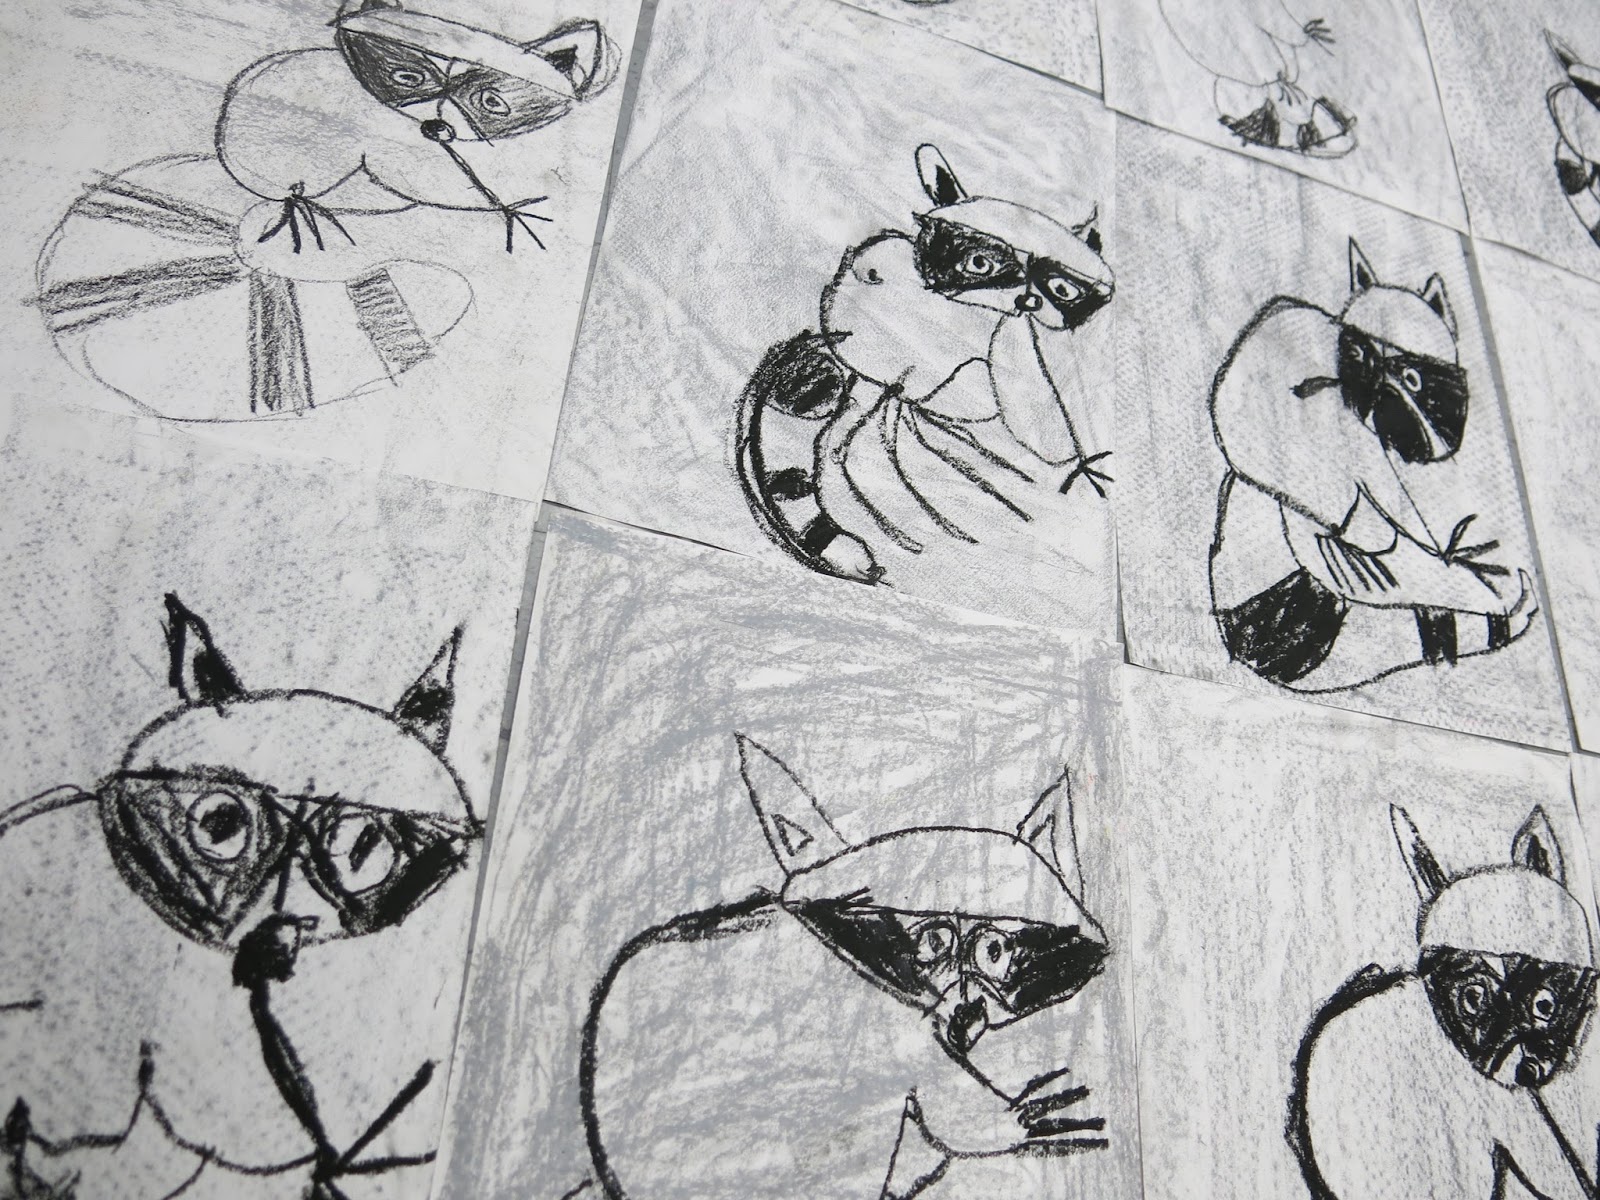
Hey, friends! I'm excited to share this fun lesson that I've started with my sweet second grade kiddos. Before fall break, I had a couple of classes that were ahead of the pack so I decided to introduce them to Charley Harper (a fave of mine) and a little guided drawing. THEY LOVED IT! They were so excited about their wee raccoons that I decided to create a lesson from their drawings. Feel free to use this lesson in your art teacherin' and creating world...all I ask is that you give me a shout out when you share on your favorite social medial. This helps folks find their way back here to enjoy the lesson as well.
For this project, we are using a ton of different media! Here's what we are using: * Faber-Castell Oil Pastels Full disclosure: I work with Faber-Castell frequently and create lessons for them using their supplies. That being said, I do enjoy their oil pastels for a couple of big reasons: they are sturdy. Unlike many other oil pastels I use, they don't break as often. They don't roll! I love that we aren't constantly chasing after them rolling off the tables. AND they are big...some oil pastels are very small and hard to hold for my students. Not to mention, they wear through them quickly. For all those reasons...and the fact that the colors are fabulous...I would definitely recommend these oil pastels. * Brown Watercolor Paint This is for the light wash used on the raccoon. * Texture Rubbing Plates or Burlap Don't have texture plates? Burlap makes for a great rubbing surface! * Construction Paper I love Tru-Ray because the paper doesn't fade and seems stronger than most. * Tempera Paint * Tempera Cakes My new favorite discovery: painting with tempera cakes on construction paper. Like, whut?! The colors stay true and I just love it!
I will say this about my latest videos: I'm trying ot make them shorter. For my second grade, I only see them for 30 minutes so I need to keep instructional time brief.
Here's a breakdown of the lesson in 30 minute increments: Day #1: Drawing the raccoon together. After enjoying some fun Nat Geo videos about raccoons, of course! Day #2: Light wash over raccoon and paint scrapping for the tree. Day #3: Creating the sky background. Rubbing and painting with tempera cakes. Day #4: Assembling our collage!
By the way, I am thinking of having each of my four second grade classes create a different woodland animal collage inspired by Harper. So stay tuned for more! I'll be certain to keep you posted on how these beauties turn out.
So far, so cute! And what a fun way to review the elements of art.
Sharing with the kids information about raccoons also got them inspired to create. I'm telling you, Nat Geo is where it's at!
One of my sweet students did tell me at the end of art class that her raccoon was "not my best work". Bless. The beauty of having a recorded video is that the kids can follow along and make another one the next art class! When drawing together, I very rarely let them start over...it's an important time to teach about a Beautiful Oops! And for them to let go of the notion that their artwork must be perfect. I always tell them that the following art class, if they are still unhappy, they can try again. Often times, they keep their original creation.
Last winter I was contacted by Liesbeth Elseviers who is an editor of children's books in Belgium. They were working on a fun Magritte activity book for children to celebrate an upcoming exposition on Magritte's work. Liesbeth had seen one of my Magritte lessons on this here blog and asked if it could be featured in the book. I happily agreed and then promptly forgot all about the book. Until it arrived on my doorstep from the Netherlands. Look how absolutely stunning this book is!
A few months ago, when Liesbeth sent me the page proof, I was blown away. She and her team really did a beautiful job with the layout and design of the book. Flipping through the pages, each page is a work of art with a large variety of Magritte-inspired art activities for kids.
The book is in English as well as French and Dutch.
I thought I would share a little flip through so you can see all that the book has to offer. It would be a great book for kids to use independently, for teachers to use as a teaching tool and sketchbook inspiration.
I love activities that give the kids quiet sketch time. Telling them the story of how Magritte came up with his surrealistic ideas would be a great jumping point for our kids to come up with ideas outside the box.
So much inspiration here! I'm thrilled and honored to be apart of such a beautiful book based on such a wonderful artist.
So where can you get your copy? Currently the book is only available to friends in Belgium and The Netherlands. You can purchase here. If interested in overseas shipping, try contacting the folks here. The book will be available in the land of Oz at the Australian Museum of Modern Art.
Fall Breakin': If they ever decide to take away my fall break, I don't know what I'll do. Aside from take a week-long sick leave, that is. totes ensemble: some thrifted, some new, all Target label
Kids, I recently discovered some disturbing news: not all the world experiences the magic that is Fall Break. And my heart weeps for those peeps, y'all. With all my glorious days of freedom, I gotta admit, I've totes lost track of time. Therefore this outfit/vacay post will be random and nonsensical. Well, more so than the ushe, kids (yes, I linked you to Urban Dictionary. I'm tryin to keep you young -n- hip, yo). I kicked off my fall break by traveling to and presenting at Bowling Green State University. It was so much fun even if I was nervous/excited/happy/spazzy all at one time (again, just the ushe).
I was SUPER stoked to (finally) meet Beth Sheets who orchestrated the whole affair and Laura of the fantastic art teacherin' blog Painted Paper (follow the link, Laura has all of her super fab fall projects up right now!) as well as the fabulous students, art educators and professors all linked to Bowling Green State University. Y'all. What a beautiful campus that is. Brought back so many happy (albeit super stressed) memories of college life.
Knott's Scary Farm: Which is a complete lie as Knott's was pretty stinkin' scary. They always manage to spook the hubs and I early in the night. But as the eve goes on, we're all, "yeah, you have a chainsaw and a mangled foot hanging out of your mouth but could you please pardon me, I'm on my way to the restroom. Cute third eye, btw." jacket: Modcloth, old; dress: picked up in Burbank at a cute shop called Audrey K. Click here for some cute Halloween attire on her website; crinoline: amazon; sandals: Chacos. My theme park footwear of choice.
On Wednesday, hubs and I flew out to sunny So-Cal for our annual Halloweenin' adventure. I had my suitcase stuffed with every Halloween garment I've created (um, what'd they do multiply? Holy creepy clothes, Freddy Krueger, I have a ton!) and we were on our way. First stop: Knott's Scary Farm.
If you've never been to Knott's Scary Farm and you are local, you should totes go. The "mazes" (what I call "haunted houses") are great fun with fantastical sets and atmosphere. There were close to a dozen mazes and each one had it's own unique theme and storyline.
The Trick or Treat house was one of my faves. Don't you love the outside? How fun was that set to create, right?
Our fave part was easily the Elvira show. You know that lady is like 63?! And every bit as hilarious, gorgeous and busty as ever. At one point she rapped a ditty about herself to the tune of Iggy Azalea's Fancy and nailed it.
Olvera Street is My Jam: Suriously, y'all. I coulda spent all day there. The atmosphere was super fun what with el Dia de los Muertos approaching. Not only that but I absolutely love the style of traditional Mexican clothing: the embroidery, the bright colors, the vintage style. I managed to scoop up several fun pieces that I'll be sharing with y'all in outfit posts to come, I'm sure. sweater and dress: Halloween DIY by me
I hadn't been to Olvera Street in several years and since my students are currently learning about the culture of Latin America, I thought now would be the perfect time. I really loved every aspect of the street, especially the clothing.
Oh, and the masks!
AND the Day of the Dead goods. There was so much to take in, I wish my students could field trip there! I snapped a ton of photos to create a prezi to share with them after break.
That night we went to Universal Studio's Halloween Horror Nights in Hollywood. Y'all. I filmed a lil video of what they call the "Opening Scare-monies" just for your viewing pleasure. Enjoy.
I'm not braggin' when I say I'm like a haunted house vet because we've gone for years. But, honestly, this scared the crapola outta me! Hence the shaky camera. We were at the front of the line with about 100 plus people behind us. Where the film ends is where we took off running away from the chain-saw wielding maniacs.
The following day, whilst out hitting my fave vintage shops, I found this! WHAT?! There's a Mood in Hollywood?! Don't mind if I do!
I loved that the window featured dresses that had been painted on. Each one was incredible.
Before you ask, I didn't buy a single thing. Not a stitch. Here's why: a buddy of mine and I always joke that IKEA gives us fits because it's just so overwhelming. Well, here's Exhibit A that Mood is just the same. There were aisles upon aisles just like this. And after the little dog tried to bite my hand, I was all THANK YOU, MOOD! and out the door.
That eve hubs and I hit Disneyland with our first stop at California Adventure to see our fave band The Mad T Party. They put on four separate shows, each with a Halloween theme. The final show featured an incredible rendition of Thriller complete with zombie dancers.
And now it's all over. Back to the real world soon. I hope that y'all have had a fantastical week! I'll be back with ya soon. Until then!