Showing posts with label art projects. Show all posts

Tuesday, February 20, 2018

In the Art Room: First Grade Woven Owls

 Holy cats, I'm excited to share this first grade weaving lesson with y'all. I do a paper weaving project with my first graders each year and try to put a different spin on it each time. Here's a peak at last year's weavings
This year, I knew I wanted to do something a little different. Here's this year's weaving project, owls! Feel free to use this lesson in your art creating world:
What's the hardest part about teaching paper weaving? Creating the paper loom! I've been creating paper looms with my first graders since my first year teaching. So, like, for 100 years. I would like to say, I've got it down. Here's me teaching first graders how to create a loom:
The giant loom is a huge help. Also, that book, The Goat in the Rug, is a must have in the art rom. Here's our follow up lesson where we learn to weave:
I like to have my kids weave in a circle. I love this because it creates this fun atmosphere. It also allows me to sit in the middle of the circle and help those that need it. I also utilize a ton of peer tutoring at this time. Oh, you done? Go help Joe Bob over there, please and thank you.
 Pudgy first grade fingers KILL me, y'all!
 I'd like to take a moment to point out that I merely SUGGESTED rainbow weavings...but did not twist any arms. So pretty!
 The following week, we learned about abstract painting...well, as much as we could in our 30 minutes together. Here's the lesson:
 And here's the result. Not too shabby for 30 minutes and a whole lot of jibber jabbering by me, right?! Eat your heart out, Kandinsky!
 The following art class, we watched some great kid-friendly videos on owls before doing a guided drawing one of our own.
 This coming week, we'll begin to assemble and I'll be sure to keep you posted. I'm so excited about this lesson! I'd love to hear from you if you give it a go!
Until then, have a great week, y'all!
 photo signature_zpsd10b3273.png
Read more »

Tuesday, November 7, 2017

In the Art Room: Royal First Graders!

Well hello there! My Royal First Graders and I are thrilled to have you drop by and visit. These sweet kiddos have been working super hard on their 9" X 12" selfies for our upcoming Artome Art Show
If this project looks familiar, that's because I've shared it before on this here blog! You can find additional information about this project here and here.
I realize that I've never shared a video of this process which might make it easier to understand. It's a project with plenty of steps...which is easy for me to break down in my 30 minute class time. Because I see my younger students for 30 minutes, I don't often make instructional videos for them. However, I did create one just for you! Here you go:
I also got a lot of questions about this project on Instagram, namely how do I teach color mixing for skin tones. So I thought I'd film myself explaining that to my students. I also wrote a blog post about that process which you can find here. 
For our Artome art show, which is a fundraiser, I always love to have the kids create self-portraits. Every parent LOVES a self-portrait! They sell really well. This fall, when I had the art show looming, I was really sweating coming up with 5 new selfie lessons. It was then that my husband said, "were the ones from last year successful? Then just do them again!" I don't know why I always feel the need to reinvent the wheel. The self portrait lessons we did last year were all so well received. So, I'm doin' 'em all again. Only the kindergarten lesson is getting a reboot. Here's what my third grade is creating:
And here is what my fourth grade is up to:
Everyone is super excited with their hard work.
 Especially my Royal Firsties! 
 photo signature_zpsd10b3273.png
Read more »

Tuesday, November 8, 2016

Field Trip! A Visit with Bebo

Y'all. I am so excited to share a new project I've been working on...a little series for both my blog and my YouTube channel called Field Trip! In this series, I'll be visiting the studios of working creatives and filming them in action. My goal is to introduce my students to contemporary creatives (I'm not limiting these trips to working artists alone) who use their artistry in their careers everyday. In conjunction with these videos, I'll be creating video'ed art lessons inspired by these 'trips. So subscribe here and stay tuned, projects inspired by Bebo to come!

But first, let's go to Kingston Springs, Tennessee to the home, recording studio and art makerin' space of John Paul Daniel, aka, Bebo
My good buddy and fellow Art Scout Troop Leader Jennifer Alvarado arranged for us to visit Bebo after we both discovered that we loved his work. He was so kind to let us invade his space and spend time watching him create that the two of us could hardly believe our luck. Thanks again, Bebo! I have a feeling my students (and yours!) are going to love this field trip adventure. Let's take a look around his studio...
These Mojo Men or Bluesmen as he calls them are my favorites. I can see the kids creating selfies in this style all while rockin' out to Bebo's tunes. By the way, you can purchase Bebo's music, featured in the video, in iTunes under John Paul Daniel. 
Jen and I scooped up so much art while we were there as well. My principal and I now both own a sign that reads "My Job is to Love You". Mine hangs in the art room, hers in her office. I like to read it each time I'm in the hot seat and pretend it's directed at me.
 The temperature is pretty mild in Tennessee and Bebo spends most of his time outside when creating. What a great idea to keep the mess outdoors. I'm pretty sure my hubs would love it if I did that. Oh! Fun fact: Bebo's paint brush washing water is rain water. He's the ultimate recycler! 
 I love the bold and bright primary color palette of his pieces. 
Everything is art for Bebo like these old paint brushes getting a new life...
 And these paint cans! These were my personal fave. I so want a stack of these for my art room.
The 8' gator that Bebo was finishing up in the video. He uses these large scale pieces outside of his craft show booth to draw attention but they almost always sell.
 Big shout out to Bebo for being the ultimate host.
Jen and I had the most terrific time! I know my students will as well.

Stay tuned for more Field Trip! episodes...I can't wait to share with y'all just who I visit next, eep! Until then... 

 photo signature_zpsd10b3273.png
Read more »

Thursday, October 27, 2016

In the Art Room: Sandra Silberzweig Selfies with Third Grade

I'm doing something new this winter: an art show with Artome. If you aren't familiar, it's an organization that will frame student art work and completely transform you school into an art museum for parents to enjoy and purchase the framed works of art. I'm having each of my kindergarten through fourth graders create self-portraits as I kinda think that is something all parents would want to keep forever. If you follow me here, you've seen a little of our progress. I'll be creating a video'ed lesson for each of these self portrait units. And if you wanna stay up to date on those, you can subscribe here
For third grade, I decided to introduce them to the artist Sandra Silberzweig and her fantastically colorful works of art. I love them so! The kids have loved the process of creating their abstract selfies so far. 
Here's the video'ed lesson. Feel free to use it in your art teacherin'/makerin' setting.
 So far, we've done the glue portion. Someone recently suggested that mixing India ink with white glue works better. I also had black puffy paint on hand for the kids who created very fine details. The difference between the puff and glue is that the puffy paint dries with a high gloss finish and is, of course, more puffy. It also is harder to use as it doesn't come out of the bottles as easily. We had to take "hand breaks" to give our wee hand muscles a rest.
By the way, the chalk I am using in the video is a brand called KOSS. I have found it on Amazon...and it truly is the best and brightest chalk I have found to use. It isn't cheap...but we've used it for years. It is the same chalk we used to create our ceiling tiles!
When I share this video with my students, it will be divided up into two parts: one day drawing and gluing, the next chalking. I'm excited to throw color theory into this lesson.
I plan to have several of these printed (and laminated!) for the kids to use at their seats as they explore analogous colors. 
I'll be certain to keep y'all updated on their colorful progress...and stay tuned for more selfie lessons and videos to come!
 photo signature_zpsd10b3273.png

Read more »

Tuesday, September 13, 2016

Art Teacherin' 101: Episode 18

Not even gonna lie to you: no matter how "prepared" I am, I spend most of my plan time running around like a crazy person prepping supplies, setting up the room, getting videos cued up or visuals displayed. I call it the Art Teacherin' Hustle. And most of the time, my hustle is spent SEARCHING for stuff. From my luke warm coffee to my half eaten Lara bar to the Sharpie markers or the funky monkey scissors, the hustle is strong with this one, y'all. But NOT for grade level examples and visuals. Nope. I always know where that stuff is, thanks to today's Art Teacherin' 101 tip:
How's that for easy? I'm a firm believer in Keep It Simple, Stupid cuz I'm pretty heavy on the stupid. But, you gotta admit, keeping up with all of this art biz is tough! I'm currently digging myself out of all things Dot Day and putting them up on the walls...(or, in the case of the very first photo, putting them around necks. My students also made Dot Day shrink plastic necklaces!)
 In case you missed these snaps over on my Instagram, here is just a sprinkling of all the projects (and project examples) that I attempt to keep up with using my lil system. By the way, you can find this lesson with video here
I've always wanted to do this extension project with printing plates. More on this process later this week. I love when a project lends it self to more fun lessons!
 By the way, my second graders framed out their texture relief pieces with some painted cardboard pizza rounds. I did notice that their texture pieces were looking a little lackluster. So I had them brush a thin coat of ModPodge over them and I'm super happy with how much they pop now.
And this third grade lesson can be found here

I swear one of these days I'm gonna get FUR REALZ organized...but until then, I'll keep offering y'all my super simple tips. Have a great week, kids!
 photo signature_zpsd10b3273.png
Read more »

Wednesday, August 31, 2016

Art Teacherin' 101: Episode 17

So you created this fabulous lesson and it's got it all: vocabulary, a cultural tie-in, skills-learned and an exploration of a variety of media. It's big, it's beautiful and you just can't wait to share your Titanic of an art lesson with the kids. Basically, you are all kinds of Dicaprio.
And then, for whatever reason, your Titanic of an art lesson starts to spin outta control...
hits an iceberg and, well, you know the rest.

What do you do with a lesson when it flops? That's the topic of this week's 101! 
I could paper my art room with all of the lesson plans I've written that have flopped. The key is not to place blame or feel shame but think objectively about what didn't work and fix it. OR forget it. And don't look back if you do.
I decided to flip first grade's flop. In the end, they LOVED making these dream catchers...but the first day of the lesson, I really thought there was gonna be a coup to overthrow the art teacher. Would I do this lesson again? Knee-jerk answer: HECK TO THE NO. Ask me in a couple months and I'll be all about the YESSSSS! 

By the way, because of said floppiness, I probably won't be sharing that lesson here...unless y'all are interested. I pulled the project idea from a couple of blogs that went about doing it in a way that proved to be too tough for my 6 year old set. I flipped it around to work for my kids. Cuz that's what we do with a flop.
In other news, here is my full Shibori ensemble. It was ranked MEH by a fourth grader today. C'est la vie. Y'all know I'm totes addicted to dying now, right?! I cain't stop! 

 photo signature_zpsd10b3273.png
Read more »

Thursday, August 25, 2016

In the Art Room: Tissue Paper Relief by Third Grade

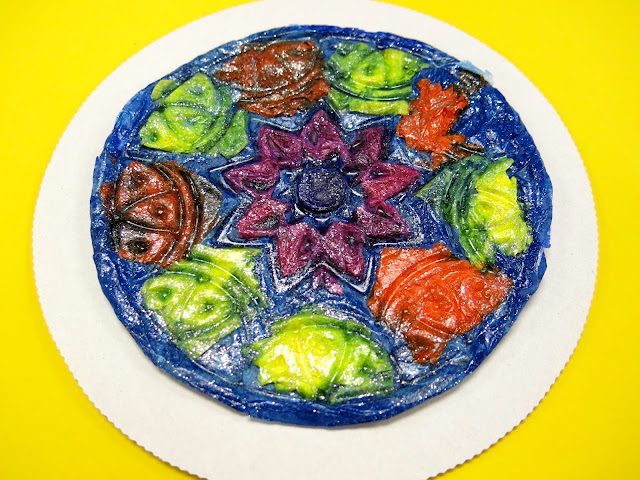
Now that our Monochromatic Selfies are complete, the third grade was ready to spend their third day in the art room creating tissue paper reliefs! I've been looking for a different spin on Dot Day and when I saw Blick present this at the AOE Now summer conference, I knew I had to give it a go!
This project took us the hour to complete and made for so much prettiness (not to mention educatin'). I created the video to share with my students...but you are welcome to share it with yours! 
Now, the relief might be finished but the project isn't complete yet! Our next step will be to adhere them to 10" cardboard rounds found on Amazon (I just have them sitting on 8" rounds for the photo) and continue our study of radial balance. I'll be sure to share that with you when they are complete. I was just too excited by these lovelies not to share right away!
 I mean...so fun, right?
 For this project, you'll need some of the following:
* Texture plates I used the ones that was recommended by Blick at the AOE conference. I liked the circle design as it went perfectly with our Dot Day lesson. However, they have a ton of cool texture plate designs to chose from. I purchased thirty plus because that's how many third graders I have in a class...and the artwork will need to remain in the texture plate until completely dry. 
 * Tissue paper squares These small squares are PERFECT if the kids are wanting to create a design. I left that completely up to the students. Many chose to create a radial design on their plate while some did a random one. I was cool with both. 
I was DREADING the idea of cutting tissue paper. I was so excited when I found these at the Dollar Tree! I purchased one for each table of four students and it was more than enough. It is a bleeding tissue, however...so some designs may get a little fuzzy around the edges. I was willing to take that as opposed to cutting thousands of squares.
* Large Tissue Paper This is where all of your scraps come in handy. The kids were instructed to use the smaller pieces for their design portion. When that was complete, they were to put AT LEAST three layers of large tissue on the back to strengthen the tissue design. 

* Watery Glue...with GLITTER! I just put white glue and water in a cup and sprinkled glitter into that. The kids also used soft brushes to apply the glue. Anything bristly tour the tissue more than normal. 
The kids put a piece of tape on the back of the plate with their name and teacher code. Here's what they look like as they are drying...not so interesting as the cool design is underneath!
 Not even gonna lie: the big draw back to this project was popping the creations out of the plate. Because the tissue is pretty fragile, I knew the kids might accidentally tear their work and become frustrated. It took me about 10 minutes to bust all of these bad boys out of the texture plates. I did crack a few of the plates while doing so...but they're fine to use again. 
Once popped out, the kids will trim around their circle design, cutting off the excess. 
 I know they'll be thrilled to see them when they get them back!
 Next up: add to a cardboard round and continue the radial design! 
This was such a fun and unique project that the kids really enjoyed. I don't often repeat projects but I can see this one happening again in the ole art room sometime soon!

 photo signature_zpsd10b3273.png
Read more »