Showing posts with label art room decor. Show all posts

Tuesday, November 21, 2017

DIY: Picket Fence to Color Gradation

 Hi. My name is Cassie Stephens and I cannot stop painting all thing things. Hide your kids, hide your wife, stash your cats and dogs. Me and my paint brushes are comin' for ya.
Y'all might remember some time ago, I created this Tints and Shade sign for my art room. Despite the fact that it looks kinda small in size, this picket fence thingie is actually about 3' across. Asha wanted to interrupt this blog post to share her adorable adorableness with you and provide a bit of scale: 
 If you've been hanging around this blog for a pinch, you know that I'm currently on a paint-all-the-wooden-thingies-found-at-the-craft-store bender. Just to give you an idea, I've painted letters...
A cabinet covered in paint stir sticks painted to look like pencils
And, probably the thing that started it all, the color wheel brushes:
And that's just the wooden stuff I've painted...I've also been on a redecorating bender and I can't seem to stop! I'm currently too lazy to link all of those posts...but just a quick scroll through my blog and you'll find some stuff. Lots of stuff. 
 Last night, I wasn't ready to go to bed...I'm on a week long Thanksgiving break, after all! It's party time! And, by "party time" I mean PAINT party time. I love late nights of watching movies and painting. Last night I watched Midnight in Paris (how is it that I had not seen that?! So good!) and started working on this bad boy.
I have Roy G. Biv decor coming out the WAH-FREAKIN'-ZOO in my art room (case in point here, here and here) so, as I painted this sign, I knew I didn't want another Roy G. Biv moment. We talk a lot about analogous colors and gradation so I thought that this sign would be perfect. I did toy with the idea of making a monochromatic sign...but that's pretty much what the tints and shade sign is. 
 This photo is simply here for you to admire this face. 
 The question I get every time I share something I plan to hang in my room is this: HOW DO YOU GET IT TO STAY ON THE WALL?! Yes, the age old art teacherin' question. Here's my trick: Command Velcro Strips. Get the ones that hold up to 16 lbs. This sign is heavy...and those strips work. I've been using them on everything and I've not had anything fall yet. 
 I am so enjoying redoing my art room. Having been in the same space for so many years, I just felt like it needed a fresh look. And it's making me happy and excited to work on it. The kids have fun coming in and noticing something new and different. Stay tuned for a BIG reveal on Friday...I'm so stoked about that one!
 This will hang in my art room near my tints and shade sign. I'll have to share a photo when it's up!
 photo signature_zpsd10b3273.png
Read more »

Wednesday, October 4, 2017

How to Decorate Your Art Room: Alphabet Cabinets!

I have been in my current art room for close to 15 years...which is hard to believe. I've only ever taught at two schools. I spent my first five years teaching in Nashville and the last 13 in my current school in beautiful Franklin, Tennessee. Can you guess what convinced me to change schools? If you are thinking all the storage and space, you are correct! I'm absolutely spoiled rotten, I'll be the first to admit. 
 Before I arrived at my school, this room was the school library. After a renovation, it became the most glorious art room with former bookshelves becoming wall to wall cabinets. Which I love...because, well, storage. BUT I'm not wild and crazy about wall to wall brown. For years I've tried to jazz up my cabinets: word walls cabinets; artwork displays; artist showcases; you name it, I've tried it. None of those things were something I could maintain because of my self-diagnosed ADHD and my self-diagnosed chronic laziness and, also, my self-diagnosed starter/not-finisher prognosis. I really should have been a doctor because it's obvious I'm good at diagnosing. But my handwriting was far too pretty so they kicked me out of med school. 
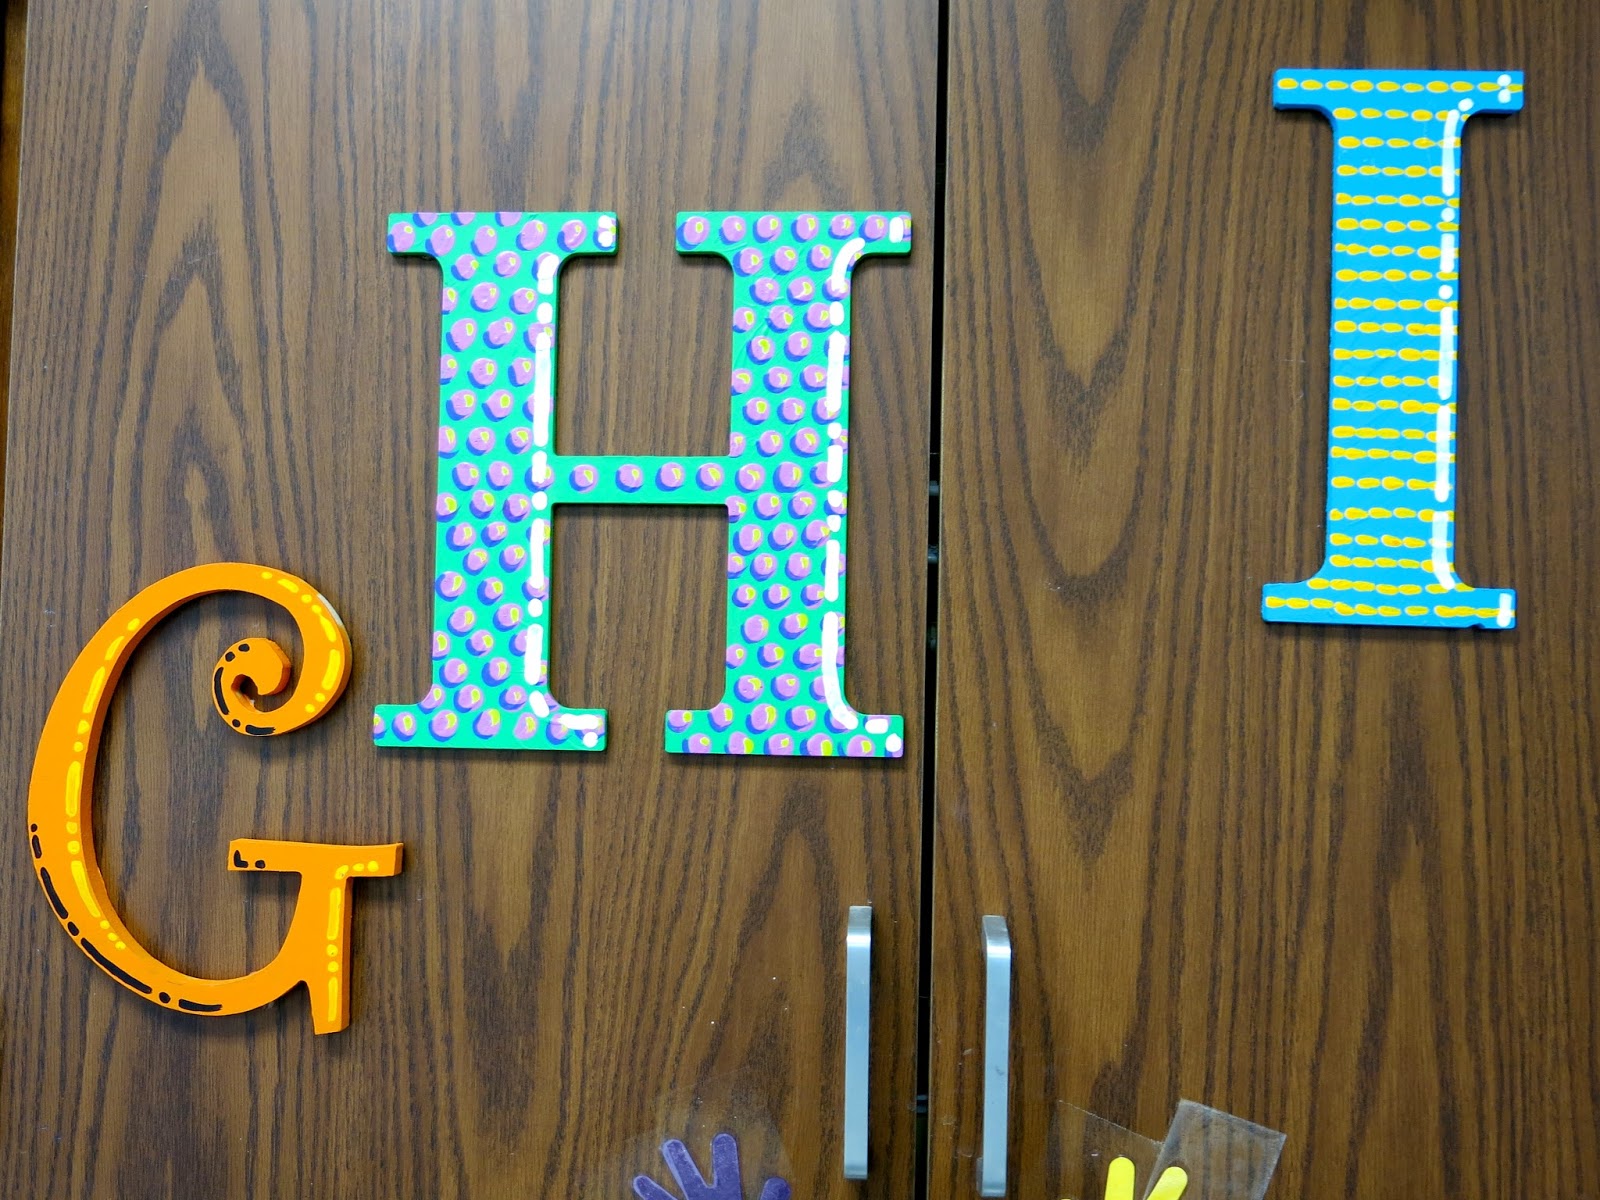
 Recently, on a trip to the craft store, I spotted a variety of letters and I got the idea to paint letters on my cabinets. If you've been following me since the beginning of the school year, than you know I'm on a redecorating kick with the idea to decorate to educate. 
 Evidence of my recent redecoratin'? Here you go:

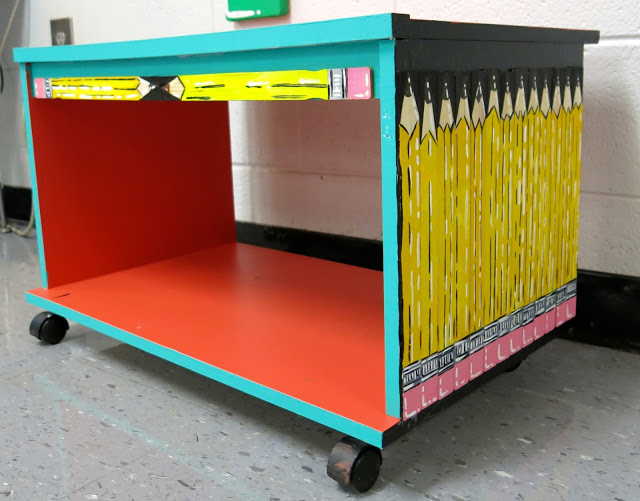
* My Pencil Painted Cabinet

* My Roy G. Biv Paintbrush Wall

* My Tints and Shade Sign 

* My Color Family Crayons

* My Color Wheel Brushes
So when I settled on the idea, I searched the discount bins at the craft stores, always bought the ones on super sale and used my teacher discount...not too shabby when all was said and done. I didn't bother priming the letters because of my self-diagnosed battles with chronic laziness. I just lathered on the acrylic paint and they were fine.
I didn't want the letters to be too matchy-match but I didn't want them to look out of place either. So I decided to stick with the same color palette and just went with patterns for some and plain for the other.
I worked on these sporadically between a handful of other projects (ADHD, remember? You should see my house! It's a mess of "a handful of other projects"...starter, not a finisher, remember?!). Total, it probably took me 2 and a half weeks to get these complete. I used our school wide open house as my deadline.
These letters do make me so happy. Although now I kinda wanna take down what is above my cabinets. I have finds from other countries...but it currently looks like Cracker Barrel if Cracker Barrel was a World Market.
I really had a great time painting. I really helps me unwind to get my craft on and this was a fun outlet. 
How did I get them to stick to the cabinets, you ask? Hot glue. But that stays between us, okay? Command Strips woulda worked great...but I had hot glue on hand so...you know. I used it.
 I do need to update my wee hands as some of them are no longer accurate. Not to mention, those have bee up since I first started teaching at the school! Which means they're vintage and I could probably sell 'em on ebay.
The thing with redecorating and rearranging...once you start, you just can't quit. I have a dozen more projects I'm dreaming up. The fun never ends, does it?
 Thanks for letting me share this new project with you...they letters really make my cabinets so much happier.
 Mostly because I love all things brightly colored and patterned!

  photo signature_zpsd10b3273.png
Read more »

Tuesday, September 12, 2017

Art Teacherin' 101: Episode 39

Haha!! I'm BAAAAACK with a lil Art Teacherin' 101 action, y'all. It's been since this summer that I recorded one of these bad boys. Between the podcast, the Wednesday night FB and IG LIVE chats, I kinda thought y'all might be a little bit tired of hearing what I have to say. Unfortunately for you, I STILL GOT LOTS TO SHARE (deal wit it). 

Since we are in the throes of Back to Schoolin', my social media outlets have been blowin' up with art rooms decorated to the nines. I have gotten SO MUCH inspiration...but I've also gotten the feeling that my art room ain't never, not EVER, gonna be at it's peak and/or prime. And that's okay. I'm taking is slow and steady (some turtle told me that how to win the race). I'm going with what works, throwing out what doesn't (read: all.that.clutter.) and enjoying the process. So that's what this Art Teacherin' 101 is all about this week. At the end of the clip, I'll take you on a wee tour of the parts of my art room that make me happy...and the parts that need some more lovin'. Here you go:
If you are interested in seeing more Art Teacherin' 101's then you can subscribe to my YouTube channel right here. If you'd like me to chat about something in particular during these AT's, you just let me know! 
(more looks inside my space...a game/tour from last year)
(and a video tour I created last year for my youngers...this will give you an idea of a "before" my redecorating spree!)...

Have a super week and remember: take it easy! Decorate to educate! You can take comfort in knowing that MY ART ROOM IS WAY MESSIER THAN YOURS! 
 photo signature_zpsd10b3273.png
Read more »

Sunday, September 3, 2017

In the Art Room: Roy G. Biv Decor!

Y'all might recall from previous posts (which I will link the ever-lovin' daylights outta here in a second) that I'm on a bit of a redecorating bender. Of the art room, of course, not my house. My house could really REALLY use some lovin' but, for now, the art room is top priority (let's be honest, it's always top priority...it's where I spend most of my time!). I'm super excited about this latest DIY: my Roy G. Biv Decor! May I get some ooohhhhhs and ahhhhhhhs up in here? Thank you!
I don't know how you get ideas but mine usually come to me slowly...I'll see something inspirational (like these hall passes!) and it's like a song that I can't get outta my head, it stays with me. Then I'll find a purpose or a need for said inspo...like the need for a Roy G. Biv reference in my art room. Suddenly, I'm motivated to crank the project out. Knowing myself, I know that I gotta work fast...before a new inspo/purpose/idea hits and I drop the previous thing like a hot potato. 
Such was the reason I hustled this weekend!
Once I had the idea, I picked up the letters and duct tape from Hobby Lobby. I'd already had a ton of these cheapo paint brushes in my stash so I just set to work painting. That didn't take me long at all.
In an effort to keep things looking like the make sense together in my art room, I added the white "cartoon" lines to both the brushes and the letters. If you follow me on IG then you've seen the stories behind this project (and the rest of my messy art room...you're welcome!). 
 I managed to snap a sad pic before setting to work. My bulletin board frame was falling down and looking pitiful. In fact, just last week, a chain of flags hung in this space...where they'd been hanging for well over 5 years. Dust for days, y'all. 
 I REFUSED to do any sort of measuring...I just eyeballed the whole thing. I tacked the paint brushes and letters up with Blue Dapp just for placement. I was thrilled that those ding dang cinder blocks actually came in handy: I was able to get mostly straight lines by following the blocks. Once all the tape was in place, I used hot glue to adhere the brushes and letters to the wall. 
I know a girl ain't supposed to stand on tables. Don't tell on me, please.
 I love that the duct tape looks like wet paint. I think the kids are going to love it. I know I already do. The photos don't really do it justice...it really makes the room look so happy and bright!
 Now I only have 75% more of my room to tackle! Not to mention a coupla clutter-tastic storage closets. One day at a time, y'all.

Wanna see what else I've made for my art room this year? Here you go!

* My Tints and Shade sign!

* My Color Family Crayons!

* My Color Wheel Brushes!  


I'm so excited to share more! 
 photo signature_zpsd10b3273.png
Read more »

Wednesday, August 23, 2017

In the Art Room: Art Room Decor

 Well, I'm back at it: picking up more things from the Wooden Thingies You Can Paint aisle and goin' to town. I've painted paddles into paint brushes, a picket fence into a stack of pencils and now this fun Tints and Shade sign! 
The other day, I was at Hobby Lobby and spotted this fun little fence. I picked up two of them and used a coupla coupons to bring the price down a pinch. I wasn't sure what I'd do with them until the idea of creating a value scale of tints and shades came to my mind. 
Over a couple of evenings, I managed to get this bad boy complete. It was very similarly to my Stay Sharp pencils. I will say, mixing up a gradient is no joke, especially when you do it over the course of a couple of days. I did struggle a couple of times getting colors to great an even value scale.
 Once the pencils were complete, I added the lettering and the fine lines. I love using black and white lines to give things a cartoon-y look 
 I was going to go with "value scale" or "gradation" but those aren't words we use a lot in my art room. We do talk a lot about mixing up tints and shades...so this was what I went with!
  Don't be throwin' no shade now, y'all. 
I also had a chance to hang my Color Families display today! I used Command Velcro strips to hang these and my Tints and Shade sign.
Because I want to be able to remove the crayons and use the as teaching tools, I used velcro dots to add them to the crayon boxes. You can see them in the secondary color box. 
 Now I did mention that I purchased two of these wooden thingies...the other will go over the door to the left of my clock. I plan to paint that in a rainbow gradation...but not sure what I'll write on it yet, if anything. I'm really excited about this area of my art room now! I am loving the new look so much...I am slowly working on giving my entire art room a make over! This is an area that the kids see a lot so it gets first priority. I even painted my easel to match some bookcases I recently redid. I'll have to give a complete tour once complete...although who knows when that will be!
 Until then, this will have to be my happy place!
 Thank you for letting me share!
 photo signature_zpsd10b3273.png
Read more »