Showing posts with label artist. Show all posts

Sunday, January 20, 2019

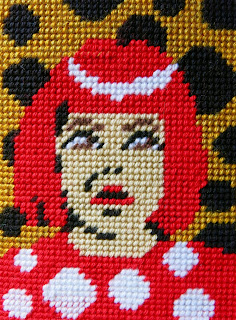
DIY: Latch Hook, Needlepoint and Perler Beads Yayoi Kusama!

 If interested, you can pick up your Yayoi Kusama needlepoint, latch hook, cross-stitch and plastic canvas design in my Etsy shop, right here! 

Well, I finally finished my Yayoi Kusama latch hook design shortly before heading to Atlanta with some art teacher friends to see her exhibit Infinity Mirrors. You.Guys. If you ever get the chance to see it, you must go! During the four hour car ride to Atlanta, I started working on the plastic canvas of my design, making some alterations as I went. Can you see the difference? Fuller hair on the right side and a more narrow face. I'm pleased with both but the design on the right is the one that you'll find in my etsy shop. Feel free to alter when you are creating your own Yayoi!

While creating the latch hook, I decided to watch the documentary on Yayoi that you can find on Amazon. I'm so glad I did. To be honest, prior to watching, all I knew about her was that she loved spots and painted them on pumpkins. That's not at all what she's about! Seeing her history and growth as an artist in the documentary really made me appreciate her work and the exhibit all the more. 
Each of my designs looks a little different as I'm not approaching them in the same way. In my Frida design, she's very symmetrical, Andy's turned a 3/4 turn (not easy to achieve in a latch hook, y'all!) and Yayoi is forward facing but not symmetrical. 
This design also has a super limited palette which I like...I feel like the bold and contrasting colors really capture what Yayoi is all about.
 And here's my group all together! I've got one more spot on this rug and my plan is to add Jean Michel Basquiat to the mix. Then I hope to continue with more, adding more familiar and artsy faces to the group. My vision is one big ole artist shaggy wallhanging!
 If you follow me on Instagram, then you saw me overshare my experiences at the exhibit. Sorry not sorry bout it.
 We had such a fun time! MAYBE a little too much fun but what happens amongst art teacherin' friends, stays amongst art teacherin' friends, okay?
 We hit up IKEA while in Atlanta and I picked up some Perler beads. I've never used these before...so this was my first attempt. Sadly my set didn't have a skin color for Yayoi so I went with white. This is the back.
And here's the front. I messed it up pretty badly...so may redo when I get the proper skin tone. But it was fun to play around with! If you tweak my pattern a pinch, you could do a version of this too!

Happy latch hookin'! 

 photo signature_zpsd10b3273.png
Read more »

Sunday, December 16, 2018

What the Art Teacher Wore #211

I need y'all to say a lil prayer for me...as we are heading into a FULL week next week! That's right. While some of y'all teacherin' friends work a partial week, we are in it to win it, truckin' all the way until 10am on Friday morning. If I make it if the kids make it that long. Every last one of us is runnin' on fumes and hot chocolate at this point. BUT...we still makin' some masterpieces!
None of which I've had two seconds to blog about...so that's super awesome. My goal is to post a bunch of winter-themed lessons on this here blog super soon. AND I do believe I've been saying that for months but things have been cray around here. I'm inching closer to being finished with my new book (preorder here, eep!!) and having some time to actually create and catch up on this here blog is quickly becoming a reality. I'm so happy for it! In the meantime, if you follow me on IG, then you've seen a lotta these lessons already. I've even shared the details in my stories. But the plan is to create real live videos for you to share with your kiddos over my break. So...stay tuned. 


 One project I'm stoked to share are these here super cute first grade penguins. The kids and I are loving this lesson and learning so much! Bingo daubers were used for both this lesson and the third grade abstract name design shown above. 
 Since kindergarten is wrapping up their snowmen this week, I had to wear this here snowman dress, right? I found it on Amazon and it was both inexpensive and super cute, if I do say so. And I just did. But not as cute as these guys...
 These were all lookin' pretty adorable but adding the chalk around the edge and to the cheeks totally took it to another level. 
 That night, my good buddy Tamara hosted a craft night...and I made this cute lil toy soldier! She is the most amazing host. We had a wonderful dinner WHILE creating. Thankfully she had the templates for the solider all cut out so it was just a matter of picking my colors, tracing and cutting. She even had a frame for each one of us. I was pretty excited to finish...and have him match my bonus room so well. 
 Another week, another tree skirt. It's the most tree skirtin'est time of the year!
These second grade chalked background for an upcoming Wolf Kahn-inspired landscape has me really excited. Yet another lesson to share with y'all soon!
I have found that all the shops have the best tacky holiday sweaters right now! Target is where I scored this lil number and I love it. 
 Speakin' of love, that's what I feel when I stare at these fourth grade beauties. Stay tuned on this one, we'll soon be adding these to our snow globes. 
And would you look at that! We got all fancy for our nephew's wedding this weekend and I just had to share...we clean up pretty good.
 photo signature_zpsd10b3273.png
Read more »

Tuesday, September 18, 2018

In the Art Room: Creating

Okay, so, two things: I made a poster for my students in my art room and I'm sharing it with you, if you like. You can scroll down and click for a free download. Second thing: if you don't like the poster, don't print it. And that's all I'm going to say about that. The end.
Okay, I lied. I have more to say. I created this anchor chart for my students. PDF right here. Nearly all of my kiddos fall under the "real creating" category. They work hard, they follow process steps, they are engaged and love coming to art. But I do have those friends who are "fake creating". They bother other artists, they rush through their work and they are careless creatives. Some might say "this is how they create". Look, I know my students. I know they all create differently. And I know when they are being lazy, distracting and careless. This is not how one grows as an artist. 

If you've seen videos of me teaching, then you know I am all about the silly. I am all about teaching to different learners. But I am not about to forfeit the art education of my students for the sake of other students who are not giving it their individual best. 

Like I said, take the poster or leave it. You do you. I'll keep doing what I believe to be the best for my young artists. They are my top priority. 

 photo signature_zpsd10b3273.png
Read more »

Sunday, August 19, 2018

What the Art Teacher Wore #202

 First Day of Art, 2018! I had to wear this costume I scored from Amazon. Y'all, it's THE WORST COSTUME. If you follow me here, then you saw what a limp (ahem) paintbrush I had. I seriously had to clip a small hole in the brush and insert a thin dowel rod into it. As for the palette, it is too small (it IS a kid's costume so there's that) and I'm not even sure if I'm wearing it right. No matter tho, the kids LOVED it!
Happy first week of school with kiddos to me! To celebrate, I thought I'd share my school photo from third grade. This is pre-glasses and pre-(much needed)braces. I'm obviously channeling the sister-wife look with my Holly Hobby get up (you 80's kids know the reference) and my long hair. Can you believe that blonde? I'd love to have that cornsilk hair again!
My week back was filled these rules and routines and this Getting to Know You sculpture lesson. It was a super week back and I'm excited to start next week!
 For my older students, next week will be their second art class...for my littles, it will be their third and fourth. This coming week will be our last to work on our sculptures before each grade level dives into their start of the school year projects. Brace yourself, we are going to be doing some exciting things.

I DON'T KNOW WHAT THOSE THINGS ARE YET. 

But I'm pretty sure they'll be exciting. I hope. And pray. 
Wore my Coloring Book Dress this week. It's crazy to think that the kiddos who colored most of this dress, who were in kindergarten at the time, are now in 3rd grade! I love wearing this dress and hearing them remember laying on this fabric while it was on the floor and coloring all over it. The fabric is from IKEA and we used fabric markers. 
 I was super thrilled, humbled and excited to be featured in Scholastic Teacher's Cool Teachers feature. I'm far from cool but I was stoked that they think I am. Thank you so much, Scholastic!
 Each year, I try to make a Back to School Dress...and, sadly, this year, I totally dropped the ball. Why? What's wrong with me? Honestly, I think that summer went to fast and the school year started too soon. Can I get a do-over? When's fall break again? This one was made a couple years ago from a pattern I've not repeated. Those giant shoulder wing things were a one time deal. 
 With all the kiddos doing sculptures my art room is quickly becoming a land mine of sculptures. I'm all WATCH YOUR STEP, PEOPLE to anyone who dares walk around my room. 
 So I'm trying a couple new classroom management thingies this year and this is one of 'em. I plan to share my fave management techniques this week, right here, so stay tuned. For now, I'm just sharing a snapshot...any guesses how I plan to use this?
 I can't even explain the face other than I was born with it. This dress was created from my all time favorite IKEA fabric. A sweet art teacher sent me a remnant and I created a dress with every scrap! More details here
 Mid-way through the week, I switched the background paper to black and I'm LOVING it. I plan to display these in a checkerboard pattern and I'm beyond excited.
 I have an ever-growing list of things I wanna do/try/work on/expand upon this year. Growth mindsets is at the top of my list. I'm re-reading The Growth Mindset Coach and loving it. This month, we've got a mantra to kick things off. 
 I realized after wearing this dress that it's pretty much like Art Teacherin' Camo...I nearly blend right in with my art room. Also...if you know me at all, you know I don't love washing my hair. It takes time that I'd rather spend sleeping in! So on this particular morning, I decided to just do a half bun thing or...what I decided to dub...
 My Art Teacherin' Mullet: business in the front, party in the back. After getting to school, and seeing myself in the mirror, I realized I was channeling my inner Jonathan van Ness and okay with that!
After a week of school (and MAYBE dealing with this!), Mitch and I took a quick trip down to Disney for their Not-So-Scary Halloween event. Halloween is our FAVORITE time of the year so we hit the parks a lot. It was so much fun and nice to get away for a hot minute. Back to reality tomorrow. I've got lots coming your way next week so be sure and pop back by!
 photo signature_zpsd10b3273.png

Read more »

Wednesday, July 25, 2018

22 Fun Projects to Rainbow-ize Your Art Room!

If you have been joining our book club weekly LIVE chats where we have been reading The Wild Card then you can relate to what I'm about to say. If you've not been joining us here and here, YOU TOTALLY SHOULD! We are a fun group and do not exclude folks who've not read the book. In the chapter I was reading just last night (because y'all know I'm all about catching up on my reading the night before the book club chat!), the authors Hope and Wade King were talking about classrooms that had lost their magic. Rooms with faded posters just barely hanging on the walls, rooms with non-sensical stuff just everywhere, rooms that LOOK EXACTLY LIKE HOW MINE DID THIS TIME LAST YEAR. Seriously! They were describing my art room perfectly. I'd gotten into the habit of just adding more and more clutter to an already clutter-tastic space. When I went in last summer, I was seriously struck by just how junky my art room felt. It really bothered me. I noticed a poster coming down at the front of my room where I gave instruction and I took that as a sign to just TEAR IT ALL DOWN. And I did. I promised myself from that moment on that I was going to Decorate to Educate. And that's what I took a year to do.

My art room is still a work in progress. I still have Early Finisher areas to set up, job charts to figure out and create and just little fussy things that I know would make my art room happier. But the bulk of the work is done...and I'm thrilled with the result. 

I hear from a lot of y'all that you are feeling overwhelmed...especially with the new school year starting. I knew that would happen to me as well. So I made a promise to myself to think of my art room as a big ole elephant that I had to decorate one lil bit at a time. I couldn't do it overnight...and stressing that I should was not going to allow me to enjoy the experience and really decide what was needed. I wanted everything in my art room to serve a purpose: to educate and, of course, decorate. I promised myself to take my time. 

Today I thought I'd share with you my favorite fun projects to rainbow-ize (and energize!) your art room. When you click on the links attached, be sure and check out the timestamp on each of them. You'll see that this was not done overnight but over the course of the year! So...if you feel inspired, just know...you got this!

First, if you've not taken a tour of my art room yet, here you go:
More room tours to come! This will allow me to explain certain areas and aspects in greater detail. This here is an overview. Feel free to drop me any questions in the comments if you have them!
Paint Brush Color Wheel
One of the first things I made for my art room were these paint brushes from wooden oars I found at Michael's. You can check out a complete blog post with how-to video right here
I decided to use these to create a huge color wheel in my art room. The blobs of paint were created from cardboard. Everything was hung with 3M Velcro hangers that you can find just about everywhere. I always use the ones that hold 12 lbs. or more.
Here's a view from the area I call Command Central where I do all of my instruction. Another thing I decided to create last year were my ART room rules
Art Room Rules
I've been doing a lot of reading on growth mindsets and really wanted to put them into play with my art room rules. These were so much fun to paint...I think that is what I enjoyed the most about redoing my art room, having the chance to create so much!
Pencil Picket Fence
As y'all might know, I got super in to finding things at the craft store and making them into something else last fall. This small picket fence was no exception. Video tutorial included in the link!
Color Mixing Cans
When I spotted these small rectangular canvases as the craft store, I knew immediately that they would make the perfect shape for a spray can. I created a video tutorial to show you how to make your own right here
 Crayon Color Families
EVERYONE loves these crayons...especially the kiddos who get to create their own! These are a crowd favorite and are displayed prominently to help my students remember the color families. Tutorial here! 
 The crayon boxes are what I get the most questions about...they are made from cereal boxes! Even my kids created their own box when we displayed them at our school-wide art show
Each of the crayons is held in place with a little Velcro dot on the back. This makes the crayons look like they are about to jump right out of the box!
Pencil-tastic Paint Stick Cabinet
I needed just a little cabinet to keep at the front of my art room to hold the art tubs for the classes I would see that day. I popped by the thrift store and scooped up this rather boring black cabinet. With a bunch of pencil-painted paint sticks and hot glue, I made this guy! Video tutorial and details right here
Color Wheel Gong
I've had a Clean Up Gong in my art room for years now...and it used to make such an incredible sound. But it was not cute, says me! So I decided to create a color wheel out of it! It is actually my favorite teaching tool as it is so stinkin' big! It also...sadly...no longer makes a fantastical sound as the paint deadened the sound quite a big. You can see more of my gong here. 
Color Coded Trash Cans
Y'all, these were so fun and easy to make! All you need are some trashcans, some painters tape and some spray paint. Easy to follow tutorial right here. 
Crayon Bins
So there are crayon bins like this...but they are not cheap. Turns out making your very one is much cheaper! Now if I could only find that elusive ORANGE bin...seriously, I've looked everywhere! You can learn how to make your own version of these right here.
 Rainbow Ornaments
Did you know you can make an art room ornament outta ANYTHING? Turns out you can! And then use them to decorate your...
Rainbow Tree
Y'all, this rainbow tree from Treetopia was just about the best thing my art room has ever seen. It totally inspired me to go ALL RAINBOWS, ALL THE TIME and it is alway there when I need a smile or a slightly prickly hug. All the details on my rainbow tree and how to get your very own right here.
Rainbow Wreath
No rainbow art room would be complete without the addition of a wreath on the front door. This wreath is also from Treetopia...and decorated by me. The tubes are created from toilet paper tubes and the brushes were just recycled. More details including a video tutorial right here
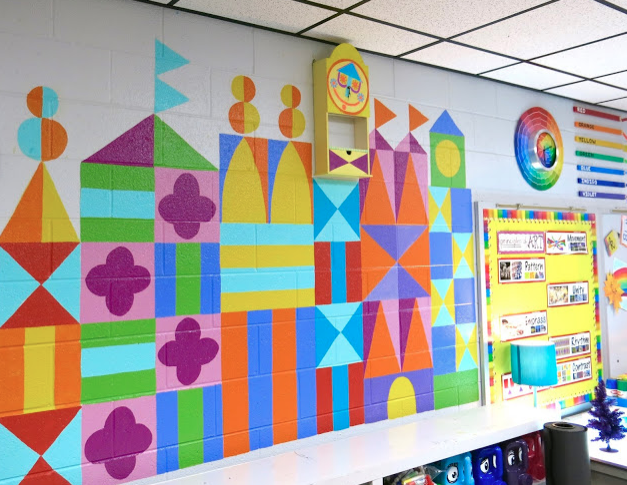
Small World Mural
I did paint my share of murals in my art room this past year and this Small World themed one is one of my faves. My kids love how happy and colorful it is...and I love being able to refer to it for shapes! More details here
Rainbow Trippy Mural
Of course, the other mural I painted this year was this beast. I had so much fun creating this backdrop...and balancing it out with a "calm" curtain and a wild rainbow flooring. All the details here
 ROY G. BIV Paintbrushes
If my kiddos leave my art room and STILL don't know the order of the colors in the rainbow then, y'all, I just don't know what. This one was SO EASY! Just paint brushes, some letters and Duct tape. Video tutorial right here!
I mean...c'mon!
Tints and Shade Sign
This one falls into the category of NO WOODEN ITEMS AT THE CRAFT STORE ARE SAFE FROM CASSIE category. In case you didn't know there was one. 
Gradation Sign
As does this one! Oh my goodness...it's a good thing I'm outta wall space.
Color and Line Rainbow Wall
LOVE this resource for referring to line names! Another easy one to accomplish with just Duct tape.
 Alphabet Cabinets
I love having tons of cabinets...but I've always hated the way the look. I don't want to paint them tho...I mean this won't be my art room forever...and I'd hate to ruin the beautiful faux wood (ahem) that are my cabinets. So this seemed liked a fun way to fix that drab brown wood. 
I've since decluttered that hot mess at the top of my cabinets!
 Early Finishers Rainbow Stuff
Seriously, y'all, nothing was safe. I spray painted these pots AND flowers in rainbow colors. They are used both in still life drawings and when my kids finish early and want to draw from observation. 
Even my wooden models and dollar store dinos got a make-over! These are also in my early finisher drawing area.
 Happy Little Signs -n- Stuff
These random bits were created just to further decorate, educate and promote kindness with color. You can spot all of them with details here. 
 Who doesn't love a good chalkboard?!
 The things I find at the flea market! This mermaid had to get a makeover before coming to my art room. The canvas was a new one painted by me as a message to my students as they come and go.
More thrift and flea market finds! I even rainbow-ized my class tubs!
Rainbow Seat Sacks!
While Dollar Tree had some seat sacks...they didn't one one in each color of the rainbow. So I had to make my own. Here's how!

WHEW!! I just went back and counted 22 rainbow-ish things?! I hope you find some that inspire you!  
 photo signature_zpsd10b3273.png
Read more »