Showing posts with label back to school. Show all posts

Sunday, May 13, 2018

In the Art Room: Everyday Heroes!

Teacher Appreciation Week was last week and I FINALLY managed to get the fourth grader's portraits of our faculty and staff up just in time. If you recall, we created these some time ago...but I'd been saving them as a surprise for the teachers and staff on Monday of appreciation week. So I sneaked in on Sunday and got 'em all hung. They were a huge hit!

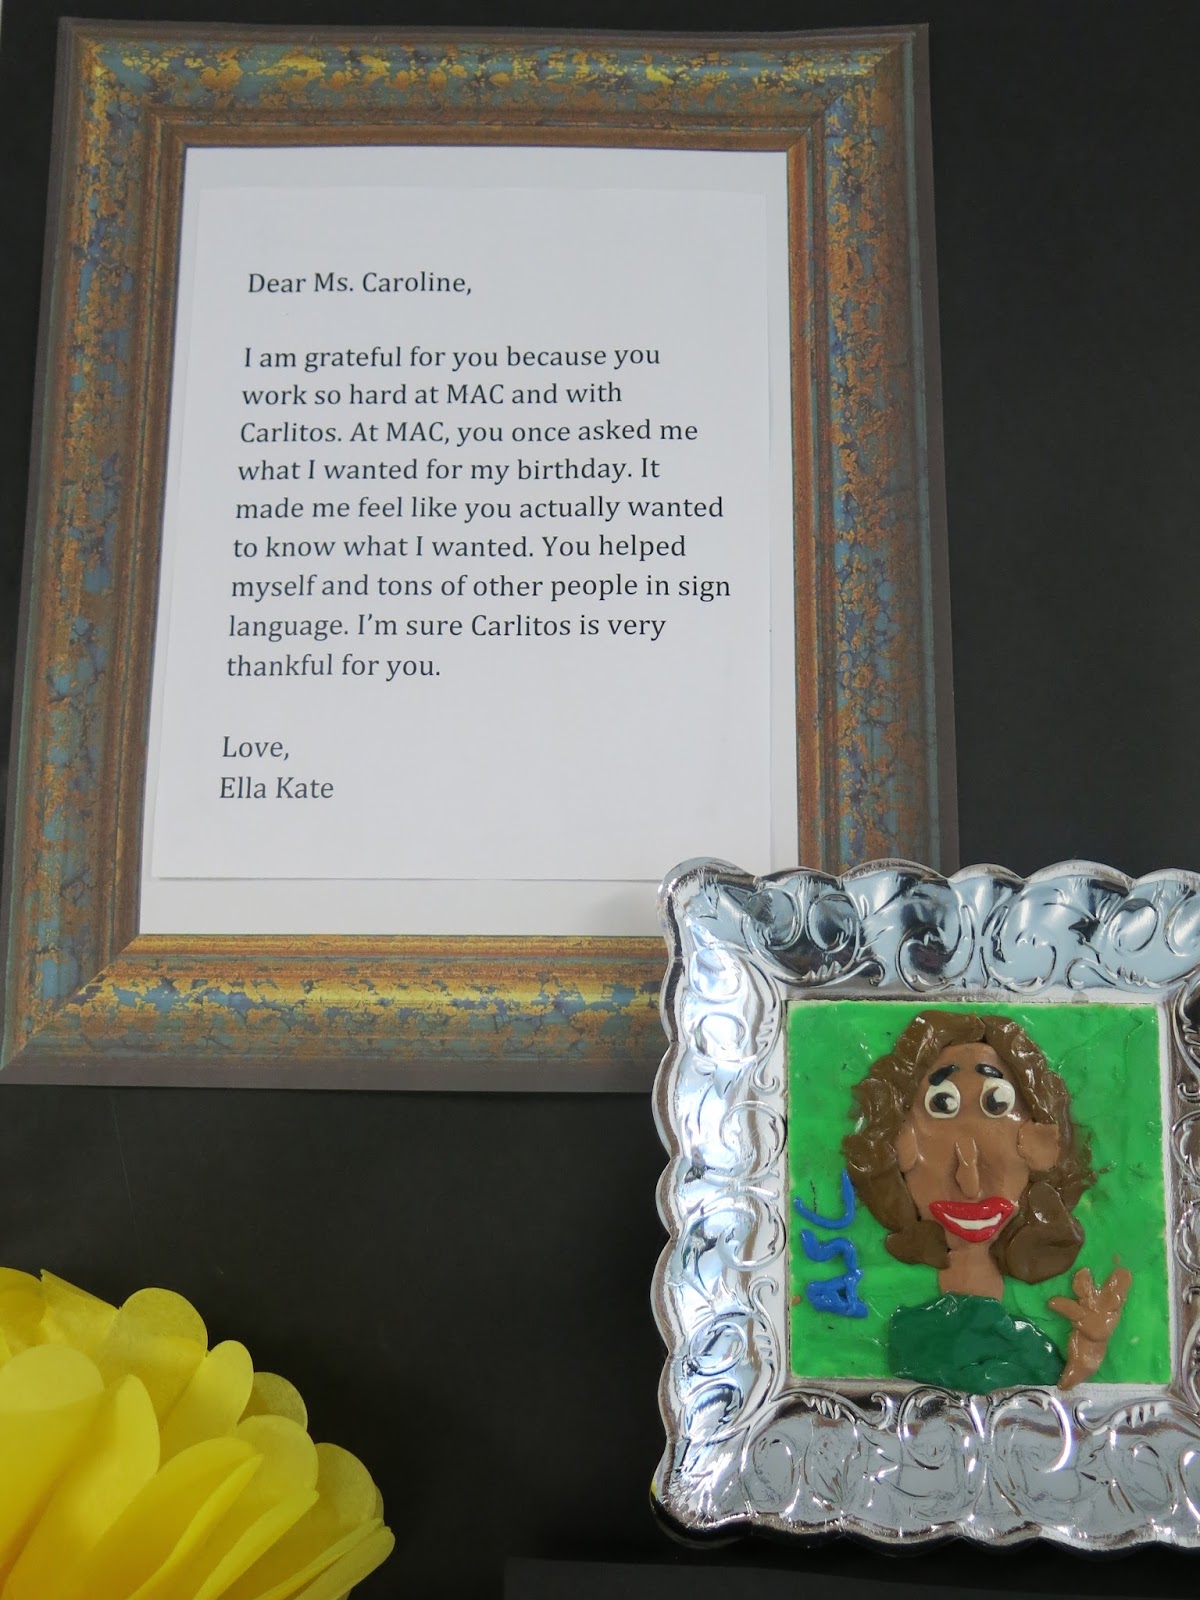
 Our theme for our art show is Superheroes...so I thought that calling this The Everyday Superheroes of Johnson Elementary would be fitting. If you recall, I did a similar project to this a couple of years ago and we called it the Gallery of Gratitude. For that, we simply created drawings. This time around, we used modeling clay. More information here
Here's the video I created for my students (and all y'all) to help them learn the process of creating a portrait with modeling clay:
I got a lot of questions about this project so I'll try to answer them here. 

*How did the kids pick the person they were to create a portrait of?
I had them silently draw the person's name after the video. If they knew the person, then they could go to their seat and get started. If they did not know the person (maybe they are a newer student or perhaps they simply have not had interaction with that person to know them well), then they could stay seated on the floor. After everyone drew a name, they could chat amongst the other kids on the floor and either swap names or do a redraw.
 * What about the people that didn't get their names drawn? Who did their portraits?

I had some kids who I learned were VERY fast at creating these mini portraits. And they loved creating them. So for those early finishers, I'd have them create a second or even a third portrait...or help those who were having trouble with their portraits.
 * What supplies did you use? Does modeling clay dry?

We used modeling clay from the craft stores...I found that some could be hard and some easy to manipulate. If they clay was hard, I simply told the kids to warm it up in their hands (see the video). I really found that all the modeling clay we used worked well. We used matte board cut to 3" squares as our base. Modeling clay NEVER sets so I added a varnish to the top to seal and protect it. For that, I used Crayola's Model Magic Glaze. The "frames" are actually plates from Hobby Lobby!
* How did you do the written portion? 

I didn't...the classroom teacher's handled that for me! I sent them an email letting them know what we were up to and asking if they could help me out. Not only did they talk to the kids about the written portion and have them write it up, they also had them type them! A parent volunteer then added them to the fancy paper frames. 
 * How long will this stay up?

I'd love to leave it up until the start of next school year...but I'm pretty sure I'm going to have to take it down before school's out for the summer. I'll be passing these back to the teachers and staff. 
 I think that about covers the questions I've been asked. My students loved making these so much that I followed their portraits up with a self portrait project of the same nature. They look so adorable for our art show!
 Were there tears on Monday morning? Y'all better believe it! This is one of the most favorite projects that I've done...it means so much to everyone involved!
 I loved reading the kind things our students had to say. Each and every person working in my school is so well loved!
 I'll definitely be doing this project again. I'd love to hear if you've done something similar!
Have a great week, superheroes! 
 photo signature_zpsd10b3273.png
Read more »

Thursday, January 11, 2018

In the Art Room: "I Am..." Mobiles

So...at the BEGINNING of the school year, I got the idea for this collaborative project...and, here we are MIDWAY through the school year and I'm finally assembling and sharing it with you. Story of my life, y'all.
At the start of the school year, I dyed a bunch of clothes pins by placing them in a bin of watered down paint. I later learned that food coloring works well also. I dyed them red, orange, yellow, green, blue and purple.
 When the students came in, we read The Dot (yes, this was our Dot Day attempt!) and we spoke about all of the things that we are. "I am creative. I am amazing. I am silly. I am funny." You get the idea.
I had the kids get two colorful clothes pins (any color the wanted) and one plain one. On the colorful clothes pin, they were to write their name on one and a word that described them on another. 
On the plain ones, I had them with  monochromatic Sharpies and create a design. I did this project with my first and second grade students who have 30 minute art classes. My third and fourth graders, who have an hour, did a different collaborative project:
You can find out details on this project here. I at least managed to get this project finished and hung at the start of the year! 
 After the kids were done with the clothes pins, I had them sort them by color. Then I clipped them around 9" cardboard pizza rounds. I then painted the center black and used the kids' painted papers to create the I am... in the middle. Initially I was going to hang these in the hallway but I was afraid they would get damaged without a watchful eye on them.
 AND because they are so stinkin' pretty I wanted to be able to see them all the time! I used command hooks and yarn to hang them above my window. They did keep rotating which would have been fine if I'd had the kids draw on BOTH sides of the clothes pin (which you might wanna do if you do this project). To keep them forward facing, I simply hot glued them together where you see them touching/overlapping a bit. 
Another happy rainbow addition to the art room that I'm happy to finally have on display!

 photo signature_zpsd10b3273.png
Read more »

Tuesday, September 12, 2017

Art Teacherin' 101: Episode 39

Haha!! I'm BAAAAACK with a lil Art Teacherin' 101 action, y'all. It's been since this summer that I recorded one of these bad boys. Between the podcast, the Wednesday night FB and IG LIVE chats, I kinda thought y'all might be a little bit tired of hearing what I have to say. Unfortunately for you, I STILL GOT LOTS TO SHARE (deal wit it). 

Since we are in the throes of Back to Schoolin', my social media outlets have been blowin' up with art rooms decorated to the nines. I have gotten SO MUCH inspiration...but I've also gotten the feeling that my art room ain't never, not EVER, gonna be at it's peak and/or prime. And that's okay. I'm taking is slow and steady (some turtle told me that how to win the race). I'm going with what works, throwing out what doesn't (read: all.that.clutter.) and enjoying the process. So that's what this Art Teacherin' 101 is all about this week. At the end of the clip, I'll take you on a wee tour of the parts of my art room that make me happy...and the parts that need some more lovin'. Here you go:
If you are interested in seeing more Art Teacherin' 101's then you can subscribe to my YouTube channel right here. If you'd like me to chat about something in particular during these AT's, you just let me know! 
(more looks inside my space...a game/tour from last year)
(and a video tour I created last year for my youngers...this will give you an idea of a "before" my redecorating spree!)...

Have a super week and remember: take it easy! Decorate to educate! You can take comfort in knowing that MY ART ROOM IS WAY MESSIER THAN YOURS! 
 photo signature_zpsd10b3273.png
Read more »

Sunday, August 13, 2017

In the Art Room: Best Back to School Projects, Part 2

Hey, friends! Tomorrow is my first day back to school where I'll have kiddos in the art room and I'm super excited. One thing I love about this time of the year is coming up with fun projects that kick the school year off right. Last week, I shared some of my favorite Dot Day projects which I occasionally use as a theme for my back to school art projects. Today I thought I'd share my favorite collaborative back to school art projects. There are a lot, so get ready! 
But before we get to that, I have some exciting news. Recently, on our Wednesday night Facebook LIVE chats (to join the fun, like/follow here), the one and only Barney Saltzberg joined us. We had an absolute blast chatting with him. You can still find our conversation archived here. He has a new book out, My Book of Beautiful Oops, and is GIVING ONE AWAY! Yay! To enter to win your FREE copy of My Book of Beautiful Oops simply do the following:

* Leave a comment below. Tell me what your plans are or what you are doing on these first days back to school. Inquiring minds wanna know!

* Leave your email address. This way I can let you know when you win, yay!

It's that easy, y'all. Big thanks to our buddy Barney for this wonderful book and fabulous giveaway. Now, let's talk Best Back to School Art Projects.
I love kicking off the school year with a good book. You Be You and Only One You by Linda Krantz are two fabulous books to bring to your art room. This is a project that can be done with all of your students...and will leave you with a beautiful work of art to showcase their efforts. More on this mural here
You can find out just how we created these fish here
Feel free to bring this how-to video to your art room!
I am in love with this wild, wacky and colorful mural that was created by my kindergarten through fourth grade kiddos. It's Okay to be Different is a favorite book of mine by Todd Parr. This mural has been up for a while now...and it still remains outside my art room door. I think it's a great message for all. You can find out about this mural here
Here's a short video to share the process!
You can read about our process of creating these funny faces right here
Monochromatic selfies are a super fun way to start the school year. I've done this a couple of different times and with a couple different themes. You can find out more about how these were created here
This video really helped my students during the creation of their selfies.
Last year, we used our selfies to create this large J.E.S. sign for our school. 
On year we even made our selfies into a world map! This one took some time to do...and wasn't easy but sure was pretty once it was complete. 
Our heart mural is now a couple of years old and still hangs proudly in our school office. I love it, it's really stood the test of time. And who doesn't love the message of LOVE? You can see more about the completion of this mural here
The details on how each heart was created and by what grade level can be found here
Speaking of love, this mural was created by all of my students...they actually made it one year while I was out on jury duty. It was so awesome to come back to some amazing art! Here's the complete blog post. 
Here's the video I created for my sub to share with my students.
And here's the second video in that series. 
Probably one of the more popular posts on this blog has been this wings mural project. It's a GREAT back to school project because it's low-mess and low-stress (until you get ready to assemble that is...and then it's HOLY COW, WHAT WAS I THINKING?!). But once it's up, you won't regret it! Deets here
Here's a video I created to share with my students...feel free to use in your art teacherin' world!
I hope y'all have gotten a couple ideas for your return to school...I'd love to know what you and your sweet kiddos are creating! Also, don't forget to enter to win Barney's new book. Just leave a comment about your first day and don't forget to include your email address. Have a great week!
 photo signature_zpsd10b3273.png
Read more »

Sunday, September 25, 2016

In the Art Room: Kelsey Montague-Inspired Mural

Ohhhh, y'all. I'm so excited about this collaborative mural that started out as a sub plan. Allow me to share with you our What Lifts You mural! That sweet face above is my assistant principal's son, Carson. 
And here's his sweet mama! Her pose makes me so happy and excited about this project. Lemme tell you all about our inspiration. 
Street art is becoming very popular in the art world. What I love about it is that it is accessible to everyone. Kelsey Montague has taken her street art to the next level by making it interactive. She's also inspired folks to think about #whatliftsyou. I love everything about Kelsey's murals: the beauty, the message and the interaction. 
She recently created a street mural in Nashville! The most amazing thing is that her murals are created in paint pens. That's right. Tons of paint pens, y'all. Time to invest in some stock. 
I wanted each of my students to contribute to the mural. Knowing that I was going to be out for a couple of days, I created a simple sub video that introduced my kids to Kelsey, got them reviewing and applying the elements of art and kept them creating. I was THRILLED to come back to school to these beauties!

Because of my 30 minute class time for my younger students, many did not finish in one class. So our first order of business when I returned was for the feathers to get finished and cut out. My early finishers then began working on the patterned papers that would also contribute to the wings. 
I love having the kids create giant sheets of patterned papers. I just throw a huge piece of bulletin board paper onto the table. Sometimes, I'll ask the kids to tell me a pattern or shape they'd like to repeat...and then tell them to go for it. Other times, I'll have a pattern started for them. You can see examples of murals with patterned papers here in our Dot Day project, in this winter collaborative, in this Village of Kindness project and in this Rousseau-inspired tiger mural
The left over papers are going to come in handy this week as we also complete our You Be You mural.
I really wanted the mural up by Monday because we are starting our Growth Mindsets in the art room then. More on that soon (including a book club, stay tuned!). That being said, I did have to hustle to get it complete. I stayed after school on Thursday taping four 12' sheets of bulletin board paper together for the black background. Then, in chalk, I lightly drew the general shape of the tip of the wing. 
Then I just started playing. I knew that I wanted their wings to be broken up a bit by the patterned papers but I wasn't sure how. Once I got a general idea, I started to hot glue things in place. 
I arrived at school at 6am on Friday morning because I was so excited to get it complete and up on the wall! I tacked down just the top of the papers so that I could lift the paper and slide the feathers underneath. I have about 400 students. Not all feathers are complete and up...but most are. I left room on the left side of the wing to add the final feathers. Once everything was glued, I outlined the top of the wing in white paint. I also added white outlines to the patterned papers. 
Back to that book I mentioned. The premise of the book is getting the kids to think beyond their "fixed" mindset that they can't do something...and change that thought into believing that they can.  Such a powerful message, don't you think? To kick things off, during art class, each of my students (as well as faculty and staff, I hope!) will get their photo taken in front of the mural. They will also write about what lifts them as that's the big idea behind Kelsey's murals. Keeping that positivity in mind, we will focus on our growth mindset. I will be sharing more on that lesson VERY soon! 
 But for now, let's get closer to these wings. 
 I only glued the "quill" of the feather down so that the feathers would have a ruffly texture to them. 
When I snap the photos next week, my husband suggested taping an X on the floor so the kids would know where to stand. Such a smart dude. 
 I'm super stoked! This was finally hung in the afternoon on Friday when my specials team buddies were free to help me hold it up and glue it to the wall. 
 To give you an idea on size. The photos I take of the kids will be hung along the wall beside the wings. 
 As soon as the wings were up, folks were ready to have their photos taken! Here is my friend Kiera who you might know as Cleopatra
My principal's sweet son, Ashton! 
 One of our P.E. teachers who you might know as King Tut (as well as Frida and Grant Wood, ha!). 
 My awesome principal and her sweet kiddos. I am super lucky to have the most supportive admins in the land. 
 Dawww, that face!
Our super enrichment teacher who is always kind enough to let me use this wall outside of her room...thank you, Ashley!
Y'all know I had to join in on the fun. BIG shout out to Kelsey Montague for the inspiration and my special area friends for helping me hang this beast. All y'all are what lifts me!
 photo signature_zpsd10b3273.png
Read more »