Showing posts with label cassie stephens. Show all posts

Thursday, October 6, 2016

Art Teacherin' 101: Episode 21

In last week's 101, we chatted about saying NO to requests for your time, your talents and your art supplies. I received so much feedback from y'all in the comments and in emails that I realized I'd touched a nerve. We all feel so much pressure to be agreeable and generous, as it's our nature. However, it's not fair when our kindness is taken advantage of. Many of you asked: what do I do when the request is coming from a superior? How do I say no when I feel pressured? I'm a new teacher, should I really say no?

These conversations took me back to my early teaching years. I don't know if it was the fact that I was new, young and/or relatively agreeable (I'm a recovering passive-agressive) but when requests came in for my time, talents and supplies, it was often under the guise of "do this cuz I said so." What I didn't realize was that I was dealing with bullies. I'll give you an example: when I first started teaching in my school district, I was told I "had" to do a project with my students simply because the other art teachers in my district were doing it. I didn't agree with the project, didn't think it was a wise use of my time or my students' art education, so I said no. Unfortunately, bullies don't like to be told no. Rumors spread that I was uncooperative and that landed me in the hot seat with my (now former) principal. From there, I was bullied by my administration to acquiesce. And I caved. What was the result? Well, for a long time, my administration and art ed colleagues thought I would do what I was "told" to do. And I did for entirely too long. Finally, one day, I decided to remove those bullies from their pedestal. I started listening to myself, the needs of my students and my time. And I started saying no.

It's not been easy. Since then, I've battled unpleasant comments, eye rolling at meetings and one very nasty email (that my current administration handled beautifully). And you know what? It doesn't bother me. When I took away the power from the bullies, it was like a weight lifted off my shoulders. I could breathe. And I could also focus on what I knew to be important to me and my students. 

It's interesting how we address bullies so much with our students but not as adults. Bullies never grow up. As long as folks give them power, you'll find them trolling online, in your workplace and, shoot, at the grocery store! Kick that pedestal out from underneath them. Reflect, listen to your gut, do what you know to be right and follow that path. From there, you can't go wrong. Love y'all!

 photo signature_zpsd10b3273.png


Read more »

Tuesday, October 4, 2016

DIY: My Favorite Fall Crafts!

When you've been around the blogging block as many times as I have (ahem), you start to accumulate a whole lotta posts. Add that to the fact that I'm a big time lover of all things fall and you've got yourself an online encyclopedia of autumn'ness. So I thought I'd put all of my fave ones into a pot, mix it all up and share it in a nice fall-y stew for y'all. Pumpkin spice flavored, of course. 

One thing el hubbo and I love to do during the fall is attend a lil something called Halloween Horror Nights at Universal Studios (I've chatted about it most recently here). That means I do a lotta mobile crafting. The above fall-themed embroidered blouse was one of those crafts I did on the plane. I'm always surprised when I get busted at the airport for a couple extra ounces of contact solution but never my needles and scissors. But whateves.
Speaking of Halloween Horror Nights, here's a sneak peak. Looks like...fun, right?! We've been going for years so it takes a lot to spook us now. But I do have a soft spot for crazy-eyed, chain-saw wielding homicidal maniacs. Call me crazy. My Walking Dead-inspired 1950's dress is always fun to wear.
Y'all know that my love for vintage runs deep...and that goes for all things Halloween as well. The old horror movies are my jam (Hitchcock's The Birds is my all time fave movie) so when I found this fun fabric with cartoon-y characters from horror flicks on it, I knew I had to make a dress...and a needle felted sweater to match.
I had so much fun painting The Bride, Busted last fall. It really reminded me just how much I love to paint. It truly was a test in color mixing as creating that variety of values was not easy. Lil known fact: I actually graduated college with a double degree: one in painting and the other in art education. I don't paint all that much...but I just might have to create another one of these with another villianess busted. I'm open to suggestions! By the way, this print is available for sale here
Speaking of vintage horror films, the fabric on this dress is full of 'em! So much fun inspiration on one piece of fabric. I've been itching to recreate large paintings based on old horror movies as well. I need more hours in my day!
Last year, I really got inspired by vintage Halloween decor, especially black cats. I transformed this lacy jacket with my Naughty Kitty Club design. Current number of members: 1. 
The cat made another appearance this year in the form of these vintage Halloween trick or treat buckets. I really can't stop laughing at these crazy guys. I so wanna make more of these, they were so fun and easy to create! 
The vintage buckets were made with Celluclay...and the little pumpkin puppet above was created with paper clay. I love exploring different types of clays from the craft store. Each has it's own unique consistency and texture. 
Fall also means needle felting time in my world. There is something super cozy about bundling up with a blanket, breaking out the wool roving and stabbing something repeatedly (uhhh). The eyeballs I needle felted onto these Target pants are always fun to wear. Haunted Mansion knickers, anyone?
Perhaps a needle felted foxy stoll?
WHHOOOO's down with an owl-tastic cardigan
 After a while, the colors of fall start to bring me down a pinch. So I love that I can brighten my wardrobe and my decor with a punch of el Dia de los Muertos. Check out these painted planters
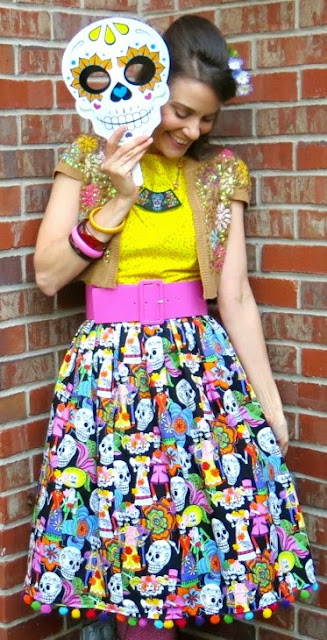
And this here dress. You can find so much fun Day of the Dead-inspired fabrics at the craft stores and online right now! 
 In fact, that's where this fabric came from, Joann's. Minus the rainbow of pom poms, I added those. 
 I love having buddies over for craft nights. Last year, we created these Day of the Dead heads
And another "flight craft", my embroidered necklace

I can't wait to wrap up some fall projects I've been working on and start some new ones. My only wish is that fall was longer! 
 photo signature_zpsd10b3273.png
Read more »

Sunday, October 2, 2016

DIY: Vintage-Inspired Halloween


Every year, when fall approaches and the light begins to change, I get this urge to create. Often times that results in a Halloween-inspired dress, needle felted sweater or painting (stay tuned for a big ole blog post with all my fave fall crafts!). This year, I was inspired to create these wannabe vintage Halloween trick or treat buckets!
 I got the idea from a shop I happened by one morning. They had these sweet little papier mache treat buckets on display in their window that were more than likely made in a land far, far away. I immediately wanted to duck into the shop and scoop them all up but the nearly $40 price tag kept me away. Then I got the idea: I'd just hit up the thrift store on the way home, pick up some plastic trick or treat containers and make my own.
Here's how, y'all!
I found three of these at my local thrift store in various sizes. I happened to have a couple bags of Celluclay that had been in my school storage closet for almost as long as I've been there. 
I had one of the big bags...and as you can see in the video I'v hardly put a dent in the thing. A little goes a long way. What I love about the clay as opposed to papier mache is that it goes on so much faster and doesn't have the texture of elephant snot. So there's that.
 Here's the making of the cat. I knew I wanted ears so for him, I simply hot glued some tag board ears to the top.
 I had a wee big of a battle with the handle but I made it work. 
Surprisingly, the tag board was able to withstand the weight of the clay. 
Covering the pumpkins was the first step. It seemed to take forever and was not my fave. I was ready to dive into the face-making part!
 So much fun. I drew a lot of inspiration from a "vintage Halloween" google search. That lead me to this incredible artist Johanna Parker who I'm currently a huge fan of!
 It was nearly 90 degrees the day I set these guys outside which worked out perfectly as they were dry in no time. This winter, when I experimented with the clay, it took up to a week to dry and did mold a bit on the bottom because I forgot to rotate the clay project. So, not only do I suffer from Cellu-Lung but also Cellu-Mold neither of which my insurance covers. Of course. 
The surface was rough but not difficult to paint. I do think kids would struggle as it is def not the easiest surface if you are trying to paint neatly. I rather dug the texture though as it meant I could play around with layers of paint and depth.
I think painting the white pumpkin was my favorite. I started by painting it completely orange then layering the white on top with a dry brush. 
After painting the details of the face, I went back and added the line on the pumpkin in orange and a dry brush of light orange and yellow. Once they were dry, I went over each with satin ModPodge to add just a hint of shine. 

I really can't decide if these pumpkins are ugly or cute. I'm going with ugly cute. Regardless, they will not be on display in our bedroom as I can't have that creeper staring at my when I'm trying to sleep. 
Ugh. I kinda wanna make more! My fall break is quickly approaching, I just might have to!
 If you follow me here, I know you've seen me sharing the process like crazy. I'd love to know if you give this a go! 
 Not gonna lie, this one's my fave. 
 But this one is a close second!
Next up on the fall crafterin' agenda: a Black Cat dress and a EYEBALL sweater, eek! I can't wait. Til then, y'all!
Read more »

Thursday, September 29, 2016

Art Teacherin' 101: Episode 20

Y'all have heard me chat before about the importance of pursing your creative passion in order to be the best art teacherin' type you can be. But you might be wondering, how? How do I find the time to do that?! Allow me to introduce you to the Power of NO. 
I was born and raised in the mid-seventies in the Midwest. I was raised to be to do what I was told even if I didn't wanna (the power of the paddle, y'all) and to be agreeable even if I didn't agree (I'm a self-diagnosed passive-agressive). When someone asks something of me, it's my nature to just say Yes! when I'm screaming NOOOOO on the inside. 

As art teachers, we are asked for our time, our talents and our resources. This should be considered sacred and only doled out in tiny amounts, if at all. I'm not saying don't be a team player (although, truth be told, I've NEVER been considered one of those!), if it benefits the education of your students and is fair for all sides of the teacherin' table, I say go for it. However, when scales are disproportionately weighted to the disservice of you, your students and your supplies, you gotta draw the line. And, as we 80's kids learned: Just Say No. Nancy Reagan taught us well. 
This past weekend, I really needed to just say no and focus on some creative YES. If you follow me on Instagram, then you know my weekend was spent crafting up a storm. From making these Celluclay Halloween heads (DIY to come, kids!) to finally getting back into my sewing room with some fun IKEA fabric...
It seriously felt like I was putting gas in an empty tank. 

So, how do you get yourself into that NO mindset? My husband put it so stinkin' well: imagine how long it would take you to do said task. Now think about how long it will take you to say no. The amount of time it would take to say no outweighs that time zapped from you day. Just say NO if you want to and forget about it. 

I also love advice about responding to requests either in person or via email: Thank you for your kind offer and for thinking of me. I am going to politely pass. 

And there you have it! More time for you, your students and their resources. Power to you and your No-ness!
 photo signature_zpsd10b3273.png
Read more »

Wednesday, September 28, 2016

In the Art Room: Spooky Starry Night

Before I chat about this lesson, I gotta give a big ole shout out to fellow Art Scout Troop Leader and good buddy Ginger Pacer. When I saw a version of this project on her Instagram (her's is super cool and involves a lot of paint exploration which I love), I knew I wanted to give it a go. However, I'm under a pinch of a time constraint with this project so I knew I needed to adapt and make it work for me. For that reason, I decided to go with a smaller format than we normally work with (these bad boys will be 9" X 12") and use an oil pastel resist. Here's the complete video'ed lesson (my apologies for the title being left out at the beginning. The kids had a good laugh at that!):
In a one hour session, my fourth graders each got their photo snapped with these wings, watched the first half of the video, drew their skies, watched the second half, painted and some even had time to sketch ideas onto dry erase boards. It was action backed...despite the fact that I was battling a monster migraine that caused me to lose sight in my eye (anyone else get these?). Since my 6 Advil and migraine meds were not kicking in, I was so thankful to have the video to do the work for me. However, it did mean that my usual Wednesday night Art Teacherin' 101 will be postponed until tomorrow. So, y'all come back now, ya hear?!
I do have a SUPER HOT tip for you until then...every fall, I bust out my Haunted Mansion CD  that was originally recorded in 1969 and sold at Disney as a souvenir for the ride. We play this over and again in my room in the fall for my older classes and you can seriously hear a pin DROP. The kids LOVE the slightly spooky and silly tale that lasts about 30 minutes. I noticed that during their free time, my kids were illustrating the story and I thought, HOT DOG! We need a haunted house project. So, when I saw what Ginger was up to, I was super stoked to heavily borrow her idea. 

So here was my little example I cooked up. 

Side note: I used to read chapter books to my students as they worked and they loved it. Their favorite are the choose your own adventure types. However, it was hard for me to help kids and provide feedback while reading. So switching to audio books has been a game changer in my room. I've recently invested in more (the Radio Theatre series is a fave) and I'm excited to play The Legend of Squanto to my students as we approach Thanksgiving. I'll keep you posted on that one, I've got to do a teacher preview first.
Back to the project! True story: when I mentioned the use of puffy paint in the video today, the kids literally cheered. They truly are my artists, I tell ya. 

Here's what they managed to knock out today. 
This kid cracked me up: "We used watercolor in my old art class but salt!? No one ever told me about SALT! Look at it!" 
Apparently, I say the words, "I say 'Go For It'" a lot in my art room because in the video, where I do say it a couple of times, the kids said it along with me. 
 I was thrilled to see the variety of takes on this project: vertical or horizontal format; round stars or star shapes; variety of mark making. You give them fluorescent oil pastels and they'll go to town, these kids. 
 So much yesssss.
 Next up: we'll paint the black silhouettes and add puffy paint. 
Our final day will involve using the silver sharpies which I don't anticipate taking long. A quick project to wrap up this study is in the works. 
Until then, pet that sweet black cat in your path and have fun!
 photo signature_zpsd10b3273.png
Read more »