Showing posts with label chalk. Show all posts

Thursday, February 9, 2017

In the Art Room: Street Art Hearts

Ah...gotta love those early finishers and those pokey little puppies all mixed up in one big ole art class. I have just that currently with my fourth graders finishing their Candy Heart Sculptures (they are SO AMAZING, y'all! I'll share soon) and third graders wrapping up their Heart Shaped Box of Chocolates. What to do? I needed a lesson that would be a one-day event, engaging, reteach the principles of art and introduce the kids to a contemporary artist. So I created this fast and fun lesson on street artist, photographer and fashion designer J Goldcrown
When the kids walked in the room, I began the video. While it was playing, I pulled those kids who still needed to work aside, reviewed directions, passed out their supplies and got them settled in and working. By the time I was done, the video was in a great place for me to stop it and review the directions with the kids. Here's the video:
This lesson is so simple and effective that it can be used with students as young as kindergarten on up to middle. I gave my students the chance to use either white or black paper. Some kids enjoyed it so much, they made a masterpiece on both white and black paper. 
I love the work of J Goldcrown. It's been fun to introduce the kids to him and Chris Uphues. I love their heart-filled works! And these look so great hanging in the halls. 
I often get asked what brand of chalk my students use...we love KOSS brand chalk
 I don't use expensive fixatives to set the kid's artwork. Instead I use cheapo cans of Aqua Net from the dollar store. Work just as well. 
Each kiddo was super engaged in this lesson which was fab as it allowed me to help those kids painting their hearts.
You'll have to let me know if you give this lesson a go in your art teacherin' world! 
 photo signature_zpsd10b3273.png
Read more »

Wednesday, December 7, 2016

In the Art Room: Fourth Grade Faux Stained Glass

Hey, y'all! Today I saw a couple of fourth grade classes for their second day working on their Faux Stained Glass Winter Scene project. I was so impressed with their beautiful work that I thought I would share and let you take a peak at how these 12" X 18" beauties are turning out. In case you missed the demo video, here it is:
On our first day, we sketched out our ideas, enlarged our favorite onto our 12" X 18" piece of paper and drew the lines in either black glue or puffy paint. I decided to change the size of the artwork to better accommodate frames. I have had parents tell me that when we do odd shaped artwork, it is difficult for them to frame. I really love the idea of them framing their child's work so of course I'm going to make some changes to have that happen!
Today we watched the second half of the video and dove right into chalkin' it up. I stressed the following: no more than three colors per shape; colors had to be analogous; keep your fingers clean by washing and drying regularly. 
 About 1/3 of the kids finished today, some used glue today (because they were absent last time) and others are still in the middle of creating. Yay! That should be real fun to coordinate all those finishers/almost finishers/no where near finisheders. Such is art teacherin' life. I plan to provide some open ended projects for those wrapping things up as that will be our last class before break. 
 This project was inspired by the success of this third grade project!
One of the half dozen freshly-glued designs from today. We dry these on our messy mats on the floor. I found that placing them on the tilted drying racks causes the glue to run.
The partially finished pieces really stole my heart. These kids were serious about taking their time and doing their best. I love this Hershey Kiss tree!
 This one is really so stained-glass-esque.
 This artist got a big warm hug from me. So stunning!
And this artist, ah! I was so concerned when I saw his glued design as I thought, that is gonna take him forever! I was worried that he wouldn't have the patience to fill it in the best he could but he really is rockin' it!
And this one says Paul Klee to me! 

Please feel free to give this project a go in your art room! I'd love to see the results if you do.

 photo signature_zpsd10b3273.png
Read more »

Wednesday, November 30, 2016

In the Art Room: Faux Stained Glass Winter Scene

I don't know what y'all call that time between Thanksgiving and winter break but I have been known to call it a naughty name or two. It's that weird in-between time where we are all comin' down from our vacation high and are so exhausted that we need another one. And just knowing that winter break is on the horizon can sometimes just be more than I (and the kids!) can handle. 

This week, so far, back to art teacherin' town has been a good one. I'm happy to be back making big messes with little people. One project that seems to have the fourth grade really excited is this Faux Stained Glass Winter Scene.
 I used black glue for the very first time in my teaching career last month and I (as well as the third graders) was all WHERE HAS THIS BEEN MY ENTIRE LIFE?! It is so much fun to create with! While they were working with it, I got the idea to introduce my fourth graders to the same media. With my Field Trip! series, I've been introducing the kids to contemporary creatives. Unfortunately, I don't personally know any local stained glass artists to film (any leads would be much appreciated!) so I created this introduction to the art of stained glass with a little iMovie wizardry. The fourth grade watched the first half of the video today and got a good start on their faux stained glass. 
The kids were SUPER bummed when I said that we weren't going to work with cut glass (really guys?!) but were excited when I mentioned black glue. I had them move to their seats and silent sketch several ideas for 5-7 minutes.
I really emphasized not creating a Christmas tree knowing that this project just might not be completed until after the holidays. However, I didn't want to limit the kids so I made it optional. Personally, I love that skull tree on the left! 
After our sketch time was up, we regrouped on the floor and watched the part of the video where I talk about drawing on large paper and using the puffy paint or black glue.
Puffy paint leaves a better, crisper line but it does take a little extra work to squeeze that bottle. The black glue (made with one part black tempra and two parts Elmer's Glue All) comes out faster but leaves behind a wider, flatter line. I shared with the kids the pros and cons and let them decide which they wanted to use. 
All but a handful of kids got to the black glue on the first day. I did change the size of the paper from what was in the video as I thought a 12" X 18" would be easier to manage. 
 One thing I had to really emphasize was keeping the drawing large. Showing that clip of the stained glass artist really did help them conceptualize the idea of large and enclosed shapes. 
 Of course, it wouldn't be black glue painting if we didn't have the occasional smearing. We learned to just let it go. The chalk can hide any imperfections. 
Gotta love a tree of Hershey Kisses! I'll keep you posted on the progress of this project. I see so many variations: landscapes, abstract designs, etc. I'd love to know if you have used this method. If you do, please drop me a line and share. 
 photo signature_zpsd10b3273.png
Read more »

Friday, November 11, 2016

In the Art Room: Sandra Silbertzweig Inspired Portraits by Third Grade

A couple of weeks ago, I shared with y'all a video I created for my third graders. The video (seen below) introduced my kids to the colorful work of Sandra Silbertzweig and allowed them to explore creating a colorful and abstract self portrait. This lesson is currently  one of my faves! Check out how stunning these beauties turned out. All of my students are currently creating a wide variety of self portraits for our Artome fundraiser...and I daresay, these just might be my faves. 
For this project, we used:

* 9" X 12" black or dark blue construction paper. I would have loved to make these bigger but that is the size of the Artome frames.

* Black glue or black puffy paint. There are a couple of ways to create black glue. My friend Ginger creates black glue with a mixture of Elmer's All Purpose glue and India Ink. I created mine with a one part mixture of paint to two parts glue. The key is to use Elmer's All Purpose, not the school grade stuff as it's runny. Also, I had some students use black puffy paint which worked great. Another alternative is to use glue on black paper as it dries clear and will leave behind a kind of transparent line that the dark paper can show through. 

* Chalk. I'm a big fan of Koss Brand chalk which can be found on Amazon. It's pricey but GREAT. 
 This project took us two plus art classes to complete. On the first day, we watched the video, learned about Sandra and did a little guided drawing. If you watch the video, you'll see I left the drawing portion open to many levels of drawing alternatives. Once the drawing was complete, the kids traced their lines in glue. From there, if time allowed, we watched a bit more of the video as a kind of sneak peak to the following week. 
The real fun came with the chalk. In the video, I really stress how to use the chalk properly...and we do a whole lot of chatting about analogous colors. I really felt like this lesson was a wonderful exploration of color theory. 
 Here is how each table of four children was set up: a laminated colorwheel that I found online and two bowls of chalk, one warm, the other cold. Students were to use the colorwheel as I did in the video. Many of them took the time to pair up and lay all of their chalk out on the wheel. This way, they could easily see what colors were available to use. I love that they were so into picking the correct colors for this project. 
After the second day, several kids were not finished. This was fine with me...I mean, look at those results! The following art class, as they wrapped up their drawing, we chatted about how their artwork was going to be hung like work in a museum. I had them get a notecard and create a label for their work. On their label, they were to write:

Artists Name
Title
Medium
Process or Description

The information from this card will be used as both an assessment and also info for their Artome paperwork. 
 Once all pieces were complete, I blew off the excess dust and sprayed them liberally with Aqua Net. I did that three times to insure the chalk particles were attached. I'm hoping hey remain as vibrant and colorful when they are framed. 
Because of our small format, I decided to opt out of having the kids add designs to their work. I had a feeling it might have gotten a little muddy if we did. If the pieces had been of larger format, I think that would have worked well. 
I'm so looking forward to this winter art show. All of the kids have been creating beautiful works of art! I'll be sharing the work of my other grades soon. 
Until then, have a bright and colorful weekend!
 photo signature_zpsd10b3273.png
Read more »

Thursday, October 27, 2016

In the Art Room: Sandra Silberzweig Selfies with Third Grade

I'm doing something new this winter: an art show with Artome. If you aren't familiar, it's an organization that will frame student art work and completely transform you school into an art museum for parents to enjoy and purchase the framed works of art. I'm having each of my kindergarten through fourth graders create self-portraits as I kinda think that is something all parents would want to keep forever. If you follow me here, you've seen a little of our progress. I'll be creating a video'ed lesson for each of these self portrait units. And if you wanna stay up to date on those, you can subscribe here
For third grade, I decided to introduce them to the artist Sandra Silberzweig and her fantastically colorful works of art. I love them so! The kids have loved the process of creating their abstract selfies so far. 
Here's the video'ed lesson. Feel free to use it in your art teacherin'/makerin' setting.
 So far, we've done the glue portion. Someone recently suggested that mixing India ink with white glue works better. I also had black puffy paint on hand for the kids who created very fine details. The difference between the puff and glue is that the puffy paint dries with a high gloss finish and is, of course, more puffy. It also is harder to use as it doesn't come out of the bottles as easily. We had to take "hand breaks" to give our wee hand muscles a rest.
By the way, the chalk I am using in the video is a brand called KOSS. I have found it on Amazon...and it truly is the best and brightest chalk I have found to use. It isn't cheap...but we've used it for years. It is the same chalk we used to create our ceiling tiles!
When I share this video with my students, it will be divided up into two parts: one day drawing and gluing, the next chalking. I'm excited to throw color theory into this lesson.
I plan to have several of these printed (and laminated!) for the kids to use at their seats as they explore analogous colors. 
I'll be certain to keep y'all updated on their colorful progress...and stay tuned for more selfie lessons and videos to come!
 photo signature_zpsd10b3273.png

Read more »

Tuesday, March 1, 2016

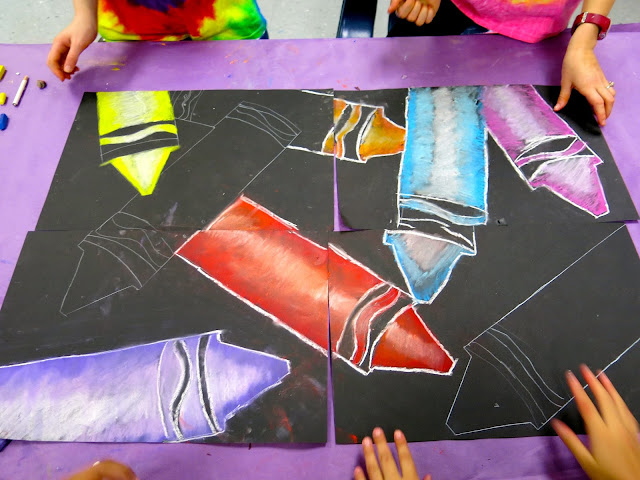
In the Art Room: A Crayon-tastic Collaborative

My fourth grade classes have been all over the place, y'all. With snow days, holidays and my jury duty-in', I've got some classes light years ahead of the rest. To try and get everyone back on the same page, I threw this lil Crayon-tastic Collaborative into the mix. The kids are currently creating papier mache crayons and pencils for an installation. I thought this little project would be a nice intro to composition, teamwork and value all while bringing everyone up to speed. 
This project took my students an hour and a half (that'd be one and a half art classes). We spent the first 30 minutes of the first day priming our papier mache creations and then jumping right in to the crayon composition portion of the project. To best explain it, I created a video that you can view and share with your students if you'd like. My apologies for the fact that my hairs kept swinging into the demo portion of the video. Note to self: invest in a hair-tie! 
Really, youtube? This is the photo you pick (well, they actually give you an option. Sadly, this was the best one).
I have about 20 kids per 4th grade class. To pick the groups, I randomly called on a student to pick a partner. Then I allowed that partner to pick the next and so on. My students are very sweet to each other so there wasn't any weirdness, thank goodness. I did step in when one group was assembled because I knew these particular kids would do more chatting than working. But other than that, the teams did great! Our first half of the day was spent plotting out the composition.
Which looked a lil like this. I gave the kids a stack of templates because I wanted their focus to be on composition, teamwork and learning to create value. I know some folks are anti-templates but not me. With limited amount of time and the lesson focus on other elements, I like to remove as many hurdles as possible. Because, let's face it, why make the struggle even more real when it already is. 
Once the team was in agreement about the composition, the tracing started. That was a pinch tricky as the kids had to think about overlapping.
From there it was the drawing of the paper. This was also tricky as the kids had to use curved lines to create the illusion that their crayon was three dimensional. 
Once the crayons were all drawn, the kids cleared the messy mats off the tables and picked a table on which to work. I was fairly certain my custodian friend would not have loved chalk pastel all over the floor. We watched this video before diving in (I love Scratch Garden's videos!)...

This helped us review monochromatic and value. The kids were to share the same pastels for one crayon. Meaning, if they agreed on a blue crayon, they had to use the same set of chalk. If they didn't, some of them ended up picking different tints and shades of blue resulting in slightly mismatched crayons. 
This group only wants blue crayons. So they are having to come up with a variety of blues. 
After the crayons are complete, the kids are to outline with white chalk. As y'all know, chalk is super messy so the final step was to clean up any smudges with a kneaded eraser. Side note: kids go BANANAZ when introduced to kneaded erasers. 
I was walking around the room once everyone had started to check on them. This was my chatty group that I looked in on last...my mistake. They'd forgotten to agree on crayon colors and got 'em all mixed up! After correcting MOST of them, they requested to leave one mixed up because, in their words, "we are kind of crazy." Can't argue with that!
Since it is Read Across America week, we have all been decorating our doors with our fave books! I decided upon The Day the Crayons Quit since it seemed to tie in with our fourth grade project! For this, I simply had my first thru third grade early finishers cut out a crayon and shade it in a similar (albeit more simplified!) manner as the fourth graders.
I loved having the kids help me (read: do most of the work) and that it tied in so well with what the older kids are creating! 

I hope y'all have a Crayon-tastic week! Until next time...

 photo signature_zpsd10b3273.png
Read more »