It all started last year, when we had a visiting artist who is a street painter (aka a sidewalk chalk artist). The kids were supposed to go outside and work on their own taped off portion of sidewalk. And then...rain. With my small brain frantically searching for ideas where the kids could still work on a sidewalk-esque surface but remain indoors, the Chalked Ceiling Tile project was born!
My super awesome administration had been asking me for a while to do some artwork on ceiling tiles. I'd put the project off as I just didn't know how to go about it. But when rain was predicted the eve before our sidewalk chalk event, the idea to have students chalk tiles came to me. After toying around a bit, I found that the reverse side of the tiles actually worked much better than the front!
Last year, second graders create these butterfly ceiling tiles as it was apart of their curriculum. This year, it isn't. So I decided to have them create something that would look nice with the butterflies: flowers!
This year, I decided to try something a little different. I've been showing demo videos on the regular in my art room and the kids have responded really well. Because I was going to be teaching an entire grade level of second graders in a loud multi-purpose room, I thought this would be the perfect time to use a filmed lesson. I've been adding videos regularly so feel free to subscribe to my channel if you wanna. Here's the video the kids watched:
You'll notice that the video is broken down into four sections: drawing out the flowers, coloring in the flowers, adding a background, outlining and autographing. I had the students work on these from roughly 9:30 to 11am. They are used to 30 minute art classes! So, I would show a small snippet of the video and allow them to work. They knew to gather back on the floor when they were finished. Of course, they all finish at different rates. When I had about a dozen or more students gathered on the floor, I would ring my chime (yes, that was a shameless plug for my husband's company) which would signal ALL students, finished or not, to gather on the floor to hear the next snippet. I do this in my art room when we have several steps, so the kids are kinda used to this routine.
Not gonna lie, this was no small undertaking but it is so totally worth it. If you wanna do a chalked ceiling tile project with your students, you'll need the following: * Chalk. I love KOSS brand. It's not cheap but it is rich in color. I bought 20 boxes last year and we were able to use them again this year. I will probably only need to purchase 10 more boxes for next year's tiles. We've also used them for other projects throughout the year. * Bowls. I had a sweet high school student shadow me the other day and I put her on the task of making a bowl of warm color chalk and cool per every two students. * Ceiling Tiles. One per kiddo. Ask your friendly custodian for access to his/her stash. * Foam Brush Thingies. Get them in the variety pack at your fave hardware store. These are perfect for blending chalk. * Bulletin Board Paper. To cover the floors. We worked in the multi-purpose room which was great for a large group of kids. Once we were finished and the tiles were stacked on a dolly, we simply rolled up the paper and recycled it! * Baby wipes. We only used these at the very end. I mean, your hands are just gonna get dirty again, right?! Don't clean 'em til you are finished. * Cheap Hairspray. Get the good stuff. You know, like AquaNet. * Fabulous Parent Volunteers. These folks are the backbone to my art program. They hang the art show. They help with clay projects. They get things done. Y'all gotta get you some. And special thanks to mine, I love y'all!
To organize this event, I simply messaged second grade and special area teachers to give them some dates. Once we landed on one that worked, I asked if they'd kindly pop in the multi-purpose room in 30 minute shifts to help the kids if needed. During that hour and a half time slot, I usually have second grade classes and a planning...so none of my other kids missed their regularly scheduled art classes, which was great!
Once floral designs were drawn, the kids moved on to the next phase which was adding color.
For some, this took some time as they drew their flowers small. This was fine with me! However, I did notice some artist-fatigue...so having the kids stop, move and watch the next step via video was good. It meant they went back to their work spot with renewed energy.
I think I would like to do a different theme with the students each year. Because these tiles will remain in the ceiling for a long time, a different theme would mean they could easily find their tiles and remember their classes theme! I had thought of taking down last year's tiles and returning them to the current 3rd grade...but I quickly changed my mind when some of those children said, "you aren't taking down OUR tiles, are you?!" I might be fun to build on this idea and add more tiles each year. So that's the plan, for now.
About an hour in, and most kids were finishing their flowers and ready for the background.
Our last phase was outlining and signing our name with black. At this point, students were finishing at different speeds and getting a wee bit squirrelly. To remedy that, I had them baby wipe their hands and go to the floor where we watched an art education video.
Once the majority of children were finished, a teacher took them outside for recess. This left me and parent volunteers to clean up and allowed those kids who were still working to continue creating. Those are usually my pokey-lil-perfectionists. I'm never gonna ask them to hurry up!
Once these lovelies were complete, we busted out the Aqua Net and commenced spraying them like it was 1985.
Personal fave back in the day. Mostly because of the Mondrian design!
After cleaning up and cleaning the tiles outta the multi-purpose room, I loaded them onto a cart and wheeled them down to my room. Our fabulous custodian Mr. Scruggs will hang them next week...I'll be sure to share a pic! If you follow me here, you'll see it real soon!
Love the composition of this one!
Check out the knees of the kid on the right. Next year, we should just take them outside and hose them down!
After the kids, before the clean up. So much colorful happiness!
My buddy the music teachers suggested that each year, for our theme, we have the kids decorate tiles that correlate to the location in the hallway. For example, outside of the gym, the kids chalk sports equipment. And outside of the music room, music-themed designs. I love that idea!
Now that this massive undertaking is complete, I can focus on Art Show Land.
Have y'all done ceiling tile projects? What did you do? I'd love to hear about it in the comments. xo!
My fourth grade classes have been all over the place, y'all. With snow days, holidays and my jury duty-in', I've got some classes light years ahead of the rest. To try and get everyone back on the same page, I threw this lil Crayon-tastic Collaborative into the mix. The kids are currently creating papier mache crayons and pencils for an installation. I thought this little project would be a nice intro to composition, teamwork and value all while bringing everyone up to speed.
This project took my students an hour and a half (that'd be one and a half art classes). We spent the first 30 minutes of the first day priming our papier mache creations and then jumping right in to the crayon composition portion of the project. To best explain it, I created a video that you can view and share with your students if you'd like. My apologies for the fact that my hairs kept swinging into the demo portion of the video. Note to self: invest in a hair-tie!
Really, youtube? This is the photo you pick (well, they actually give you an option. Sadly, this was the best one).
I have about 20 kids per 4th grade class. To pick the groups, I randomly called on a student to pick a partner. Then I allowed that partner to pick the next and so on. My students are very sweet to each other so there wasn't any weirdness, thank goodness. I did step in when one group was assembled because I knew these particular kids would do more chatting than working. But other than that, the teams did great! Our first half of the day was spent plotting out the composition.
Which looked a lil like this. I gave the kids a stack of templates because I wanted their focus to be on composition, teamwork and learning to create value. I know some folks are anti-templates but not me. With limited amount of time and the lesson focus on other elements, I like to remove as many hurdles as possible. Because, let's face it, why make the struggle even more real when it already is.
Once the team was in agreement about the composition, the tracing started. That was a pinch tricky as the kids had to think about overlapping.
From there it was the drawing of the paper. This was also tricky as the kids had to use curved lines to create the illusion that their crayon was three dimensional.
Once the crayons were all drawn, the kids cleared the messy mats off the tables and picked a table on which to work. I was fairly certain my custodian friend would not have loved chalk pastel all over the floor. We watched this video before diving in (I love Scratch Garden's videos!)...
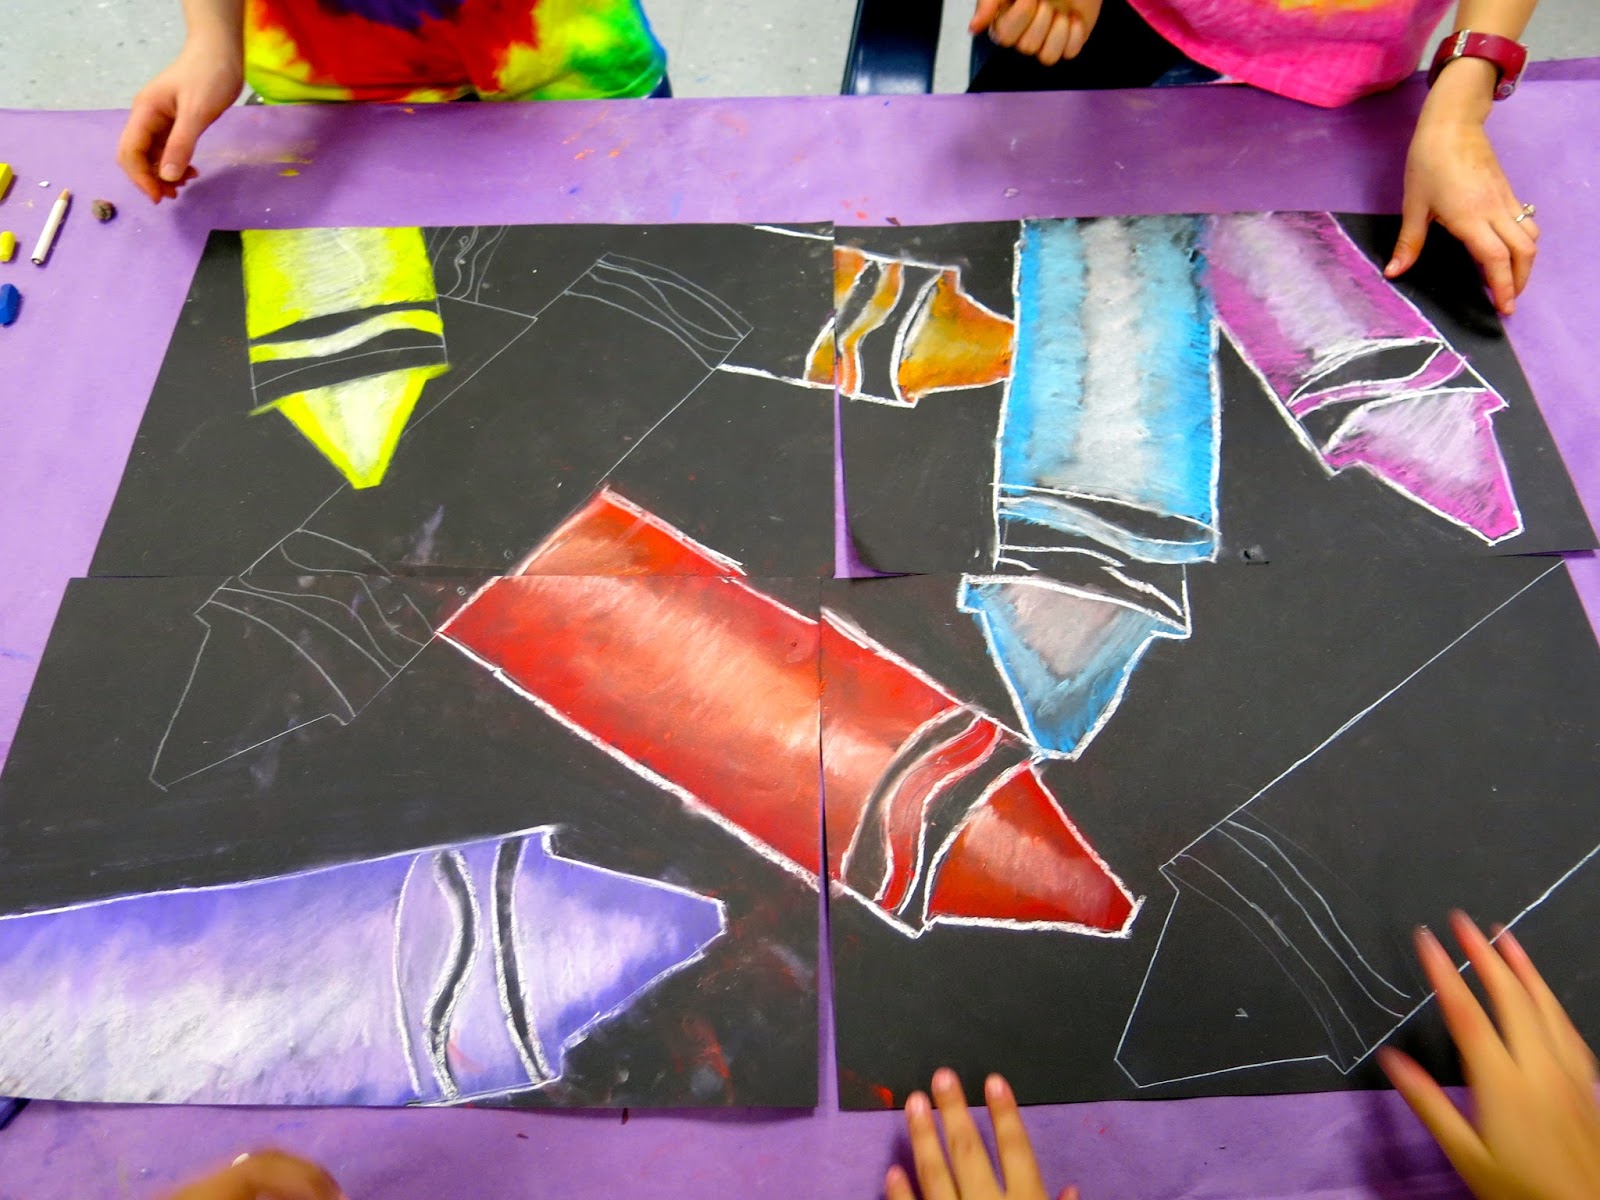
This helped us review monochromatic and value. The kids were to share the same pastels for one crayon. Meaning, if they agreed on a blue crayon, they had to use the same set of chalk. If they didn't, some of them ended up picking different tints and shades of blue resulting in slightly mismatched crayons.
This group only wants blue crayons. So they are having to come up with a variety of blues.
After the crayons are complete, the kids are to outline with white chalk. As y'all know, chalk is super messy so the final step was to clean up any smudges with a kneaded eraser. Side note: kids go BANANAZ when introduced to kneaded erasers.
I was walking around the room once everyone had started to check on them. This was my chatty group that I looked in on last...my mistake. They'd forgotten to agree on crayon colors and got 'em all mixed up! After correcting MOST of them, they requested to leave one mixed up because, in their words, "we are kind of crazy." Can't argue with that!
Since it is Read Across America week, we have all been decorating our doors with our fave books! I decided upon The Day the Crayons Quit since it seemed to tie in with our fourth grade project! For this, I simply had my first thru third grade early finishers cut out a crayon and shade it in a similar (albeit more simplified!) manner as the fourth graders.
I loved having the kids help me (read: do most of the work) and that it tied in so well with what the older kids are creating! I hope y'all have a Crayon-tastic week! Until next time...
As some of y'all might know because I've been talking about it nonstop (I often wonder just how I have acquired so many nice friends that allow me to ramble on and on without complaint. My guess is that they've formed some sort of support group), I've been out of school for several days due to el jury duty-o. You can see what I wore here cuz you know you wanna. Anywho, knowing that I was gonna be out for so long, I knew I'd have to leave some legit sub plans. So I created a couple of videos and was super pleased to see that both the kids and the subs were happy with the result. AND LOOK! Check out what they made whilst I was doin' my civic duty!
This is JUST ONE of the MANY huge banners that the kids created! Each child, kindergarten through fourth, created a quarter of a heart. Students with extra time then worked on making the letters. I was so excited to see them today that I used my planning time to hot glue them into place. To do that, I "borrowed" a roll of bulletin board paper from our work room, unrolled it onto my art room floor and set to work a-gluing. Like I said, this is just one big banner...the kids also created ones with letters that spell out SMILE, HAPPY and PEACE. They'll be going up on a large wall in our school cafeteria. But this one I was so stoked about that I grabbed a couple of teacher friends in the hallway and had them help me slap it up on the wall this afternoon.
Our inspo for this project came from the artist Romero Britto and the art teacher Jenny K! Jenny has a great drawing sheet that features Britto and his designs. Knowing that I was going to be out several days, I really wanted a project that the kids could work on happily and successfully and be something that could brighten up and spread the good word of LOVE throughout our school!
On the first day I was out, I left this video for my sub to share with the students. I've never done video'ed sub plans before but I gotta tell ya, I'm NEVER going back to paper plans! This was fun and easy for both the sub and kids. And a happy sub is one that spreads the good word. I heard from my admin and teacher buds that both of my subs were thrilled to work in my room. Of course, I took the guess work out of it and made their day cake!
Today was my first day back and it's also my busiest of days. You now how it feels when you've been gone for many days, you feel completely out of the loop! I really felt relieved coming back knowing that my room was going to be in order and that my students would continue this project. Here are my kindergarten friends coloring away.
Many of you asked me about the art stix I refer to in the video. My students have a set of these and they are well loved. They are made by Prisma and are essentially the led of a color pencil. The colors are fantastically vibrant and the kids love using them.
My younger students, kindergarten through first, created the bottom of the hearts while my older ones did the top. The reason behind this is that my older students have longer art classes and therefore more time to work on the big spaces. The papers the kids used are 12" squares. My sub and I used templates to create the thick line diagonal line that you see as well as the heart hump line (I know there's prolly a better word then heart hump but you knew what I was talking about, didn't you?!).
So that they could spot their part of the heart later, the student's name was written along the edge of their design.
Once I started laying out the hearts I felt like they needed a little something more. So I flipped some upside down and noticed the diamond negative shape that was created. It was then I got the idea to have the kids create letters for those spaces. That's what this follow up video is all about...
I put the sub in charge of tracing letters and the kids cut them out before decorating them.
This was such a successful sub plan that even though I'm not finished with assembling all of the pieces, I just had to share it with you right away! You know, in case you wanna do something like this for Valentine's Day. It's definitely a no-fuss type of project. Definitely one to consider at the start of the new school year when you want to introduce all of the elements of art and start your year with that WOW! factor. If you are interested in more of my lil videos, you can subscribe to my youtube channel here.
In other fun and exciting news, you can hear my podcast interview with the INCREDIBLE Patty Palmer of Deep Space Sparkle, here! And if you do this lesson, please let me know, I'd love to hear your tips, tricks and see your student's end result!
Monday, You Ain't Right: I have a super hilarious coworker who loves to tell me, "Stephens, you ain't right!". To give her credit, this was after I explained to her that, no, my stockings were not purchased this way but created with a little creative tucking. It's no wonder that I usually get a side-eye and a head-shake from my work budz. crayon hair clip: made by me, DIY here; crazy sweater: vintage; dotted dress and tights: Target; flats: Payless; shoe clips: made by me, DIY here
So a while back, I got a big thick envelope in the mail. The return address looked boring and official so I threw it on the dining room table where it sat for more days than I'm willing to admit. "You better open that letter soon," el hubbo warned, "It looks pretty important."
Turns out it was. I've been summoned for el jury duty-o.
Looks like I'll be outta the art room for five days spread across two weeks. Now, I've slapped together I'm-so-sick/night-before/please-don't-vomit-on-these sub plans before but that was when I was in a pinch and knew I'd prolly only be out for a day. However, knowing that I'd be missing this much time with the kids, I really didn't want to deprive them of a fun and art-ucational experience. So, my Friday afternoon looked a lil like this:
If you follow me on Instagrammerz, you already know that I decided to create a video'ed sub plan! I've been showing my students videos of myself lately which has been super awesome because 1. it allows me time to prep; 2. it allows me not to forget anything that I'm supposed to say; 3. [truth be told] it allows me to kick back and drink my fourth cup of coffee. There. Cat's outs the bag. After sharing this photo, I had a lotta questions about what the lesson entailed, which, fingers crossed, will be a Romero Britto-inspired Pattern-tastic Heart Mural Collaborative! So I thought I'd share it with y'all! PLEASE keep in mind that this is me addressing my first through fourth grade students. I promise I don't talk to adults this way (well, okay. I do. And, for that, I apologize).
Now. I've never done this before. I do plan to go in every morning of my JD to prep the technology. Thankfully, the courthouse is just a couple blocks away from my school so I have the luxury of popping in and doing a little prep. I also created a two minute video of myself chatting with the sub so he/she knows what our routines are and some housekeeping biz. I'll be sure to keep y'all posted on how it goes. Until then, back to the What the Art Teacher Wore (or shoved in her hair) show!
When I shared this DIY with y'all a while back, my sweater got more interest than my hair clips! It was quite the conversation starer with the kids as well. One said, "it's like you have crayon worms crawling all over you!" Yikes, kid. That's the stuff of nightmares.
I actually have a wee shoe clip problem. And a love for making stuff outta Sculpey. You can see this DIY here.
Thank You for Being a Friend, Tuesday: Thank y'all so much for the very positive feedback on my art teacherin' videos! My goal is to share more videos weekly so if you wanna stay in the loop, you might wanna subscribe to my channel as my videos go up before they appear here. Smooches! sweater: thrifted; eyeball top: Urban Outfitters; scissor skirt: Modcloth; tights: Target; shoes: Dolls by Nina
#OnWednesdaysWeWearArt: Y'all check out my awesome "I like to ARTY hard" shirt? It was created by artist My Friend Court (Courtney Pilgrim). Court is a former art teacher turned full time artist. Her work is as happy, bright and colorful as she is (if you don't believe me, just scroll thru this Instagram account, kids). Each Wednesday, Courtney does a lil #OnWednesdaysWeWearArt where we can dress with an artist in mind, snap a photo and use that hashtag on ole Insta. I decided that Court was my muse by wearing her shirt! top: My Friend Court; skirt and belt: PinUp Girl Clothing; dotted tights: Target?; shoes: Sofft
But What Will You Wear?! Thursday: So, I've been letting my classes know about my upcoming absences. Which led to a nice chat about jury duty and civic duties. I could tell I was making real headway when I was asked, "But what if they find you guilty?!" Once that issue was resolved, ahem, this convo went down:
Kid: What will you wear?
Me: what do you mean?
Kid: uh. Like. Will you be dressing like how you always do? Like (with a wave of the hand) that?!
Kid 2: She only has crazy clothes, what do you think?!
Couldn't have said it better. sweater and dress: thrifted and vintage
Gone Cuckoo Friday: Anytime I've procrastinated the daylights outta my life, which always means my Fridays are a mess, I go a lil cuckoo. So what better day to wear this number, eh? sweater and tights: Target; boots: Anthro; belt and crinoline: Amazon; cuckoo dress: made by me, DIY here