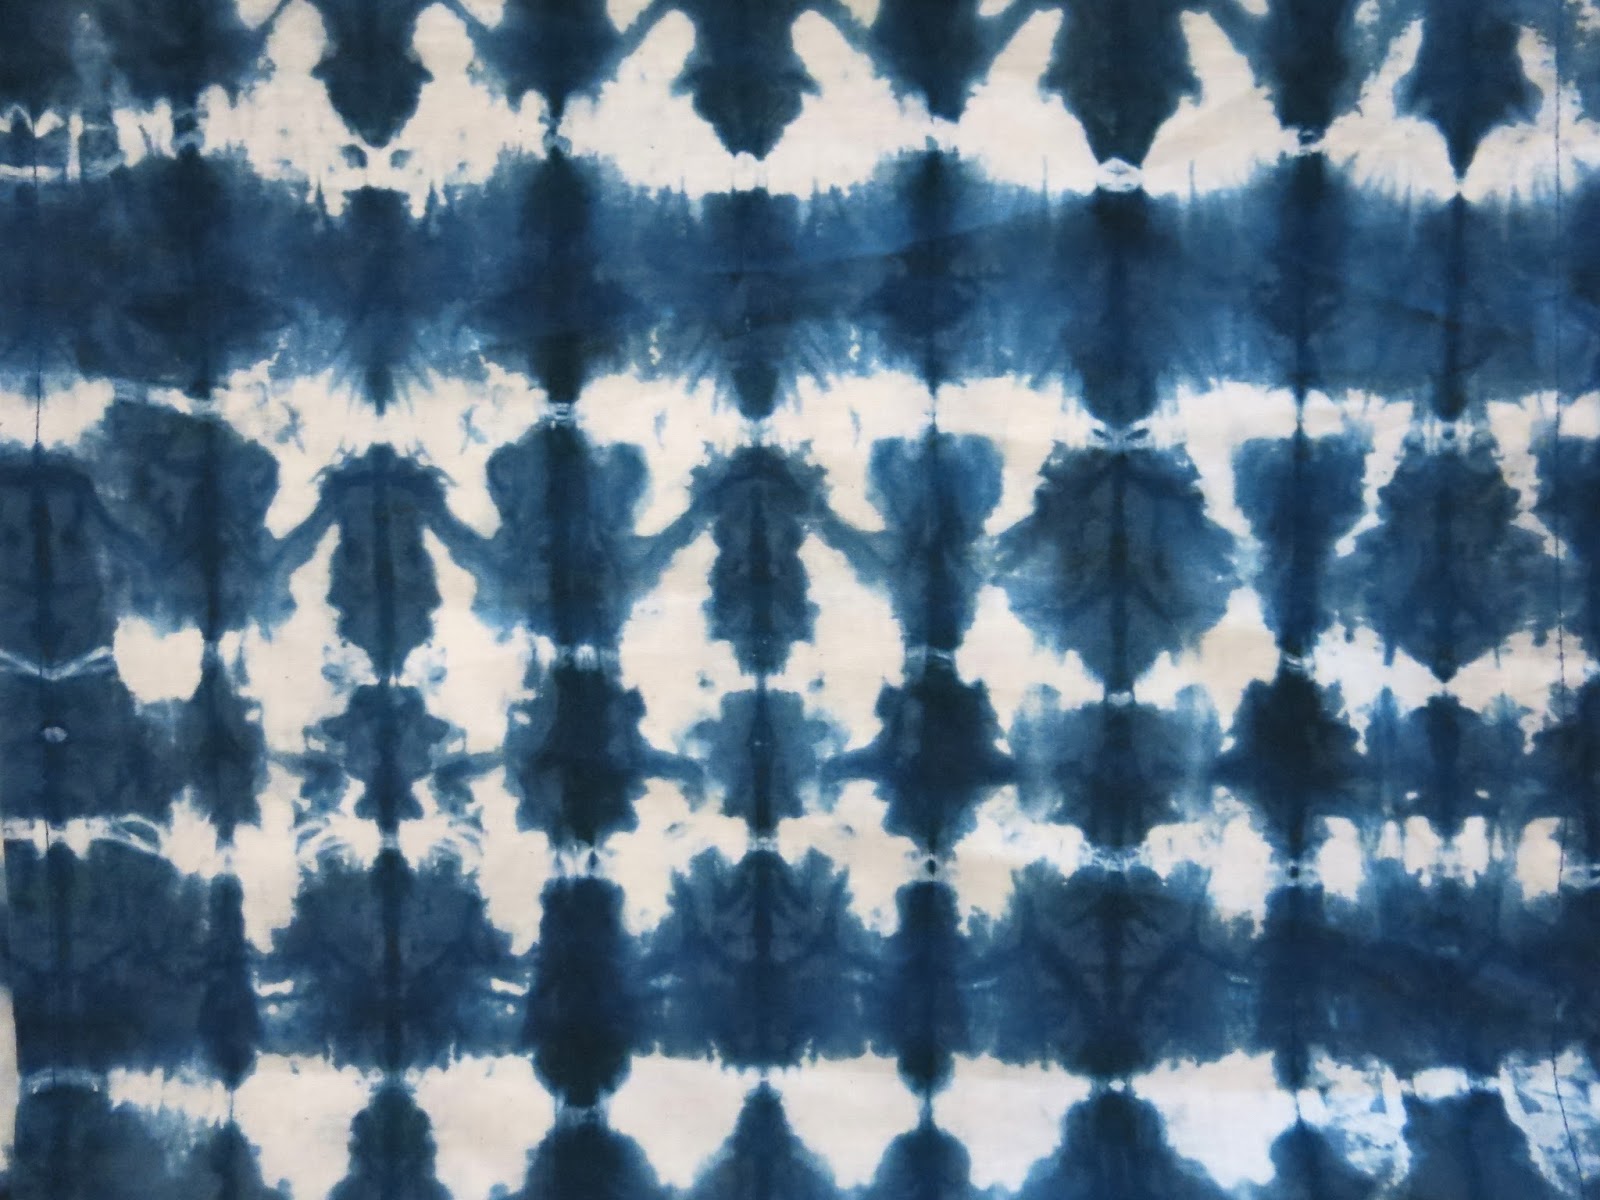
Y'all don't even know how excited I am about my Shibori-dyed napkins. Dinner party, anyone?
True facts about me: I suffer from Public Creating Anxiety. When attending any workshop, craft activity or any adult-art-makerin' of any kind, my stomach muscles tense up, my mouth goes dry and I just can't create anything that doesn't make me wanna cry myself to sleep at night. That doesn't stop me from happily attending any crafty date I get invited to (so, call me, y'all!). I mean, I love learning something new and fun. It's just I'm totally stressed THE.ENTIRE.TIME.
Case in point: the first time I learned Shibori...(back in the day when I made poor choices in footwear)
Me and my buddy Debbie!
Way back in 2007, I was super fortunate enough to travel to Japan as apart of the Japan Fulbright Memorial Fund Teacher Program (I've been campaigning for them to shorten that name for years). If you aren't familiar, it is a program where 200 teachers from all over the U.S. are invited to stay in Japan for nearly 2 weeks. During that time, you are educated about the culture, taken into schools, toted around and even allowed to stay with a host family. I made so many wonderful friends and learned so much. It truly was an experience I wouldn't swap for all the dark chocolate in the world (which is really saying something). At one point during our adventuring, we were taken to Aomori, Japan and a Shibori dying facility. After the tour, we were told that we'd be able to try our hand at this beautiful dying process. Being the only art teacher in the group, all eyeballs were on me and my design. Needless to say, no one was really impressed with my lackluster performance (although, personally, I am more embarrassed by that ensemble. WHAT AM I EVEN WEARING?!)
Needless to say, after that flop nearly 10 years ago, I didn't attempt Shibori again...until a couple weekends ago when my friend Sara had some art teachers over for a Shibori party!
Where I made much better outfit choices but STILL sucked at dying. You can see my dud of a dye hanging on the far left. I was so sad at how my attempts at dying turned out. I mean, how can I stink at tie dye?! I love me some fiber arts, that's my jam. That afternoon, determined to better my dying skills, I ordered a dying kit and a couple books on Shibori. And last weekend, I went NUTS.
And, it's official: I'm in love with Shibori!
If you wanna give Shibori dying a try, I recommend this kit and purchasing a bolt of muslin (so you can really go to town like I did) and bunches of rubber bands. Be sure to follow the dye mixing directions carefully for best results. If you'd like to learn the techniques I tried, I go thru each and every one of them in this video.
Even if you follow my folding and banding techniques to a T, that doesn't mean they will turn out just like mine. The fun is not knowing what you are gonna get.
Baby Banding: I picked up some of those tiny rubber bands for fine hair at the Dollar Tree. For this look, mark your fabric with a disappearing ink pin where you want your designs to be. Then pinch the fabric just a little and place a rubber band around it, wrapping it several times. If you do that with one rubber band, it will create the circle you see. If you add more rubber bands, one below the other, it will create the larger circles.
Over Dying: If you dye a piece of fabric and you are disappointed by the outcome, don't throw it away. Just try something new and toss it back into the dye bath. For this piece, I first just scrunched the fabric into a ball and banded it. Unfortunately, not enough dye was able to get into the bound areas which left big areas of white. To add more design and color, I placed wooden beads under the fabric and attached them to the fabric with rubber bands. I threw that back into the dye bath. Once the rubber bands and beads were removed, they left behind those beautiful floral designs.
Paperclip Dying: This one was super easy. Just accordion fold the fabric and bind it with paperclips. You can see the halos of the clips on the top and the bottom.
Wooden Block Dying: The kit I mentioned comes with directions and suggestions for dying. One was this method. To achieve this look, accordion fold the fabric. Then triangle fold the fabric (see video). Once complete, add a block of wood to either side of the triangle and bind with rubber bands. The dye only manages to seep into the outer edges of the fabric.
Diagonal Fold: Instead of starting your accordion fold at the bottom, try something different by starting at one of the orders of your fabric. Once finished, add rubber bands every 2" for this kind of look.
Accordion Fold: Same method as above...but start the fold on the side instead of the corner.
Faded Look: This was one of my first pieces. I tried the wad-it-up-and-band-it method and it was a dud as it left me with large areas of white. So I just threw it in the dye bath for a moment and it added the really beautiful light blue color. Now it's one of my faves.
And then I completely lost my mind and started dying everything from wool yarn that I bound with rubber bands.
To wooden beads that I bound with the baby bands.
And wooden bangles that I wrapped in rubber bands (my new fave!).
And, um, my hands. You might have noticed that my finger nails, which I NEVER paint, are currently painted blue. That's to hide the fact that they are indeed blue.
So what does one do with a dozen pieces of Shibori dyed muslin? Make napkins, of course! I simply hemmed the edges and they were done. I scored those napkin rings on the cheap via Amazon.
This calls for a dinner party! It's a shame that I don't cook.
Perhaps I'll just host an "Admire my Shibori Napkins" Party. I wonder if anyone would show up.
Regardless, I'm loving how the indigo blue goes with my dining room...and now I can say that I can Shibori dye! I can't wait until the weekend to do it some more, I'm totally addicted.
P.S. I attended another craft night on Wednesday hosted by my good friend Tamara...and was again struck by Project Creating Anxiety. Tell me I'm not alone in this! Looks like I'll be working on that craft this weekend and attempting to perfect it as well.
Lemme share with y'all a lil story about a crazy person who THINKS she can sew but is totes winging it 99.2% of the time. Look, kids, I come by this know-it-all-but-don't-know-nuthin' attitude naturally. How about I paint a picture for ya: I've been living in the Nashville area for something close to 20 years now. Every single time my dear sweet crazy mama comes to visit, she gets lost. Like, WAY lost. Like, calling me after driving 40 miles past my house, lost. Mind you, I've not moved anywhere different in the last 7 years. The roads have not mysteriously changed. I don't live in the Bermuda Triangle. This woman, who owns both a GPS and has Siri on speed dial (I know that's not really a "thing" but whateves), REFUSES to use either of these modern-day handy dandy devices because she THINKS she knows where she's going.
Kinda like her daughter. Who THINKS she knows how to sew. Riddle me this: Would a fur realz stitcher create a Franken-Dress with a mashup of 6 patterns?! Me thinks not.
In other news, some bird was DYING for some air time, y'all. Get that fine feathered friend on The Voice, stat!
In other-other news, there is not a single solitary photo of me standing still like a normal person. I blame that enormous circle skirt and yellow crinoline. You try wearing that combo and not spinning yourself silly!
So let's start with the dress pattern that likes to shatter dreams, ruin lives and drive folks to drink (it's a short drive, y'all. It don't take much): Butterick B5606. Like, whut the heck. It looks all easy peasy, right? Well, lemme tell you, it's a lie. I hit a road block on the SECOND STEP. I watched tutorials. I read blog posts. I laughed. I cried. I shook my hands at the heavens and wondered just how Butterick had managed to dupe me into another dress pattern again (it's been a while...but my distaste for Butterick goes WAY back). I'll tell you how: it was That Bow.
That's all I really wanted outta that dress, that bow. I was determined to make it happen even if I wasn't about to learn how to sew a gusset or whatever that nonsense Butterick Step 2 was taking about.
So I did the unthinkable. Serious Sewists, plug your ears: I cut the pattern apart. That's right, I cut off the long tail in the pattern that makes the bow and I used it to cut out the yellow strips for the bow. I had no idea just how I was gonna make that yellow bow happen but I was determined.
And that's when I busted out my trusty tried and true Simpliciy 8087. This one never lets me down. It's my go-to because I'm a fan of that waistband. I used the pattern for the waist and the back bodice from here. Then, again, I did something crazy: I cut the back of this pattern to match that of Butterick. Yep, I cut a big ole honkin' curve outta the back of the bodice pattern (I've since taped it back together, stop sweating) to accommodate the open bowed back. Then I did some magical trickery (read: I'm too lazy to type it all out) and shazam! I had a bowed back and a big ole waistband!
Now if you follow me on Instagram, then you know this dress had short sleeves instead of capped for a while. It just made the dress seem too heavy and matronly. So I used yet another pattern for the cap sleeves and pockets (YAZ, Y'ALL. This thing has pockets!)
So I only used this pattern for a hot minute for the front bodice. I don't know what I did wrong but my neckline comes up way higher than hers. Just sayin'.
Like, see?
The Anna Maria Full Circle Skirt is my go-to for a circle skirt pattern. I love it because, unlike my vintage circle skirt patterns, it's a modern length. I did add three inches to the bottom of the pattern to get this length. And I did have to bust out the Scout Tee just to make a wee bias tape to hide a mistake on the bodice. Because I was at the end of my seam-rippin' rope, kids.
Yellow chucks and crinoline come courtesy of Amazon. That crinoline was delivered to my doorstep on Sunday!
So, here she is! ANOTHER Starry Night Dress (my other one here)! One made without the help of Siri or a GPS...just like my mama done taught me. Until next time, if you see a crazy lady about 40 mile south of Nashville, send her my way, would you please?
Might we please have a lil confession time up in here? Cuz I need to unpack some stuff and I don't mean those boxes that have been in my garage since we moved seven years ago (real talk: those boxes ain't never gonna see the light of day, y'all, let's just be honest). Confession Numero Uno: Not only am I crummy housekeeper, I'm also pretty sucktastic at that whole decorating thingie too. You can't be good at everything, y'all (hair flip). And I most def have a big fat hairy list of items at which I am no bueno: cooking, cleaning, yard maintenance and, you guessed it, decorating. I mean, I can decorate an art room like nobody's biznatch but working on our house has me all...
I just can't even. I don't even know where to start. In fact, we've got this one room that normal folk be calling a bonus room which I've dubbed the BOGUS room. It's just one more space for me to not clean and not decorate. I did attempt bedazzling it when we first moved in and painted up these round paintings which have that lovely early-2000's color palette...
AND that's pretty much all I ever did to that room. In fact, every time I wandered into the bonus room with a lil decorating on my mind, I'd take one look around and be all...
Now I know I sound totes ungrateful as many folk don't have a surplus of space. And lately, I've been working on a Super Top Secret Project (details to come!) in which the bonus room has become a great place to stretch out and work. For that reason, I'm really putting my heart into making this space one that I love to come to and work in. And I decided my first order of business was updating those horrible round painting thingies.
Now if you've been hanging around this here blog for a hawt minute then you know I love all things Mary Blair. I've created paintings inspired by her, made necklaces, you name it. So I decided I wanted to Mary Blair-ize the bonus room! But I wasn't feeling very certain I wanted to invest a ton o' time into it if I wasn't gonna love it. So I uprooted these white and gold plate/frame thingies I found for cheap at TJMaxx several months ago and decided to create some wee needle felted sketches! The above is what my sewing table looked like before...
And then after. Now imagine that as MY ENTIRE HOUSE and you've pretty much got the picture. Say a lil prayer and light a candle for my hubs, would ya?
After a little bit of playing around, I came up with this! I was super pleased. Y'all know I'm a big fan of needle felting as it's just about the most easiest thing in the world. In fact, I always find myself needle felting to excess in the winter months. Check out last week's DIY!
Just a lil closer look.
I wasn't as in love with this one but I figured, eh, it's just a sketch. I'm sure to change it up quite a bit when I design the larger format circle.
I like needle felting on patchworked pieces of fabric. One of my first wall pieces from needle felting was done that way. I like how it adds just another layer to the design.
Even though I still had one more little needle felted sketch to complete, I decided to dive right in to the making of my first large wall hanging. Mostly cuz I knew I'd have the help of this bad boy...
What you see here is not a sewing machine but something far more magical: a needle felting machine! That's right, y'all, like a rare rainbow farting unicorn, they do exist! The hubs got it for me for Christmas for not too much dinero on el Amazons.
I love the thing. All I had to do was just tack some of the roving into place and slide it under the half dozen needles on that machine, hit the pedal and let the machine do the stabbing. It isn't great for detail work so I do resort to my trusty Clover needle felting pen for that.
But it's fab at blocking in large areas for me and look!
One down! Only two more to go!
C'mon, man! How about a lil power of positive thinkerin'?!
Okay, confession numero dos: this is pretty much how I feel. However, I'm determined-ish to follow this through and have at least one room in our house that looks decorated and finished. I'll keep all y'all posted.