Hi. My name is Cassie Stephens and I cannot stop painting all thing things. Hide your kids, hide your wife, stash your cats and dogs. Me and my paint brushes are comin' for ya.
Y'all might remember some time ago, I created this Tints and Shade sign for my art room. Despite the fact that it looks kinda small in size, this picket fence thingie is actually about 3' across. Asha wanted to interrupt this blog post to share her adorable adorableness with you and provide a bit of scale:
If you've been hanging around this blog for a pinch, you know that I'm currently on a paint-all-the-wooden-thingies-found-at-the-craft-store bender. Just to give you an idea, I've painted letters...
And that's just the wooden stuff I've painted...I've also been on a redecorating bender and I can't seem to stop! I'm currently too lazy to link all of those posts...but just a quick scroll through my blog and you'll find some stuff. Lots of stuff.
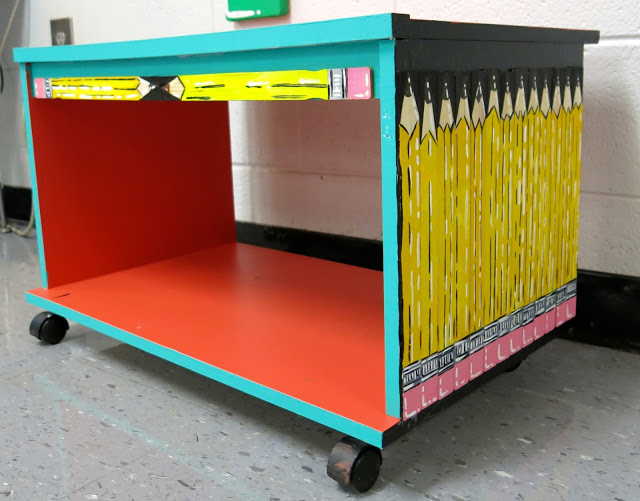
Last night, I wasn't ready to go to bed...I'm on a week long Thanksgiving break, after all! It's party time! And, by "party time" I mean PAINT party time. I love late nights of watching movies and painting. Last night I watched Midnight in Paris (how is it that I had not seen that?! So good!) and started working on this bad boy.
I have Roy G. Biv decor coming out the WAH-FREAKIN'-ZOO in my art room (case in point here, here and here) so, as I painted this sign, I knew I didn't want another Roy G. Biv moment. We talk a lot about analogous colors and gradation so I thought that this sign would be perfect. I did toy with the idea of making a monochromatic sign...but that's pretty much what the tints and shade sign is.
This photo is simply here for you to admire this face.
The question I get every time I share something I plan to hang in my room is this: HOW DO YOU GET IT TO STAY ON THE WALL?! Yes, the age old art teacherin' question. Here's my trick: Command Velcro Strips. Get the ones that hold up to 16 lbs. This sign is heavy...and those strips work. I've been using them on everything and I've not had anything fall yet.
I am so enjoying redoing my art room. Having been in the same space for so many years, I just felt like it needed a fresh look. And it's making me happy and excited to work on it. The kids have fun coming in and noticing something new and different. Stay tuned for a BIG reveal on Friday...I'm so stoked about that one!
This will hang in my art room near my tints and shade sign. I'll have to share a photo when it's up!
If you've been hanging around this here blog for a bit, then you know I've been hosting a weekly craft night right here with the focus being on felting. In order to lead the craft nights the best that I can, I've been pushing myself to explore the one area of felting that I'm not super comfortable with: wet felting. Y'all know I'm all about the needle felting...but this wet felting stuff is a bit of a learning curve. So far, I've wet felted a beaded necklace, a clutch and now this matroyshka doll. Here's how:
One thing that you have to commit yourself to when it comes to wet felting is that it is time consuming and requires patience. This is not something you can rush. The felting process takes time...in fact, it took me probably 45 minutes to an hour from start to finish to complete the wet felting process. After drying out over night, I was able to start needle felting.
This also proved to be pretty time consuming...but I do love needle felting. That being said, I had originally planned to make another doll to fit inside this one...but I don't know if I'm ready to make that kind of time commitment!
Like I said in the video, when I started needle felting, I didn't go into it with much of a plan. I really wanted to focus on the patterns on the clothing: dots, stripes, flowers.
The beauty of needle felting is that it really helped to form, shape and stabilize the doll. I was concerned that when I removed the wooden form, the entire doll would collapse but it remained relatively solid...but the needle felting really proved to make it solid.
Now, getting the diameter of the opening of both the top and bottom of the doll did prove to be a little tricky. To make them the same, I did have to do a lot of needle felting around the rim of both to get them to be the same width.
Creating the flowers and patterns was really my favorite part.
I thought the doll should be wearing an apron which is why there is a blue tie in the back.
After felting the doll, I realized that I could felt around any number of objects floating around...so when I spotted Easer eggs at the grocery, I decided to give them a go! I know y'all probably have a ton around your house too. This is a much quicker wet felting project then the doll, that's for sure. Here's a quick video on how I did it:
I've got a lot of felting videos currently up on my YouTube channel that you might want to check out. I've also been posting one minute felting videos on my Instagram if you are interested.
I totally had intentions of needle felting the other egg as well...but that went out the window with the second matroyshka doll. On to the next best thing!
Looking forward to seeing you all this Wednesday at 8pm CST for our next craft night right here!
Hey, y'all! I'm taking a break from tonight's usual Facebook LIVEsession as the husband has requested a night out. Which will probably involve dining at the fine Southern establishment known as Cracker Barrel (who can deny those biscuits, I ask you, WHO?!) which I ain't above passing up. But I'll be back next Wednesday, 8 pm CST to chat about all things First Year Art Teacher-y! You can still catch our past couple of LIVE chats here. This week, I thought I'd chat about how to do something you'd think is basic but is actually pretty stinkin' tough: speaking your mind. It's one thing to do it...and it's another thing to speak your mind in such a way that folks are open enough to listen. Even if your opinion isn't a popular one. Here are my suggestions: * You can say anything, ANY-STINKIN'-THANG, if you just choose your words wisely. It's funny, I'm super duper non-confrontational but have noticed of late that if I don't speak my mind (nicely) and stand up for myself (calmly) no one else will. It's time to wo-man up and say what needs to be said...in a way that will be listened to. * Speak with your end goal in mind. This is directly from my extremely wise husband. Do you want your end goal to be that folks pause, listen to what you have to say and give it some thought? Of course you do! So don't offend them with your words. Use words that will get you to your end goal: a conversation. * Say it with flowers. Does anyone else remember that old ad? I'm not saying send folks flowers, I'm just saying use words that are pretty and smell good not ones that stink and are offensive. Put yourself on the receiving end. Is that a bouquet of words you'd wanna hear? * Start with "I feel..." No one can argue with your feelings. Unless you are irrational and crazy. In which case they will just say, "well, she is irrational and crazy, so it would make sense she feels that way..." Be honest without don't be a drama queen. * Don't yuck someone's yum. This is a direct quote from my buddy Patty Palmer. I love it so. Say what you need to say but don't yuck someone's yum while doing so. Sigh. If only doing such was this easy, right? Practice makes us better, y'all. I find that being honest with your feelings and open enough to listen to other side of any conversation is the very best way to go. Love y'all!
In last week's Art Teacherin' 101 blog post, I shared with y'all my concerns about teaching peace, love and kindness this coming school year. I feel there is a great need to bring this teaching into our art rooms (and all classrooms, for that matter!) and build it into our curriculum. But how? It's not a "standard". We don't have an "I Can" for that. It's not required of us...and I don't recall learning how to teach kindness (like, whut?!) in college. We cannot expect children to just KNOW how to be kind. We don't expect them to KNOW how to hold a pencil, cut a piece of paper and not spread glue all over their hand and lick it off (ahem). We teach them these things. So, in that respect, we can't expect them to know how to treat each other with peace, love and kindness. We DEFINITELY can't expect that of them when our collective actions, displayed on every news outlet, shows we don't know how to treat each other either!
So, for that reason, I'm on a mini-campaign to bring peace, love and kindness into my art room this year. I do hope you'll join me...and share your thoughts, books and lessons in the comments below. United is how we are going to accomplish this goal. And we are doing it for the best reason possible: our students and their future.
My apologies for getting a little long winded here. And emotional. I was trying to keep it together!
I've been scratching my head and wracking my brain to come up with ideas. One way I thought we could kick off this campaign for kindness is with a little something I'm calling the #calendarofkindness and #peacefulheART. I do hope you (and your students) will feel free to join on your preferred social media. I know even my school district is already on board! I'll be posting in Facebook, Instagram and Twitter and using those hashtags. I can't wait to see what you share!
I've also created a long list of books that I cherish and share in my art room below along with projects that I've found to be successful. Please feel free to add your two cents in the comments so that we have a growing list of books, resources and projects for peace.
Many of my art teacherin' buddies shared their fave books with me so I'll make sure to add them here. However, I only felt comfortable speaking about the books I've actually read and used in my art room. Love the What Do You Do with an Idea...what a great book to start the art year with! Also, The Hundred Dresses is a short chapter book. I like to read it aloud to my 3rd and 4th grade students while they work. It's a book that teaches about kindness...and makes me cry every time. As does The Giving Tree. Anything Shel Silverstein has written speaks to my students, they love him!
I love these books that celebrate our differences while explaining how we are also the same. The Colors of Us is read to my students every year before we learn to mix our flesh color for self-portraits.
My copy of The Big Orange Splot is so worn out, I've read it to my students to much. It's another book that points out our differences and explains how that is what makes us unique. It also does an excellent job of teaching how we should celebrate the differences of others. Remember: when we teach children to first love themselves, they will be able to love one another.
So anything Todd Parr writes is awesome. And happy. And colorful.
Have y'all read this? It's fan-freakin'-tastic. Get it in your library stat.
Also check out Linda Kranz's other book You Be You...it's excellent as well.
Now, let's talk projects. Here are a handful that I've done with my students to cultivate a culture of kindness. The Gallery of Gratitude was a huge hit.
Each employee of our school was drawn and written about. They cherished these images and words and have them on display in their offices and classrooms!
This hangs proudly right outside the art room door. From floor to ceiling. It really is OKAY! Different is grand.
The Village of Kindness was a successful collaborative project that used recycled materials. I loved how happy, colorful and sweet this display was for our art show last year.
Each house had a door that, when opened, shared a kind message.
This school-wide collaborative now hangs proudly in our school office. It was created by all students to show that we have heart!
This love-based mural was so easy that it was my sub plan! I've created a video to teach this lesson. Feel free to use it in your art room!
Here's an oldie but goodie that we created a couple of years ago, a We Are the World mural! It was a fun and impactful way to kick off the school year.
Of course, The Dot is a great way to start the year as well. It also promotes self-love and how that love can transmit to others. Here is a list of fun Dot Day art projects.
Art can also help those right in your own backyard. We did just that with out Houses to Help project!
Here's a list of some other projects that promote kindness:


