Showing posts with label nashville. Show all posts

Monday, April 15, 2013

DIY: More Dip Dying and High/Low Hemline

There's something you should know about me: I'm a fads-hater. I ain't proud. But there are current trends that make me wanna punch a pillow (kinda wimpy, I know, but I've got soft delicate hands and punching hurts!). Case in point:
  • Skinny Jeans on Dudes. Seriously? I don't know what it's like to be a dude but I can only guess that those are...uncomfortable. They make me uncomfortable. Shoot, I actually can't even wear those because the moment I get my leg half way in, I start to experience calf-claustrophobia. Every time I've tried on a pair, I have a near panic attack and can't get outta 'em fast enough.
  • Yoga Pants as Pants. Ladies, for reals? Ya'll act like it's so terrible when our Walmart friends show up shopping in their sweats and slippers. To me yoga pants is just the yuppie version of the same thing. You just worked out? Awesome. Now go change your clothes.
  • The High/Low Hemline. Didn't we do a varied length hemline like 5 years ago? So this one is now high in the front/short in the back? Yippie, I can flash my spider veins and ghastly white thighs for all the world to see...
World, you're welcome.

So, um, yeah, not only am I a fads hater but I'm also a big fat hypocrite. But I promise I didn't recreate this hemline simply because it's "in". I kinda had to alter it somehow or this dip-dyed DIY would have me lookin' like a wannabe hippie. And I gave up that look in high school.

But I'm getting ahead of myself. Let's do the back-track boogie and start at the beginning...
 So a couple of weekends ago, when I was on my dip-dying bender, I decided to dye this 1990's Express rayon number that's been hiding in my closet since high school. Because I'm an idiot, I forgot to snap a photo of the dress before...but the one on the left is very similar in pattern, color and style. And, of course, a DIY of mine wouldn't be complete without a little Antho-spiration.

I began by actually reading the directions a little bit more carefully. Turns out you are to completely dissolve the dye in a small amount of hot water before adding it to the warm water dye bath (I used warm water because I was afraid hot would shrink the rayon). Not dissolving the dye completely and simply adding the powder to the dye bath is the reason I had a couple of dark dye dots on my shirt. Live and learn.
Or not. This is my version of a measured portion of non-iodonized salt. For more dying directions, you can see my first attempts here.

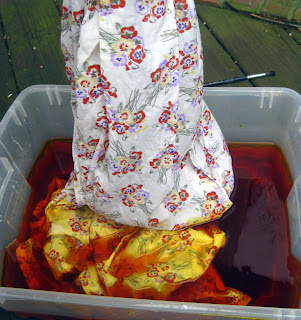
Originally, I had wanted only the bottom of the dress to be dyed. So, like last week, I double bagged the top of the dress and proceeded to slowly sink the dress into the yellow dye bath on on the left. I let it soak up to the waistline for about 5 minutes. Then I pulled the dress out about 5" and left the rest of it to soak in the yellow dye for 20 minutes. This helped achieve the gradation to yellow I was going for.

After pulling that out of the dye bath and doing the running-under-water-until-clear thing, I prepped a fuschia dye bath. I eased the now-yellow dress into that bath (see right photo) following the same routine: about 5 minutes of a soak to create a gradation and the bottom for 20 minutes.

And then I pulled a typical Cassie: I touched the top of the clean white dress with drippy fuschia dye fingers. So much for that double bagging. Knowing I'd never be able to wash out those drips, I proceeded to dye the top of the dress in the fuschia dye bath.

And, viola! One hippy-dippy-dyed dress. Now all I need are some Birkenstocks, some dreads and a couple showerless days and I'll be all set!
And that's when I decided that an altered hemline would update this dress a pinch. I figured I'd already taken this dress beyond the point of no return, why not hack into it and see what more damage I can do? Creating this high/low hemline is quite possibly the easiest thing in the world. Decide just how high you'd like the dress to go and mark the dress. Using a curved line reminiscent of an elementary school slide, stop just beyond the midpoint of the hem. Iron a 1/4" hem and stitch.
And done. One style I exclaimed not three days ago that I'd never EVER wear now happily resides in my closet between my skinny jeans and yoga pants.
Warning: High/Low hemlines are not for windy days and grannie panties. Just sayin'.
Outfit details: dress: Express; shoes: Lucky Brand; bow belt: made by me, DIY here
As I was dying this dress and the one from last week, I realized one was made up of the cold colors while this was warm. I thought for sure they'd make great teaching outfits when teaching color theory...but I've since changed my mind on this little number. It's going to have to be a fun summer frock or beach coverup. I'm stamping this one "Not Approved for the Artroom". See, I kinda know what professional attire looks like. Fishnets, yes; high/low, no. 

Until next time!


Read more »

Tuesday, January 22, 2013

What the Art Teacher Wore #51

Monday with the Moms: Okay, I'm just going to brag and say I have the best moms at my school. A couple of them have been working with the kids to create a ceramic piece for a fundraiser. If you don't have mom helpers, I strongly encourage you to send out an email and just ask. You won't believe the response you'll receive! sweater and skirt: someone PLEASE make me step away from the Anthropologie sale rack, it is so awesome right now!; tights: Target; belt: made by me for the Gnome Dress; shoes: Miss Albright, Anthro
 Hiya, dudes. Sorry for the slightly delayed "What I Wore this Week" as I know you were just dying to see what duds I donned. But I have a good excuse:  My mom was in town from Indiana! We didn't have the chance to see each other over the holidays and so there was much gift-giving, chitty-chattering and face-timing with lil Bro and his girlfriend to do. Not to mention the serious retail therapy and dining out we indulged in. When we weren't together, I did manage to finish a DIY that nearly was the end of me (pretty sure I say that about every DIY). Spoiler: it involves 17 yards of tulle. A tool working with tulle? Never a good idea.

Along with my weekly wears, check out these rad photos hubs managed to get with his Christmas present. I got him a deer camera and he mounted it in the woods near our house. He's not a hunter but a big time animal lover and thoroughly enjoys seeing these animals in their element. I think I like these furry neighbors of ours way better than the human ones. 

I do hope you enjoy. Stay tuned for this week's DIY and possibly a finished art project by the lil artists. Until then, have a wonderful week!
Hubs had his camera on the motion sensor to capture these shots. This weekend he switched it so that the camera will start recording 30 second snippets of video. I can't wait to see what it captures.
Too Warm for Snow Tuesday: You already heard me whining about my lack of a Snow Day here. With the 50 degree temps we experienced this weekend, I have this sneaky suspicion we aren't going to score a free day this year. Such sadness. dress: Max and Cleo, TJMaxx; fur collar: gift from a friend; tights: Target; leg warmers: Germany; boots: Anthro
You might notice in some of these photos that the bucks are missing an antler. This is the time of year that the deer begin to lose their antlers. They grow them again in the spring. Hubs has found at least three deer antler on his walks in our neighborhood woods. We've got a couple on our mantle and one on our deck for the squirrels. Apparently they are a fan of the marrow.
Giant Bun Wednesday: I actually had  a student inquire what was inside my hair that "makes it so big." I told him donuts. And I have a kindergartener convinced that it's what I eat that causes my legs to "change colors". When I wore my purple tights, I told her I had eaten too many grapes and the white tights made my legs white from too much milk. This time when she asked what I'd been eating, I asked her what she thought. "Cotton candy and ketchup." Like, ew. dress, sweater, sweater clip: vintage; shoes: thrifted; red fishnets and turquoise tights: Target: bow belt: Pinkyotto
Can you count how many deer are in this photo? The camera isn't supposed to make a sound but it must do something. In many of the photos the deer are looking right at the camera. I love the thick coat of fur on this guy.
Big Ole Skirt Thursday: The only prob with wearing a crinoline under your skirt is that you are constantly knocking things off tables! I must have sent a dozen works of art flying off tables and to the floor with just a stroll through the art room. sweater and tights: Target, old; shirt and necklace: gift; skirt: made by me, tutorial here; belt: Pin Up Girl; shoes: Softt
While the deer cam was snapping away photos of animals in the wild, I managed to get a photo of this 18 lbs. beast with my cat cam. We found out this week that not only does she resemble Garfield in her girth and tabbiness but also her affinity for lasagna. P.S. If you come to my house for leftover lasagna, don't mind the cat hair.
Floral Legs Friday: Sometimes I don't even know what I was thinking when I put together an outfit. Take this fine specimen for example. Flowers? Plaid? I should thrown in some polka dots and called it a day. What in the world...? blouse, brooch and skirt: vintage; sweater: thrifted; tights: Urban Outfitters; shoes: Anthro
Hands down my fave deer camera photo so far, this image of Grizzly Adams. Or is that Chuck Norris? Sasquatch, perhaps? The world may never know...


Read more »

Wednesday, January 9, 2013

In the Art Room: Wait, Where Were We Again?

We were collage landscaping: My fantastic fourth grade students completed these landscapes just before winter break which was a kind of miracle. Thus far, this project involved painting the sky, oil pastel texturing paper for land and collaging. But the real excitement of constructing toilet paper tube castles began this week. I can honestly say I've never seen kids have more fun with ole tp tubes. You can see our inspiration here.
 Have you ever had one of those deep sleeps that when you wake up, you've no idea who/what/when/where you are? Kinda like that time during spring break when you took that trip down to that place and drank too much of that one stuff and you hung out with someone whose name you can't remember and you might have done somethings that probably aren't legal in most states...or maybe that's just me.

 Regardless, that's how going back to school this past week has been. No matter how organized I left my classroom (granted, my idea of organization being that stuff is stuffed into random cabinets and...shooooved...clooooosed...there! Whew!) I still come back in a fog. Thankfully, I snapped these photos right before we left so I'd remember what we'd been up to. And so I could share them with you. See how nice I am? 

If you are a teacher, I hope your return trip back this week has been a good one. If you aren't a teacher, say a little prayer for the rest of us, would you? Particularly that the kiddos don't open any of my cabinets and become buried underneath all of my "hey! I've been looking for that!"
We were surprising our art teacher: With their awesomeness. Seriously. I am so impressed by my students. I love their landscapes and cannot wait to see the end result. I'll be certain to share it with you.
We were cardboard printing: Ack! Would some responsible art teacher get this second grade kid an apron!? These prints were made with gold paint (sadly the metallic doesn't photograph well) and will be used as the background for our cuckoo clocks. You might have heard me mention those here and here.
We were printing patterns: You might notice that I tri-folded the construction paper. As they were printing, the kids were instructed to create one pattern in a column and then repeat that in the other two columns. Then, boom, you got a pattern. These folded lines really helped them keep their patterns in place and not just stamp randomly all over the paper. Although there was some of that.
We were cuckoo clocking: So the printed background will be the wall for us to hang our cuckoo clocks on. This project has been so much fun since we've learned how to write in Roman numeral and create a clock. Do you see the brown paper underneath? That is our wooden clock crafted from textured brown paper that we cut and wove. 
We were munching: We might have had some quasi German treats as our intro to all things Deutscheland-ish. The kids were required to say, "Brezel und gummibarchen, bitte. Danke!" Don't worry, I had some gluten free pretzels and the like for my friends with allergies. I'd hate to see them miss out. 
We were collaging: The first grade has been creating the Black Forest as a home for their gnome. We just started crafting our gnomes this week and they couldn't be more excited. In fact, I wore my gnome dress today because it was requested by one of my classes. So cute!
And some of us were seriously collaging trees: I mean, wow. First grade? Dude. Luckily she finished the other two off this week.
We were (and still are) asking about Jes: Silly guy is lost in the mail. He'll make it to his next destination. In the meantime, a concerned second grader created this Lost Jes poster with a pretty handsome reward.
 I'll share with you the complete lessons and the end result when(ever!) we get 'em done.

Chat soon!


Read more »

Tuesday, June 12, 2012

DIY: Ode to Nashville, Tennessee

Greetings, outta-towners and in-towners alike!
You may recall a couple of weeks ago I showed you around my Tennessee-themed home. In that post I mentioned wanting to create another Tennessee-inspired painting. Well, here 'tis! All 2' X 5' of it. I'm all about the Go-Big-or-Go-Home, can you tell?
The original postcard that inspired the painting.
Interested in creating your own city/state souvenir postcard? Well, it's actually pretty simple. You'll just need the following: 
  • Canvas, any size 
  • Enlarged copies of the postcard lettering if you are not comfortable drawing your own
  • Acrylic paint, brushes
  •  State/city maps (I picked mine up for free at AAA)
  • Chisel-tipped sharpie and black brush pen
  • Tissue paper and stick pins
  • Modge Podge
DIY Disclaimer: I am prone to take the more-difficult-and-frustrating road when crafting. Don't ask me why. For your sanity, I've also included an easier version of the same directions which you will find under the heading "Or you could just...".
Eye-ballin' it. Not something I recommend as it wears out the eraser and the patience.
I began with a sketch. I started with a line that all of the letters would rest on and then created a parallel line 8" above that. Lightly, I drew in the letters giving each one about a 3-5" width. 

Or you could just...enlarge copies of the postcard. Enlarge each letter, cut it out and play around with the positioning on your canvas. Once you've got it where you want it, tape them down and trace around the letters with pencil.
The color in this photo is slightly off, as it's much more a mustard-yellow, not a poop-yellow.
From there, I mixed up a giant batch of the background color. Always mix up more paint that you think you'll need. Why? Because it is impossible to mix the exact color twice. You may think you can and then you put brush to canvas and realize Homer-Simpson-slap-to-the-head-"duh!" style that you needed more white/yellow/black/wine. Trust me. Keep paint covered in Saran Wrap until the very end of your project as you never know when you might need to touch up a spot (this I did not do and you'll see why I wish I had shortly).

Or you could just...take the easy no-paint-mixing road and just buy the color of paint for the background. In that case, buy two tubes.
Tissue paper tracing.
To insure that my map letters were going to fit my canvas, I created letter patterns using tissue paper.

Or you could just...remember those letters you so cleverly xerox copied? Those will be your letter patterns.
Creating the map letters.
With my letter patterns pinned onto my map, I cut out each letter for my sign. If you are using your original xerox copies, you could do the same.
Ta-dah!

Making the letters three dimensional.
With the letters cut out, I began the background painting. Before putting paint to canvas, I used a pencil and lightly sketched in where I wanted the drop shadow to be. This shadow helped the letters really pop out and gave them a three dimensional quality. Again, mix up way more paint than you'd ever thought imaginable and dive in.

Once the drop shadow was complete, I began Modge-Podging the letters into place. Using the matte Modge Podge, I covered the area of the canvas where the letter would go, placed the letter on top and then added another layer of 'podge on top of that. Once dry, I began using the chisel-tipped Sharpie to create a black shadow on the right side of the letters. You can see this best in the photo below
Guess who can't spell Tennessee? Although, I do believe Teene-see would be a pretty cute name, don't you?
Now, when it came to adding the other written text, lemme just say I thought I was so clever. I wrote out the text on tissue paper and then traced it with a Sharpie. The thought being that the Sharpie would bleed through just enough for me to trace them with my brush pen. Sounds great, right?
Sure it woulda been had I been able to spell correctly. My horrendous spellin' ways always take me back to that Frightening Fifth Grade Spelling Bee where I spelled...wait for it..."morning" incorrectly. That's right, I thought it should be "mourning" as in "We are all mourning the dreadful spelling of this poor dimwitted girl." 

Thankfully, this spelling error was corrected with a little bit of acetone (that'd be nail polish) and a q-tip. I managed to wipe off my boo-boo just enough...as well as remove a wee bit of paint. Remember how I told you to save your paint? Yeah, this would have come in real handy if I had. Der.
Nash, Tenn., yo.

Just a closeup of my Sharpie-outlining skillz. There is no way I'm ever going back to painting hard edges with a brush. No. Way.

My vintage record player has the best acoustics. I decided to sample my latest thrifted records during a painting lull.

Finished sign now hangs out in my kitchen.
So you can handle this, right? Just follow my much easier or you could just... and you'll be well on your way to your very own souvenir sign!

Or you could just...take a nap. That's my plan anyway. 

Thanks for stopping by!
Read more »