Showing posts with label second grade. Show all posts

Wednesday, February 1, 2017

In the Art Room: A Rainbow Book!

Don't forget about tonight's MAKE AND TAKE! Supply list and details here. See you at 8pm CST right here!

Hey, y'all! Recently I hosted a PD at my school that was taught by a couple of my favorite art teacherin buddies, Debbie Flynt and Kim Shamblin. They shared with us how to do many paper treatment techniques (more to come!) and create unique books. One of the books they showed us to make was this pop out one. As soon as I discovered that the book had six pages, I realized I could create a rainbow book. Perfect for reteaching my second graders the order of the colors in the rainbow!

I think they are gonna love this one! Here's the how-to video I'll be sharing with them next week. Feel free to use this lesson and video in your Land of Art Teacherin'. 
Because I see my second graders for 30 minutes twice a week, I'll probably break the lesson down like this:

Day 1: Book covers. Decorate cover if time allows.
Day 2: Folding papers. Use peer tutoring to help those kiddos who initially struggle with the fold. Store in envelopes marked with the kid's names.
Day 3: Gluing papers into the book in Roy G. Biv order.
Day 4: Finish books! 
The magic of a pop up book is aways exciting. We are going to look at pop up books and learn about book making as well. Early finishers will be introduced to other pop up techniques.
Dunno about your kids, but mine are OBSESSED with rainbow order. Their weavings were full of them!
Have so much fun!
 photo signature_zpsd10b3273.png
Read more »

Saturday, January 21, 2017

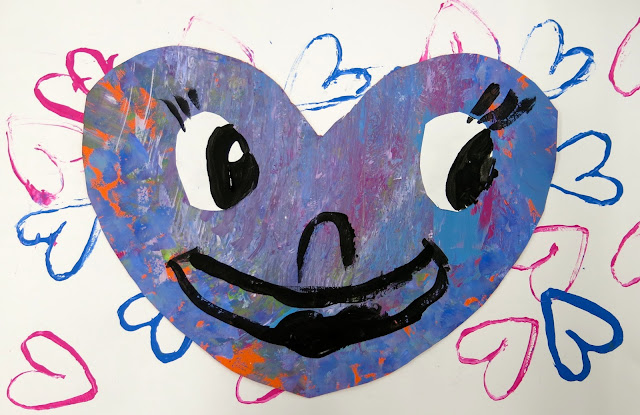
In the Art Room: Happy Hearts Inspired by Chris Uphues

Hey, friends! Second grade-land has just finished off a fun project with a strong focus on LOVE. My theme this year has been kindness and with Valentine's Day right around the corner, I really wanted to focus on all things love-y. Because, let's face it, the world could use a whole lot more love right now! 
And if these happy hearts don't help spread the love, I don't know what will! 

Another focus this year has been to introduce my students to more contemporary artists and also street artists. During my search, I discovered the artist Chris Uphues and completely fell in love (sorry, I had to) with his work, especially his happy hearts! 
If you aren't familiar, Chris is an artist based out of Chicago whose heart murals can be found there as well as in New York and Los Angeles. When I discovered his work, I was immediately struck by how happy it made me! I knew the colors, energy and joy in his work would really resonate with my students. Y'all should really check out his website...I love that his hearts can be purchased in the form of reasonably priced prints, patches and pins. I've got a cart full! 
I would totally cover a wall in my house in these! I mean, who wouldn't?! 
For the Happy Hearts pieces that my second graders created, we used the following:

Day 1:
* Black and white paper, 12" X 18"
* Tag board heart stampers
* Paint in yellow, magenta and turquoise

Day 2-3: 
* Painted papers, construction paper, scrap papers for hearts
* White paper for eyes
* Black paint
* Scissors and glue
Day 1:

I see my second grade kiddos for 30 minutes, twice a week. On our first day together, we chatted about Chris and his work. I introduced the kids to printing and we printed a black paper and a white paper full of hearts. To see how the heart stampers were created, watch the first 5 minutes of this video
On day 2, students learned how to cut out hearts. Many students knew how to do this already...but I had several that didn't. This was a great introduction to symmetry! I also offered them oval, circle and other shaped templates for the eyes. Once those were glued down, black paint was available for the artists to paint the faces. I had printed off several sheets of Chris' hearts to give the kids ideas for expressions. 
By the end of the second day, we had a ton of these! I love how happy and fun they are. 
Over the next couple art classes, the kids created more hearts and began adding them to the printed backgrounds. They so enjoyed creating these expressive heart faced characters. This project was a huge hit with them! 
Each kid was super engaged in creating their heart collages. When I told them that we'd be moving on to another project next week, each class shouted "WHY?!" They couldn't stop making these hearts! I just might have to give them one more day to keep on heartin'. 
As they worked, the kids had stories about each heart and how they interacted with each other. We had heart moms, dads, babies, grandparents, you name it! 
As they worked, the kids laughed at their hearts, showed them off to friends and pulled ideas from one another. 
Before gluing, we did chat about composition, overlapping, emphasis and scale. I wanted to remind the kids of these thoughts as they worked...but made sure not to weigh in too much as I really wanted to see where their ideas would take them. 
 Because, I mean...look at how fun and funny they are!
I'm so looking forward to showcasing these throughout our school along with all of our other LOVE-based projects. Just a quick scroll through this blog and you'll find half a dozen love-based projects we are currently working on in the art room. 
The best part is, I've tagged Chris Uphues on several posts showcasing the kids' hearts on my Instagram and he's been so sweet to respond! The kids have loved hearing his positive feedback. 
It's made us feel all...happy! Like this. 
 
If you are looking for a fun lesson for your students that introduces printing, symmetry, expression, collage and the amazing contemporary artist Chris Uphues, I strongly recommend this fun lesson! Love to hear from you if you give it a go!
 photo signature_zpsd10b3273.png
Read more »

Tuesday, August 23, 2016

In the Art Room: Texture Relief with Second Grade

Well, now that our Monochromatic Selifes are finished and we are impatiently waiting for that art teacher to hang them up (can I contract out for that? I'm buried under cute and colorful self-portraits!), it's time for us all to move on to our next masterpiece: Texture Relief Dots for Dot Day! 
 Each of my grade levels, kindergarten thru fourth grade, we are creating a dot-based work of art inspired by Peter H. Reynold's The Dot. We're doing all new Dot Day projects this year...if you like to check out all the Dot projects we've done over the years, check here.
This year, for second grade, I decided to give one of my most popular blog posts a reboot and focus on texture.
Filming my lessons over the weekend means I have a shorter weekend...but a much smoother week. I am loving this new method. I actually feel like the kids are learning so much more as I don't forget valuable vocabulary and information. I just hope I have the stamina to keep it up! I also enjoy sharing them with you. Please feel free to use in your art rooms.
 For this project, we used the following:

* 8" Cardboard Circles purchased from Amazon
* 3M Spray Adhesive
* $1 a can matte spray paint from Home Depot. Be sure and get the cheap stuff, it rubs off the best.
* The finest of steel wool, 000 
* Textured items like leaves, burlap, twine, lace, etc.
* Aluminum foil. I found boxes of sheets of foil that worked really well because it was the perfect size. It is then and may tear so tell the kids to be careful.
Before the kids arrived, I sprayed each of their circles with the adhesive. This way, they were ready to start applying their textured items. When finished, they brought them to me. I sprayed again, added the foil and sent them to their seat to rub the foil and reveal the texture.
Once it was rubbed, the kids trimmed off the excess and folded it underneath. That took up all of our 30 minutes of art class.
 I took all of the circles outside today and spray painted them black. 
The kids watched the bit of video about burnishing. We definitely did have some small holes and tears happen. A thicker foil might have helped but it would have given us a less detailed texture design. 
 I mean...
 How cool is that? After the burnishing was complete and our hands were washed, we chatted some more about texture and the difference between real and implied. This was such a fun and quick lesson that gave us beautiful results.
I really like how they look on their messy mats, we just might have to frame them out that way!
I'm interested to know what other textures y'all might recommend we use in the future. I'd love to add more to this fun project!

 photo signature_zpsd10b3273.png
Read more »