I have been oversharing this lesson so much on my Instagram because I LOVE IT! My second graders learned so much in the making of these kindness prints: how to create a printing plate, make marker prints, pull ink prints, burnish their printing plate with spray paint, steel wool and aluminum, use Model Magic to mix colors and create a heart and...last but not least, pick a word of kindness that best resonates with them. DID I MENTION THAT THIS LESSON PACKED A PUNCH?! Holy cats! But, y'all. I'm in LOVE.
So, how did we create these masterpieces? I created a video to share the process. I thought I'd break it down class-by-class what we worked on. Keep in mind that I have 30 minute art classes with my 2nd graders...so I'll be breaking down my lesson in baby bites for those of you that have hour long classes. Just combine my two days and you'll know what you can accomplish in one class of an hour.
Day One: Chatted about Robert Indiana, looked at his LOVE sculpture. From there, we switched gears and began drawing the designs on our printing plate. First with one color ink pin and then a different color to insure that we made the lines deep enough. Day Two: Continued tracing and then started coloring our designs with water soluble markers. Early finishers pulled the first of the marker prints.
Day Three (week two): We spent the class pulling marker prints. Once you print one, you simply recolor and print another!
Day Four: EVERY ONE'S FAVORITE: INK PRINTING! These kids loved ink printing...and pulled a million amazing prints. The key is having a tray that is rectangular (so the kids only roll up and down; I'm using the lid from my tempera cakes) and using ink. Sorry, no skimping here, paint just won't cut it.
Every two kiddos shared an ink tray and a brayer. I used the same ink and brayer for two classes, back to back. No issues with the ink drying...prints pulled were still beautiful!
Day Five (week three): I've had the idea of the kids doing something with their printing plates for some time now...and I really thought they would be great embossed. Here's the key: the prep is a little on the heavy side. I laid all of the plates on a large sheet of paper, gave them a shot of 3M spray glue and covered them with inexpensive foil. Then I sprayed them all with the $1 a can matte black spray paint from Home Depot (this is the ONLY paint to use when doing this kind of project, it burnishes off the easiest!). Then the the kids burnished off the spray paint and they were amazed with the results. Some even wanted to add color:
While pretty, I would recommend skipping this step. It just about killed my Sharpies as the tip of the marker was ruined by the spray paint particles.
Day Six: We made Model Magic hearts! The kids could pick any two primary colors and white. They rolled them, twisted them until they got their desired color/design. Then they shaped them into hearts. They had to also decide upon their word of choice...so they would know where to place their heart. Their heart would act as the dot to the I or the O.
Day Seven: LAST DAY! We used strips of 4.5" X 1" pieces of paper to create our words. They were glued down. Then the kids picked a construction paper frame and decorated it with sparkle tape I found at the Dollar Tree! A long project? YES. Did they learn a lot of new styles, methods and techniques? YES-YES! I would definitely do this again...I can't wait to hang these in the hall!
After winter break, I always find myself in the mood to start Valentines-y/Warm-Fuzzy/Lovey-Dovey projects with the kids. When doing a little searching on my blog last night, I discovered that I've done 15 Valentine's-themed lessons over the years. I had no idea I'd done so many! I thought I'd share them with you today. May of the links back to the original post will include an instructional video. Please let me know if you do any of these lessons, I'd love to see what you and your kiddos create!
Robert Indiana Love Prints! Believe it or not, my sweet FIRST GRADERS created these a couple years ago! It was a great lesson for printmaking and definitely one I will be doing again. If you don't have printing ink, you might want to check out this blog post where I'll show you how to print with paper and markers!
James Rizzi Love Birds! Who doesn't love James Rizzi?! These birds are based on some of his work and is a great tie-in if you've already taught Rizzi and his fun cityscape works.
Recycled Hearts! Last year, I had a stock pile of messy-mats from our months of painting. We used them to make these two fun works of art (see below also) and they were such a hit! What a great way to review the warm colors, pattern and line.
So much sweetness!
Chris Uphues Hearts! If y'all don't know who Chris Uphues is, then you need to! He's one of my fave dudes to follow on Instagram. His artwork is so fun, so happy and so kid-friendly. They had a blast creating these happy hearts inspired by him.
J Goldcrown Hearts! If you need a quick one day project, I would recommend this one for sure! You can introduce your students to another street artist, J Goldcrown, and have them work in chalk! This is a great project for just about all levels.
Sculpture Hearts! Last year, I introduced my second graders to Celluclay with this project. I have 30 minute art classes with these kiddos so we had to hustle! We spent one day covering our foil hear in clay, two days painting and the last day stringing beads. These were one of my favorite projects for Valentine's day!
My Heart Has Wings! If you want to do a feel-good project with your faculty and staff, might I recommend this one? We did it on a PD day and it was so much fun. Of course, this would be a great project for kids as well.
Candy Heart Sculptures! My fourth graders created these candy hearts last year and they had a blast. We used plaster strips which created a super hard surface for the candy. We even made giant candy boxes to display them in!
Woven Hearts! Every year, first grade does a paper weaving and every year we do something a little new. Last year, they nailed the weaving part so well, I thought I'd introduce them to simple sewing. They did great and I loved hanging them up like a quilt.
Candy Heart Drawings! When my fourth grade early finishers were done with their candy heart sculptures, I had them move on to a drawing of their candy hearts with oil pastel.
Britto Mural! A few years ago, I had to be out for a couple of weeks for jury duty. While I was gone, I had my students work on the parts of this Britto-inspired mural. It was great because then there was a fun masterpiece to hang in the hall when I returned. You can check out the instructional videos in the link.
Valentine Animals! My kindergarten kiddos created these fun animals last year. I created an instructional video for each one which you can find by clicking on the link.
Collaborative Heart Mural! Collaborative pieces are a lot of fun this time of year. If you follow the link, you'll see which grades created what for this huge collaborative pieces that still hangs in our front office.
Peter Anton Box of Chocolates! This might have been a kid-favorite as it involved using EVERYONE'S favorite art supply: puffy paint! Check out how we made the faux candies and boxes by following the link. What are your favorite projects this time of year? Love to hear!
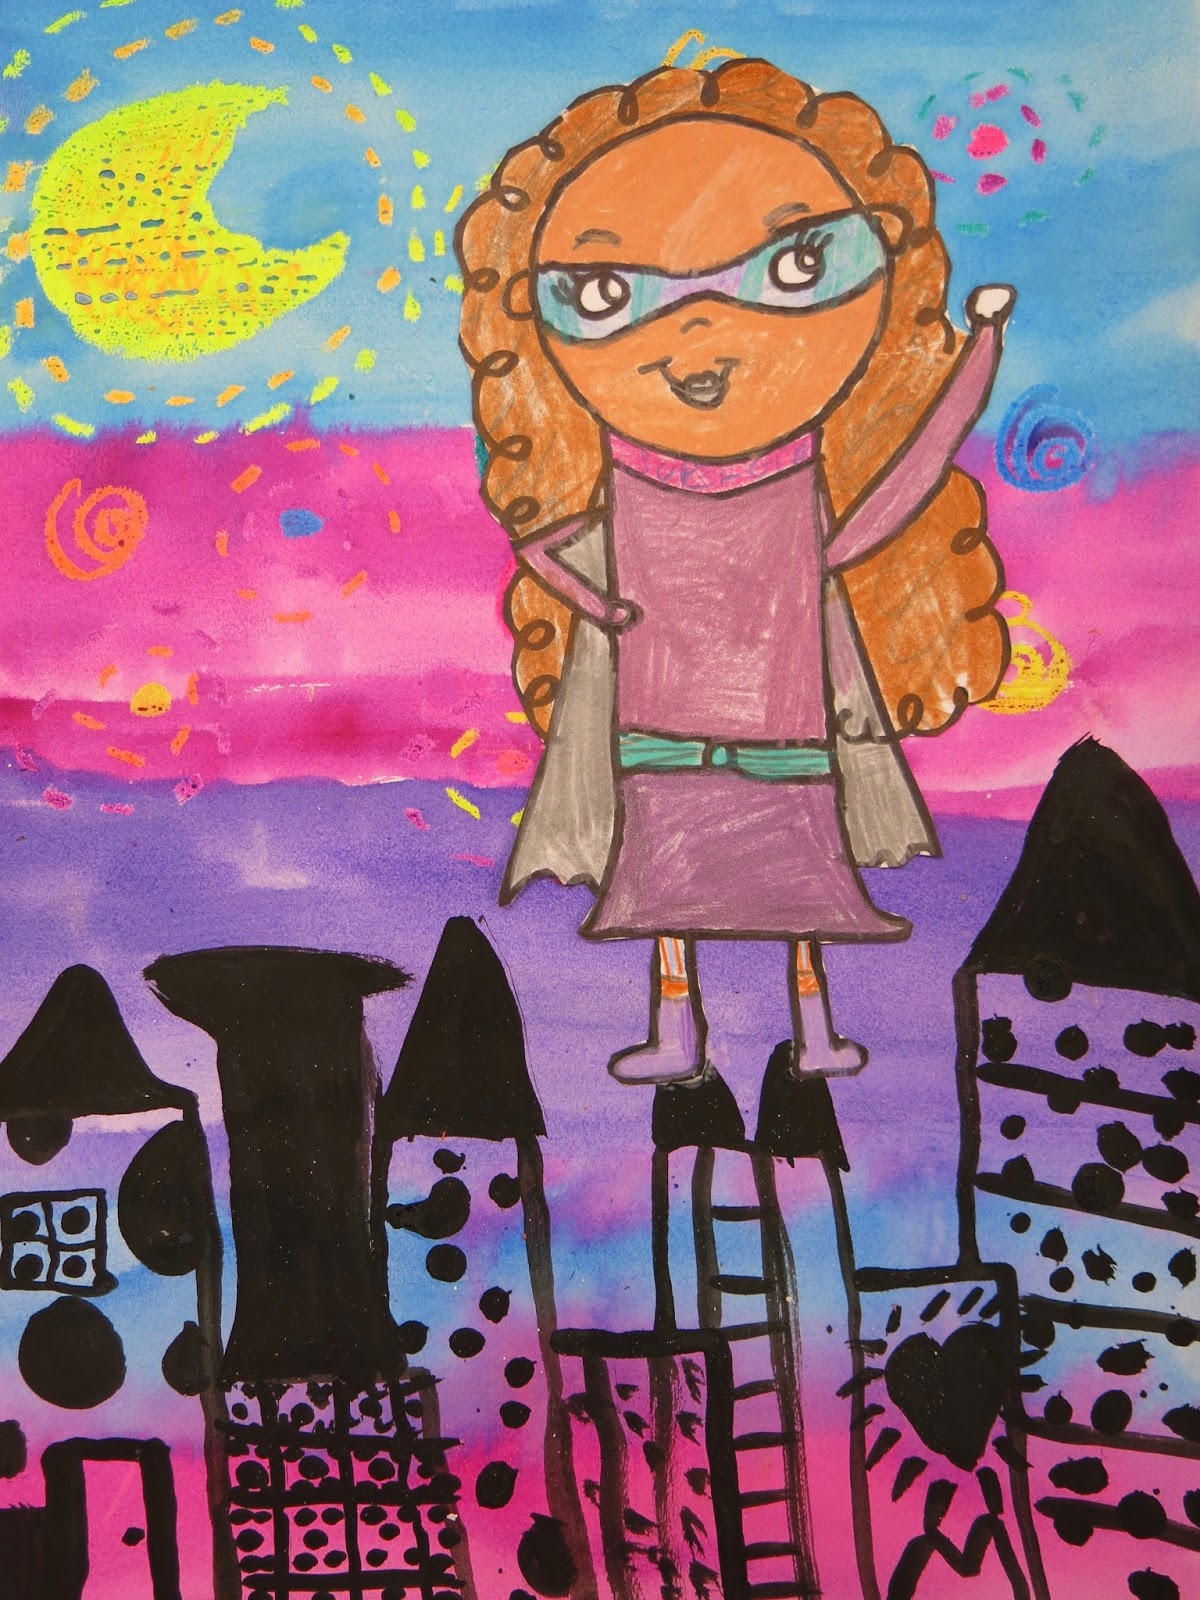
My second grade kiddos just finished up their Super Hero Selfies for their Artome art show! These 12" X 9" works of art were so much fun to make...and to see the finished result. I thought I'd share the process with y'all!
We began by chatting about Vincent van Gogh and looking at Starry Night. From there, we used our paper and my VERY favorite oil pastels (Sargent's florescent brand!) and created our skies. Because I have 30 minute art classes, that took one art class. The following art class, we added either all warm or all cool watercolor to our skies:
Y'all might have heard: I LOVE me some Crayola watercolor paint. I order the following and place them in each watercolor pan: magenta, red, red-orange, yellow, green, turquoise, blue-violet and violet. I place them in that order so the kiddos know what colors they can use as far as warm/cool colors go. The following day, I busted out the tiny brushes and India ink for some cityscape painting:
We started by painting simple rectangle shapes. Then we added shapes on top of those like triangles, rectangles and squares. From there, windows were added. They really rocked these!
Many of my students sketched their cities out on dry erase boards first. This really helped them get comfortable with their ideas before attacking their paper. It did mean that some kids took two 30 minute art classes to complete their cities...I was okay with that. I never mind the kids going slower if it means they do their best and are proud of their work.
Once the paintings were complete, we could start creating our Super Hero Selfie! The kids were given a circle template...simply so we didn't end up with tiny little folks. The template really helped them gauge size and get a jump start. I did a quick demo on how to create a body by using shapes like a rectangle for the torso. I showed them how to draw stick arms and legs and turn them into THICK arms and legs. Some of us are still pretty skinny tho, ha!
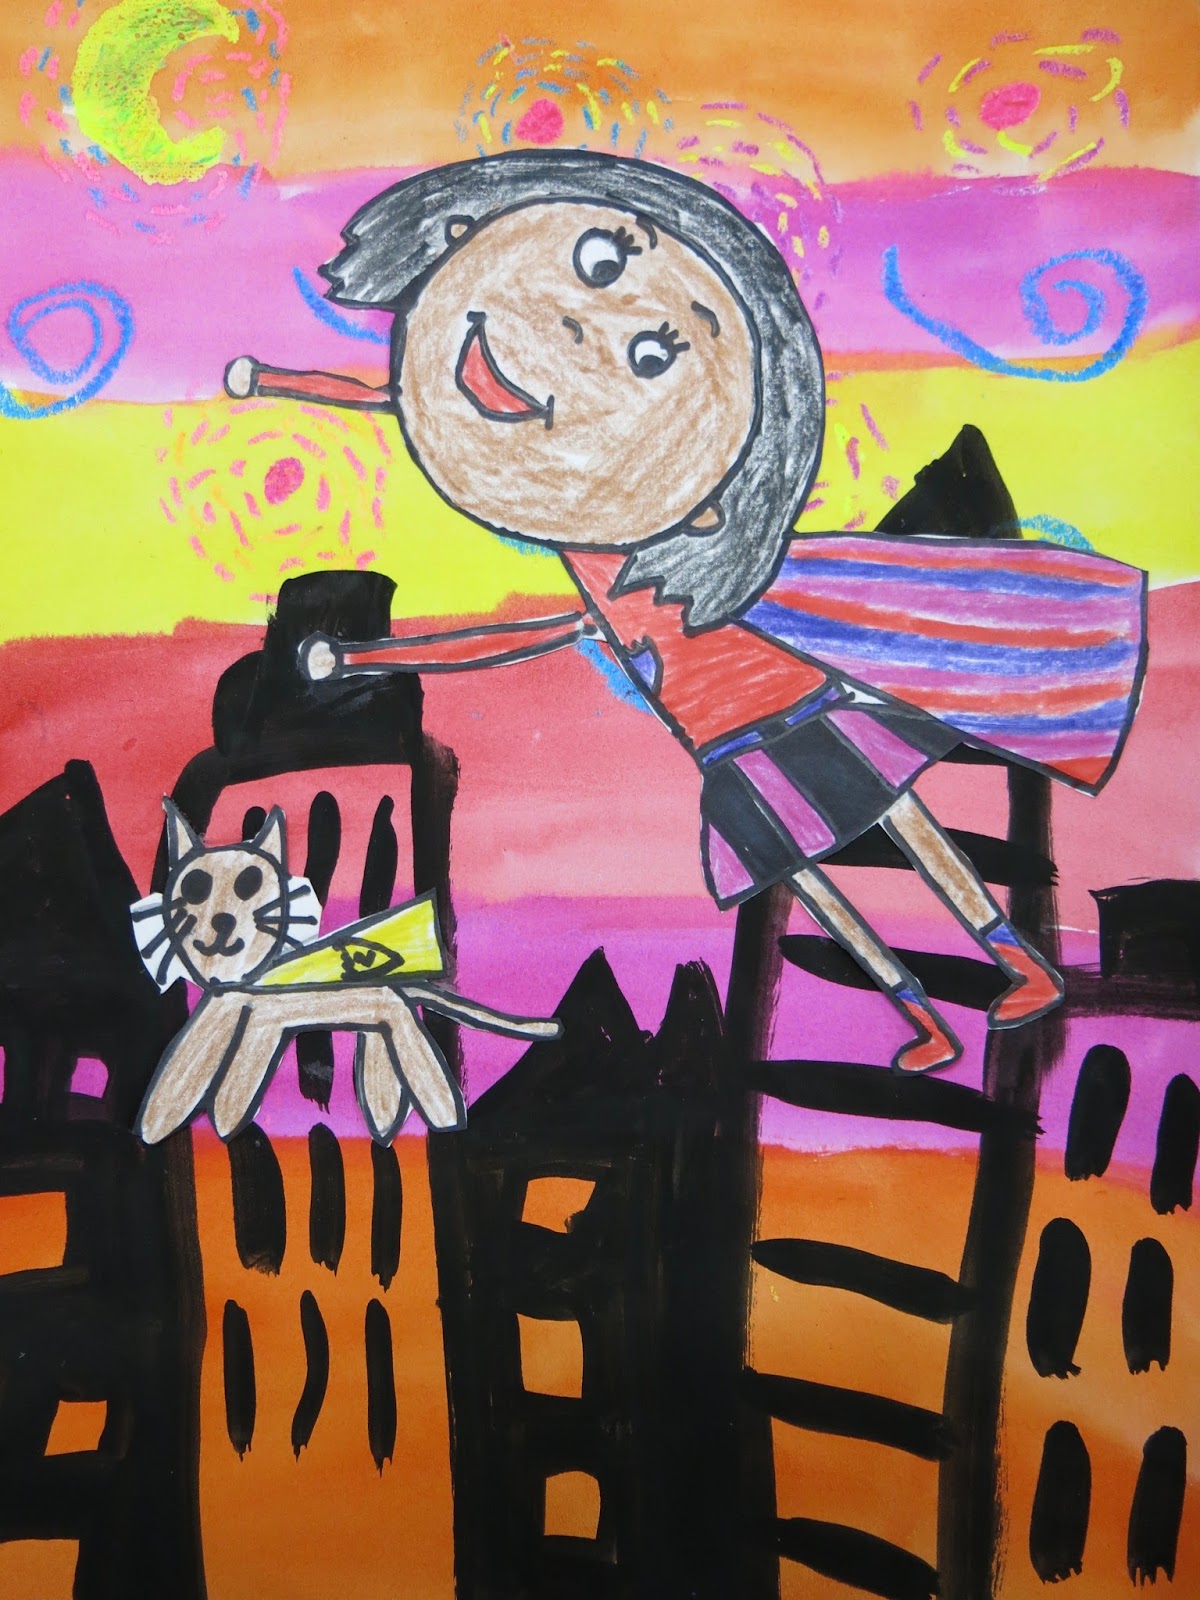
LOTS of kids wanted to add their pets or their siblings as their sidekick...how cute! After drawing with pencil, tracing with Sharpie, the kids added color with color pencils. In all, that process took about two art classes as well.
Then the CAREFUL cutting began. Not gonna lie: some of us may have cut off limbs. No biggie, we simply glued them back in when we glued ourselves onto the background.
When coloring, we did talk quite a bit about color schemes. We chatted about the colors of Superman and Spiderman, Wonder Woman and the rest...they have about three specific colors. The kids were tasked with picking out 2-4 colors for their hero.
Weapons were not approved but shields were, of course!
And capes!
And disguises!
One thing that really helped was giving the kids an About Me super hero sheet. They had to come up with a name for their hero, what their special power was and how they make the world a better place. On that same sheet, they had to create a sketch of themselves as well as a sidekick.
I'm really excited about these and cannot wait to see them at our art show!
I don't often repeat projects but this one was a winner with the kids and parents last year.
Last year, I had the kids paint a black silhouette of the city and add the windows with paper. I didn't love that as much...the paper didn't really stick well to the ink and the kids didn't really rock those windows. You can see it here.
I'm IN LOVE with the designs on her buildings. Second grade, y'all!
If you follow me on Instagram, then you've seen me share my teacher sample of this Charley Harper-inspired lesson. I filmed the demo a week or more ago...and finally got around to editing it and posting it to my YouTube channel. My plan is to do a series of woodland animal videos inspired by Harper...we'll see how many I manage to complete. I have a tendency to be a pokey lil puppy.
But enough about that, let's get to the lesson video:
Now, like I said, this is the second in a series of Harper-inspired lessons. In case you missed it, the other lesson is a mash-up of van Gogh's Starry Night and Harper. You can find it here. In this lesson, I'm using the same supplies as I did in the raccoon project. Here's the list:
* Faber-Castell Oil Pastels Full disclosure: I work with Faber-Castell frequently and create lessons for them using their supplies. That being said, I do enjoy their oil pastels for a couple of big reasons: they are sturdy. Unlike many other oil pastels I use, they don't break as often. They don't roll! I love that we aren't constantly chasing after them rolling off the tables. AND they are big...some oil pastels are very small and hard to hold for my students. Not to mention, they wear through them quickly. For all those reasons...and the fact that the colors are fabulous...I would definitely recommend these oil pastels. * Brown Watercolor Paint This is for the light wash used on the raccoon. * Texture Rubbing Plates or Burlap Don't have texture plates? Burlap makes for a great rubbing surface! * Construction Paper I love Tru-Ray because the paper doesn't fade and seems stronger than most. * Tempera Paint * Tempera Cakes My new favorite discovery: painting with tempera cakes on construction paper. Like, whut?! The colors stay true and I just love it!
I just had a GREAT couple of questions thrown my way after sharing this lesson on YouTube:
Fabulous questions, don't you think? Here's my response...
May I have a soapbox moment? I'm aware that there are art teachers who do not like guided drawing instruction. I've grown tired of folks speaking of the right and wrong ways to teach art. I'm also super leery of those who speak as though they have all the art teacherin' answers. Here's a secret: they don't. NONE OF US DO. We're all working with our students everyday, listening to them and trying to figure out how to best teach this amazing creative process to them. There are many different ways to teach art...and it's good to dabble in them all. But it's no good to put the methods of other art teachers down. Okay, soapbox moment over and out.
I will keep you posted on how these Harper-inspired projects progress! Until then...