Showing posts with label summer art projects. Show all posts

Sunday, May 19, 2013

In the Art Room: The Art Show Part 1

It seems that when I fell off the DIY wagon it was because it had crashed into the What I Wore wreck. Now that the art show is behind me (huge sigh of relief), I hope to get back to regular blog posts soon. Thanks for hangin' with me! Now here's what I wore at the Art Show: top: Banana Republic, yard sale; skirt: vintage, etsy; wedges: Target, last season; palette hair clip: DIY
Important In-Bold Message: Thank you parent helpers at JES for hanging each and every piece of artwork for the show. The children, their families and the staff have enjoyed seeing their hard work. There wouldn't be an art show without you! My sincerest of thanks.

Last Thursday night, I was able to put another notch on my belt. My Art Show belt that is. If my weak memory serves me correctly, I do believe this is a monumental notch as this was my 10th art show at my current school (I spent previous 5 years teaching at a school in Nashville).  You can see last year's Art Show here and here. Because I took a mountain of photos, I thought I'd share with you the work of my kindergarten through second grade students first. I've written about most of these projects on this here blog, so look out for the link if you are interested in reading more.

Oh! I almost forgot. If you recall from my last post, I mentioned that my students sculpted dogs and cats from clay as apart of their service project. Well, they managed to raise $430 dollars for Happy Tales Humane! Congrats, Awesome Artists!
Our theme this year was Traveling Europe  (we only managed to hit France, Germany and England). At the beginning of the school year, I had each student create a self portrait in either green, blue or yellow and used them to create this map. Full project details here.
Because we were traveling abroad, the students created both suitcases and passports. If you scroll down, you'll see some examples of the suitcases or check out the lesson here. Because we were flying overseas, each class had a plane drawing contest that the kids voted on. The winning drawing was enlarged by the artist on my Elmo while I snapped photos of the kids pretending to be looking out the window of a plane.
This fourth grade plane is a crack up. I do believe it's coming in for a hard landing as many of the passengers appear to be freaking out. Or sleeping. Or getting sick. Gotta love fourth grade.
A wall of kindergarten art. I always snap photos of the artists to go along with their work. Their photos are not shown in this picture. I did not involve my kindergarten artists in our traveling theme. There are so many art basics to cover, that I like to focus on those during their first year of art. You can read more about those lovely abstract paintings here.
These self-portraits as artists were so fun to make. And we got to recycle our "messy mats" into aprons! More here.
Here's a fun weaving lesson that I'll be sharing with you in the next couple of weeks: Woven Fish!
Here's a glance at a first grade class. These guys were included in our travel theme. They also have to write artist autobiographies which are always entertaining to read. You can see more of the German Gnome Project here.
One of my favorite projects this year was the Hot Air Balloons over Paris. Anytime you can include a photo of the child in a work of art, it's a success. Lesson here.
Both my first and second graders created these Royal Self Portraits. Each one is so expressive and a perfect match of the artist himself.
The one on the left looks very much like a doll from It's a Small World. And the one on the right just cracks me up. Lesson details here.
In my art room, I had the clay projects on display. Sadly, the art room became flooded with folks before I got any photos. Here are some of my first grader's clay animal sculptures as chatted about here.

Second grade goodness. This year, I tried out CD weaving with the kids. I loved the lesson and it seemed to take the kids a less amount of time to complete, which was a bonus. My art teacher friend over at the blog Art Matters does an excellent job demonstrating the steps to creating these weavings.
I love the beautifully printed background of this German Cuckoo Clock. Lesson plan here.
These paintings created near the beginning of the school year seem extra exciting to me since my trip to Paris. Geez, I still can't believe I was there! Does that feeling ever go away? Parisian Landscape Lesson here.
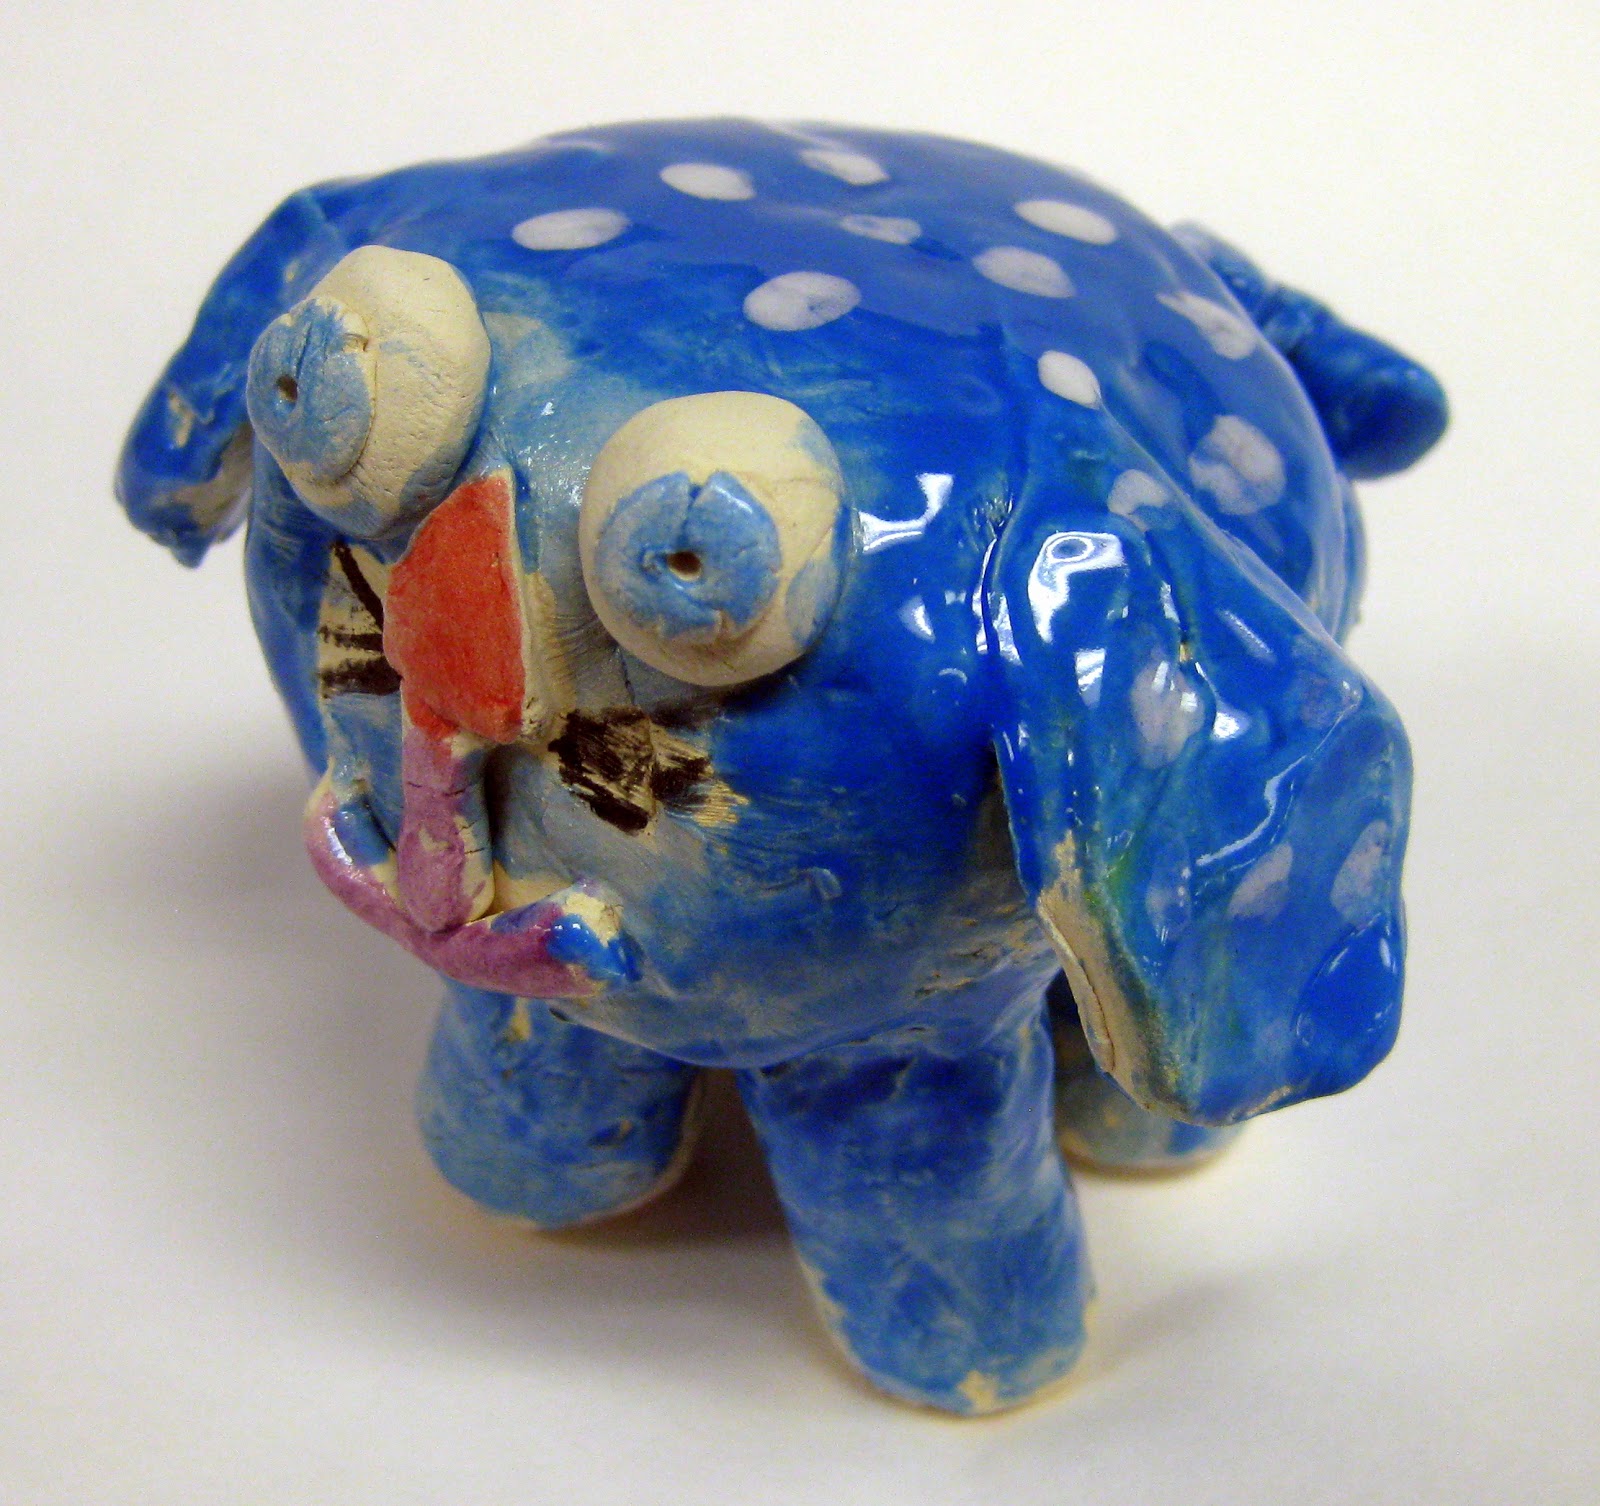
My second graders created their animals by putting two pinch pots together and adding legs. Lesson on this in the near future.
Stay tuned for some incredible work by the third and fourth grade students! And, if you have any questions or thought about the projects you see here, I'd love to hear from you. 
Read more »

Tuesday, June 26, 2012

In the Art Room: Weaving, Part 3

Weaving by one of my fourth grade students.
Hello, crafters! This week I am going to show you how to remove your completed weaving from your loom. If you have not started your weaving, no worries, you can begin here at Weaving, Part 1. Or, if you've finished your weaving and are now ready for the flap, you can catch up by reading Weaving, Part 2.

However, if you've done it all, then let's get to taking that weaving off the loom! This doesn't take long at all so you should be done in a snap.
You may begin on either side of your loom. I am starting on the side with the flap. Cut two warp strings close to the top. Never cut the warp strings close to the weaving as that will cause your weaving to unravel.
Tie your first knot so that it sits right on top of the weaving or weft strings. Do not pull the knot too tightly or it will cause the weaving to smash down and become uneven.
For the second knot, pull very tightly so that the double knot is secure.
Continue this process of cutting two strings near the top and double knot tying them until you have gotten to the end. If you have an odd number of warp strings, you will encounter three warp strings to tie at the end.
If you have this issue, simply put two strings together as one and tie it to the left over string. Double knot tie it as you have done the other warp strings.
Double check and make sure all warp strings are tied off and secure. At this point, you can snip the warp strings shorter.
When you flip your loom over, you will do the exact same thing. I like to pull the warp strings out from the other side or you could simply cut two as you have been.
Again, cut two, double knot tie two and continue until all strings are tied and secure. Trim warp strings.
Now you are ready to remove the weaving from the loom. This might be a bit of a struggle, especially if you have woven very tightly. But you can do it. Just put the end of the loom between your knees and start pulling the weaving off the loom. In art class, we say it's like taking a too-small sock off of someone's foot.
Don't worry about messing it up because you can't. Although it may look like you are.
And if you see this, don't panic.
Just flip it inside out and flatten by hand. Viola! You've woven a pouch!
Next week, I'll walk you through sewing on a button and making that little warp tail (seen in the photo above this one) disappear. Then we are on to creating the handle which is very easy and fun. Please feel free to ask questions or leave comments if you've got 'em. Happy weaving!
Read more »

Saturday, May 12, 2012

In the Art Room: Mother's Day Flower Pots

Our kindergarten students have changed so much this year that their growth reminds me of their blooming flower collages.
There are some folks that just don't get paid enough. These people include egg-inspection factory workers (speaking from experience, thank you very much), corn-detasselers (another item on my resume) and kindergarten teachers. Now, don't get me wrong, I enjoy teaching the littles but I only see them in half an hour intervals. And, sometimes, in that half an hour, I can have one empty his bladder, one start to cry for her mama, one step in said bladder-empty-outter's puddle and one decide to smack me on the tooshie on his way out the door with a "bye-bye, Mrs. Stephens!"
Overheard kindergarten convo: "I got a man's haircut yesterday but I'm still a little boy." Such sweetness, sigh.
Despite all of that, I can see why the kindergarten teachers keep coming back for more. No other group of kids is as enthusiastic about everything under the sun as kindergarten. Every new skill taught is met with an "ohhhh" and an "ahhhh" and often awarded an applause.
Take this Flowery Collage, for instance. We used the left over scraps of textured paper we had created for our Mammoth Monet Mural. For the background, we learned all about creating a tint with primary blue and white when sponge printing. Once that was dry, we chatted about our French friends Claude Monet and Henri Matisse and their love of nature and collage, respectively. And their flowers are simply tres magnifique, no?
Pretty as a petunia.
But I'm getting ahead of myself. You see, the wee ones actually painted these here flower pots before creating their collages. Every year our awesome kindergarten teachers help their students celebrate Mother's Day with a Mother's Day Tea. At the tea, each mom is presented with a handpainted terracotta with a lovely little flower inside.
We only used one 1/2 hour class to complete these. It was a whirlwind of painting fun but next year I think two art classes would be better.
I offered to help the kids paint their pots in the art room this year. I demonstrated on a couple of broken pots how to paint the middle of the flower, or stigma. We chatted about pollen (which is why we are all so sneezy) and nectar. I then showed the kids how to add the petals, stem and leaves and grass. We topped it off with some line designs around the rim.
Remember these? I guess you can see where my idea of having them paint flowers on their flower pots came from...
"My mama is going to love my pot. She's gonna say 'Did you really make it?' " ...adorable
Once the pots were painted, the kids had a big time with the collages because they could see the connection. And because we learned the word "collage" and said it in our funniest French accents complete with a "viola!" after every simple task completed. You see, I told you, it's the little things when it comes to the little ones. As long as we're not peein', cryin' or nose-a-pickin', it's a pretty fun group to hang with.


Read more »

Wednesday, April 11, 2012

In the Artroom: Monet's Waterlilies

Me: You painted both snails the same color...you didn't want to use variety? Student: Well, it's a Mama Snail and a Baby Snail. No one will know that if they are different colors. Me: (mental head slap) You are a genius.
This week back to school has been so exciting! Everyday, I walk into my room, open the kiln and gasp at the awesome creations of my students. This week we've been glazing the clay projects completed before spring break and the students have been totally rockin' it. I thought I'd share with you this kid-approved lesson.
I was told that the Tooth Fairy likes to chill in Monet's Garden on her off nights.
We've been learning all about the artist Claude Monet and just finished completing our Mammoth Monet Mural before break. During that unit of study we also chatted extensively about ponds and waterlilies. The kids were thrilled when told they were going to create a clay waterlily of their own.
I shared the photos of Monet's Garden with the kids that I snapped while at the Moma in March. The best question yet, "Where did his mom get paper that was so big?"
A lovely lily close up.
Pac Man vs. Sponge Bob's Buddy Patrick.
 For this project, you'll need the flowing:
  • An Army of Amazing Moms
  • Tons of clay
  • A class set of clay mats
  • Skewers
  • Waterlily and Lily Pad templates
  • Mayco Wonderglaze
  • Toothbrushes
  • Cups of water
Okay, about that first thing on your list, I'm serious about that one. Let me tell you why: I have 1/2 hour art classes. Many teachers wouldn't even attempt this kind of crazy with such short classes. But with an Army of Amazing Moms, anything is possible. Now, I have The Best Moms in my room, but I'm sure you've got some pretty fabulous ones in your school just dying to help out. All you have to do is ask, it's really that simple.

This lesson is a version of one originally created by one of the most incredible art teachers I know, The Clay Lady. Not familiar with her? Watch her demos on youtube, she rocks.
 To create the waterlilies, the kids need to do the following:
  1. Pound out clay to Oreo thickness and trace a waterlily and lily pad as seen in top clay photo.
  2. Bend two points of the star upward (as shown above), over lap and smoosh clay together.
  3. Continue bending points of star upward, overlapping and smooshing until entire lily is complete. It should look like a closed flower.
  4. Use fingertips to gently bend flower pedals outward.
  5. Toothbrush the bottom of the lily and a place on the lily pad and attach.
This artist used the back of her brush to create "perfect dots" and stripes on her bumble bee.
After that, I explained to the kids that they could add one or two creations to their lily of their liking. I did a little snail and insect demo but they had much bigger ideas. "How do you make a hummingbird? The Toothfairy? A Tarantula?"
A frog chillin' at his pad.
I told them this...anything can be created out of clay with three things: a sphere, a slab and a coil. So, stop and think about what you want to create and decide which of those three things would be the best for the job. And, just look at this variety! They got it.
I was told that this is a one-eyed version of Sponge Bob's buddy Gary. Meow.
Now let's chat about glazing. This Stoke and Coat glaze by Mayco is where it's at. The colors are vibrant and the consistency is very fluid. I dole out the glaze in styrofoam egg cartons along with cups of water for brush cleaning.
A first grader created this hummingbird. I know, right?
 Before glazing, we have a nice loooong chat about my two rules:
  1. Do not glaze the bottom (it'll stick to the kiln).
  2. Do not layer different glaze colors.
Another hummingbird.
Because of the countless choices of colors, some kids go a little bonkers and just want to glaze their project to death. I give them free reign to add patterns like dots and stripes but I stick hard and fast to that no-overlapping-twenty-colors-on-your-piece rule.
And the end result? Nothing short of adorable, says me. And my new friend, Happy Buggy-Eyed Snail.

Thanks for dropping by!
Read more »