Saturday, April 28, 2012

What the Art Teacher Wore #14

Floral, Gingham and Dots Monday: This photo was taken as the UPS man drove by, honking and waving at silly me and my tripod. sweater: vintage and thrifted; skirt: Anthropologie, last summer; tights: Target; shoes: Dolls by Nina
Kids, you'll have to forgive me, but I've gone a bit berzerk. Not only did I find some super groovy masterpieces that kinda-sorta coordinate with my ensemble...but I've also found The Missing Link. I'm not talking about some neanderthal-looking dude (though I'm pretty sure that guy was standing behind me in Goodwill yesterday telling his kid to, "Git over hair, nay-ow!"). I mean, The Missing Link to completing my look. I'm adding each to my Christmas, birthday and Arbor Day wishlists (what, you don't get prezzies on Arbor Day?). Thanks for indulging my silliness. Enjoy!
Red, White and Blue Cherries created by the husband and wife team at Just Plain Pix.Cherries are my absolute fave fruit. You?

I really really want a bike. Not to ride or anything. Just to look at. I promise I would look at it every single day. Can I have this one, pretty please?

Surprise! Evaluation Tuesday: Erm, yeah. My dear principal came about 30 seconds before my kids did for my surprise evaluation. No word on how it went. But there was no rolling around on the floor, crying or fit throwing, so that's good. I was on my best behavior. dress, jacket and belt: vintage, thrifted; tights: Target; shoes: Lucky, purchased on the cheap at Marti and Liz

The browns and golds in my outfit reminded me of this painting. Do you recognize it? It's kinda famous. But it's a little difficult for me to see...

Oh, that's better. I just needed my fancy smancy brown and gold cat eye glasses that coordinate with my outfit to help me see. Now I recognize her, it's Mona Lisa by "Vincent da Vinci" (a direct quote from one of my students this week).

Seeing Spots Wednesday: On this day, I just happened to be wearing an apron...which was good because I managed to pour a ton of paint all over it without even noticing. Afterward, one of my kids told me that my name should be "Mrs. Messy". dress: vintage, thrifted; sweater: thrifted; shoes: thrifted and altered by me...I had to add the blue fabric just to keep the shoes on.

Explosion, Roy Lichtenstein ... this is pretty much what my apron looked like after the paint attacked it.

Wonder what the UPS man would say if he saw me in my polka dotted ensemble on the steps of this  red spotted house with the teal blue steps?

Thursday: sweater: Paris Market Vintage for $4! ; dress: Talbots, thrifted; belt and flower: H&M; fishnets: Target; shoes: Indigo by Clarks; kid sunglasses: ebay

Love Angie Lewin's work. She's got a book out of her prints as well.

You see, I won't be riding the bike because I'll be driving this! I really want a vintage car. But hubs has had his share of old cars: a Bronco and a couple of Mustangs and says his days with the oldies are over. Sigh.

Friday, My Love: sweater: Ann Taylor, thrifted; dress: vintage, thrifted; belt: made by me; shoes: BC Shoes

My outfit reminded me of ketchup and mustard. So did this painting by Henri Matisse.

And what better way to handle one's ketchup and mustard than with these incredible gloves. I went through a phase in high school wear I wore sweet lace gloves until my giant man-hands busted out of them. Oh well. One can dream.

Wednesday, April 25, 2012

In the Artroom: Fabulous Frogs

Painterly Frog: This here is a froggy artist that really gets into her work. Notice the sweet details like the paint brush, palette, blue beret and, of course, the paint splatters.
I can't tell you how much fun it has been to go to school, open the kiln and be greeted by these guys each morning. While learning about all things Claude Monet, my third grade students contributed to our school's Mammoth Monet Mural with their frog-tastic drawings. When brainstorming their upcoming clay projects, I thought it would be good to continue our Monet theme. So my second graders created ceramic waterlilies and my third, these frogs!
Redneck Frog: Oh my, can you believe those teeth?! I am so in love with this backwards-baseball-cap-wearing, orange-eyebrows-on-the-outside-of-the-baseball-cap wigglin', mysterious-black-bug-eating Hillbilly Frog!
Obviously, the kids really enjoyed creating these unique frogs. They have been so pleased with them, as they should be. I loved this lesson because, once the kids followed the steps of sculpting their frog, they were free create any sort of frog imaginable. And they did.
Fashionista Frog: That was actually the name given to the frog by the artist. Apparently, Fashionista's hobbies include"being pretty, being sassy, hopping and teasing the poor fish." Hmmm, sounds a lot like the artist herself!
For this Fabulous Frog creation, we used the following:
Artistically-Inclined Frog: I was really concerned about the stability of this frogs easel that is precariously straddling the lily pad but it made it out of the kiln unscathed. Notice the little beret, the palette and the paintbrush.
Because I have half hour classes, I taught this lesson in several classes. On Day #1, we:
  1. Twisted our grapefruit sized piece of clay into two equal pieces. 
  2. With one piece, we pounded the clay flat into Oreo-cookie thickness and traced a template that was in the shape of a lily pad. We wrote our names on the bottom of this clay, wrapped it in a wet paper towel and placed it in a zip lock bag with our names written on it.
  3. With the other half of the grapefruit, we created a pinch pot for the frog's mouth and body.
  4. With the leftover clay from cutting out the lily pad, we rolled coils for the legs and attached them to the pinch pot with the toothbrush and water.
  5. The pinch pot with legs was then wrapped in a wet paper towel and placed inside the ziplock bag on top of the lily pad until next time.
As the kids were working, they were constantly coming up with names and quirky stories about their frog. So, once the frogs were out of the kiln, I had them do a little froggy biography.
Day #2:
  1. I demonstrated to the kids how to add eyes and a tongue.
  2. I explained to the kids that all things can be created out of clay with the use of a sphere, a coil or a slab.
  3. We brainstormed different ideas for frogs and froggy accessories and discussed how they could be created.
  4. Students completed their frogs (just barely in a half an hour!) and attached them to their lily pads.
Standardized Test Taking Frog: Yep, it's the time of year. Notice the #2 pencil. What you can't see is that this frog is also wearing a fabulous red and blue backpack.
Day #3 and 4: Once the clay projects have been fired, we begin glazing. I tell the kids I only have two rules for glazing: don't glaze the bottom (it will adhere to the shelf in the kiln) and no glazing your clay projects five thousand colors. We spend one day just blocking in the colors with at least two coats of glaze.
Rock Star Frog: Gotta love a frog that dyes his mohawk to match is guitar.
On the second day of glazing, we use smaller brushes and begin to add details like dots, stripes or just delicate lines.
Special Agent Frog: Ma'am, I believe I found the dragonfly you were looking for...

And here was our final task: writing about our fabulous frogs. The kids don't get to take their frogs home for a couple of weeks due to our school-wide art show. But they were dying to see them and chat about them. So, we filled out this sheet in pencil and traced over our pencil lines in skinny sharpie. This paper is actually a folded card. When we display the frogs at the art show, this little placard will sit next to the artist's frog.

Paint-Brush-in-my-Mouth Frog
This project really brought out the kids artsy side...which is why I think they created so many Artist Frogs! It also brought out more of their crazy humor...I learned that during this exchange:

Me: Hmmm...it says on your sheet that your frog loves to eat "pizza, sushi and ... frog legs?"
Kid #1: Yep!
Me: You do realize that you made a frog. And he likes to eat other frog's legs?
Kid #1: Yep, he's got cannibalistic tendencies.

Ya gotta love 'em!

Monday, April 23, 2012

DIY: Stripping and Hooking

Look at that sweet face, poised and ready to get her hookin' on. Photos from a 1951 Rug Hooking Bee. What I wouldn't give to travel back in time, dress spectacularly and join the fun.
My mother-in-law is a stripper. And a hooker.

It's not a secret or anything, we're all cool with it. To each his own, we say. It's good to have a hobby.

It was just a little something she started doing on the side a couple of years ago. We didn't think much of it. She got her sister interested in it and now, me.

That's right. I'm a hooker. 

A rug hooker, that is. Why, is there any other kind?

Now, lemme clarify. Because when my MIL first began speaking of rug hooking, I immediately had a flash back of the rug hooking I did in elementary school. I remember sitting on my babysitter's couch every afternoon hooking an image of a mushroom with short little strips of yarn. My dad even made one of these types of rugs, a large red number featuring a running tiger. Very 1970's chic. But that's not what I'm talking about. That's latch rug hooking.
The rug hooking I'm talking about involves strips of wool, not yarn. And, if you'll notice in above photo, the surface that is hooked upon is a fabric called Monk's Cloth. Not the holey grid-like fabric used in latch hooking.
My mother-in-law with one of her many hooked designs. The barn she is hooking is from a drawing my hubs did in junior high school.

And an adorable rug hooking she made for me. Notice the turquoise and orange variegated wool near the border? It came from an old wool jacket of mine. And the brown wool on the inside border is from a jacket of hubs. This hooking will one day be made into a pillow or to cover of a footstool.

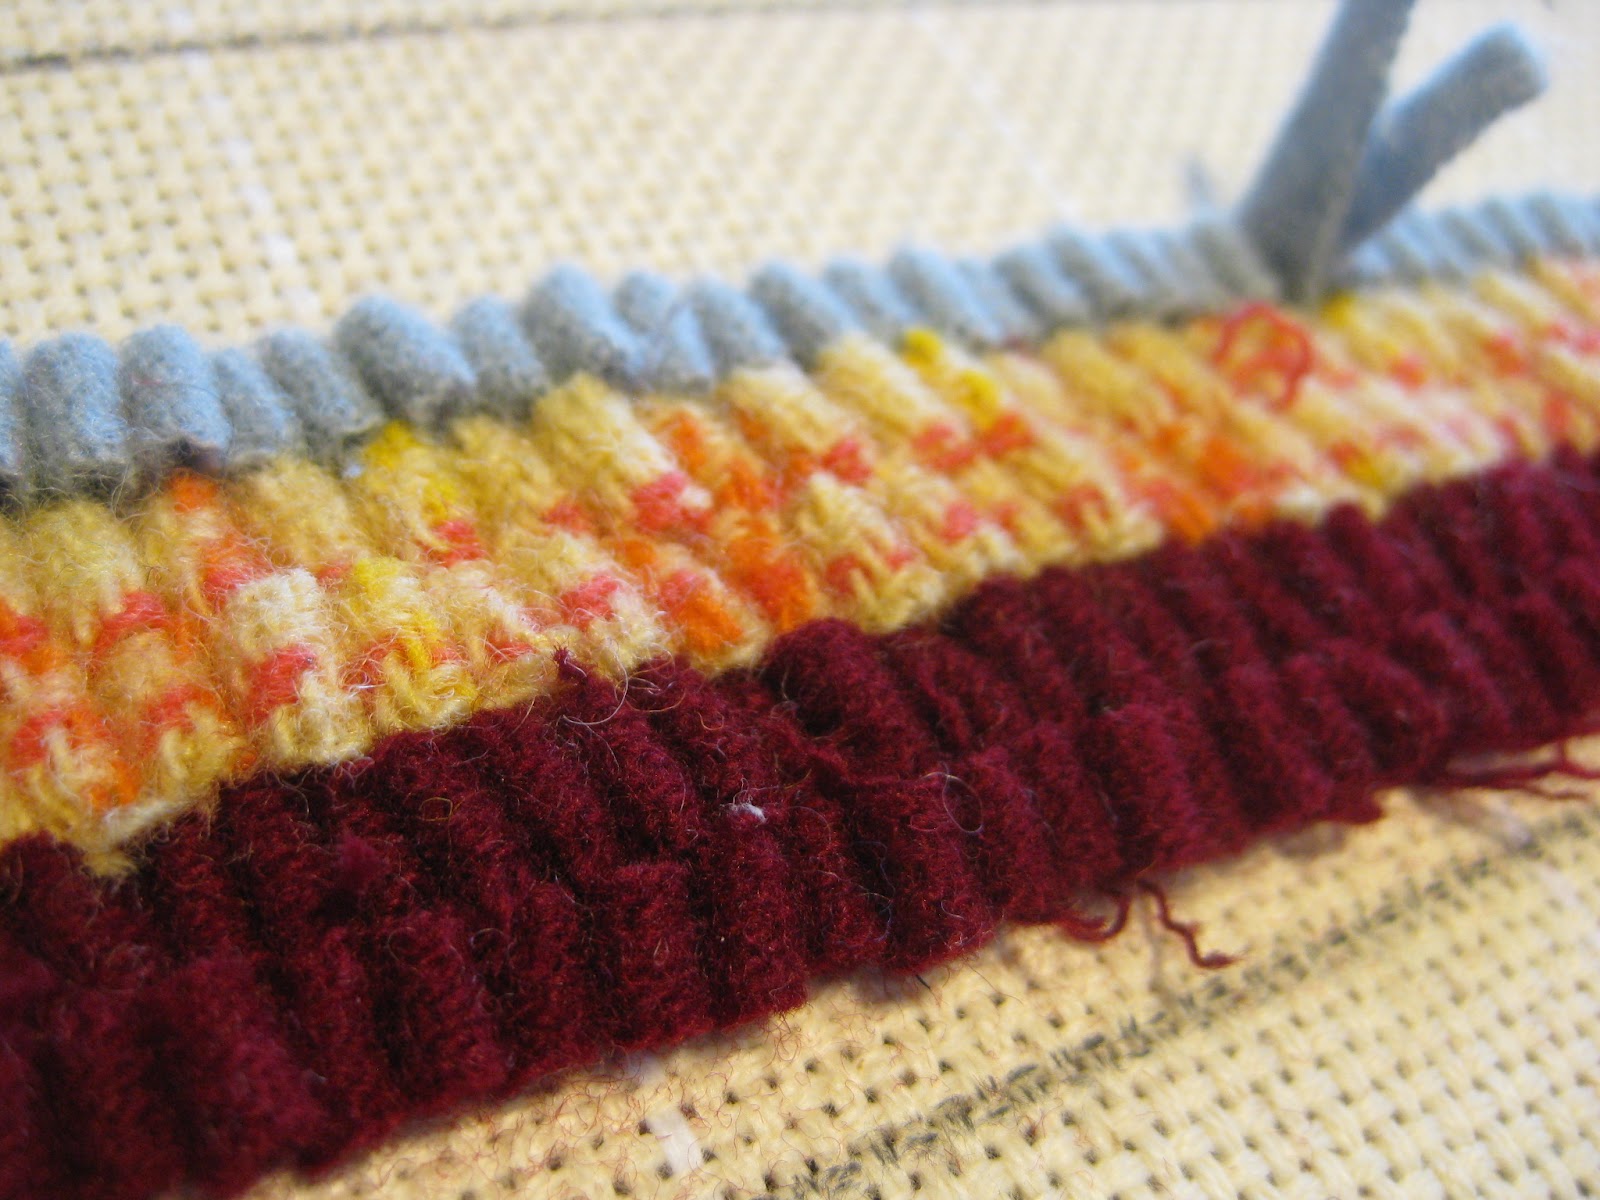
So, to try your hand at rug hooking, the first thing you'd have to do is strip some wool. Wool fabric, which can be purchased or recycled from wool clothing, is stripped through a device that leaves it looking like colorful linguine. A rug hook, best seen in the hand of the freckly little girl, is inserted into the Monk's Cloth with one hand while your other hand works underneath looping the wool over the hook.
Once the wool is looped over the hook, it is then pulled to the surface of the Monk's Cloth. With your other hand still underneath the fabric, it pulls the excess strip down to make the wool loops even with the others.
Once a couple of rows are completed, the loops should look like little rows of soldiers standing in a row, not crowded but straight and even.
My wee little finished section! My hope is to create a decent sized rug for my kitchen. I just had to share this little square (it's about 8" x 8") with you as I was just so excited by the result. Who knew I'd love hooking so much?
Er, I dunno if I'll ever like it that much. Ahem.
As always, thanks for dropping by! I'll be sure to keep you posted on my progress. Now if you'll excuse me, I've got important hooking to do.

Friday, April 20, 2012

What the Art Teacher Wore #13

Monday, you sure do know how to sneak up on a girl: sweater: vintage, hand knit and thrifted; dress: vintage, thrifted; fishnets: Marshall's; flats: Urban Outfitters via the interweb
Hiya, kids! I do hope you've had a lovely week and have an action packed weekend planned. Me? If I can manage to just sleep past 6:15am without some 20 lbs cat clawing my arm, knocking things off the dresser and meowing incessantly demanding her breakfast, I'll be in heaven.

Until then, here's a little peak at what I wore this week. I am having so much fun discovering new works of art based on my outfits that I can't help sharing them with you. Enjoy!
Do these shoes look kinda-sorta familiar? They were created by the makers of the leopard shoes found in last week's outfit post.
Can you believe this beauty? This is an obi, which is the sash-like belt that is tied around a kimono. I learned that the Japanese believe the crane can live up to a 1000 years and therefore represents a long life. The crane also mate for life and so represent a happy marriage. Aren't they beautiful? I discovered this obi here.
Totally rainy and a bad day for sandals Tuesday: dress: vintage, thrifted and embroidered by me here; belt: made by me, available in my shop; anchor sandals: Sperry, my once-in-a-lifetime preppy shoe brand purchase
One of my little embroidered ladies reminded me so much of the painting below.
I love this painting as well as the other pinup-style paintings by the artist Gil Elvgren who is called " The Norman Rockwell of Cheesecake." From here, I learned that Elvgren was interested in painting the girl-next-door type who finds herself in adorably embarrassing situations. You know, the kind where you just happen to have great legs, clean underwear and a non-holey slip when the wind decides to blow your dress up.
Wild Wednesday: dress: awesome etsy shop Supayana, the owner of the shops is so sweet and was able to create and ship my dress from Montreal in less than two weeks! headband: Super Awesome Peachy Tuesday; tights: Target; shoes: Indigo by Clarks

I love this detail. Many of Supayana's dresses and tops feature an adorably designed illustration. This one reminded me of a much happier version of Picasso's Blue Period couple below.
Pablo Picasso, Couple in Cafe, 1903
Sunny Thursday: dress: vintage, thrifted, dyed brown; belt: by me, available in my shop; shoes: Lucky Brand, found for cheap at one of those shoe resale shops
Ha! I wish I could look as pretty as this picture. From head to toe, I love everything about this girl's look. Heck, everyone looks divine this in this photo, even the Snooty Girl in the Snood! Secretary Jane Yaeger walking Hollywood and Vine, 1944 by John Florea
Friday, if you were a dude, I would so totally go out with you: top: vintage, thrifted; skirt and tights: Target; shoes: Indigo by Clarks
Sorry, but with the black and white bird on my shirt, Picasso was just the obvious choice. Dove of Peace, Pablo Picasso, 1952


Thursday, April 19, 2012

In the Artroom: Full Moon Rising

Every year my school hosts an end of the year art show. Throughout the year, I hoard all of the masterpieces the kids create. A couple of weeks before the art show, my Army of Amazing Moms start to mount, sort and organize. Once completed, each teacher is given the mountain of masterpieces for their class. They recruit their room moms who then hang all the works of art.

I teach 420 kids. Each of them makes roughly 5 works of art.

That's 2100 pieces of artwork that fill the hall's walls of our school.

And it freaks me out every year...will I be able to get everything ready in time? What about those absent kids who need to finish? And where on earth did I put that class' paintings?!
As I was making a feeble attempt to organize for the show, I stumbled upon these beauties created by my genius fourth grade students. They painted these masterpieces at the beginning of the school year and I'd completely forgotten about how amazing they were. It was a great lesson for the start of the school year as it allowed me to introduce the elements of art and a couple of the Big Name artists.
So I thought I'd share it with you!
For this lesson, we used the following:
  • charcoal sticks
  • large rectangular sheets of paper
  • black tempra paint
  • naked crayons (our name for crayons sans paper)
  • Crayola watercolor paints with the addition of turquoise and magenta
  • watercolor brushes
  • color diffusing paper in leaf shapes
Here's how we went about creating:
  1. We started the year learning about Leonardo da Vinci. Using charcoal sticks (because Leo would have used 'em!) and the element of art of line, we drew a tree branch from observation. 
  2. From there, we drew a circle for the moon anywhere on our painting and painted over our charcoal lines with black tempra paint.
  3. Next, we chatted about Leo's love of nature and did some leaf rubbing. This introduced organic shapes, texture and color. 
  4. Finally we were ready to paint. First warm colors were introduced with the leaf painting.
  5. For the background, we used the cool colors and a variety of values.
  6. During this time, Vincent van Gogh and his love of line, texture and movement were introduced. I'm sure you can see his influence in some of the paintings.
I love the variety of lines this artist used on her tree branch.

Just like any lesson, you've always got the Early Finishers and the Pokey Little Puppies. I myself fall under the PLP category, so I don't like to rush the kids. For my early finishers, they were given the format of a cinquain poem and told to use their artwork as the inspiration.

There are a couple of different ways to go about a cinquain poem. We wrote ours like this:

Line 1: A noun
Line 2: Two adjectives
Line 3: Three -ing words
Line 4: A phrase
Line 5: Repeat Line 1


The kids wrote their poems onto these leaves with a sharpie. These leaves are made from what's called a color-diffusing paper. After writing their poem, the kids used warm color water based markers to color their leaves. Then they simply painted their leaves with water and viola! A beautiful poem-y leaf to accompany their masterpiece.
Because of the dark sky in this painting, the artist used white to paint their tree branch to make it more visible.

I love how this branch seems to hug the moon!
And there you have it! A great addition to our art show. When it all finally comes together, I'll be certain to share photos of the show with you. Thanks for stopping by!