Tuesday, February 4, 2014

In the Art Room: The Magritte Project, Three

Whatcha got here is the finale to the Mega-Magritte Project. This was seriously like the project that kept on giving. Aaaaaaand giving. Which I loved because I could tie in so much. But I do believe the 3rd grade and I are ready to move on.
Now if you are new to this blog, welcome! I've noticed a wee spike in my views thanks to The Art of Education's nomination of this here blog for Art Ed Blog of the Year (What?! I know, right? I'm just as surprised as you). If you've not checked out the blogs nominated, you should. So many of those art teachers work tirelessly on their blog. You can vote for multiple blogs so, if you feel so inclined, I'd love your vote! Okay...shameless self-promotion over.

Aaaaand, what was I saying?

Ah, yeah, if you're new, welcome, pull up a chair, introduce yourself, grab a snack, sit back and relax. But, please, try not to fall asleep. The snoring becomes a little off-putting and makes it hard for the rest of the readers to doze off.

Okay. Seriously? HOW DID I GET OFF TOPIC AGAIN?!

Magritte! I began by introducing the dude with a coupla books, visuals and, of course, a costume...

Which was probably one of the worst artist costumes to date because I couldn't see anything; my annoying loud voice echoed off the back of the apple and hurt my ears; and, to top it all off, all I could smell was my own breath. Which smelled like coffee and the Altoids I consume to mask the smell. That I now know doesn't work.
We chatted a lot about this particular piece and just exactly what the meaning of Surrealism is. We decided that it was something that looked real but couldn't possibly be real. The book Dinner at Magritte's by Michael Garland had loads of examples of that.

I decided that the 3rd grade was going to create a Mega-Magritte Mural. You can see the full lesson and finished product here. To break it down for you, the kids painted a 12" X 18" piece of paper with a tint and shade of blue. Then they used oil pastels to add stars and clouds. On the backs of their paper, they were to trace two birds, one Day and one Night. Again, head here for clear details (I'm too tired to retype it all!).

For the mural, the kids were to donate one of their birds. Their spare bird was then used in a 9" X 12" tissue paper landscape collage. That lesson can be seen here.

We chatted bunches about analogous colors for the sky and how to decide upon a color palette that would best contrast their bird.
And then we were left with these amazing negative shaped papers after we cut our birds out. I couldn't bear just recycling them. So I turned it into a literary lesson which lead to the creation of something called The Compliment Game! Here's how it worked:
  • Each student was given a 6" X 10" piece of Rolyco's Color Diffusing paper. It has the look and feel (and does the exact same thing) as a coffee filter. The kids were to write their name and teacher code on the back. 
  • We chatted about what a compliment was. We also discussed character words. And similes. Then the kids were given one minute to fill their page with words that best described the person that they are. For this, they used warm colored water-based markers.
  • When the minute was up, they were to trade papers with their neighbors. Again, the timer was set and they were to write complimentary words that described their friend.
  • Once the timer went off, the kids swapped papers with the person across from them. They had to read the back of the paper to know who they were writing about.
  • Timer off. Swap with neighbor. One more round.
  • After the fourth and final round, the kids were given back their papers. And you should have seen them. They loved reading what their friends had written about them! It was so sweet. 
  • Then they were to chose the words that they felt best described them and make them permanent. For this, they traced the words in sharpie, still using the warm colors.
  • Lastly, the papers were placed on a styrofoam plate and painted with water. Below is the result.


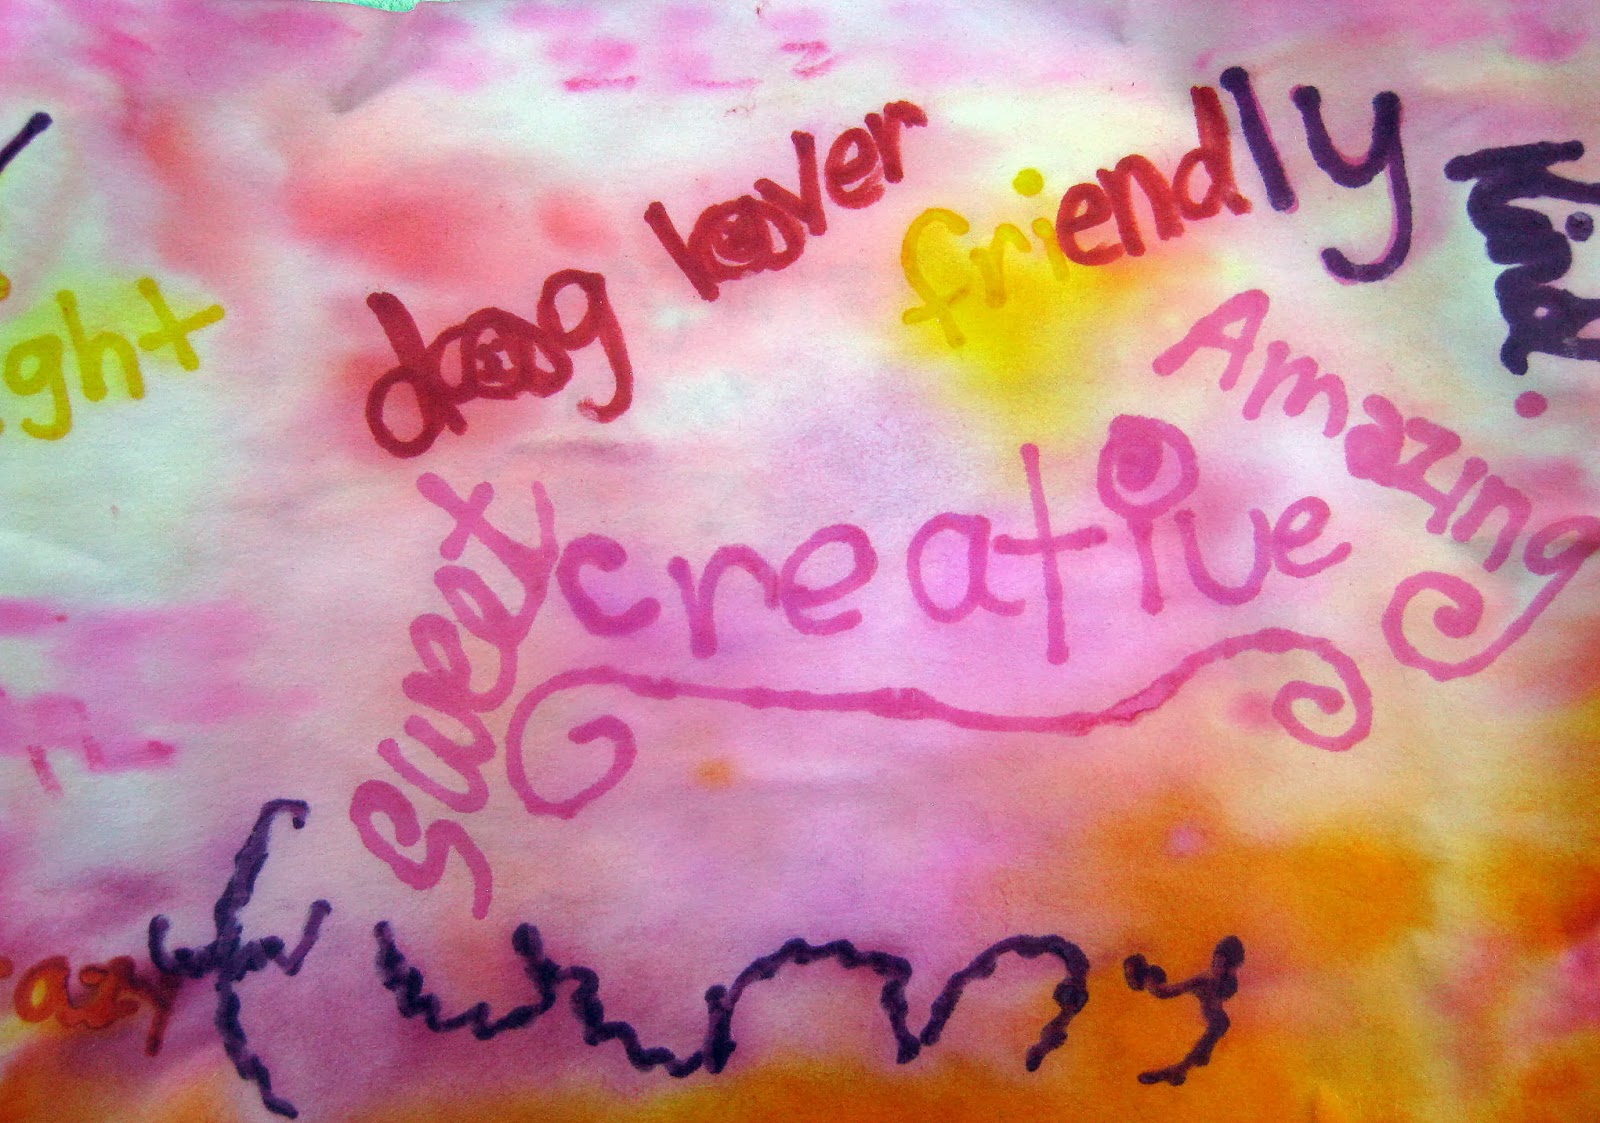
Now, for the cool color paper, I tried a couple different things. We didn't play the game this time. Instead one class (the one you are seeing) wrote words that told the person they would like to become. What they dreamed they could be. Which was pretty cerebral for 'em. 

For another class, we wrote words that described what we are like on the outside since that was the opposite of the words that described our character. This seemed much easier for them. If they ran out of words, they could ask a friend. Although, you gotta be sure an emphasis compliment again as I do believe I read "stinky feet" on someone's paper. Thankfully, Senor Stinky Feet has a good sense of humor. The last paper was also traced in sharpie and painted.
For our final step, we added our wordy papers to our negative shaped birds. And, viola! We can finally close our Magritte-y Chapter. 

Until next time, kids, don't forget to go here and check out these amazing blogs and vote!

Monday, February 3, 2014

Artsy Book Club and ... an Announcement!

Okay, before you get all confused into thinking that this here crazy blog got voted for Art Ed Blog of the Year in 2013, relax, it didn't. However, it did get NOMINATED for Art Ed Blog of the Year for 2014! I'm thrilled and honored to be among some of my favorite art ed bloggers. Click here to check out the other nominees and cast your vote for Art Ed Blog of the Year...which, if it happens to be mine, I thank you!

I'm also excited by the number of you who have not only have joined the Artsy Book Club but already begun drawing and posting your work! To inspire the rest of you, I thought I'd give you a peak at the work that was posted today. Remember, anyone can join this book club (even if you are One Drawing a Day book-less, I'll update the page with the daily drawing tasks) and anyone can share their work there. To view drawings posted, simply click on "Recent Posts by Others" on the right hand side of the page.

So, without further ado, check out these wonderful drawings of Day #1's assignment: A Still Life with a Fine Tipped Pen...
Jill created her still life on brown craft paper with a white pen. As soon as I saw it, I was like, WHAT?! Isn't it stunning? I love the contrast of the two mediums not to mention her lovely line. It looks like a reverse etch-a-sketch to me.

Alright, ya'll know Phyl over at There's a Dragon in my Art Room, right? If you do, then you know this still life is, like, SO Phyl. She's fun, funny and quirky, just like this drawing. If you are not familiar with her blog and you are an art teacher, do yourself a favor and check it out. She's Art Ed Blog of the Year material any day in my book.

I love this drawing by Abby. She's a fellow art teacher who proves, with this drawing, that you don't need a glorious still life or a huge block of time to just draw something. ANYTHING. Even if it's your keys. I love what she wrote about her drawing:
This is my first assignment. It is a symbol of how busy my life is these days. Sometimes I feel like I live in my car. Ok not literally but I am in my car more that I would like to be, especially sitting in traffic.

These lovely drawings were created by Marcia who is ALSO nominated for Art Ed Blog of the Year! Congrats, Marcia! Her blog is Art is Basic and, well, it's basically amazing. You've gotta check it out and add her to your voting ballot (just read you can vote for more than one of your favorite blogs, how fun!).


Art teacher Rina created this sweet drawing. I love this still life of that delicate tea pot, box of teas and cup. I want to see this painted and framed in my kitchen, I love it so!

Kerry shared this drawing and I love it for it's snapshot-of-my-life-ish-ness. It looks like a healthy snack break with mystery miniature pigs. Kerry, I think I need details!
So I may or may not have lurked Roo's FB page to find out what an incredible artist she is! I love this sketchy style of hers. This is her nightstand which she says she needs to clean...I say, LOOK AT THAT AMAZING STILL LIFE! Cleaning is always at the bottom of my list.
Okay, can you guess what this is? I thought oranges in an egg carton but Janet, the artist, wrote: Here's my drawing for day 1. The author suggested drawing something that had meaning to you, so I drew the eggs that are down on my worktable. I have started doing my yearly pysanky egg work, and these are empty eggs waiting to have something done to them.
Ya'll, Maria is my art teacher buddy whom I've become fast friends with even though we've never met. She's from Ecuador and she's so fun! I mean, just look at her still life set up! She also created the awesomely surreal drawing below.

I was so inspired by these...and so unmotivated to tackle my latest sewing project, that I drew this view of my sewing machine and spools of thread.
Always one step ahead, Phyl has already begun Day #2's drawing assignment: using a calligraphy pen (don't have one? just use whatever, ya'll!) and draw some organic still life. Think flowers, plants, you name it. And don't forget to have fun!

I don't know that I'll always be able to share these drawings...but I was too thrilled not to do so today. Hope you'll join us on our drawing journey!


Sunday, February 2, 2014

What the Art Teacher Wore #88

Too Chilly for this Hill-billy Monday: Dude, at the start of the week it was beyond cold. Like, in the single digits. You'd think having grown up in Indiana, I'd be able to handle that scandal. I mean, I remember walking to classes on my college campus (go, I.U.!) and having my eyes freeze shut each time I blinked. Can't handle the cold scandal any more, ya'll! sweater: Anthro, last year; skirt: vintage, thrifted; tights and scarf: Target; shoes: Dolls by Nina
This weekend my house became a Potpourri of Putrid Smells. It all started on Saturday, when a certain cat who shall remain unnamed (ahem, that fat thing's name is Asha but she'll also answer to anything that resembles the sound of one opening a bag of cat food) decided to throw up approximately half her body wait down the...wait for it...heating vent. Yeah. Needless to say, our house had a lovely Hot Cat Vomit scent until late last night...when that smell was overtaken by the odor of an army of pissed off skunks who reside under our deck. Just when I was finally able to breathe again, hubs informs me that said Vent-Vomiter placed a dead mouse under our bed. GEESH. The Animal Kingdom is out to get us!

Okay. I need to Let. It. Go. Deep breathing, inhale -- ACK!! I STILL TASTE SKUNK! -- exhale, exhale, EX-FREAKING-HALE. 

Alright, forget that breathing business. Let's focus on something else, shall we?
Who has their book and is ready to DRAW?! I'm so excited, several of you have already started posting your drawings here. Please feel free to join the Artsy Book Club even if you don't plan to post your work or even read the book. You can join simply by "liking" the page. I set the official start date for Monday, February 3rd but I was so inspired by those of you that have already begun that I did the first drawing task today: A Still Life with a fine tipped pen. Follow the linky-loo to see some still life drawings already posted.
I thought I'd share with you today an artist that I discovered during those cold days at Indiana University: Isabel Bishop. I've always considered Bishop to be one of my favorite artists. I love her intimate narratives, her unique way of capturing color and atmosphere (there just seems to be so much AIR in her paintings) and, of course, I love the retro appeal. Bishop began her career as an illustrator but quickly switched to paint as her medium of choice.
Tidying Up, oil on masonite, 1941
Again, Fuh-fuh-freeezing! Tuesday: I believe I did the penguin waddle a half dozen times that day. dotted shirt: Old Navy; dotted dress: Target; sweater and shoes: thrifted
At the Noon Hour, 1935; Lunch Hour, 1939.  I love the moments that Bishop chose to capture. Just everyday snapshots of young women in New York City. If these were created today, I supposed at least one if not both women would be absorbed by their phones or taking selfies. But that's just a guess.
A Sweater with Built-in Mittens! Wednesday: I was so excited when I thrifted this Anthro sweater. I love the pockets! Also, did you happen to notice those huge brush paintings behind me? $2 at an estate sale this summer. I cannot wait to go estate saling again, one of my fave things to do. skirt: old, The Gap; tights: Anthro; boots: Lucky Brand bought at Marshall's
Friends, 1942
Feelin' Vintage-y Thursday: I've had this wool dress since my I.U. days...unfortunately, it's not lined. By the end of the day, I can't seem to get outta this wool number fast enough. sweater: Anthro, thrifted; dress: vintage; shoes: Anthro


Two Girls with a Book


"Finally, You're Weird Again!" Friday: Apparently I've been dressing pretty tame lately as this was said to me by a 3rd grader. Which was quickly followed by a debate by two kindergarten friends who couldn't decide if I was 14 or 23. I'll take either, thank you very much. sweater: vintage, thrifted; skirt and tights: Target
I can't seem to find the title of this painting so I apologize. However, I had to include it, I just love it. I attempted to create a series of people-taking-coats-off paintings in college inspired by Isabel Bishop. Don't you love her sketch-painting style?
Isabel Bishop, painted by Alice Neel, 1974. If you aren't familiar with Alice Neel's portraits, you outta be. I think I'll have to feature her sometime. Her work is awesome.

And here's my wee sketch. This was today's first drawing task: A Still Life. I chose the counter top in my bathroom. So looking forward to filling my sketchbook with drawings! Hope you'll join the fun!

Thursday, January 30, 2014

In the Art Room: Painted Trees (A Work in Progress)

So I thought I'd share with you a project that we just started this week and isn't quite finished yet. Usually I post projects once they're complete...but I've noticed when I peruse art blogs, I like to see Works in Progress (WIP. WIP it good). It kinda helps me wrap my brain around the steps of the lesson and the time it took to complete. Because, when I see these awesome projects posted on my fave art blogs (check out these nominations on The Art of Education for a killer list of art teacher-y blogs), I sometimes feel a little overwhelmed and get that "my kids could never do that" feeling in my gut. But that could be the indigestion from all those bowls of butter noodles and cereal (go here if you need a reference to that not-so-funny inside joke).

So, without further ado-do, I present to you my second grade students Painted Trees Project which is currently a Work in Progress.
Disclaimer: I ALMOST didn't post this photo because it looks like such a hot mess. The messy table, the grimy water cup, that Dirty Ole Sponge Bob and the sad state of the watercolor tray. Not to mention the rando cups of paint stacked on the table. But, even though the photo is embarrassing for me, I thought you should see it for a coupla reasons:
  1. You don't need the World's Cleanest Art Room to create the World's Greatest Art. Like you, when I get to school in the morning, I don't stop running around and preparing supplies until the kids walk in the door. And by then, I'm usually exhausted by all the paper cutting/paint preparing/clay wedging/and coffee making (because without that none of the aforementioned would be possible). My goal is to have all the supplies accessible and ready. Bright and shiny clean is not tops priority for creating...in my room anyway. That being said, I am beyond grossed out by those cups and sponges and will be cleaning 'em in all my spare time.
  2. I love to see how art teachers set up their tables. So I thought I'd share how I set up for watercolor painting...even if it looks like a disaster. I use that styro tray to hold the paint, non spill water cup (best invention ever), and a Dirty Ole Sponge Bob (that's what we call him) to dry our brushes on. Because the students were using warm or cold colors to paint their skies, I like to have the watercolors organized in ROY G. BIV fashion so the kids can easily look down and see that the warm colors are the first three colors in the rainbow and the cool are the last three. Now, I did remove green and replace it with magenta for two reasons. I didn't want them to add green all over their skies (call me a control freak, I've been called worse) and I wanted them to know that magenta could be used with a warm or cool palette. See, there is a method to my messiness.
  3. When you have 4, 30 minute back-to-back classes with each working on a different project, you end up with a variety of supplies on your tables. Hence the cups of paint. That would be for a 1st grade project I'll share with you in the future. 
Now, let's chat about supplies for a moment. I used to hate teaching watercolor to the children because I couldn't find a decent set of paints. Or brushes. And it was frustrating for me and the kids when their end result wasn't as amazing as they'd hoped. Now I've got the good stuff. Put this on your next supply order:

Crayola's Watercolor Mixing Set Yes, they're more expensive than their regular watercolor paint. But so worth it. I mean, look at those colors! 

Royal and Langnickel Paint Brushes So soft you'll catch the girls pretending they are make up brushes and putting imaginary blush on their cheeks. Or non-imaginary paint all over their face. Not that that has ever happened in my room. Ahem.
Okay, let's chat about this lesson. I started with flashcards with words that pertained to the lesson such as: watercolor, paint, brush stroke, warm colors, cool colors, sumi-e, Japan, Asia, etc. As the children entered my room, they read these words to me even if we hadn't discussed their meaning yet. This is an adjusted version of my vocabulary post that you can read here. Once inside, we gathered around a table to watch a demonstration. I told the kids that making art was all about making choices and that today, as artists, they had many to make:

Which direction will I format my paper, vertically or horizontally? 
I am creating a sky scape. What time of day do I want to paint?
Will my sky have a sun, moon or neither? 
What size sun or moon will I have?
If I am making a moon, what phase will it be in?
Would I like to paint with all warm or all cool colors?
What kind of brush strokes could I use?
I know, a lot to think about, right? AND in 20-ish minutes once they returned to their seats. I did a quick demo as a reminder on how to properly paint with watercolor. Here's what I tell 'em:

It's called watercolor paint because you gotta add water. Place a couple of drops of water into each little pan.

Your paintbrush is like a ballerina...she always paints on her tiptoes. She never ever scoots around on her bottom. Because that would be ridiculous and unattractive (although mildly entertaining). 

Listen to your paintbrush. If it's making a scratching sound as it sweeps across your paper, it's thirsty. Add more paint and water. It's also telling you it's thirsty when you see scratchy brush strokes. Give that ballerina a drink!
I then showed them a wee demo on wet into wet/wet into dry. Then I hurried 'em back to their seats so they could actually begin.
At the end of the first 30 minute class, most had finished their 10" X 12" paintings. And then some looked like this. Like, amazing, right? These students completed their watercolor paintings the following art class.
It was interesting to me to see how one class managed to finish in 20 minutes...meanwhile all looking strangely similar. It's funny, I didn't even do that ring-around-the-sun thing in my demo.
And other classes really slowed down and thusly this was the result at the end of the class.
These paintings were finished up on the second art class as well.
During the second 30 minute art class, those that were not finished with their skies were allowed to do so. Those that were finished, moved on to adding a tree to their skies. But before we did, I chatted some about sumi-e brush painting techniques. I told the kids that they were to create a tree painting on practice paper first before attacking their painted paper. I gave them permission to paint as many of these paintings as they wanted until they created one that they were happy with. I really love these little paintings. 
During my little demo, I showed the kids how to apply pressure to their brush to create a thick line...and then slowly lifting the brush off the paper while painting the branches. This made the lines of the branches become thinner and more branch like. For the twigs, students could use itty-bitty brushes. Another tip is to have the students slowly twist the brush as they lift it off their paper which also thins the line.
I'm excited by the results of this 2, 30 minute painting lesson. But we're not finished yet...stay tuned for what happens next with these masterpieces!