Sunday, March 16, 2014

In the Art Room: Let's Make Sushi!

Konichiwa, ya'll! As you might recall, my wee artists are learning about Asia this year with a current focus on Japan (Asia's a big ol' place, not sure we'll be able to focus on much beyond Japan, India and China, sadly. I'd say I need a longer school year but that'd be crazy talk). Last year, when we were travelling Europe in art class, we had tea and biscuits when learning about the United Kingdom. The kids pretty much thought that was the best thing ever. For that reason, I got the notion that we outta learn about the Japanese art of crafting sushi by making some of our own -- both collage...and edible!
 I began this lesson with my 1st grade students by doing our usual: looking at the map, finding Asia, finding Japan, chatting about what makes it an island, counting the four main islands in Japanese (ichi! ni! sahn! shi!), you get the idea. We then chatted about how rice is a staple in many Asian countries. And, with Japan being an island and all, their main source of protein is fish. This go a lotta "eeew!"s from the 1st grade set who declared: I hate fish! Unless it's buttered, battered and fried, a la Chef de Capt. D's, that is. We are in the South, after all. We eat our Moonpies the same way.

But, kids! Many times, their fish isn't cooked. It's raw!

 This got a lotta wide-eyed stares from the peanut gallery. At this point, I busted out the super sweet book Yoko by Rosemary Wells. If you've not read it, it's all about a little Japanese-American cat who takes her sushi to school only to be made fun of by her classmates. In the end, her teacher saves the day, as usual (it's what we do). After reading, the kids and I decided that food that is unusual to us isn't weird, it's just different. And, possibly, delicious.
My inspiration for the collage portion of this project came from the book First Book of Sushi by Amy Wilson Sanger. The images in the book are these amazing collages that look rad and were surprisingly easy for the kids to create.


Another source of inspiration for the kids was my set of sampuru (which means sample in Japanese. Note, this is not my set but an example pulled from the interwebs). I told them about how when I was in Japan, the restaurant windows were filled with sampuru to give potential diners an idea of what to expect inside. Creating sampuru is a fine art in Japan as it's meant to look realistic and enticing. So our collage sampuru had to do the same.

If you wanna make a totes delish sushi collage as well, here's what ya gotta do (in 30 minute art classes):

Day #1: Printmaking! We did some monoprinting on a new class favorite the Gelli-Art plates. They print just like gelatin (go here for my most popular blog post to date [which isn't saying much, ahem]) but without the prep and the bad feeling you get when you find out where gelatin comes from (animal bones, people). The draw back? They are pricey -- these were $10 a pop. I had one for each two kids and they seemed content, albeit chatty, to take turns. These printed papers later became their plate for sushi.

Day #2: Making sushi! After reading our talk and reading about Yoko, we started by making two sushi rolls. In the story, we saw how Yoko's mom made the sushi by laying out the seaweed, pressing the sticky rice on top, adding a surprise and cutting the sushi. We wouldn't be able to experience those steps until later...so for now, we simply traced circle templates and added our surprises inside the circles. Most of us stuck to green for avocado or cucumber, orange for carrots and pink for fish.

Day #3: With our plate and sushi created, we learned about common Japanese condiments while eating sushi. We chatted about how we use ketchup, mustard, salt, pepper here...but in Japan, they use wasabi (some kids had tales of this super hot green stuff), ginger and soy sauce. We created that, the green grassy garnish, some sashimi and chopsticks.

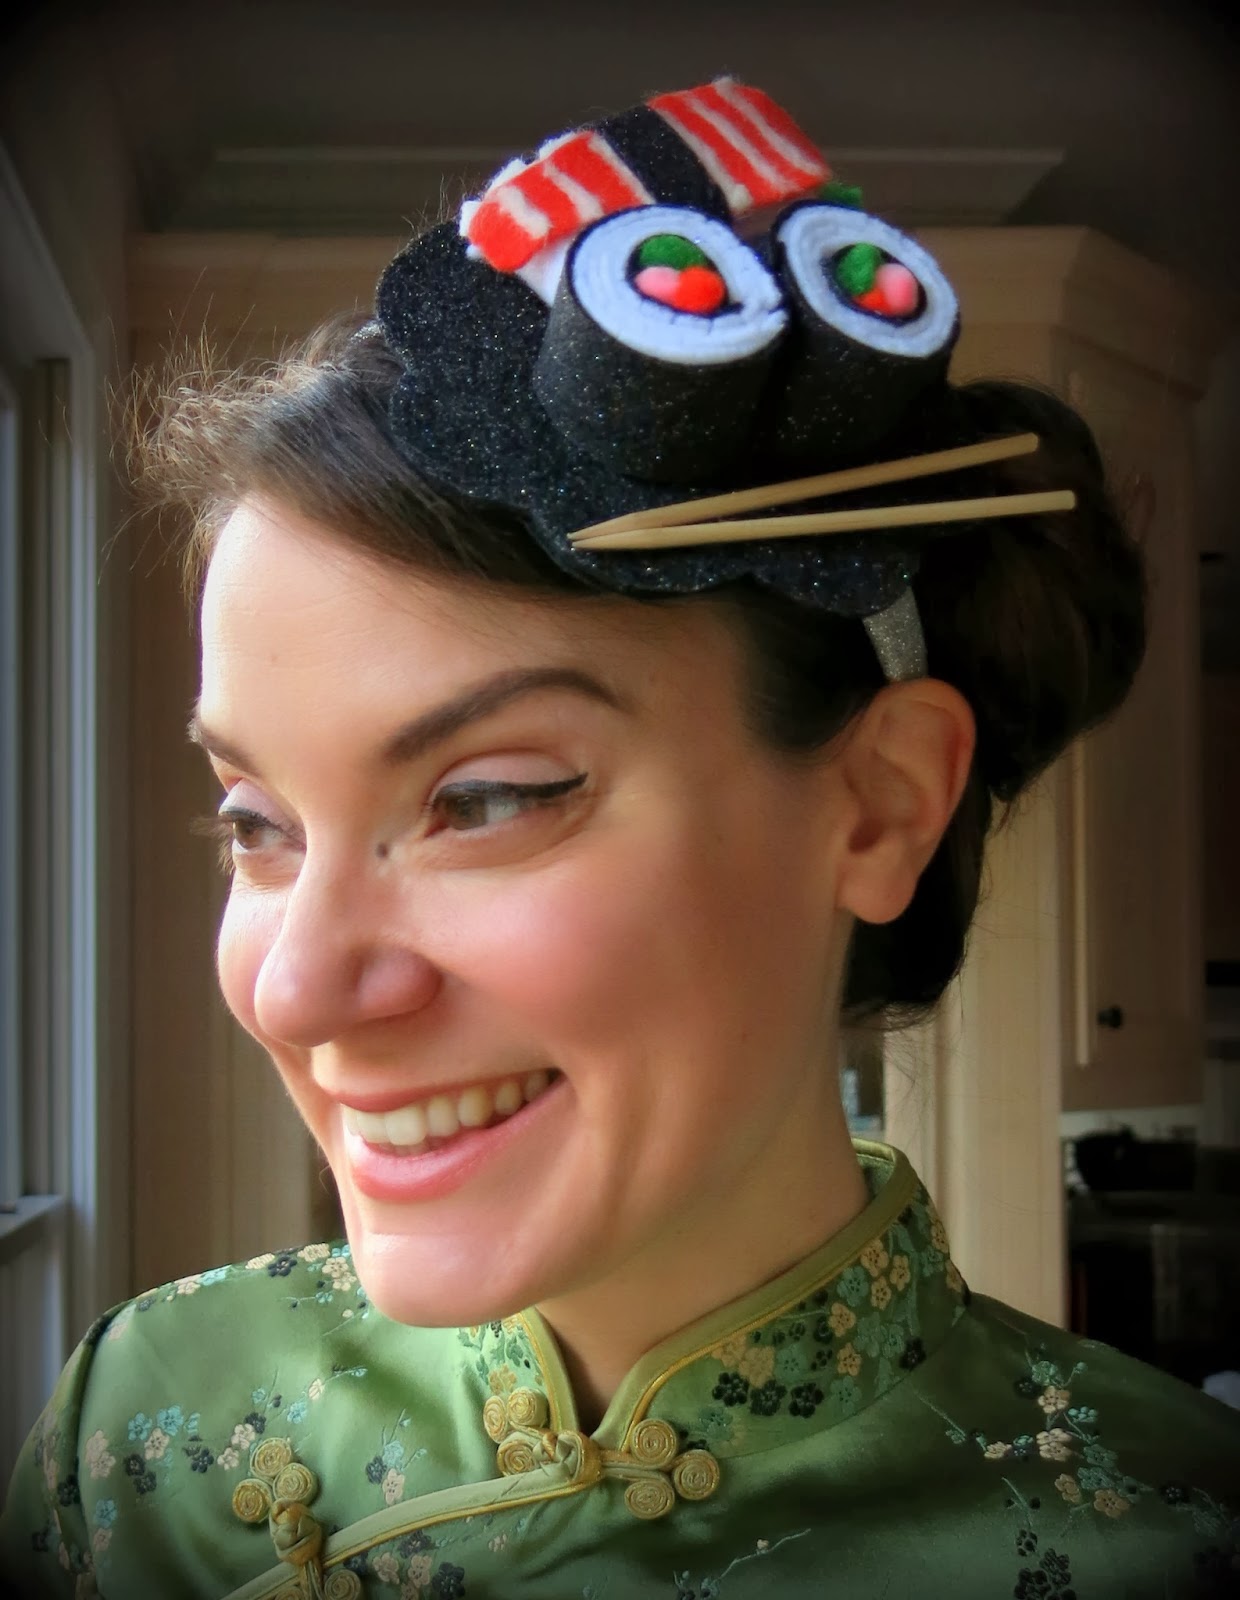
This hat was a pretty big hit with the kids...although they kept looking at my head and saying things like, "ohh, you are making me hungry!" which I thought was odd until I remembered just what was on my head! DIY directions here.
Day #4: On our last day, we put the finishing touches on our sushi collage and added a black border as well as a paper frame. Because we've gotten so much use out of our random painted scrap papers (thanks for the idea, Painted Paper!) I don't throw anything away. It's kinda a problem. But it makes for such fun collage material!
Ohhhh, looks delish!

Day #5: Candy Sushi party! As a wrap up for this lesson, I thought it'd be super fun for the kids to make candy sushi. Of course they were all over that idea! In fact, I mentioned it a little too early in the lesson which lead to the question "when is candy sushi day?!" like, every 5 minutes. I finally set a date and the anticipation was through-the-roof high.

To make it a wee bit more authentic, I greeted the kids at the door in my kimono and asked them to remove their shoes and place them up against the wall. Thankfully my room smelled like a candy factory which cancelled out the stinky feet smell.

When we entered, I doused the kids in hand sanitizer and had them go shopping for a paper plate, a set of chopsticks, a packaged Rice Krispie Treat and a Fruit Roll Up. Once they dropped that off at their seat, we met at a demo table for some quick directions. I reminded them of the tale of Yoko and how her mom prepared the sushi. I had found some packaged seaweed at the grocery and showed that to the kids. I wanted to emphasize that we were only making candy  sushi...that the process would be kinda similar but, well, not. And the taste would be completely different. I didn't want some kid begging to go out for sushi only to be disappointed it didn't taste like a fist full of sugar.
So the process goes a little like this: lay our your "seaweed" (aka Fruit Roll Up). Squish your "sticky rice" (that'd be your sticky Rice Krispie Treat) to make it about the same size as your seaweed. Place it on the seaweed and put some surprises inside. We opted for gummi worms and bears.
Roll it up and slice with your plastic knife.
Now, for my pre-K friends, I didn't have chopsticks so we used the Japanese snack Pocky. These didn't prove to work so well as they broke easily and melted in our hands. Not that the kids minded!

For those wee ones, they used their hands.
For my 1st graders, we had chopsticks and they loved them. However, they had no clue how to use them, even after a demo. Watching them attempt to operate them was kinda like watching a baby giraffe trying to walk on their new found legs -- hilariously awkward. They dropped more sushi than they put in their mouth. Which made me think: maybe I'll invest in some class chopsticks so the kids can practice some fine motor skills with them. They enjoyed using them (so much so that one boy picked up all the food wrappers with them) but definitely needed some practice. Have you all ever done fine motor activities like that in your art room?
By the way, I tried a bite of candy sushi...and all I can say is, I'll eat the real thing any day. SoOoo much sugar! Those kids were seriously vibrating when they left my art room!
But it was super fun and I'd totally do it again. In fact, I've got several 1st grade classes that have yet to have their party so I'm looking forward to more sushi-making-madness soon!

Have ya'll ever done an artsy food activity in your art room? I'm hoping to continue this tradition so I'd love to hear your ideas...icing cookie color wheel, anyone?

Off to get some sushi! Chat soon.

Wednesday, March 12, 2014

In the Art Room: Teaching Good Craftsmanship

Patterned painted plates by one 2nd grade class after 2//30 minute sessions. These will serve as our looms for an upcoming circle weaving lesson.
SooOOooo, I've not really shared with ya'll an art lesson recently. Kinda cuz we're in the middle of, like, a billion (one 4th grader girl actually said to me, "Mrs. Stephens! We CANNOT start ANOTHER project until we finish at least one!" as the rest of the kids proceeded to list all the projects we've started and yet to finish. "But kids! There's just so much we need to cover!" which got me a bunch of arm-crossing and head-shaking). I've also not posted any art happenings in light of my last "In the Art Room" post. After writing about my (very wishy-washy) thoughts on choice-based teaching, I've been questioning many of the teaching practices in my art room. One of them being craftsmanship.

Can you teach good craftsmanship in the art room?

(Me about a month ago):  Like, duh, is this a rhetorical question? 

(Me all I-just-don't-know-anymore-ish): I dunno, am I somehow gonna kill some kids' creativity and be responsible for his therapy bill in about 15 years?! 
After seeing how the amazing art teacher behind Shine Bright Zamorano lists his student goals and expectations on the board, I totally did the same. I absolutely love that dude's blog, ya'll should go check out the incredible work of his students. Oh, and if you happen to see any spelling errors, not my fault. My white board lacks autocorrect. 

As an art teacher, we've all been there. You see a student working on a beautiful masterpiece that'd make Picasso all goosebump-y. So you turn your back for a second (to tend to the kid that's decided that magenta paint is just the right shade for nail polish -- oh, but wait, RED would be so much better, lemme just lick this other color off -- STOP! WHAT. ARE. YOU. DOING?!) only to find that when you return to said Picasso, she's decided, in a last moment of kid genius, to dash off a smeary smiley face right smack dab in the middle.

What do you do?

You gave directions! You chatted all what constitutes a pattern: lines and shapes that repeat! You gave out what you've dubbed The World's Smallest Paintbrushes so the kids could successfully create detailed-ish patterns! You always allow plenty of time to finish in following classes so that if said Smiley-Face-Painter wanted, she could created a whole pattern of smileys the following class! Yes I'm screaming because that Smiley Face is smirky and arrogant and saying to me:

Hey! Picasso wanted to paint a Smiley Face not some stinkin' pattern! Get over it, she's the artist!

Oh, boy. 

Touche, Smiley Face. Touche.
HooOOOooowever. The expectations where clearly stated (patterns, people) and the level of craftsmanship was demonstrated and set (paint slowly, carefully and thoughtfully). Now I know my friends in the 7/8 year old set are different kids with different tastes, levels of patience and ability. And I keep that in mind while they are creating. But my job is also to push them. To show them how to go beyond what they even imagined they could do...isn't it? Or is expecting them to go above and beyond taking them too far away from "well, I know it doesn't have patterns but {brace yourselves, you know you've heard this before} I wanted it to look that way."
Okay. But...

But what?

It wasn't what I expected? It wasn't what I wanted it to look like? 

Should it really be?
I really don't know.
 This internal art teacher debate (I seem to be having a lot of these lately) brought me back to my thoughts on choice-based teaching. I am certain choice-based teachers expect certain levels of craftsmanship even when their students are choosing the materials and subject matter, right? But how often is work that is beneath a students' ability allowed under the statement "that's how I wanted it". 
What I have found, when I hear that statement (which to my art teacher ears sounds like a cop-out) is that my students need a little more of a nudge. I have them walk around the room and check out the awesome work of their friends. I have them tell me what it is they are working toward because I've often found the cop-out was due to a failed attempt. At which point I usually do a little one-on-one demo on my own project to help, hopefully, motivate. Then I try to make myself scarce to see what my little artist friend can make happen on their own.

And, usually, the one who is most surprised by what they create is the artist themselves.
Like the artist behind this plate. After working more patterns into his piece (after some gentle nudging), this little dude was so proud, I saw him quietly take his buddies over to the drying rack to show off his work. When we were standing in line to leave the room, he kept turning around and looking at his plate like he couldn't really believe what he'd painted.

And that's super important to me.

Would he have been as proud without that extra nudge, without an expectation of good craftsmanship? 
My gut feeling is telling me no. But I did have a bean burrito for dinner so I'm not totes trustin' my gut feeling right now.

What are your thoughts on this issue? 

We should teach good craftsmanship, I think we can all agree on that. But to what degree? 

Where do we pause, hold our tongues and allow the artist to exclaim, "that's how I wanted it," even if it doesn't meet expectations? 

I'd love to hear your thoughts. 

Sunday, March 9, 2014

What I Wore #92 and Back to the Drawing Board, er, Sketch Book

When Everyone in the World Gets a Snow Day But You: You wear a sad-looking puppy sweater, smear read lipstick on your face and make the most of the day. Granted, we did get Monday off...but Tuesday we had to return. Meanwhile, the rest of ya's slept til noon (or later, how glorious!), ate bonbons and got caught up on Days of Our Lives. Jelly! sweater: Old Navy; dress: Francesca's a million years ago; crinoline: Amazon; boots: Lucky Brand; tights: dunno; leopard scarf and headband: gifts
Hey, kids! I hope there's some super happy sunshine in your neck of the woods as we are finally seeing some blue skies here. This weekend, I've spent time outside drawing and painting and the sun felt like heaven on my skin. Wouldn't it be so super rad if spring just decided to kick winter to the curb and make herself at home? I'd be down with that. 

Since the weather is so divine and...it's mah burfdey!...Ima gonna keep this post short with just a little of What I Wore and what I've managed to draw for the Artsy Book Club. However, I do wanna throw out a coupla questions to ya'll:

1. Are you going to the NAEA conference in San Diego at the end of the month?

2. I wanna have a meet up! Would anyone be interested in a little Crazy Art Teacher gathering? I know, the whole thing is One Big Crazy Art Teacher get-together, but I dunno. I'd just love to meet ya'll!

3. I'll be presenting! -Ish! I'll be presenting on a panel titled Elementary Division Carousel of Learning and Advocacy (side note: there will not be any actual "carousel" at the presentation. I already asked) on Sunday, March 29th from 9:30 - 10:20am in the Hilton Hotel/Indigo 2014B/Level 2 (you got that? Because I'm pretty sure I'm gonna need your help finding the place when the time comes). I plan to have a couple gifty-surprises for the first 20 folks that make it to my panel. Yay!

Alright, that's all I got. Off to roll around on the floor, eat copious amounts of cake and cookies and holler "it's my birthday, I'll do what I want!" to the cat and hubs. Have a great week!
So a couple of years ago, I took a pastel class from this seriously fun and kind dude named Paul DeMarris. Not only is Paul a fabulous teacher and artist, he is also the creator of his own line of oil sticks. They are like working with butter saturated in the most glorious of colors. He's recently branched out into the "crayon" market (I use that term loosely as they were more oil pastel-esque than waxy crayon). He sent me a sample of the primary colors and white to play with...and I cannot stop using them. They blend beautifully and when layered they almost have the appearance of oil paint. You should totally contact Paul (he's honestly the nicest and most friendly dude!) if you'd like him to lead a class or are interested in his sticks.
Blue Willow Pottery Wednesday: My art teacher BFF (Hi, Mallory!) did this amazing art lesson last year on Blue Willow Pottery. I borrowed pretty heavily from her lesson, especially telling the kids The Legend of Blue Willow Pottery. To set the mood, I went with this blue willow-wannabe dress. sweater: vintage, thrifted; dress: vintage; shoes: Anthro; tights and necklace: Target
Having worked for days on my sushi hat/dress ensemble, I had a hankerin' for the stuff. I picked up this lovely tray at the grocery and it was a battle of willpower to draw it before devouring it. I actually had to lock myself in my sewing room to draw this as the cat could smell it and kept pounding on the door. This drawing was also created with Paul's sticks.
Let's Go to the Art Museum Thursday: I had an inservice after school on Thursday that involved seeing an Asian art exhibit. I decided my sushi ensemble would be appropriate. Surprisingly, I was the only one wearing sushi that evening...what's wrong with people?! hat, dress, shoes: DIY by me, go here; bag and sweater: thrifted; tights: Target
The last two days have been this lovely. I seriously could have sat outside and soaked up the sun all day. This is a little watercolor meets Paul's crayons.
Thanks, Mom! Friday: So I may have dropped some not-so-subtle hints to the mom that I needed this skirt in my life for my birthday. And it managed to come in the mail just in time for me to wear on Friday which was perfect because I almost didn't have a stitch to wear (ha, I kid. I have enough clothing to blanket the state of Tennessee. Sometimes it gets cold). Thanks, ma!! pencil skirt with pencils skirt: Anthropologie; sweater, blouse: thrifted; necklace: The Paper Source; shoes: Dolls by Nina; tights: Target; palette pin: gift from a friend (thanks, Paul N.!)
So, I may or may not have a shoe addiction. Here are a couple that I love (despite what my feet say). These were such fun to draw that I might actually have to sketch some more from my growing shoe collection. This was drawn in crayon.


Friday, March 7, 2014

DIY: Sushi on my Head, Sushi on my Feet, Sushi EVERYWHERE

So, I managed to score Snow Day this week, ya'll! Which, in Tennessee, means a coupla things:

1. It probably won't snow but it might snow so get yourself to the Winn-Dixie, buy all the beer and bananas that'll fit in your buggie* and drive like a crazy fool on the slightly slick roads, ya'll! 

2. Your TN friends will be blowin' up your Facebook with photos of their kids creating the World's Smallest Snowmen (complete with copious amounts of dirt and gravel), making snow angels in 1" snow (dirt -n- gravel angels to match the snowmen) and sledding. Again, in dirt and gravel. Cuz in the South we like to say, "You get whatcha get and you don't pitch a fit." This apparently applies to snow-dirt-gravel.

3.  It will more than likely be a lovely 70 degrees in just a matter of days (because TN weather is moodier than me after sobering up from a Beer/Banana Cocktail {see first footnote to understand my only slightly humorous humor}). So, for that reason, a Tennessee Snow Day is Sew-a-Sundress Day!
Since we are currently learning about Japan in art class, complete with my 1st grade friends creating a sushi collage, I thought it was about time I stitched up a Japanese-themed dress. I actually have a couple Asian-themed dresses in the works but they were placed on the back burner for my Artist of the Month dresses...which got put on the backety-back burner for my Valentines' Day number and my Dress Like a Book Character frock. Whew! Too many burners goin', ya'll! Story of my life.

For this here dress, I used the same vintage Vogue (or "Vague" as I like to call 'em) dress pattern as I did for my Crayon Dress. It's a pattern that honestly has hardly a whisper of directions, just arrows, diagrams and comments like "sew this to that and make sure it fits."
Even with those lame-o directions, this snowed-in seamstress was able to stitch it together (my apologies for the creepy speaking-in-third-person-ness). Speaking of snowed-in, that dusting of white stuff on the ground which kinda looks like I dropped a super small sack of flour? That's what we in Tennessee call SNOW. Yessur, that thar got me a day off from school and a two-hour delay the following day. Don't hate.
In my latest What I Wore post, I shared with ya this Sushi Hat that I wore for Wacky Hat Day. I had seen several images of "sushi hats" online and they looked simple enough to make. Turns out they were so easy-peasy that I even made some Sushi Shoes. Because what's better than Stinky Feet? Stinky Fishy Feet, that's what!
So just how did I make this, you ask (well, more than likely you are probably asking, "WHY did you make this" or maybe "WHY do you think I wanna know, I ain't makin' this!" to which I would respond, if you don't  have a handcrafted sushi hat and matching shoes, you just ain't livin', my friend). 

For this magical feast for the feet, you'll need some stiff sparkly felt (yes there is such a thing. My life is now complete), pompoms, tooth picks and white felt. Oh and a pair of thrift shop shoes you don't mind permanently adhering felt sushi to.
Cut a 2" strip of felt about an 1" tall. Hot glue your pompoms of choice to the end, roll it up and glue it closed.

Cut some white felt about 6" long, 1" tall. If you snip the ends, the white felt looks more like rice once it's rolled up. Wrap that a coupla times around and hot glue into place.
Like so. By the way, in each photo I had to cleverly hide my pitifully peeling thumb. This weather has my fingers cracking and nails peeling. Which means my dreams of becoming a hand/foot model are pretty much ruined. Sigh.

Oh! To finish, wrap the "sushi" in a final layer of black felt for the seaweed and glue into place.
For the sashimi, I did do a wee bit of felting so show the little lines of fat in the salmon. That was then glued to a bit of rolled up white felt and wrapped in a strip of black. I had to add a felt bit for ginger and a green lump for wasbi. Toothpicks worked best for the chopsticks on my shoes. For my hat, I used small skewer sticks.
And now a word from my boss, The Cat...
"Don't you believe for one second that this crazy lady sewed this dress herself! While she was making sushi, which, by the way, she wouldn't even let me sample!, she locked me in her sewing room and demanded I finish the hem of her dress. As you can see by the look of focus on my seriously cute kitten face, I take my job very seriously. Despite my lack of recognition by said crazy lady. Humph!"


Ahem, whatever. Don't you believe a word outta that cat's mouth! She's convinced me on more than one occasion that I've forgotten to feed her and tricked me into doubling her breakfast! She's basically a con-artist in a cute kitten suit. 

And that's all, ya'll! I hope you have a super fab weekend and I'll chat with you again at week's end!

* So I was at the grocery just a day or two before the weather hit and I noticed that there were no bananas like anywhere. And then I saw buggie (yep, that's what we call 'em down here) after buggie filled to the brim with beer and 'nanas. Is there some sort of Banana/Beer Cocktail I'm not aware of?