Tuesday, January 12, 2016

In the Art Room: Troubleshooting Printmaking with the Littles

Hey, y'all! It's Printmaking Season in my art room currently and it's been a big fat hairy success. Mostly because, let's face it, printmaking is super mysterious, magical and mega-awesome. The kids are always surprised and thrilled by their result and pulled prints always elicit the biggest oooohhh's and ahhhhh's. 
BUT. There is the Dark Side of printing as well. Y'all know what I'm talking about. Poorly inked plates. Smeary prints. An inked and printed on body part (um, that was today, in fact. See below). However, I think I've got some tipz -n- trickz for y'all that might make life in Printmaking Town a lil easier. So click the sideways triangle below and I'll walk y'all thru some steps!
By the way, since my room tour video, I've seen a nice jump in my youtube channel subscribers. Thanks, y'all! My goal is to share more videos like the one above and the instructional videos I create for the kids. If you are interested, please feel free to subscribe, I'd love to have ya! 
 So, those marker prints...where have they been all my life?! They are super fun, easy to do and a great way to introduce kids to the magic of printmaking. I got the idea from one of my fave art ed bloggers, Don Masse (thanks, bruh!). You can find his awesomeness here
During the next two thirty minute art classes, the first graders printed with ink. Each student made a minimum of 5 prints which will be used in an upcoming project. By the end of the printing process, they were experts at covering their plates completely and pulling clean-ish prints. I mean, their fingerprints all over the background are prints as well, right?! Just say yes, there's no point in arguing with me. 

Give that paper a back rub, kid. 
Pulling only part of the way up and checking the print was encouraged. This way the kids could lay the paper back down and rub some more if need be. 
I have found that printing on copy paper works the best. I also have the kids use Speedball washable ink. Names are written on the back of the paper before printing is started. 
The kids were allowed to go to another table to use more ink. However, this will result in blended colors...which is cool if you use analogous colors. We had red and yellow out which created these lovely blended prints. 
 Love how it pops on this blue paper!
The kids really enjoyed these prints!
 Printing limbs was not encouraged...but super funny when it happens. This sweet girl leaned onto her plate accidentally and did a lil body printing. It's a new trend. She's totes cutting edge. 
Y'all saw these last week. These were created by my third grade after watching my lil demo video...


This week they'll watch this video. I hope it is as successful at explaining the process as the first one!
I'd love to hear your printing tips and tricks, y'all! Please feel free to share 'em in the comments. Until next time...

 photo signature_zpsd10b3273.png

Sunday, January 10, 2016

What the Art Teacher Wore #154

Totes Tuesday: Well, we actually returned on Monday but that was kinda a rude awakening and I just couldn't seem to pull it together enough to snap a pic. You didn't miss much, lemme tell you. Just sitting-in-meeting 1950's vintage wear. You know, the ushe. But on Tuesday I was feeling a lil more up to form. Getting back into a routine of not staying up til midnight and beyond and rising late in the morn takes some easing into, y'all. sweater: thrifted vintage; skirt and boots: Anthro; scarf: gift from a student; tights: Target; bracelets: street market in Cali
Well, it happened. We went back to school. This year our district provided three glorious days of PD which I totes enjoyed. Not only was our art professional development fabulous (check it out here and here!) but it also helped us all ease back into the routine of things. I was stoked to have a couple of days to prepare my room for my Art Teacherin' Resolutions (part 2 coming next week!). In fact, so many things have changed/updated/whatevered that I decided to create a brand new Art Room Tour for y'all! 
There are still a TON of things I want to do to my magical art teacherin' space (like, A.TON. Is our job ever done?!) but until then, this is as good -n- groovy as it gets. By the way, many of the items you see me pan over in my artsy joint will be spoken about in detail at AOE's winter online conference where I'll be talking about how I attempt to Maximize my Minutes in the Art Room. And until next time, have a great week, kids!
 Wonderful Wednesday: We had the chance to work in our rooms and get caught up on teacherin' life on Wednesday. What a wonderful gift! Not surprisingly, I didn't manage to get everything done but do we ever? I sometimes wonder if/when the day will ever come when I leave my art room and think, "Welp! I got everything checked off my list, all's done!" Instead, I just close my door on the mess, shake my head and walk away super fast. I'm sure that makes me look like a nut on the security cam! sweater: made by me, DIY here; skirt, boots and belt: Anthro
 Bring 'em in, Thursday: The kids came back on Thursday and I was ready to throw all kinds of new things at them. You can read about some of those routines in my Art Teacherin' Resolution post (update this next week!) sweatshirt: Forever21; dress: made by me, DIY here; shoes: Payless with shoe clips made by me
One of my resolutions was to film myself instructing and play that for the kids. This allows me not to forget any details I need to share and frees me up to prepare supplies and drink my coffee (because, priorities). I was worried that the videos wouldn't be as effective and the kids' artwork wouldn't be as awesome as it usually is, but...
 Check out these cityscape printing plates! The kids and I were both thrilled! I have since created a video to walk them through the printing process which they'll see this week. Here's a peek: 
Feel free to use this lesson and these videos in your art room. And any feedback would be much appreciated. Third grade was my test pilot this week. Because it went over so well, I will be making more videos just like this. If you are interested, y'all can subscribe to my youtube channel to keep up. 
 Friday Already?!: That was fast! Teaching only two days a week will do that to you, I guess! It was a fun week and I'm looking forward to the next. I hope y'all have a super duper upcoming week as well! blouse and sweater: thrifted; palette belt: etsy; palette skirt: Pin Up Girl Clothing; tights: Target; shoes: Clarks
Oh! I have to share this sweet image with you! When my kindergarteners were finished with their paintings on Friday, I threw down this piece of fabric I purchased at IKEA and asked them to color it with my fabric markers. When I told them it was going to be sewn into a dress, they were thrilled! I overheard my sweet little friend in the blue on the right tell the other kids when they came to the floor, "Mrs. Stephens is going to make this into a dress and wear it! We will be famous!" They are so funny! 
 photo signature_zpsd10b3273.png

Thursday, January 7, 2016

In the Art Room: 3-D Letters!

Hey, y'all! I'm back, as promised, with the other awesome project I did during my fab-o art teacherin' PD this week! In case you missed the "I Am" books post, let your fingers do the clicking and check it here. In the afternoon, the leader of our PD, Daryle Grenead, taught us how to make these super fun 3-D letters! 
Full disclosure: a good buddy took Daryle's class a while back and gifted me her half-finished ART sign (thanks, Deb!). So I got to skip several steps and fly straight to the papier-mâché and painting. You know, the fun stuff. But don't you worry, I took several photos of my friend Jennifer's hands while she worked away on creating her letter so I could share them here with y'all. She's a glorious hand model, that Jennifer. You'll see. But first! 
Check out the inspiration that Daryle created and shared with us! He recommended doing this project with middle schoolers. He also mentioned that if they do something like their name, each letter takes about one art class to tape and papier-mâché. For our time's sake, each of us did one letter (well, except for me). 
To start, Daryle recommended using stencils to help the kids cut out their initial. We simply laid the stencils over the cardboard and traced. Two will need to be cut out with box cutters, one for the front and the back. Daryle said he cut the letters out for his younger students to save on instructional time and for safely issues. If you are doing an entire word as I have, you simply lay out the letters of your word on a large sheet of cardboard. Make sure each letter is touching, tape the letters together and trace onto the cardboard. This way, when you cut it out, it is one solid piece of cardboard, not multiple pieces. 
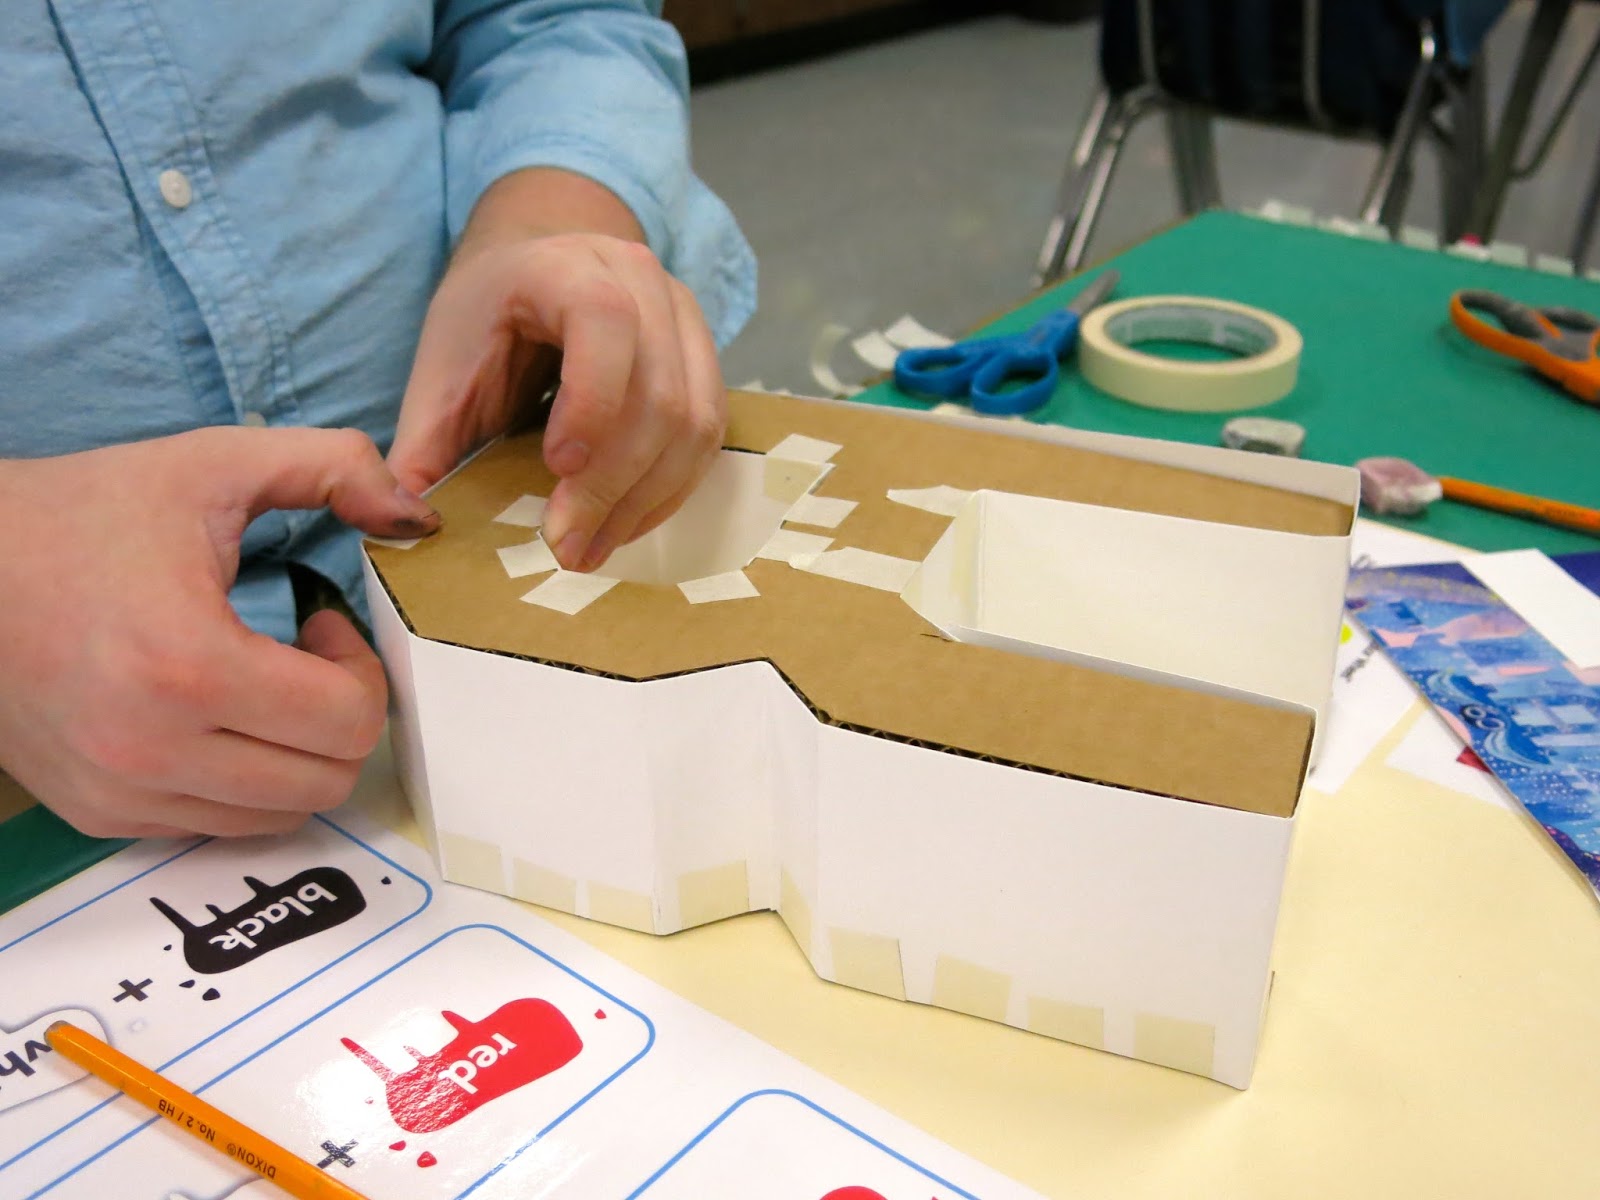
 Once you've cut out your two letters (or your complete word, cut twice), lay a piece of heavy duty poster board beside your letter. The width of the board will determine the depth of your letter. As you lay the board beside the letter, add tick marks as each corner of the letter. This is where you will fold the poster board. 
 As my friend Jennifer's lovely hands are demonstrating. 
 Once that is complete, fold the paper along your tick marks. 
Which is easier to do if you score the board first with a dull pencil and then fold over matte board. 
 Ta-da! You can start to see the shape of the letter! 
Using masking tape, start taping the edge of the letter to the poster board. You'll need to use a couple pieces of poster board to complete the letter so be ready. 
 And have tape ready. 
While Jen was taping away, I started snapping pics of my buddy David working on his R. Notice that when he was done with one side, he fitted the other cut out into place and started taping that down. Also, don't forget to create that super fun inside piece! 
And bring on the snotty papier-mâché! Layer the whole stinkin' thing. Now you see it would take the kids multiple days to do just a letter. A great art club/after school/summer camp kind of project, says moi. 
 I love that some folks skipped the letter idea and did things like this and symbol and we even had a dollar sign!
 Of course, you can see here, I was pretty spoiled by my friend's half finished efforts. I just had a lil work to do and let it dry over night. 
For the more advanced set, Daryle had created these amazing pieces for our TN football team. 
 Before painting, Daryle suggested painting everything with a coat of white acrylic. Then add color and seal with a clear coat. 
 I couldn't wait to get to school the next morning and finish my sign! The best part was splatter painting it. Seriously, y'all. I now know why ole Jackson had a thing for paint slinging, it was a blast!
And now it hangs proudly at my Art Supply Store. The kids loved seeing it today! 
 photo signature_zpsd10b3273.png

Tuesday, January 5, 2016

In the Art Room: "I Am" Books

Well, welcome back, my fave art teacherin' friends! I know most of y'all are back to schoolin' even if the kids aren't there. My most amazing school district has decided that we ease back into the routine by providing with us three days of professional development before The Return (of the Chillins). Today, one of my favorite art teacherin' buds Daryle Grenead came and demonstrated two awesome projects to bring back to the art room: I Am books (shown in this here post) and 3-D letter making (to come on Thursday, stay tuned). 

These books are a barrel of fun and so easy to make...not to mention they tie in so much literacy, it's enough to make your reading specialist's heart grow three times it's size! Daryle recommended doing this project with the fourth grade and up set. I can't wait to give it a-go with my favorite wee artists.
Let's start with the best part of this here accordion-style book: the cover. We used the same relief-style method that I've shared in this blog post where we used leaves. 
To start, we each had two pieces of square 5 1/2" pieces of matte board. Very thin poster board (or heavy weight paper would work as well) was used and a collaged design was glued into place with good ole Elmers.
Once finished, we used 8" X 8" pieces of foil. DULL SIDE UP (that's super duper importante, hence the ALL CAPZ), spray adhesive was applied to the foil and our collaged piece was placed face down. The edges of the foil were then wrapped around the backside of the matte board. 
Using a cotton ball, the surface was rubbed until our design appeared. To get into those hard-to-reach places, a q-tip was used. 
BOOM, y'all! Because heavy-ish gauge foil was used, designed could then be drawn into the foil with a dull pencil. And no foil was harmed in the process...an art makin' miracle!
Look, maw, no punctured foil! 
Using that super cheapo $1 black matte spray paint from your fave hardware joint, lightly dust those bad boys. 
And buff off the spray paint to reveal your incredible design. Prepare yourself for the oooohhhhssss and ahhhhhhssss, y'all. Cuz they're coming...
 Like, right? I done tole you.
 Now, let's talk about that writing portion. Daryle provided us with an I Am poem prompt that inspired our narratives. 
There are truck loads of examples of I Am poems online. If you ask Mr. Google, he can help you out. 
 Now, prepare yourself as I share my poem-writing soul with you. You're welcome. 
We used heavy duty watercolor paper for this portion. The paper was 5" X 30" (me thinks. Don't quote me on this. I'll deny everything). 
 Read on, my poetry skillz are pretty much unmatched. 
Just got the memo, I've been named Poet Laureate. Who is Laureate, anyways?
And there you have it! Have y'all done these kind of books with your students? I'd love some more ideas. And Happy Back to Art Teacherin'!
 photo signature_zpsd10b3273.png