It has been a long time since I forced myself out of my sewing comfort zone. Like, a really long time. In fact, it's been a long time since I've even sewn anything (I blame the writing of this book for that!). Some months ago, while shopping at the fabric store, the idea to make a Frida dress came to me. I immediately pulled up the image of Frida with the green floral background and purchased all of the fabric I could in that color palette. I thought "this idea seems beyond my capabilities but if I scoop up all the supplies, I just might try it." And so I did.
And, hold on to your pearls, THIS BABY HAS POCKETS!
While shopping, I also scooped up a 1960's style shift dress pattern. I knew that a simple front with no waistline would have to be the "canvas" for this kind of creation. Now, y'all know that I'm all about the needle felting...and that's normally how I while away my winter days...but something about the look I was going for said applique. So I started sketching.
I cut out and laid the front panel of the dress out on some wrapping paper. After tracing around the pattern, I started sketching Frida. If this Frida looks familiar to you, that might be because I was referencing my Frida latch hook design. After sketching her out, the REAL fun of cutting out all of the pieces and adding the iron on backing began.
I have done A LOT of applique but I've never used Heat and Bond...like, what?! I guess I just didn't know it was a thing! When I found it at the craft store and used it, I was like WHERE HAS THIS BEEN MY ENTIRE LIFE ON PLANET EARTH? It's that amazing. BUT a lot of work to add to each piece.
Once the backing was added, then I simply laid it out and ironed in place. I thought I was doing okay...until I started the HOURS of stitching. Applique is not for the wimps, kids.
I went through a lot of back and forth decision making with this dress. First up: to use a floral print for the flowers or stitch flower shapes. I'm happy I went with the floral print. I did something similar with her shawl. Then I had to reach out to my IG fam about thread color. Initially, her face was outlined in peach...but you just couldn't see her jaw line. So I outlined just the jawline in brown...and it looked like a beard. Eventually, I seam ripped the crapola outta the thing and used dark brown for her ears, jaw and neck. And I'm happy with that. Thanks, IG fam!
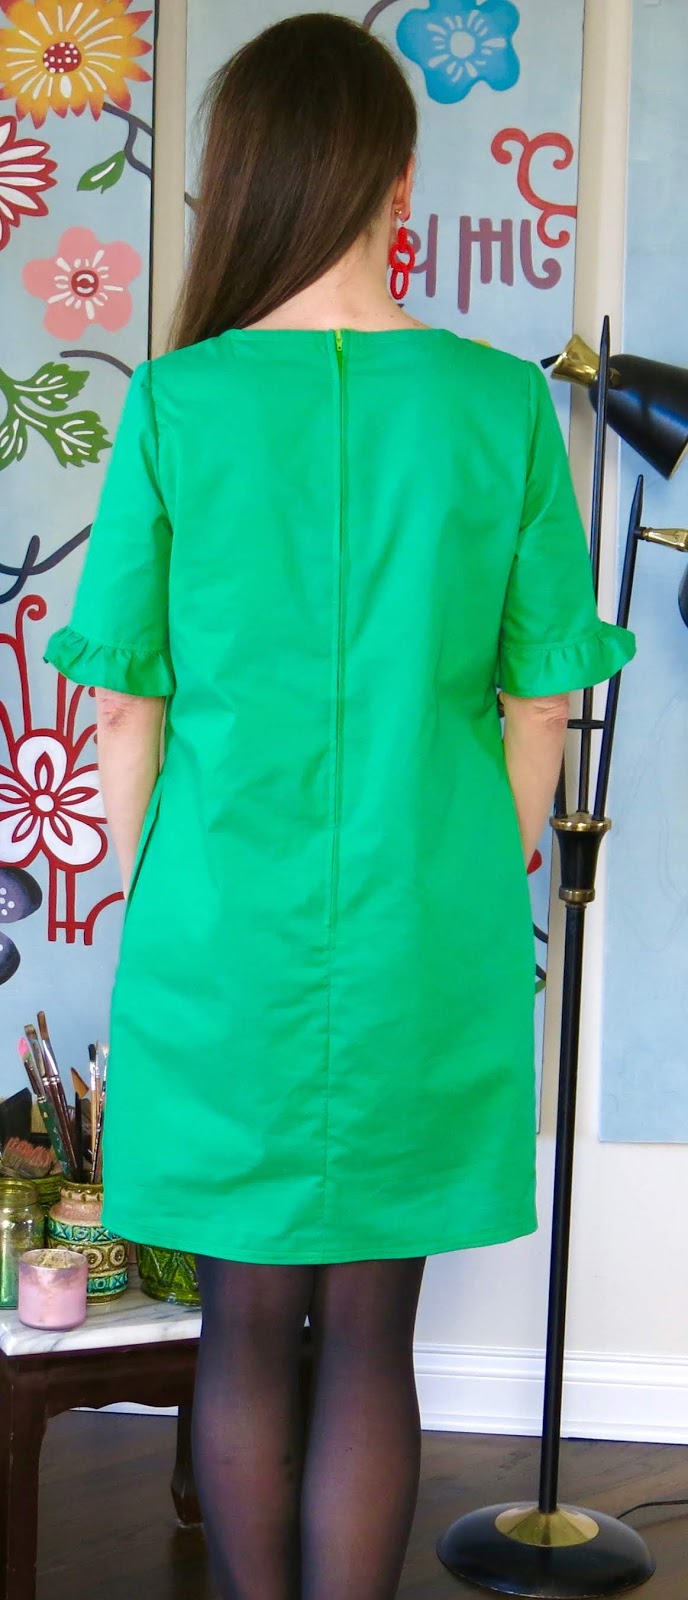
By the way, ANY machine can do this stitch. And look, the back is as pretty as the front!
Because the stitching took so long, I totally dragged my feet on finishing! The dress pattern had a couple options for sleeves. In the end, I wanted the dress to have a fun, tropical and retro feel so I went with the sleeves with a ruffle at the bottom.
What do I hate most about sewing? Basically everything. Is that crazy? I'm not a detail person, I'm not a perfectionist when it comes to sewing ... and these are traits a good sewist has! But what do I REALLY hate? SLEEVES, y'all. Stitching in sleeves.
Not long ago, I was at Dollar Tree and found these foam heart shapes. I got an idea to use them in conjunction with the book, The Shape of my Heart with my kindergarten friends. I've ALWAYS wanted to do a project inspired by this book but I just couldn't think of a way to make it work...then, I got the idea to use foam shapes and pull prints. We've been doing it all week and we are loving it. I made a process video for you and your kiddos!
I see my kindergarten for 30 minutes, twice a week. On the first day, we used foam shape stickers purchased at Michaels to fill our hearts. We read the book and chatted about the difference between organic and geometric shapes.
The following day we were ready to print! A friend on Instagram suggested that I use foam rollers and tempera paint for the printing portion...here is a peek at our table set up:
And here's a look-see at our prints!
Don't you love them!? Each kiddo pulled two prints. Next week, we'll begin cutting them out and adding them to our dotted backgrounds. Details about that in the video. Now, what to do with our heart printing plates? Well...check out that first image and be sure to watch the video! I'm so excited, we'll be making metal reliefs with them. I did not explain the process of how we will frame those metal hearts in the video as I'm still working that through. I'll keep you posted tho. Have fun with this lesson...I know we have been!
Do you ever have one of those projects come to you because of a series of events? That's how my Clipboard Gallery idea came to be. But, before I get in to it, let's talk clipboards in the art room. Do you use them? We do ALL THE TIME! In fact, the original set I were purchased my first year teaching. Here's how I use clipboards in my art room: when we are guided drawing together on the floor and need a drawing surface; when tables are pretty messy with paint, glue or chalk and the kids need a "clean" surface for drawing; when my early finishers want to lounge out and draw in my early finisher areas, they grab a clipboard. Do y'all use them in your art rooms? While I love clipboards, my system for organizing them was anything but desirable. I had a huge plastic bin that the kids just tossed them into with a loud clatter. It was ugly, took up floorspace and always overflowing with clipboards. Then an art teacher buddy suggested I check out a clipboard holder...and my life was changed forever. BEHOLD! My amazing clipboard holder!
(Cue the angels singing) RIGHT?! Here's the link. The also come in half sizes which can be MOUNTED TO THE WALL! Say what?! But I needed a full set so I went with this one. It holds 24. Some of my classes are larger than that so I do have a small bin under this table that holds my spare ones. Now I had a new problem. My old clipboards were 1. ugly and 2. all sorts of different sizes. So I ordered these in a variety of colors. Rainbow, of course. Have you met me?! With my new and sparkly set of clipboards, I was left wondering what to do with my old ones. I was halfway out the door to dump them in the teacher's lounge on the freebie table when I walked past this hot mess:
What you see here is my Masterpiece Gallery. It's my little place in the "foyer" of my art room (I have a big ole room and yeah, I got a foyer) where I like to showcase the artwork the kids create at home. The problem? It's become more like a Mess-terpiece Gallery with pictures hanging crooked, falling down, overlapping. It's a disaster! AND my inbox is overflowing with more sweet drawings!
Side note: with 30 minute classes, a lot of my class time was getting eaten away by kids giving me drawings and us chatting about them. While I do love doing that, I just don't have the time. So I got a mailbox this year an the kids put their drawings inside and put the little flag up. They loving doing that and letting me know that there is a surprise inside! BUT, as you can see, it's overflowing too! As I was walking by this mess, I had an a-ha moment. I'd use my old junky clipboards to create another area, outside of my room (as I have no more wall space) to showcase artwork created at home. And the idea of the Clipboard Gallery was born. But first, I had to spray paint these guys white as they were a mess!
Despite the cold, we had some sunny days this week so it was perfect. Once dry, I spray painted them rainbow-y.
Look how well they match my room!
Hanging them was super easy because I always use these 3M Command Velcro strip things. Went up in a snap!
The giant clipboard was one I scored at the thrift store a while back for a couple bucks. They do sell them online...the cheapest I found was $30! So I got a steal. I did purchase more clipboards this weekend at the Dollar Tree so I can add more clipboards...I have a feeling this is going to be a very popular spot to share my students creations from home. How do you all display kids work from home? Love to know!
So this was a lesson that I came up with just the other day as a way for my fourth graders to 1. have a quickie lesson after working FOREVER on their snow globes ...which look amazing, by the way! Check it out:
(these just need their bases!) and 2. Use the practice papers they created before painting their snow globes. You see, before making the background of their globe, they had to do three painting sketches:
The kids asked me several times what the plan was for their sketches and I was like, I dunno, planets?! The other day, I thought marbles would be more fun...and a shorter lesson. A friend over on IG (thank you Mrs. Cook! Y'all give her a follow!) suggested the artist Glennray Tutor as an artist inspiration...and that's how the lesson came to be. Here it is, if you are interested:
I was SO EXCITED to do this lesson today with my kids that I actually got to work EARLY (which never ever happens) to prepare. The minute I walked in the door, they'd cancelled school for snow. C'est la vie. I did stay and get a bunch of stuff accomplished. Including editing my I Can board!
One question I get A LOT is about supplies...what supplies are the best to order? It's scary, putting in a supply order! We have such little money we don't want to waste it! You can check out some posts about my favorite art supplies to order here. In this video, I'll even walk you thru some of my favorite things for my art room. These posts are a couple years older and definitely need an update but many of my fave things remain the same. Especially my fave watercolor paints.
Only with quality watercolor paints will you get beautiful paintings! That and teaching kids HOW to use watercolor paints correctly. If you lurk this blog, you'll find plenty of posts of me teaching my students how to use their paint the right way to create amazing masterpieces. THIS LESSON (arrow pointing up) will be posted here super soon! So...instead of typing it all out, I thought I'd create a video to share my favorite paints with you, all available in your favorite art supply catalog. This is NOT a sponsored post...so you know I'm speakin' the truth!
I'm so thankful for companies that continue to make quality art supplies for kids. Our young artists deserve the best!
Here's me explaining how to paint to my small friends.
Hey, friends! A while ago, I created a Chris Uphues-inspired video for my sub to use. Because my classes are either 30 minutes in length or an hour, the video is broken up a bit. For example, as you watch, you'll see that my 30 minute kids learn about Chris and then do some sketching on dry erase boards before tackling paper. My older kids did this too...and then about 30 minutes in, met on the floor again to view the rest of the video. As I've said before, I LOVE having my students sketch on dry erase boards...it's their favorite because of the slick and forgiving surface. And it's mine as it uses less frustration and time with erasing and reworking. Here's that sub video...feel free to use it in your art teacherin' world. All I ask is that you give credit to lil ole me when you share your student's work or resources.
Side Note: Jen and Chris Uphues are some of my most favorite folks on the planet. You'd be hard pressed to find two kinder or more down to earth people. I LOVE introducing them to my kids because I know that these are some seriously AMAZINGLY good people. And I'm super judge-y so you know I'm tellin' ya'll the true (insert winky-tongue face emoji).
Meeting them this fall was one of the highlights of my school year!
When I initially created the lesson, I wasn't sure how I wanted the kids to finish their work...just this week did we dig the drawings back up and I started letting my early finishers work on them. All my kids are in the middle of some big projects that they all seem to finish at totaly different speeds. So this lesson has been a fun and quick in-between project. They kids love drawing these funny faces!
If interested, you can pick up your Yayoi Kusama needlepoint, latch hook, cross-stitch and plastic canvas design in my Etsy shop, right here!
Well, I finally finished my Yayoi Kusama latch hook design shortly before heading to Atlanta with some art teacher friends to see her exhibit Infinity Mirrors. You.Guys. If you ever get the chance to see it, you must go! During the four hour car ride to Atlanta, I started working on the plastic canvas of my design, making some alterations as I went. Can you see the difference? Fuller hair on the right side and a more narrow face. I'm pleased with both but the design on the right is the one that you'll find in my etsy shop. Feel free to alter when you are creating your own Yayoi! While creating the latch hook, I decided to watch the documentary on Yayoi that you can find on Amazon. I'm so glad I did. To be honest, prior to watching, all I knew about her was that she loved spots and painted them on pumpkins. That's not at all what she's about! Seeing her history and growth as an artist in the documentary really made me appreciate her work and the exhibit all the more.
Each of my designs looks a little different as I'm not approaching them in the same way. In my Frida design, she's very symmetrical, Andy's turned a 3/4 turn (not easy to achieve in a latch hook, y'all!) and Yayoi is forward facing but not symmetrical.
This design also has a super limited palette which I like...I feel like the bold and contrasting colors really capture what Yayoi is all about.
And here's my group all together! I've got one more spot on this rug and my plan is to add Jean Michel Basquiat to the mix. Then I hope to continue with more, adding more familiar and artsy faces to the group. My vision is one big ole artist shaggy wallhanging!
We had such a fun time! MAYBE a little too much fun but what happens amongst art teacherin' friends, stays amongst art teacherin' friends, okay?
We hit up IKEA while in Atlanta and I picked up some Perler beads. I've never used these before...so this was my first attempt. Sadly my set didn't have a skin color for Yayoi so I went with white. This is the back.
And here's the front. I messed it up pretty badly...so may redo when I get the proper skin tone. But it was fun to play around with! If you tweak my pattern a pinch, you could do a version of this too! Happy latch hookin'!