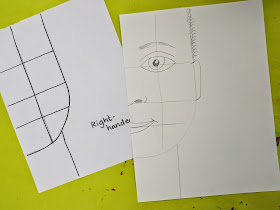
So when I came across these self-portraits on pinterest (I know, I know, I said "found it on pinterest" but I really did! And there's no further link than the one provided. However, if you happen to know this art teacher, I'd love to give credit where it's due. Thanks!). I loved this lesson for a coupla reasons: first of all, the kids only have to draw half of the face. This makes me happy because one of the biggest struggles I've found with children drawing a self-portrait is symmetry. They become fixated on drawing both sides of the face exactly the same (even though they're not!) and just work themselves up into an eraserin' tizzy.
The other thing I loved about this lesson was that it provided a space for a big colorful background. And we had JUST the paintings for that!
Dunno if you recall, but my 3rd graders are the ones who had the incredible opportunity to sing a song for the book Beautiful Oops. Before hitting the recording studio in Nashville, we re-read the book and did some fun "oops" paintings. More details on that awesome fun here.
For the creation of the Oops paintings, the kids were told that we were going to make a painting with no planned outcome in mind. We weren't going to worry about "mistakes" or "messing up". We were going to enjoy the painting experience and let our Oops'es speak to us. It was so much fun! To start, I showed the kids a technique of putting blobs of paint at the top of the paper and using old credit cards to drag the paint down.
After that, we played a game where I drew a number and a line/shape name (like, for zample, zigzag/five) and the kids painted those. I've played this game with the kids before (deets here) and it's a great way to introduce abstract/non-objective painting.
Once our paintings were complete, we hit the road and headed into Nashville for our session. We were surprised and thrilled to be able to Skye with the author of Beautiful Oops, Barney Saltzberg.

To ease the pain of the Perfectionist Portrait, I provided my students with a sheet to slide under their drawing paper. Using a clip board, they joined me on the floor with their two sheets and a pencil. Lightly the kids traced the guide lines provided under the sheet. Then we had a big long chat about facial proportions, features and what makes our faces so uniquely different from our friends. As we chatted our way through these topics, we drew our faces together.
I told the kids that this was just their basic steps. Once finished, they were to return to their seats with mirrors in hand and create their own individual likeness. They made changes to the expressions, added glasses, details for hair, freckles, you name it.
Another thing...I'm always telling the kids, "Please color like my favorite band. In ONE DIRECTION." Which gets plenty of eye rolls from the kids.
The following art class, we read about Rembrant and I kinda introduced shading. I do believe it's a tough concept for 3rd grade. However, I like to throw stuff out there to see what lil fish are gonna bite. You can't go wrong over estimating kids, says me.
"I'm adding makeup to myself portrait." You know, with the amount of eyeliner I wear, who am I to judge? Love the variety of colors in her hair.
To set their delicate portraits apart from their bold paintings, the kids traced the edge of their drawings on a piece of black paper and glued it to their portraits to create a shadow. This was then thoughtfully glued to their paintings.
This kiddo nailed her hair and expression. NAILED IT.
Love everything about this one.
In the original lesson I borrowed this idea from, the students wrote their names in the background. So I gave the students the opportunity to print their names with small pieces of cardboard.
Or paint their names, in the case of this lovely lil artist.
I love cardboard printing because of the bold exact lines it creates. I did ask the kids to attempt printing their names on scrap paper first before giving it a go on their paintings.
The kids were so stinkin' proud of these works of art! And I'm excited to jump back into the self-portrait pool with my other grades. What are some of y'all's most fave portrait lessons? I'd love to know. Til then!


I like the project, but what I'm REALLY in love with us your rock & roll apron! Totally smitten!
ReplyDeleteI meant 'is', not 'us'. Sorry! Or I suppose I should say OOPS!
ReplyDeleteCassie, have you tried Gelli Prints? Would love to see what you come with ;-)
ReplyDeleteTHATS SO COOL that I'm gonna do it with my Grandchildren!! I have enough girls to have my own basketball team so they are going to lOVE this project. I have spent the last 25 years painting and this year I'm taking off. Been sitting in one spot for too long all by myself, just me and my watercolors...You have given me all kinds of project ideas to do with the kiddies and Thanks for that!
ReplyDeleteHi Cassie,
ReplyDeleteJust wanted to swing by and say that I used these last year at the beginning of the year with my Year 5 students to fill up our blank, bland walls. They did find it much easier to draw half a face. I loved how each student put their own personal touches on, freckles, hair clips, earrings etc. Such a bright, fun idea. I can see this will be a lesson that I do again and again!