Monday, October 7, 2013

What the Art Teachers Wore #79

Monday: Ermkay, I'm just gonna say it cuz you're already thinking it: this picture totally looks like some sort of  feminine hygiene stock photo. So much so I was tempted to title this "Massengill Monday". Fun fact: did you know that massengill is "a slang term for someone who can be correctly classified as a douche", according to Urban Dictionary? Oh, interwebs. How you educate me daily. sweater: felted DIY by me, see the back of it and read all the gory details here; dress: Anthro purchased at Buffalo Exchange; tights: Target; boots and belt: Anthro; flower clip: gift
Happy fall, ya'll! It's officially fall break (aka "The Most Wonderful Time of the Year" with exception only to Winter, Spring and Summer Break) and I'm pretty stinking happy. This time of year is our favorite at Casa de Cassie because it's when we start hitting the haunted houses near and far. In fact, hubs and I just now did a little count and found that we've already done 20 houses this fall! I'll be certain to share those escapades with you soon but if you are dying to read about it now, you can check out our past trips to Universal Studios Orlando Halloween Horror Nights here, Universal Studios Hollywood here and Busch Gardens Williamsburg Howl 'o' Scream here. I know, we kinda crazy. Oh! And lemme know if you've got any haunted house recommendations. We're always up for a new adventure!

Since I was feeling fallish, I decided to autumn-ize my wardrobe this week. I also rounded up some fall art work (f'art work? Sorry, I had to. It's the 12 year old in me) to set the mood. What are your plans for these crisp fall nights? Aside from haunts, mine include a nightly mug of hot chocolate. I'm curious what you're up to!  Chat soon.

I'm looking at this picture and making a BIG TIME sad face as this girl is leaving me shortly after fall break! When we return from break, she'll only be with me for another week before she jets off to her next school. They will be so lucky to have her. I know I'm going to go through some serious Rebecca-withdrawals.

Georgia O'Keeffe, Autumn Leaves, Lake George, N.Y., 1924 You know her as that lady who paints giant flowers. But she's so much more than that! You can check out her work AND the incredible artwork of young artists influenced by her here. Yes, I'm plugging Painted Paper again. No, I'm not on her payroll. Yet.

Feelin' Squirrely Tuesday: I mean, seriously. Is there anything worse than knowing you have a BigFatHairy break just waiting around the bend? Not only was I squirrely but I was going nuts! (and, yeah, that whole squirrel/nut reference was on purpose). dress: thrifted, Target; sweater: Urban Outfitters, last fall; tights: Target

Eehhhhh, I LOVE this dress. I totally think that color palette would make a create color scheme for some fall decor, don't you? Plum, mustard and cream. Sounds like a disaster of a food combo but love them colors.
As does my man Millias. John Everett Millias, Autumn Leaves (really, same title as O'Keeffe?), 1856

Potter Wednesday: My P.E. teacher buddy said I looked very Harry Potter in this outfit what with my Hedwig the Owl buckle and my key tights. Both Rebecca, my hubs and said P.E. buddy are HUGE Potter fans, having read the books and seen the movies. I'm kinda lame...I've yet to get through the first book. Meanwhile, I'm ashamed to admit I read ALL the Twilight books. Ahem. If you decide to discontinue reading my blog for ever and ever after that statement, I'll totally understand. sweater: vintage, thrifted; dress: vintage; tights: etsy shop TejaJamilla; belt: gift from a friend; shoes: Nine West, thrifted
Howard Hodgkin, An Autumn Leaf, 2000

Tigress Thursday: Okay, so when I saw these shoes at the local discount shoe place, I had to have them because at my school, we are the Johnson Tigers...so these shoes are totally educational. In fact, I'm thinking about turning in the receipt to the bookkeeper (this is legit, riiiight, Julie?!). The kids loved 'em but my feet called it quits at noon. Party poopers. dress: Anthro purchased at Buffalo Exchange; tights: same etsy shop as the key tights; blouse: gift; shoes: Naughty Monkey purchased at Martie and Liz; belt: Target; necklace: vintage, thrifted

Guess who as a thing for cheetah print? Just guess! If my shoes had been cheetah, pretty sure this girl woulda went home with 'em.

Don't suppose I can feature fall paintings without showcasin' this number. Vincent van Gogh, Mulberry Tree, 1889

Fall Break Friday!: This day began with me and a buddy riding a miniature motorcycle through a gym filled with hyperactive children (are there any other kind?!) and ended with me wearing a rainbow on my head. AND it was only a half day. Details on just why I was wearing this ole rainbow hat to come but until then...sweater and necklace: vintage, thrifted; skirt and shoes: Anthro; tights: Target

I'm just gonna tell you, it's hard to take a picture of this girl without it being blurry because we are usually cracking up for some reason or another. Usually because one of us is singing some horrible song ridiculously out of tune (ahem, me) while the other is usually rolling her eyes, groaning "oh-my-gerd" and then singing said tune. It's a vicious cycle of hilarity. Says me.
Edvard Munch, The Scream (of Nature), 1893. Seriously. That's the full title. Who knew? I thought maybe it was The Scream of Fall Break or The Scream After Hearing the Art Teacher's Sing. You decide.

Wednesday, October 2, 2013

In the Art Room: Viking Ship Collages

Kids come up with the best ideas. You see those rough waves that viking ship is riding? This third grader decided to take her relief-sculpture-collage to the next level when she rolled the tops of her waves around her pencil. Genius, I tell you.
Before I get into the 'splainin' of this lesson, I gotta tell you that it was inspired by one of my fave art teacher blogs, Painted Paper. Laura's blog is so amazing and so inspiring that I'm often left shocked, stunned and just plain astonished by what her students create. And when I'm not picking my jaw up off the floor at her mad teaching skillz, I'm left shaking my fists in the air, jaw clenched, groaning, "Argh! Painted Paper! You did it again!" like some villain whose evil plans are foiled by a superhero. Cuz that's kinda what she is. Seriously.
Not sure if this Viking ship is coming or going but I do love the double-header.
When just-back-from-Norway student teacher Rebecca mentioned wanting to do some Viking-themed art projects we promptly scoured the interwebs for ideas. And that's where we came across Laura's viking ships. We changed ours up a bit for what-works-for-us/what-we-wanna-teach purposes and I thought I'd share the results with you. Rebecca and I are absolutely thrilled with how these turned out and the kids are pretty pumped as well.
These seascape collages took us multiple 1/2 hour art classes so lemme break it down for you. We began with two class of insanely busy painting processes. I blerged in detail about that here.

Day #1: The kids were to select a piece of colorful 12" X 18" construction paper that would be used both as the base of their collage and as their sky. They also collected a piece of 6" X 18" blue construction paper and white paper, as seen below (details of how we go about collecting supplies and general art room routines here). To paint the skies, the kids first sponge painted white paint over the top half of the paper with a large sponge. Using a smaller sponge and colors of the choosing, they added color to their sky. Once complete, students used different shades of blue to create a dry brushed painting on the white paper. Splatter painting was done on the construction paper. It was almost the most insane and fast-paced 1/2 hour ever. Almost.
FYI: The concept of dry brushing is like rocket science to children. Unless they are water color painting. And then it's let's-scrub-those-poor-paint-brush-bristles-until-there's-a-hole-in-my-paper land. Art teachers, amiright?!
Day #2: The day we completed these 12" X 18" babies WAS the most insane day ever. I explained these painting processes in detail here.


(Blogger was being a hater and wouldn't let me write a caption below that photo of Rebecca where I know she's talking about Norway and I know she's painting to not-Norway but, trust me, she's been there and she totally knows where it is...right, Rebecca?!)

Day #3: After all that painting madness, Rebecca shared stories and photos with the kids about her trip. The learned all about the terrain of Norway and the rough waters of the surrounding sea that the Vikings had to cross on their many voyages. From there, the kids watched as Rebecca demonstrated tearing the blue painted papers for the seascape collage. Once the papers were torn, the kids were told to only put glue on the straight line, not the torn one and begin gluing at the horizon line, making their way to the bottom of their paper, creating a pattern of alternated papers as they went.
Day #4: With the seascapes complete, the kids were ready to create their long ships. Rebecca took the kids on a voyage back in time to learn about the Vikings and their ships. She even had them practice their rowing skills on the floor which was awesome. Now, I'm not gonna lie, the kids did use a template for their ships. And I know that might rub some of ya'll the wrong way but with the time constraints I work with, it allows my students to get much more accomplished. Once the boats were cut out, the kids began creating shields for their ships that were unique to their tribe of Vikings.
Day #5: On this day, Rebecca reminded the students about how each clan of Vikings would also have sails that were unique to their tribe. However, the sails usually had stripes. Each student was given a 5" X 6" piece of white paper and shown how to cut a curve on the sides that would make their sails appear three dimensional. The kids used that curve of their sails to draw on their painted papers and create the stripes for their sails. Shapes were added on top of these stripes to make them unique.
When the kids learned that the Vikings hung their shields over the edge of the boat to both protect their boat and save space on the ship, the kids also took to hanging swords and helmets from their ships.
Day #6: On this day, the kids cut out a mast and glued that to the back of their ships. Then they applied a line of glue to the bottom of their boat and placed it under their first set of waves. Work on the shields and sales continued.
Day #7: With the ship and mast glued into place, the kids were ready to attach their sales. To really make them look like they will blowing across the sea, the kids applied a thick line of glue to both the top and bottom horizontal lines of the sail. These were then held in place for about thirty seconds to really get 'em to stick. A little demo on how to create a serpent's head on the ship was given to those that were interested.

So impressed with the design on the sail and the swords on the ship!
The puppy Vikings. Precious.
And there you go! Almost a dozen art classes later and one art project complete. Sigh. Such is the life in the Super-Short-Art-Class. On the bright side, these look totally amazing and my fingers are simply itching to get 'em up on the walls of our school halls. 

Thanks for reading and have an awesome rest of your week!

Sunday, September 29, 2013

In the Art Room: The Andy Warhol Mural

So you've seen it as a backdrop to some crazy DIY Campbell's dress, now it's time to shine some light on this 4th grade mural. In case you don't know the back story, I'll give it to you in 20 words or less: parent wanted posters for upcoming canned food drive; I wanted a mural for the cafeteria; student teacher Rebecca suggested this. Because she's a genius.

Because the kids were in the middle of creating their dots for this project, I decided to ease them into all things Warhol with a coupla of my fave books: Getting to Know the World's Greatest Artists by Mike Venezia and Dropping in on Andy Warhol by Pamela Geiger Stephens and Jim McNeill. As the kids finished off their dots, they trickled to the floor as I read. By the way, one little trick I use to reinforce the names of artists is this: as I read, I'll only read the artist's first name and the kids are to say the last name. I've found this really helps them retain the names of artists...although I have had this happen on more than one occasion:

Me: Vincent...

Kids: DA VINCI!

So, it's not a perfect formula.

 Speaking of Vincent da Vinci, er, van Gogh, here's a Starry Night mural created by this same group of kids way back when they were in second grade town. So they are experts at this grid-thang.


Because this project was all Rebecca's idea, she did the planning. She found this image online and created a grid that would provide at least one image per student. We have between 24 - 25 students per 4th grade class so some early finishers were given another piece of the pie, er, can to draw. Rebecca made several copies of this can and colored each of those copies in a different Warhol-inspired color scheme.
This is actually one of the color schemes that didn't make the cut but I thought I'd share it with you to give you an idea. After each of the 4 copies were colored, Rebecca then cut them along the gridded lines.
And here's how they looked chopped to bits. Each 1" X 1 1/2" (and that's a rough measurement) was given a code on the back to help keep when gluing down the pieces. Each student was given a piece of paper that measured about (and I'll have to get back to you after a visit to school tomorrow for a more accurate measurement) 10" X 12".

Each of the 4 class' different cans cut, organized and clipped. Which would be all Rebecca's doing as I'm not nearly as organized as that gal.
Directions went a lil something like this: 
  • Name and code (as seen on the back of the small paper) on the back of drawing paper
  • As you start your drawing, look at the 4 edges of the little square. Where you see the beginnings of a line, like the curve of a can or the start of a letter, put a little tick mark on your drawing paper. Think about the scale of the drawing and how you will have to enlarge your drawing to make it to scale.
  • Use a pencil, trace with sharpie, color with corresponding colors in oil pastel.

I'm not gonna lie, the lettering, especially the cursive font of the "Campbell's" wasn't a walk in the park. For those kids, another demo was given, this time more of a one-on-one or with some peer-tutoring thrown in the mix, and it worked. The kids really seemed to enjoy the process and they loved the result. As they finished their pieces, Rebecca spray glued them to a large sheet of bulletin board paper which you can see the pink coloring of in the photo below.
Okay, despite the fact that there's a glue bottle on the ladder, I promise you no Elmer's was used in the hanging of this piece. We had a couple of drawings where the edges were coming off the bulletin board paper and that glue was our solution. We had a wee bit of tack strip at the top to hang the piece from...but that didn't solve the dilemma of the fly-away-bottom (which sounds like a personal problem, if you ask me...symptoms of fly-away-bottom include a bottom that just won't stay attached, use Elmer's Glue only as directed). So, we resorted to the Hotter than Hades glue gun (seriously, I watched it burn a hole clear through my fingernail and It. Was. Awesome) which, at my school, is a Big Fat Hairy No-No. But my principal's away on maternity leave, and, as the saying goes, when the principal's away, the art teachers are gonna hot glue the crap outta the school. Or something like that.

I can't believe that in just two weeks, this girl is gonna leave me! I mean, how could she?! What am I supposed to do, teach or something? That's just crazy.
A coupla more close-ups. In retrospect, a chat about David Hockney's photo collages would have been a great tie-in with these cans.
Since Rebecca had to go and teach, she left hanging the last coupla cans in my hands. No problem, says me, I got this!
And with one tug on the extension cord, I managed to make this magic happen. Sigh. Seriously?! I really don't think this girl outta leave me, do you?

In all seriousness, I hope you'll give a big ole mural a-go at your school. The impact is amazing and the kids love it. If I've failed to answer any of your questions, please feel free to either email me or leave a comment...and I'll try my best to answer your questions. And thanks for dropping by!


Wednesday, September 25, 2013

DIY: Campbell's Soup Dress after Andy Warhol

Forget the dress, check out that soup-er mural! It's simply un-can-ny how much it resembles the work of Warhol. More condensed details on the fourth grade's latest masterpiece soon, but for now the h-Andy work of this dress will just have to be suffice. Or is the word "sufficient"? Eh, you say "tomato", I say "shut up, fool!" Because I'm rude like that. 
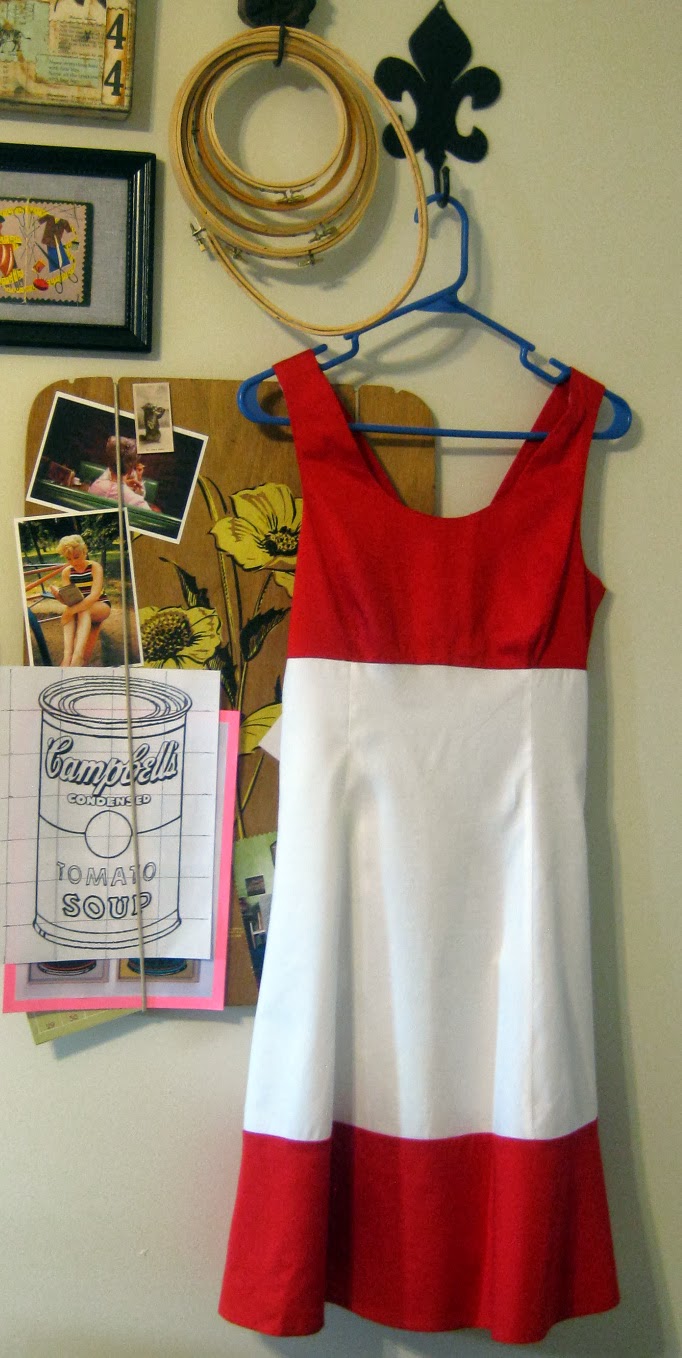
I dunno how you spent your weekend, because, as I mentioned, I'm rude and therefore forgot to ask, so lemme just tell you how I spent mine: Making a Campbell's Soup Can Dress in honor of our artist of the month, Andy Warhol. Oh! And did I mention that I almost committed sew-icide (death by sewing a nightmarishly impossible task)? Because I did. Seriously. Each one of those appliqued letters was at least ten years off my life. Which I don't suppose is possible being that there are 19. But whateves. Me and math have never gotten along.
You might recall I'm on a bit of a mission to create an outfit for each of our artists of the month. Thus far, I've managed to sew up a Great Wave dress in honor of Hokusai and a splatter-tastic number for Pollock. And now I can add some Andy Warhol to my dress-terpiece wardrobe. Yippie! It only shaved 190 years off my life (and, yeah, it took me from initially mentioning that math problem until now to come up with the answer)!
This whole mess, er, dress started when a sweet parent approached me about having the kids create posters for an upcoming canned food drive. I'd already had it in my head that our school's cafeteria needed a new mural and had mentioned such to Rebecca. With her big soon-to-be-an-amazing-art-teacher brain, she thought up the idea of the kids creating a class set of Andy can murals. And the rest is history (with details to come, pinkie swear and spit shake).

Check it out: the Souper Dress is a screenprinted paper dress that was made and sold by Campbell’s Soup Company in the late 1960s. Obviously, the creation of this dress was inspired by the one and only Warhol. How I'd love to get my kitten mittens on this number...if only it wasn't selling for hundreds of dollars on that devil website known as ebay.
 While student teacher extraordinaire was busy workin' on that, I was plotting my outfit to accompany said lesson. Because if it's one thing I've got, it's priorities. And a serious lack of mathematical skillz.

 
My mom happened to spot this dress on a recent thrift store jaunt and, knowing my can-plan, scooped it up for me. Can you believe it's perfectness? I swear this bad boy was just beggin to be Campbell's-soup-ized. To can-onize this dress (because after all the work, I'm declaring this thang a holy relic), I added a silver ban to the top and bottom. I didn't shorten the dress at all although in this side-by-side it appears that way. And, of course, I appliqued the crap outta the thing with all 19 of those letters. Not like I was counting or anything. Ahem.

Now I never really go about anything the right way or even the easy way, so if you are gonna embark on your very own Warhol number, might I suggest you go to a legit DIY blog. However, if you are up for a challenge of sew-icidal proportions then, welcome to the Thunderdome, friend! Grab your Xanax and let's hop to it! 

I began by laying my dress out and placing a sheet of tissue paper on top of that. I kinda love lettering so planning the size of the letters and penciling them in was fun for me...in a I-like-to-pick-at-my-hang-nails fun kinda way.
After that, I chose the fabric for my letters and ironed some fabric stiffener to the back. Wait, there's another name for that, right? Because "fabric stiffener" just can't be right. That makes it sound like I showed the fabric some dirty pictures of sewing machines and thread and it got all hot and bothered. And that's just weird. Wait, what were we talking about? Lemme start again, sorry...

Iron some stuff on the back of the fabric that will beef it up (heehee), pin tissue paper to fabric and cut. Wow, I managed to get all that out in one sentence when it took me an entire paragraph above.
Because I thought the pins would create puckers in the fabric when sewing, I tacked the letters down with Stitch Witchery which is that roll of stuff on the left.
And then the appliqueing commenced. Which, as you can see, is just a zigzag stitch really close together. I struggled with turning the curves of the letters which shoulda been a harbinger (the one SAT vocabulary word I actually remember) of what was to come with those curvy swirly "Cambell's" letters.
Speaking of...I actually contemplated felting these letters in place knowing they were to be a beast. But I opted to first give it a shot applique-wise and then resort to felting if needed.
Are there any pro-applique'ers out there? Because one look at this photo and you can see I'm strugglin'. Pushing all the fabric of the dress through the machine was not my cup of tea. Do the Real Housewives of Applique-town have a certain machine with a longer sewing machine arm, a flatter presser foot and a built-in margarita maker, perhaps?

When it was all said and done, I was pretty happy with my goofy dress. Which provoked mucho commentary when I hit the grocery store after school. Here's just a pinch of the convo I engaged in at the checkout counter:

Checkout Clerk: Oh! I love your dress! Did you make it?!

Me: Um, yeah. I did.

CC: Oh my goodness {Calling to the other checkout clerks:} Hey, guys, come over here and see this dress! She made it! 

Awkward Checkout Clerk: Neat. {Looking in my cart} You aren't buying any soup? That seems weird.

Me: Yeah, well. I'm trying to cut back.

ACC: That's too bad. {Checkin' my dress out again} I hear it's "Mmmm...mmm...good." Can I help you out with your groceries?

Me: {Trying to suppress my freaked'outed'ness}NO! I mean, no. Thanks.

Stay tuned for the post on how the fantastic fourth grade created these murals. Until then, finish that soup! AND stay away from Awkward Checkout Clerks. Toodles!