Wednesday, December 22, 2021

Pegboard in the Art Room

To know me is to know my love of pegboard. It's a big part of the teacher cart I designed with Prang. It played a huge role in making my sewing room more organized. And it helps keep my painting supplies organized in my crafting space. I would cover the world in pegboard if I had my way. 

Last fall, my instructional space was relocated. The area you see above was my teaching space for many years as that's where maintenance decided to place my television which I use with my document cam. I never understood the location: it was close to my entranceway; it was a small space and it was far away from the view of my students if there were at their desks.

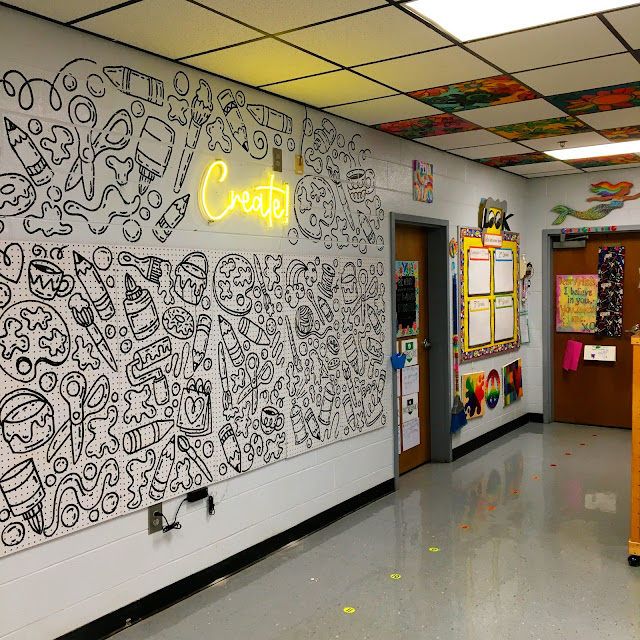
Because that space was too small for children to sit with one another due to social distancing, I requested my TV be relocated to a more centralized spot in the art room. It feels SO MUCH better to have it there (like, it makes so much sense, you can see it here). However, this once-beloved area soon became forgotten and, well, sad. So, over the summer I asked my dad, who was visiting from out of town, to help me hang some pegboard.

It was easy! We had to purchase concrete drill bits and screws and I say it was easy cuz he did it all. We only bought three pegboards but I decided I wanted the whole space covered. So I bought more and my custodial friend Mr. Joe hung the rest.

And then it sat blank and unused for the start of the school year. 

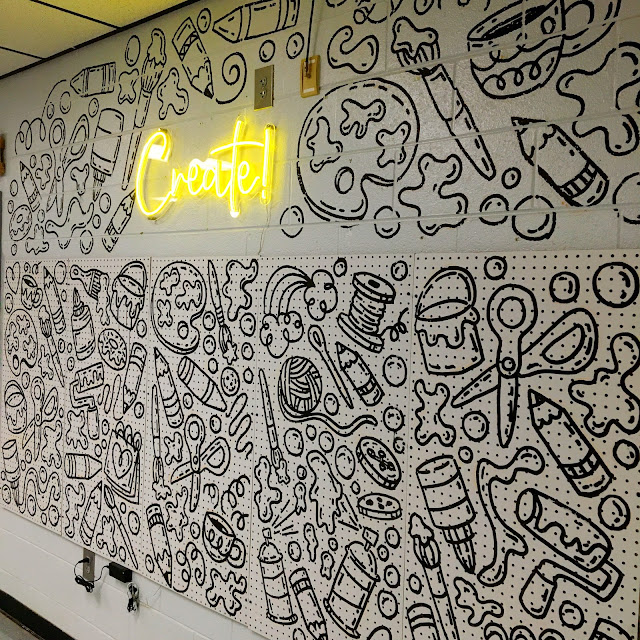
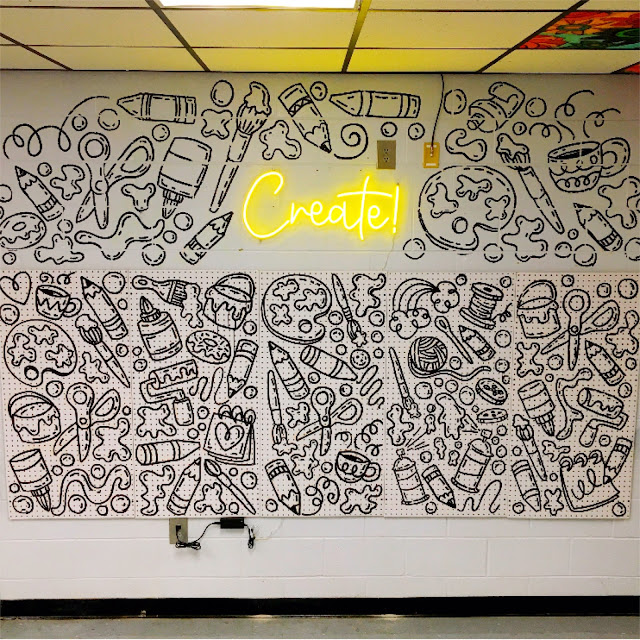
In October, I finally figured out what I wanted to do with it: make it a black and white doodle drawing! I have A LOT of rainbow action in my art room but I like to balance it with black and white. So I used my handy dandy bingo dauber and went to town. Here's the video:
I work on things VERY SLOWLY meaning that I'll do a little here, there, take a massive month-long break...and then finish it off. That's kinda my thing. 

On Amazon you can create your own neon signs, did you know that? It was a splurge but I spend more time in my art room than I do my actual home...so I figured, why not? I love it. Yellow is my fave color and it really seemed to pop. The photos do not do it justice!
So...what's gonna go on the pegboard? Aprons for sure. Dustpans for messes. And everyday supplies that my "store" (the large table where kids go to collect supplies) can't hold like Sharpies, pencils, etc. Not sure! I'll be certain to keep you posted. Thanks for letting me share!


photo signature_zpsd10b3273.png

Tuesday, December 21, 2021

Simple, Small and Fast Stitching Project for Kids!

Last week, my fourth graders were wrapping up their pillow sewing project (we were doing the Faux Shibori project that you can find in my book Stitch and String Lab for Kids). I discovered that with my HUGE cookie cutter collection, I could give my students the opportunity to continue sewing if they wished. All you need for this project are the following:

*Cookie Cutters
*Felt
*Chenille Needles (they are my favorite as they have a sharp point and a large eye)
*Thread
*Pins
*Stuffing or shredded paper or grocery bags for stuffing

My students were able to create these in my 30 minute art classes, if you can believe it! This is after their previous sewing project so by now, they are experts. If you want to make your own, I created a video for you! Here you go:

And if you are new to sewing and wish for a slower tutorial, here you go:

Please be sure and subscribe to my YouTube channel as I upload videos frequently. Have fun! 


photo signature_zpsd10b3273.png

Tuesday, December 7, 2021

Let's Weave a House!

Let's weave some cute little houses! Here is a project I'm currently doing with my second grade students and they are loving. I will say, I have VERY small second grade classes that make helping these new weavers easy. If I had larger classes with little weaving experience, this would be perfect for fourth grade. But my second graders have been weaving since first and had experience with this lesson

Supplies we used:

* 6" X 7" cardboard
* 72" warping yarn (easy! Hold the end of the yarn between your fingers. Wrap from your fingers around your elbow three times and BOOM! you have the right amount...here, watch this:
* Yarn monsters for weaving
* 6" Plastic needles
* Small folded paper for a 'hotdog bun' 

Here is a wee video that I created for my students and YOU! My apologies for the audio about half way through. I'll try to fix but until then...feel free to share in your art teacherin' world:
I can't wait to share with you my students' finished weavings. Until then, have fun! If you need more weaving ideas, try searching my playlist titled Fibers on my YouTube channel. Have fun! 


photo signature_zpsd10b3273.png

Tuesday, November 23, 2021

DIY: Let's Make Tacky Christmas Earrings!

While you are out doing your holiday shopping this week, you might want to snag some of those small ornaments you spot. I think they are meant of small trees but in my mind, when I spotted them, I saw nothin' but EARRINGS!

To make your own, you'll need the following:

* Small ornaments with a loop at the top.
* Jump rings (the metal circles with an opening)
* French hook earrings
* Jewelry's tools or a pair of pliers

It's that easy! A fun craft you can do with small humans. Here's a quick video to show you how:

Have fun, friends and Happy Thanksgiving!


photo signature_zpsd10b3273.png

Thursday, November 18, 2021

Paper Weaving Made Easy!

Currently all of my first grade students are paper weaving. We are working large this year with 12"X18" pieces of paper as our looms and I wasn't sure how it would go. Normally, we work half that size but they did great! This isn't the end of what these weavings will ultimately look like. However, when I shared on Instagram, I got a lot of questions about the process. Did I cut the looms? If not, how did I teach it so they could cut them easily? I have a LOT of weaving videos on my YouTube channel. However, I thought I'd create an updated video on this current project. So...here you go!

I hope you find this helpful! I've been teaching paper weaving to my first graders this way for years. 

Stay tuned, I'll be sharing all of my favorite weaving projects soon!

photo signature_zpsd10b3273.png

Thursday, November 11, 2021

Sewing Basics!

My fourth graders are getting ready for a new sewing adventure! Last year, they stitched these pizza pillows. Next up, we are dying our own fabric and creating a kind of faux-Shibori dyed pillow (see below). 
I love teaching sewing (and all things fibers) to my students. If you are interested but don't know where to start, I share all of my tips and tricks in my book Stitch and String Lab for Kids

I'll be sharing my favorite fibers projects in an upcoming post but if you just can't wait, you can hop over to my YouTube channel and visit my "Fibers" playlist! Be sure and subscribe, I'm currently adding a lot of video content!

I decided to create a video to walk my students through sewing basics. I played it today on our first day of stitching and it was a hit! I didn't have to thread a single needle and only tied one knot. If you'd like to view it, here you go:

Feel free to use it in your art teacherin' world!
There are a lot of things I've learned about teaching children to stitch over the years. Many of my tips you'll see in the video. However, I plan to share much more in upcoming Art Teacherin' 101 videos. 

Just a preview: fourth graders opened their dyed fabric, pinned it and began stitching in 30 minutes! When they are interested, it's amazing how fast they can work. 
Here's where we're heading. Again, this is a project from my book and always a hit. Happy stitching!

photo signature_zpsd10b3273.png

Wednesday, November 10, 2021

Black Glue and Chalked Tiger Lesson

My third graders are wrapping up a lesson that we've loved! So I thought I'd share the process and the video with you. Here you go!
If you cannot view the video here on this blog post, hop on over to my YouTube channel to see it there. Feel free to use this video in your art makin' world! Be sure and subscribe, new videos are added all the time!
At my school, we are the tigers so this was the reason behind our animal choice. At the start of the school year, our focus was on what makes us special and unique. Now we are moving on to how we fit into our school community and what makes our school special! All students are currently creating mascots. It's been so much fun! 
My third graders usually do a black glue and chalked piece inspired by Sandra Silberzwig. It's a popular lesson and you can find it and the video here. 
It was fun to try something new and the kids rocked it. Have fun! 


photo signature_zpsd10b3273.png

Monday, November 8, 2021

Art Teacherin' 101: More Paper Talk!

I know paper isn't the most riveting thing we could be chatting about as art teachers BUT I feel it's so important. Which is why I currently have a wee series of paper chats currently on my YouTube channel!
Last week I spoke about how to find the best kind of paper for your art room. In case you missed it, here was the video:
Now let's chat about watercolor paper! There's a lot to know there too. Here's more:
If you've ever flipped through an art supply catalog, you may have been confused by all of the paper that end with the word "board": tag board, rail board, matte board, posterboard, foam core board, SO MANY BOARDS! Here's what I feel you need and what you don't in your art room: 

If you are interested in more Art Teacherin' 101 videos, please check out my playlist! 


photo signature_zpsd10b3273.png

Sunday, November 7, 2021

Centers in the Art Room

I'm not sure if you've been experiencing it in your art teacherin' world but of late I've noticed that my students are on the squirrely side of life. It's hard for them to sit still, focus and contain their level of excitement. I can usually manage to ride that wave in 30 minute art classes as we get up and move round, do a little dance, do a whole lot of call and response and stay very busy. However, recently I decided to try something new (for me) and that was create some art-makin' centers for my students on the Friday before Halloween. 

It's hard to do new things, especially if you've been at this art teacherin' thing for closing in on 25 years. However, pushing yourself out of your comfort zone is what keeps us fresh and keeps our students excited and intrigued. That's what I noticed when I created this center-formated art day. 

Here's a little of what that looked like:

If you cannot view the above video, than try viewing this blog post from a laptop. Or just tap this link. 
I've done open centers in my room before, most notably on our Field Day. You can read all about that here. I will say, it's a lot of work on the front end when I set up for Field Day. What I found in this most recent experience is that it doesn't have to be. Kids make the most of each center regardless of what is offered. In fact, limiting the supplies seemed to force them to really stretch their imagination. 
Some of my take-aways:

* Limit the centers. Too many seem to overwhelm the kids. Instead, start with just 3-4. 

* Introduce "greatest hits" as well as 1-2 new centers. At the start of art class, you will need to run through the centers to let the kids know what's in store. Too many new centers means too much time spent explaining and confusion. So maybe share ones you know the kids are familiar with (for me that was the large pumpkin coloring sheets and blocks) and introduce the new ones. 

* Limit the amount of kids per center. I limited mine to 2-4 kids per center, depending on the center. I had a sign on each that let the kids know how many kids could create in one space. 

* Dismiss kids to center one at a time. After explaining, I asked each student individually where they wanted to start and dismissed from there. Allowing each student to hop up at once and make a mad dash is not how you want to start your class! 

* Allow students to switch centers at a designated time. With 30 minute art class, I set my alarm each 7 minutes. This allowed kids to hear my alarm and know that if they wanted to switch, they could. My rule was they had to tidy their space before leaving it. This prevented kids from center-hopping from one place to the next without digging in. 

* Hold kids to your rules and routines. Sometimes when we do something different, the kids think that rules and routines go out the window. Let them know that the routines you've established for clean up, working together and noise levels still apply. 

* Pay attention to what they respond to. It might surprise you! And it might give you ideas for future centers. 

Have fun, friends! 


photo signature_zpsd10b3273.png

Wednesday, October 27, 2021

Art Teacherin' 101: Let's Talk about Paper!

Bringing back a popular series (and the namesake of my book!) about all things art teacherin'. A question that I get A LOT is about paper...what paper is the best to purchase for an art room? Well before I can share that, I think it's important to know some paper vocabulary. So in this video, I'm going to fill you in and share what I use in my art room. I hope this helps! Remember: if you can't view this clip from my blog, try viewing my blog from your laptop, not your phone. Thanks, friends!

photo signature_zpsd10b3273.png

Monday, October 25, 2021

Frankenstein Collage and 3-D Pumpkins!

Hey friends! Need a couple of fun and easy videos to get you through the week? I'm not sure if your school or your students celebrate Halloween. However, I'm sharing in case you want to mix it up a bit with a lesson on Frankenstein. Or maybe this is one for you to do with your kids at home! If you can't view the video here (for some reason, videos won't show up on my blog if you are viewing from your phone), you can always check them out on my YouTube channel. Please be sure to subscribe! Working on new content for you all!
Looking for a fun and easy what to show your students how to draw and paint (without paint!) a 3-D pumpkin? Here you go:

Have a great week, y'all! 

photo signature_zpsd10b3273.png

Sunday, October 17, 2021

How to Create a Paint-by-Number of Your School, an Update!

Hi, my name is Cassie Stephens and I like to start projects and then wait months, sometimes even years, before I finish them. 

Please tell me I'm not alone. 

Case in point: this project that my students began on field day last spring. You can read all about it here. You can also check out this video unless you are reading my blog from your phone...in which case you'll need to view this post from your laptop in order to check out the vid. Technology is super cool. 

We go all out on field day with collaborative projects. ANYTHING to keep me from sitting outside all day and doing sidewalk chalk or melty face painting. You can see our field day set up for the art room here. 
After the kids painted it in the spring, it looked a little rough (sorry, I don't have any photos). I was a little disappointed by the look of it until I realized that all it needed was to be outlined again. That REALLY made the colors pop and cleaned it up nicely. 

I went in over my fall break and really enjoyed listening to a podcast and outlining this beast. It took no time at all. And I used my fave new hack of drawing with a Q-tip dipped in ink. It works so well, provides a consistent line and holds quite a bit of ink! 
I did use a Sharpie to write the name of our school. I also would STRONGLY recommend using bottles of craft store acrylic for this painting. We initially painted it with tempra and it looked so faded, translucent and chalky. 
Like many schools, the front of ours is a little boring in that it has a huge parking lot out front. So I took some liberties by adding our country and state flag, our state flower and a banner with our school district logo.
And now I'm totally hooked on the idea of creating more paint by numbers with the kids for our school!
It was really easy by just snapping a photo of the school and tracing in Procreate. I am thinking that we need a giant canvas of our school mascot next!
Pretty sure this beauty will end up in the front lobby of our school. I cannot wait to see it up! Here's what it looked like the day we started painting it. I'll keep you posted on how it looks once up!


photo signature_zpsd10b3273.png

Sunday, October 3, 2021

Kindergarten Rainbows and Self-Portraits!

Hello, friends! My kindergarten is wrapping up a self-portrait lesson and it's one that I've never done before with them. I'm super happy with the result and I wanted to share with y'all. Mostly I wanted to share some of the tips and tricks and things I learned in hopes that it may help you, if you decide to go down this rainbow/self-portrait path. 

But first, let's chat about where this lesson falls in my kindergarten line of projects. We start the school year in kindergarten with Line Sculptures. From there, we moved on to Dot Painting. Following this, we painted Rainbows! Now, in the past, I completed this Line Unit before moving on but the last couple of years I've mixed it up a bit. I will bounce back to those lessons but for now, we are painting. We've also not finished our rainbows (by adding the sun and clouds) but that will happen this week. 
My favorite supply for painting with kindergarten are tempera cakes. This is a little what my set up looks like. I always serve up paint (or have the kids get their own paint) on trays. This helps us carry the supplies easier and contain the mess incase there are spills. If you know me and my paint set up, then you know that we normally use dog dishes for water and a sponge. But sometimes we are using them for other things so this is my back up set up: water pot (these are my favorite and you can find them here, they are NO SPILL!), sponge for 'drying' our brush (sponges are called Dirty Ole Sponge Bob and I get them from the Dollar Tree) and a tray to hold the sponges (old sushi dishes!).
My tempera cakes are usually a mess. You can purchase tempera cakes in a set but they always end up getting crumbly or with a big hole in the middle. The tray the cakes come in is crap and a thing plastic. I noticed huge messes of paint left on tables a couple of years ago...which was from the thing plastic tray splitting and paint leaking out the bottom! So now I NEVER order the whole tray, just the refills like I do my pan watercolor paint. I love Prang's tempera cakes as well as Jack Richesons. I order all the colors in the rainbow. I use muffin tins and plastic condiment cups to create a palette for the kids. When we are painting our skin tone, the palette is changed to have only red, orange, yellow, white, brown and black. For painting rainbows, this is how I set up the palette. 
We spend a LOT of time listening to this song and this song as well as learning the ASL for all of the colors in the rainbow! Then we hit the ground running and paint our rainbows. 
Even in 30 minutes (the length of all my art classes), I always have early finishers! So early finishers are given another sheet of paper and told to paint a rainbow pattern. We wrap those up the following art class. 

Hot Tip: Cut 2" off the paper that you plan to frame that way it's ready to frame on traditional size construction paper! I plan to frame these self-portraits on black construction paper 12"X18".
The following art class, we learn what a self-portrait is! This video REALLY helped and we loved it! 

After listening, dancing and singing with the song, I demonstrated drawing a large self-portrait as the kids directed me. I asked "what should I draw first? What shape should I use? How big should I draw?"

Afterward, they were given paper and a permanent marker (I wished I would have had them use a regular black marker as the line would have been thicker). They did an amazing job! 
The following art class, we learned all about scissor safety! And how to carry and wear our scissors correctly. Below is a video on how I explain scissor safety to my students (if you cannot see this video, try viewing this blog post from your laptop):


After cutting out, kindergarten glued their selfies to their rainbow backgrounds!
This is definitely a project I'll be doing again! 

photo signature_zpsd10b3273.png