

Every year I do a weaving project with my students, kindergarten to fourth grade. And when asked at the end of the year what their fave art project in the universe is, weaving always ties first place with clay.
And who can blame them? Digging ones hands deep into clay or entangled in a bundle of yarn is just about the best feeling ever, says the art teacher. However, I've grown a little tired of the usual weaving project my third grade students create. So when I saw these amazing tree weavings on pinterest, I was inspired to have my students create one of their own.
 | |||
| Stunning, right? And if you know Russian (at least that's what I think it is) then you'll totally understand the directions. I'd click the "translate" button but I guess you gotta know the Russian word for that to make it happen. All kidding aside, the website does an excellent job of demonstrating the process. For headache-free purposes, I decided to forgo the bent twig option and have the students craft their loom from a Chinet plate. |
 |
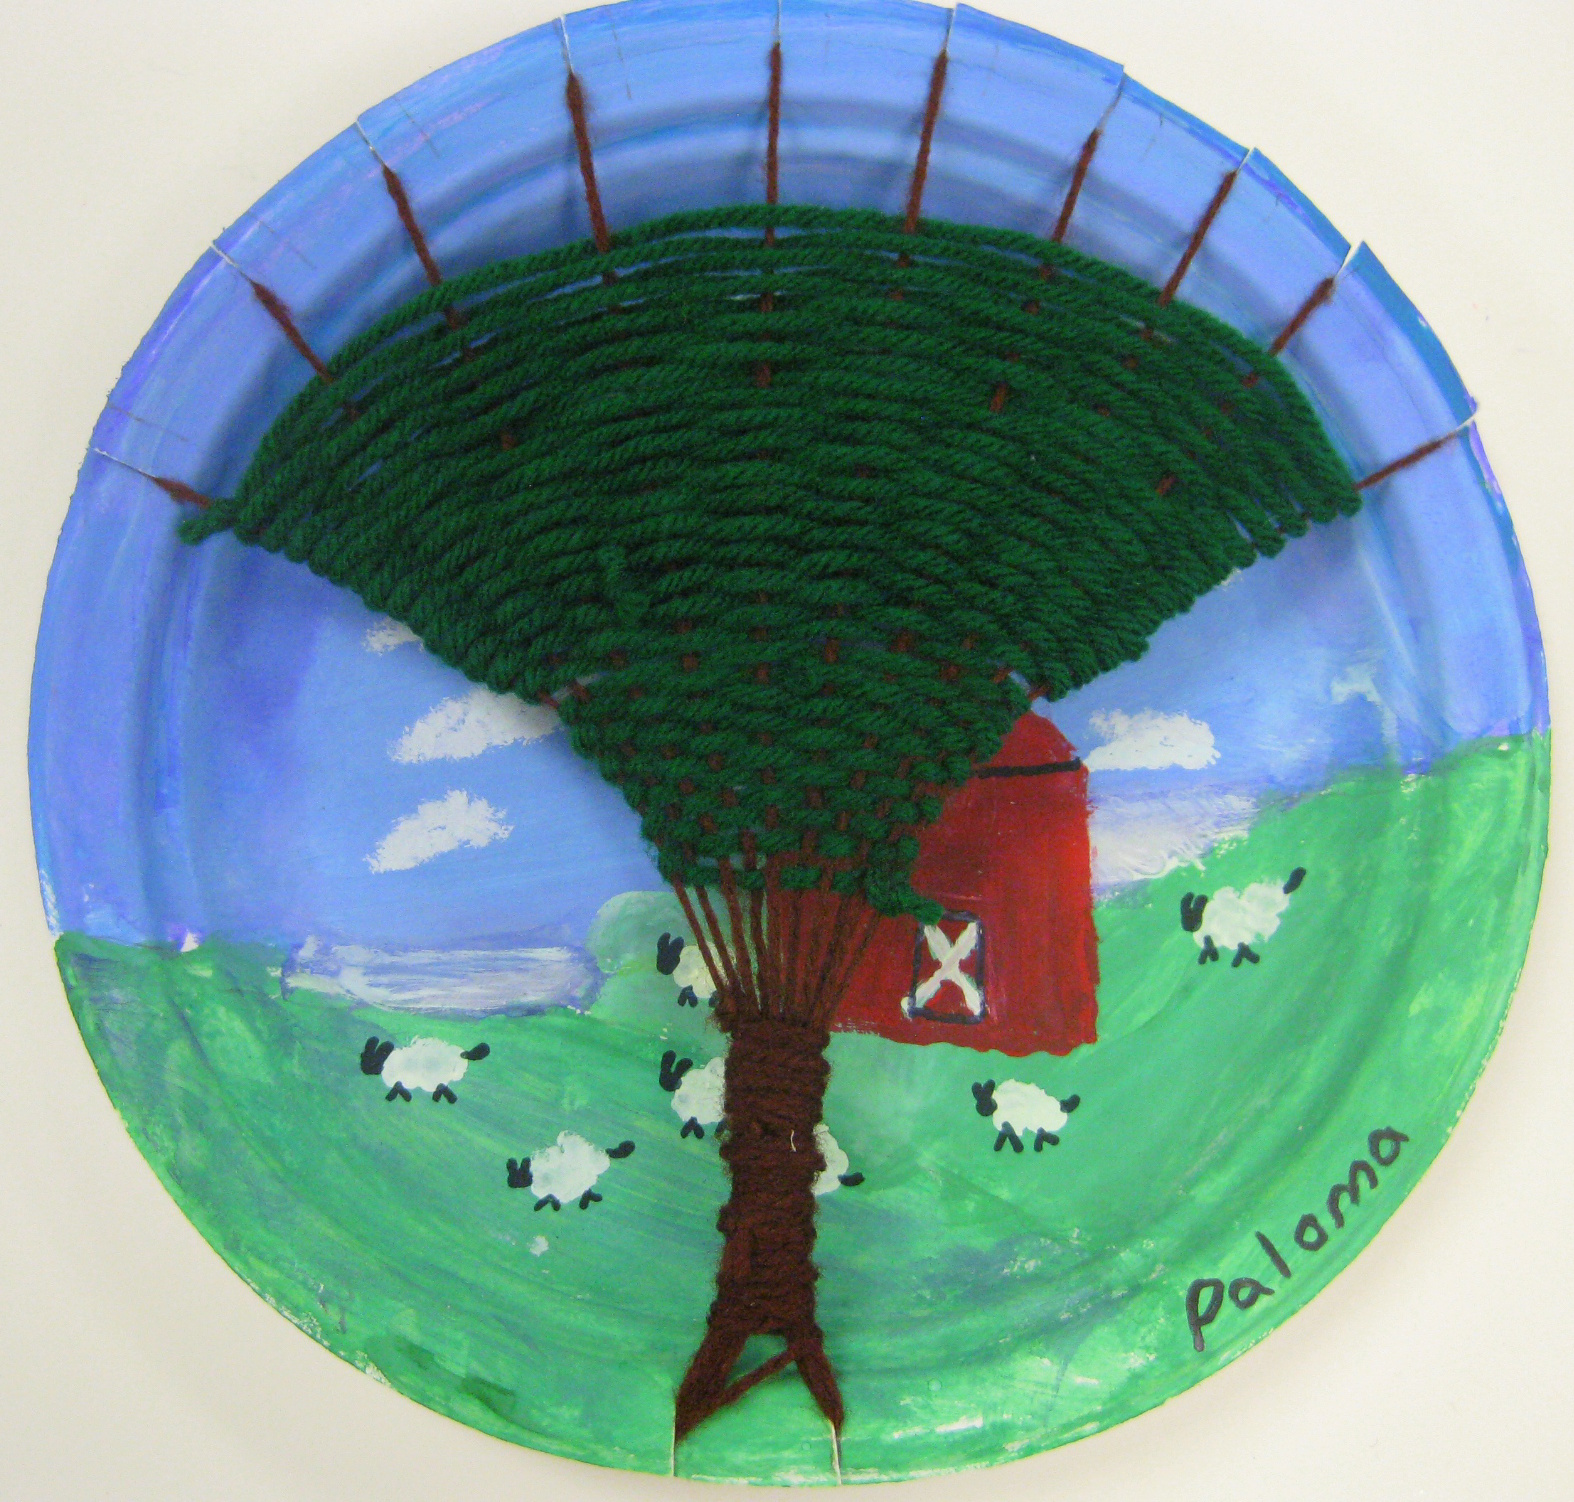
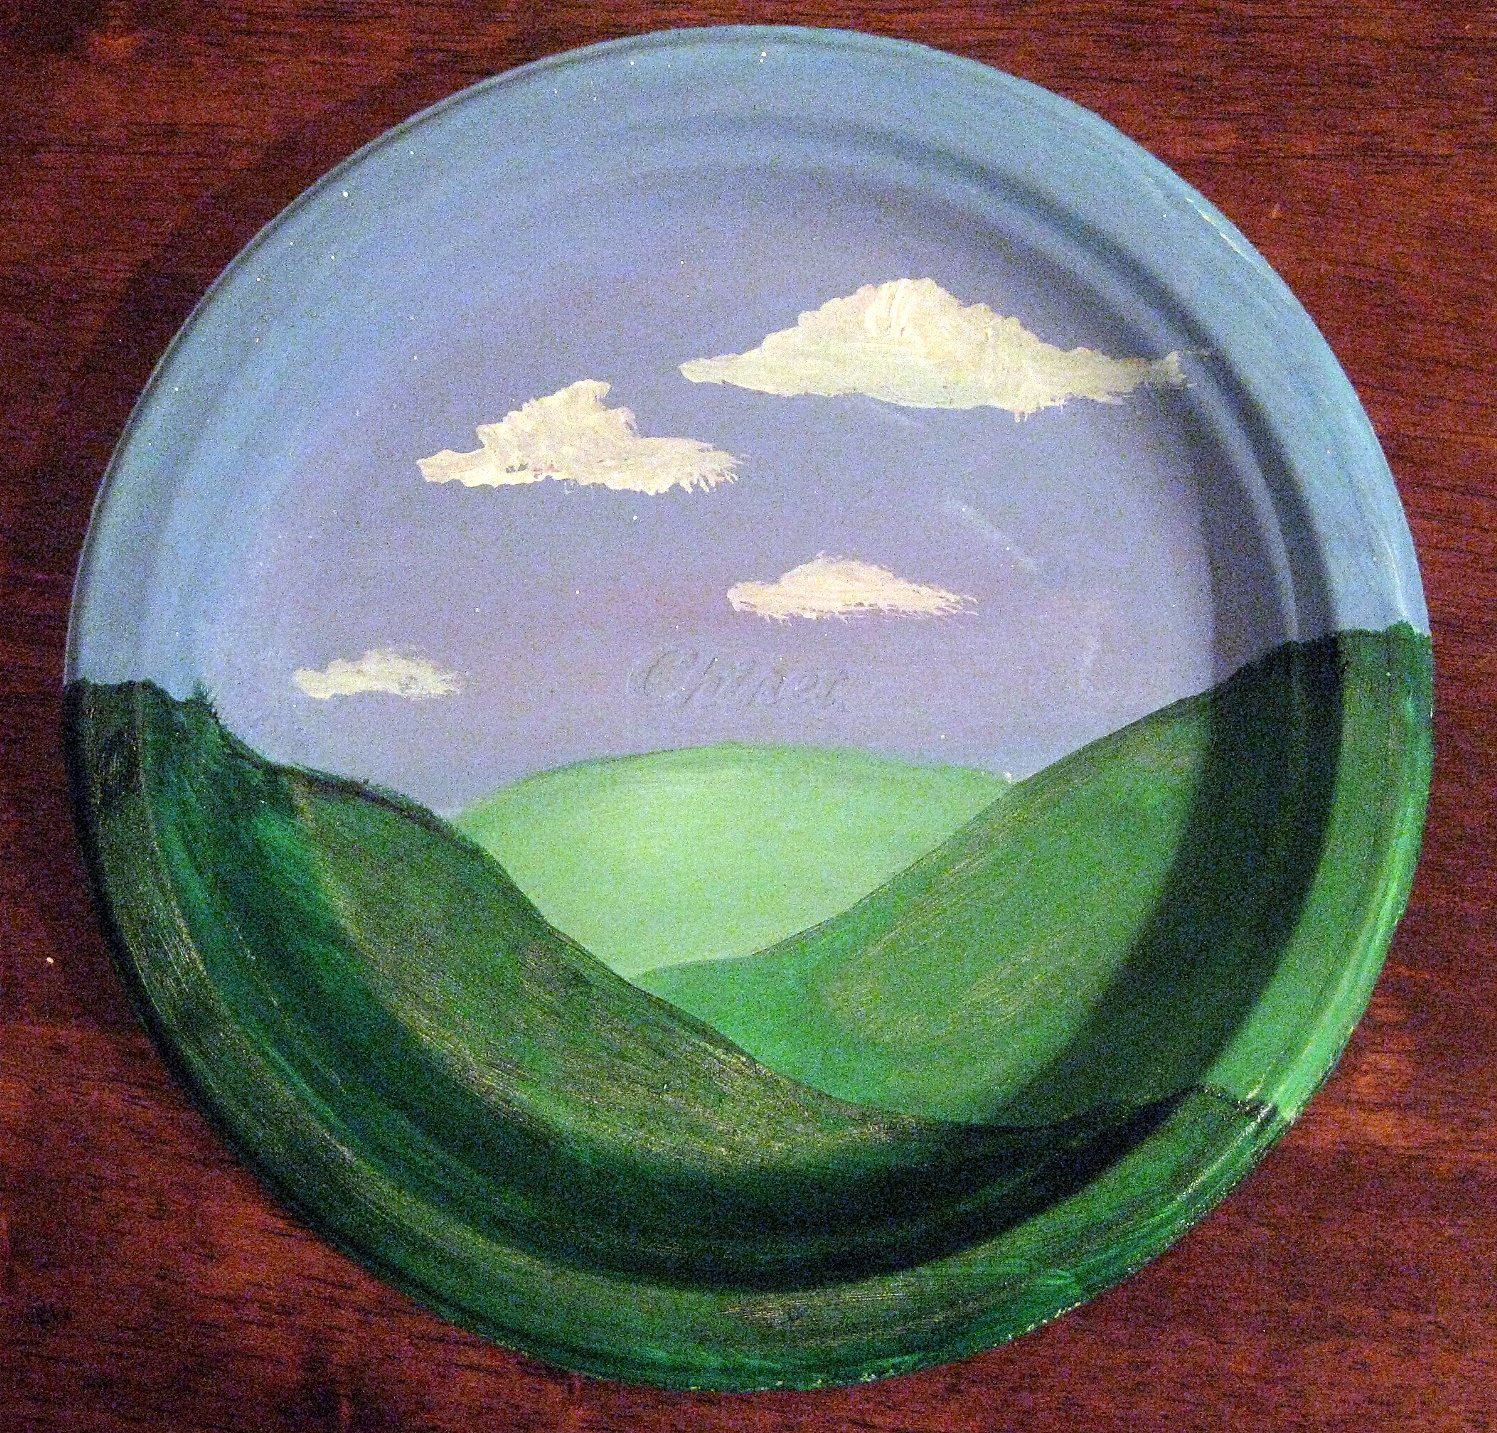
| This weaving lesson was also apart of our study of the United Kingdom. We studied many landscape photographs and paintings of the countryside of such places as Northern Ireland and Scotland. Our first day was spent painting a sky on our plate. If you recall, these kids have plenty of experience with sky painting as they are the ones who created these German Gnome Landscapes. The following art class, we chatted about how to create a fore-, middle- and background in our landscapes. |
Students were encouraged to mix three different values of green to create a sense of depth. From there, they were given the option to enhance their landscape with what they'd imagine a countryside in the United Kingdom to look like. As you can see, we were feeling mighty sheepish.

Once our landscapes were complete, we were ready to begin the process of creating and warping our loom.

By placing a Tree Weaving Template over their plate, students could draw the correct number of notches on the top (10) and the bottom (2). These notches were cut to the inner edge of the plate.

With notches cut, the students met me on the floor with their plates and about a yard and 1/2 of pre-cut yarn. Our first step was to wedge the yarn into the bottom left hand notch as seen above.

With the long end of the yarn, we put the yarn into the far left top notch, out the notch beside it, into the bottom left, out the bottom right and back up to the top. This process was repeated until all top notches were filled in. We ended by going in the bottom left notch, coming out the right. At this point, we were ready to create our tree trunk.

Which is super easy. With the end of the yarn, begin wrapping it around the yarn at the bottom, tugging gently as you go. If you run out of yarn, simply double knot a new piece to the old. Once your trunk is tall enough, tie it off to a tree branch.

Some bare trees ready for weaving.

To begin, we double knot tied our chosen color to one of the tree branches on the end. From there, we began the process of weaving over and under. One thing the students struggled with was weaving loose enough. You see, they wanted to pull tightly which caused the weaving to slide down the branches and pull the warping threads inward. However, once they got the hang of it, it was smooth sailing.
 When we first began this lesson, we chatted about wool and where it came from. I passed around some natural wool roving, some cream colored some brown. We chatted about how different colors of wool come from different color sheep. I guess that inspired the sheep in this landscape.
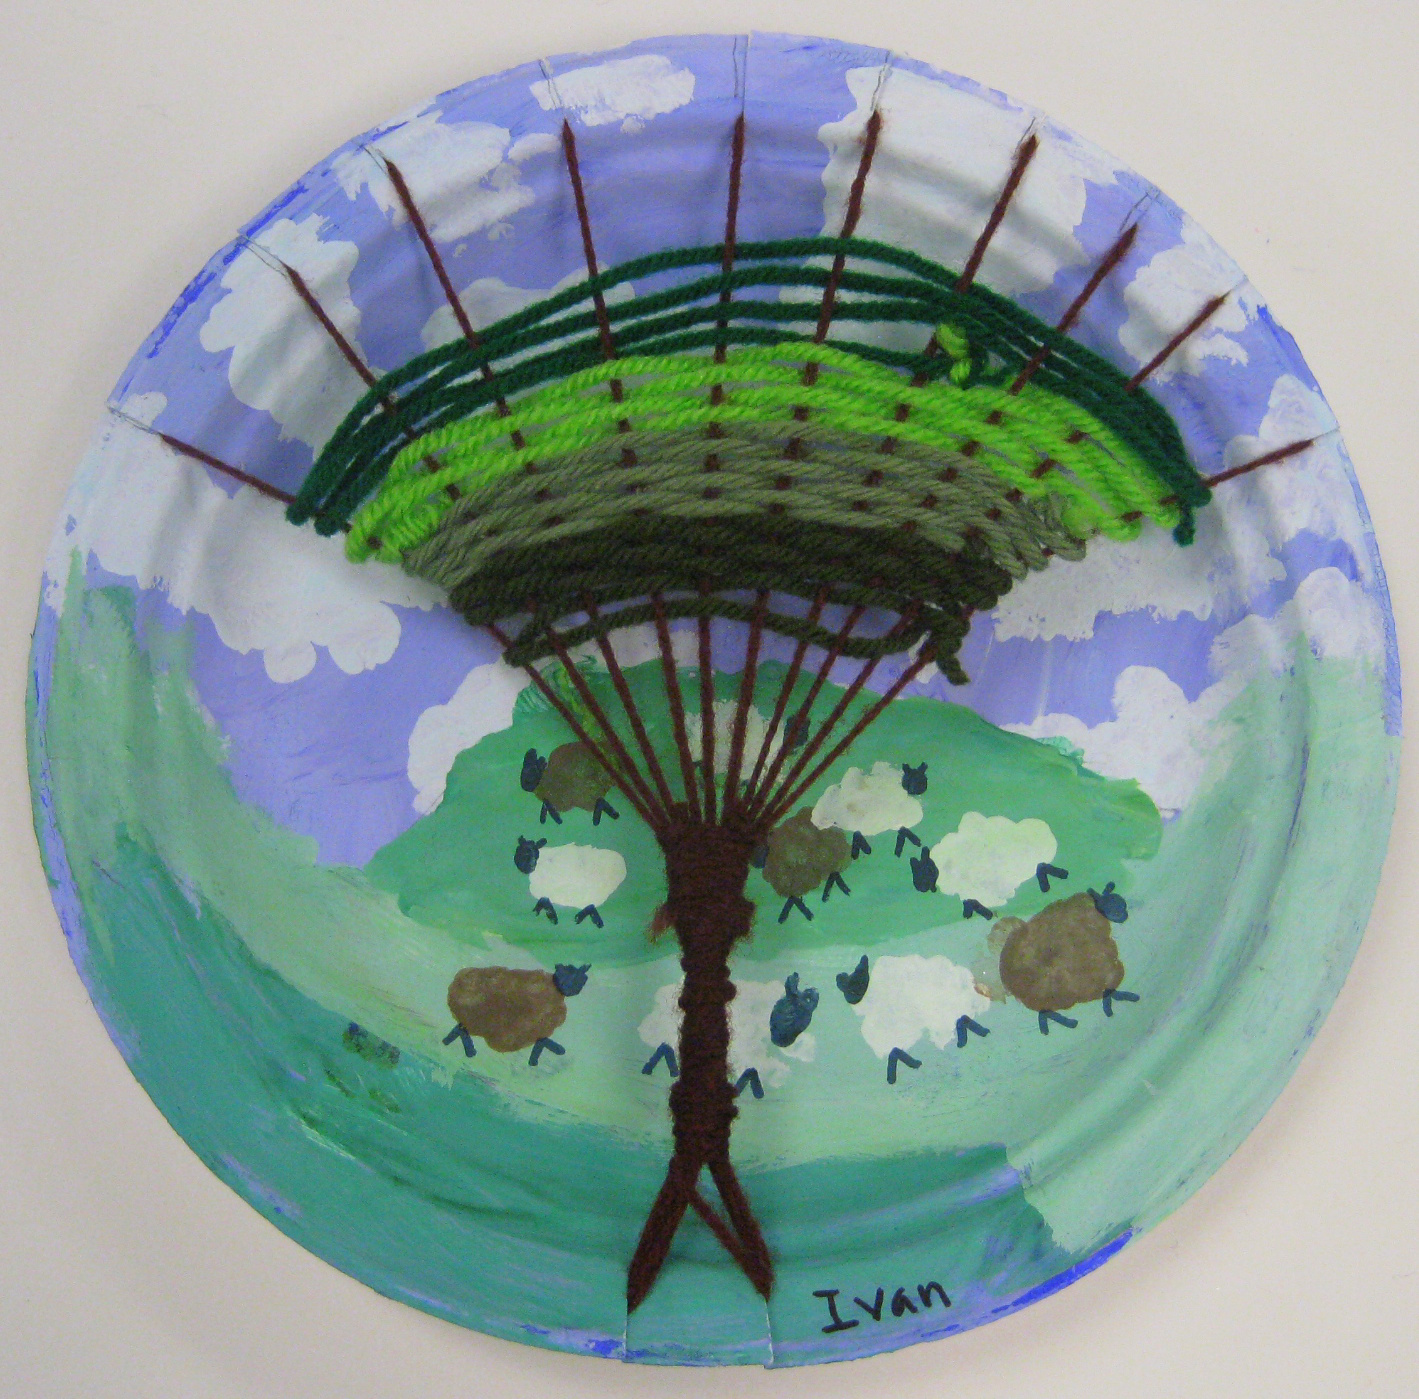

New colors were added with a double knot tie. Weavings were ended with a double knot tie off as well.

So that we could hang these for our upcoming art show, students tied a piece of yarn to the backside of the plates.

And that's it. Honestly, the warping/weaving portion took no time at all. And I foresee so many variations of this project in the future: a woven peacock, a turkey...okay, that's all I've come up with. But I'm sure to think of some more (your input would be greatly appreciated and promptly stolen as an idea of my own!).
I do hope my explanations helped and that you're encouraged to try this lesson with your students. If you're still not gettin' it, just translate it into Russian and it'll all become crystal clear. And if you'd like some more weaving projects, you can check here. Chat with you soon!


Absolutely beautiful! I have a new weaving project for next year!
ReplyDeleteYay! I think you'll love it, I know the kids will :)
DeleteDid these with my 5th graders on 6inch plate. We did the opposite, wove from trunk to top. Some wove multiple threads at once, some braided yarn and wove it. We looked at Sky Tree by Thomas Locker. Students illustrated seasons in the background and had to mix paint to show depth. Then the color in the branches had to match the season illustrated. I even managed to teach stitchery as some wanted apples, flowers ,etc in the tree. Great project! We made symmetrical stands for them for the art show.
DeleteThat sounds awesome!! We'll have to follow your lead with the book and those stands, great idea!
DeleteWhat are symmetrical stands?
DeleteThese are fantastic! What an awesome idea!!! :)
ReplyDeleteThis has got to be the most original weaving project I have seen! Pinning, pinning, pinning!! I hadn't seen the Pinterest inspiration. The more I look, the more ideas I can think of for what to do with these. In the fall, use red beads for apples (we have lots of apple trees around here) or maybe a cherry blossom theme, or even underwater with the trees being coral formations instead.... Can't wait to give this a try!
ReplyDeleteI love this! This is the freshest weaving idea I have seen in a long while. So glad I put off the annual fourth grade weaving project until I read your post!
ReplyDeleteIsn't weaving the best!? For my Art Club kids, it comes in second to paper mache- and I'm sure that's just because we don't get to play with clay. (We're just finishing up our CD weavings this week and they look awesome!)
ReplyDeleteI'll pin your beautiful trees-maybe for next year!
Hi Cassie! Love this project. This would be absolutely GREAT in our December issue, which focuses on fibers and textures. All that appears to be missing are a materials list, learning objectives, National Art Standards and high-res photos -- and you have a perfect project for the magazine! Email me and let me know if you are interested in submitting it for publication. (My fingers are crossed.) Thanks!
ReplyDeletemaryellen@artsandactivities.com
Im trying this next week with a Texas Hill country theme! Thank you!!
ReplyDeleteDue to begin weaving tomorrow, think ill set the straws aside this year and take out some paper plates. Great project!
ReplyDeleteMy students in Kalgoorlie Western Australia have to painted their landscapes and can't wait to start their weaving. Thanks for the great idea.
ReplyDeleteOh, how exciting! Please keep me posted and let me know if you have any questions!
DeleteThis is interesting! I enjoyed reading your great post.Thanks for the valuable information and insights you have shared here. Femme A La Fleur
ReplyDeleteI am going to start this project with my kiddos tomorrow (the weaving portion anyway, we already made the landscapes.) Anyway, just a thought- I think I will have them weave from the trunk up and I hope this will remedy the pulling too tight and squishing the "leaves" down problem. Love all your ideas- I'm not sure when you sleep, but thanks for all the inspiration Cassie!
ReplyDeleteYay!! Please keep me posted, I would LOVE to know how that turns out. AND I'd love to see photos :) Thank you for your kind words and have fun!
DeleteThank you so much for this wonderful idea!
ReplyDeleteWhat kind of paint did you use for the background scenes? not tempera...looks like it is acrylic. I love this idea...and I teach grade 3!
ReplyDeleteHi! I used washable tempra by Crayola...it's my fave. And these were done with 3rd grade, I think your kids would love creating them!
DeleteGreat activity! We actually did this with my Y Princess tribe...the girls loved it, and the dads did as well (since it was super easy). THANK YOU!
ReplyDeleteYay! How fun is that! Glad you give it a go :)
DeleteThis is great, hope to try it with my grade 3 this year! Thanks for sharing, as always!
ReplyDeleteLove these cheerful and unique weavings! Thanks for sharing and providing clear directions.
ReplyDeleteThese are GREAT! I have my spring weaving project. This is so different from the God's Eyes, card board rectangles, and dream catchers I've done over the years. I can't wait. Thank you for sharing ;-)
ReplyDeleteOh my I love these! I will definitely be trying with my art class. I've just found your blog and love it, thanks for sharing!
ReplyDeleteyou could weave umbrellas...
ReplyDeleteThese are fabulous, thanks so much for sharing! Definitely doing these with my third graders this year!
ReplyDeleteJust a quick question Did you do these with the large chinet plates or the smaller ones? What a great idea. Thank you, Thank you.
ReplyDeleteThank you!!! This is great help!
ReplyDeleteFound this in the storage room.
ReplyDeleteHand made loom.
IMG_0609 copy.jpg
EXCELLENT
ReplyDeletesuper
Perfect article
That's really something extraordinary. It’s like thinking out of the box and producing this kind of excellent stuff in front of everybody. Really very impressive.
ReplyDeleteIt is amazing and wonderful to visit your site. I've learn many things from your site.
ReplyDeletelandscape trees
I can't wait to try this with my 2nd graders this year!!! I love to do weaving, and this is really a super original idea. Love it!!! Thank you
ReplyDeleteI love this project. I've done it the past 2 years since I saw your post and it has been a rock star project. It's always so fun to see how the weaving clicks with the students and they really get into it.
ReplyDeleteWonderful crafts!
ReplyDeleteWhat an amazing project! We're going to use this for our kids' 3rd grade class. What kind of paint did you use? how long did it take to dry? I'm just wondering if we'll need to do this project in two classes. Thanks for your help!
ReplyDeleteI just did some basic weaving with 7,8 and 9 year olds .This would be a super follow on lesson .
ReplyDeleteAwesome! Could also be a parachute!
ReplyDeleteHi Cassie…few logistical questions for you. After your first couple of days of getting the painting portion done, how did you split up your time on these with the actual cutting, then weaving? How many classes/chunks of time did these take to complete? How did your students handle the knotting - I can foresee that being a whole lesson in itself? I completely love this project and want to do it with my 4th graders, but am a first-year teacher and am finding it difficult to guesstimate lesson planning time here. Any further tips for breakdown? Thanks!
ReplyDeleteCan't wait to try this!
ReplyDeleteThey are amazingly creative crafts for walls. I would try this with my daughter as she is always interested in these kind of activities.
ReplyDeleteValet Parking Heathrow
harga kidney care capsule for man
ReplyDeleteI enjoy reading through a post that will make men and women think.
Your work is beautiful. How long did it take you to learn this weaving technique? It looks super easy and creative. I am going to mention this to my sister. She teaches school and this would be a nice project for the children to learn.
ReplyDeleteIt was very useful for me. I'm happy I found this blog. Thank you for sharing with us,I too always learn something new from your post.Visit our website atcara cepat kurus tanpa olahraga
ReplyDeletepengobatan alternatif penyakit ginjal pada anak
ReplyDeleteciri ciri penderita penyakit liver bengkak
ReplyDeletethat is the cutest thing iv'e seen. I will be doing this project in our homeschool lession
ReplyDeleteTammy
http://www.tngardencenter.com
cara mengobati herpes simplek secara alami
ReplyDeletekidney care capsule green world
ReplyDeleteIt was very useful for me. I'm happy I found this blog. Thank you for sharing with us,I too always learn something new from your post.Visit our website at pengobatan kesemutan pada penderita diabetes
ReplyDeleteIt was very useful for me. I'm happy I found this blog. Thank you for sharing with us,I too always learn something new from your post.Visit our website at pengobatan alternatif tumor usus besar secara alami
ReplyDeleteJamu Tradisional Untuk Meningkatkan Vitalitas Pria Dewasa
ReplyDeleteVitamin suplemen penambah darah yang paling bagus
ReplyDeleteobat penyumbatan di prostat
ReplyDeleteHarga Blueberry Juice Green World
ReplyDeleteManfaat Vitamin E untuk Kesehatan Tulang
ReplyDeleteCassie, I LOVE your blog and ideas! You are brilliant! I came across the weaving because I was looking for a little weaving project for my 4th graders to tie in with my Viking unit. I also have the same question someone else asked: did you use the regular or larger dinner chinet plates?
ReplyDeletecara mengatasi sakit lambung pada anak
ReplyDeleteI'm thinking of doing this with my third graders, but I only have one lesson to squeeze it into. If I pre-paint and cut the plates, how long do you think the actual weaving part takes?
ReplyDeleteYour article very well and good, bringing inspiration to many. I hope people visit my website ...
ReplyDeletegejala infeksi lambung
Very impressive and informative post. Information Technology are really very helpful nowadays at work and studying ...
cara menyembuhkan penyakit kadas di selangkangan
ReplyDeleteI always have 3rd grade paint a landscape with a feeling, and then create a traditional weaving to reflect the feeling of the painting. But, wow! What a genius idea to combine the two! I will have to try this next year! Thanks!
ReplyDeleteGina
its gonna be on fire when you already know it -> Obat Salep Kadas Kurap Kutu Air Di Apotik
ReplyDeleteNot sure how much yarn to plan for per student.
ReplyDeleteDo you know how to write a college research paper ?
ReplyDeletesuplemen gamat sea cucumber
Our skilled writers can help you to create the best paper and your professor will be in admiration of it.
Cool stuff you have got and you keep update all of us.
ReplyDeleteΠαράθυρα
I LOVE your blog and ideas! Your article very well and good, bringing inspiration to many. Thank you for sharing.
ReplyDeleteobat gondok beracun
ReplyDeletecara diet sehat yang alami tanpa olahraga
ReplyDeleteObat Paru Paru Rusak
ReplyDeleteCara Pengobatan Infeksi Paru Paru
ReplyDeleteCara membersihkan paru paru kotor
ReplyDeleteJust finished this amazing project with my grade 3s. They were asking to do another weaving project before this one was done. Thank you for the idea. Next year, I am thinking of trying to turn them into Hot Air Balloons for variation.
ReplyDeleteAlberta, Cananda
obat tradisional untuk penyakit asma
ReplyDeleteHerbal Walatra
ReplyDeleteCara Menghilangkan Dahak Di Paru Paru
ReplyDeleteObat TBC Tulang
ReplyDeleteHi I just did this with my 3rd grade - 2 sections. I used small dessert plates. The kids in one class used the tree template. However the plates bent a lot (they were heavy). The next class we hole punched the plates - much better
ReplyDeleteOBAT HERBAL ASMA PALING AMPUH
ReplyDeleteWhen you place an order Tanaman Obat Herbal Untuk Ambeien we’ll pair it with a writer who has relevant experience your topic and type of paper. You’ll get top-notch results from our experts. Plus, this experience will help you learn how proper academic writing is done. Tanaman Obat Ambeien That’s what matters the most!
ReplyDeleteWe did this in my Philosophy class to go along with our discussion of Time. I used the suggestion of kicking things off with Thomas Locker's book Sky Tree. Worked perfectly! It took several sessions, though, for the painting, so I experimented with a variety of other art materials that don't take so long to dry. Here are the results: http://switzerite.blogspot.com/2018/04/paper-plate-tree-weavings-reprised.html
ReplyDeletepengobatan tumor miss v
ReplyDeleteCara Mengobati Ginjal Bengkak
ReplyDeleteobat kanker darah leukimia
ReplyDeletewalatra propolis brazil
ReplyDeleteThis article is really interesting. I dont know what will be in the future, but maybe some thing will happen from this article. I read another interesting article about Healthy here: Harga Walatra sarang Semut That was so cool too, so maybe u should visit this site;)
ReplyDeleteObat Edema Paru
ReplyDeletehttp://solusikesehatanalami.uzblog.net/walatra-berry-jus-suplemen-anti-kanker-5731177
ReplyDeleteInfeksi Paru Paru Menular Atau Tidak
ReplyDeleteBahaya Paru Paru Basah
ReplyDeletePenyebab Paru Paru Basah
ReplyDeleteObat Batuk Berdahak
ReplyDeleteTanaman obat herbal amandel
ReplyDeleteInternet marketing became an inevitable thing for the success of every business.Doing the right kind of online advertising methods help you get good leads, traffic etc which will, in turn, boost your business. Visit : Obat Psoriasis
ReplyDeleteObat Batuk Disertai Sesak Nafas
ReplyDeleteObat Batuk Disertai Sesak Nafas
Obat Batuk Disertai Sesak Nafas
Obat Batuk Disertai Sesak Nafas
Obat Penyakit Kuning
ReplyDeleteObat Penyakit Kuning
Obat Penyakit Kuning
Manfaat Daun Jambu Biji Untuk Kesehatan
ReplyDeleteI visited so many website seeking for help, it looked hopeless, until I came in contact with Dr Purity the real spell caster, who helped me to restore my broken marriage. If you’re having similar problem in your marriage, you want your husband or wife to love you again, you have someone you love and you want him or her to love you in return, you are having any challenge in your relationship. Dr Purity LOVE SPELL is the solution and answer to your problem, contact him today via Email. puritylovespell@gmail.com or you can also call him or add him on Whats-app: +2348070980389.
ReplyDeleteCara Mengobati Paru Paru Basah
ReplyDeleteQNC JELLY GAMAT
ReplyDeleteQNC JELLY GAMAT
The article you have shared here very awesome. I really like and appreciated your work. I read deeply your article, the points you have mentioned in this article are useful
ReplyDeletepotty racers 2
Wow! what a great project. Your work is so creative. I am so impressed to see your work.
ReplyDeleteThankfully. Homeplix
Cassie,
ReplyDeleteI absolutely love these but I was wondering what size plate did you use? Thank you so much always for sharing your ideas!!