Hey, y'all! I’m so excited (and nervous with sweaty hands but mostly excited) to share with you the Cassie Stephens Podcast! Creating this podcast was one of the first things I put on my Summertime To Do list and I'm thrilled (and really rather shocked) that I am able to bring it to life. It's been a lotta work and I am equal parts frightened and thrilled to share it with you. As you might know, I have worked with The Art of Ed for some time on the podcast Everyday Art Room. I learned so much from that experience and I am so thankful for that opportunity. This week will be my final episode with Everyday Art Room before passing the mic to Nic Hahn who I am positive is going to do an INCREDIBLE job (go, Nic!). I'm excited to hear what she has to share. While I have much more to share on all things art teacherin in this new podcast, I wanted a place where I could also speak about life: my bouts with depression, feeling lost, hating myself both as a teacher and a human, struggling to figure out just who I am, what I want out of life and how to love the person I am...it sounds dark and sad (but, y’all know me, it wont be for long!) but that is life. The part of life so many of us hide from or refuse to talk about. Well, I want to talk about it. Along with our day to day art teacherin life. Because that IS life: a mixed bag of family, work, feelings and figuring it all out. Here's just a bit more:
Many of you have asked about making the podcast available iTunes and I'm working on that. When it's available there, I will def let you know. Until then, you can find it on Breaker, Google Podcasts, Radio Public, Spotify and Pocket Casts. I'm also trying to figure out how to make it available for you right here!
It's been a learning curve for sure as I'm doing all the recording, editing and the rest. You'll have to be patient with me...at least more patient than I've been with myself. You don't know how many times I nearly tossed this idea out the window. But what I want to share with you means so much to me...so I'm gonna keep on trying to make that happen. Love y'all! And I would love to hear what you think. xo!
Summer time is my favorite time to sew...but, sadly, I've not been doing too much of that lately! Right before Art Show Madness, I started getting that sewing itch and decided to do something a little different. Instead of just sewing one dress at a time, I decided to do something that I called Batch Sewing. I know people batch certain tasks or projects like painting or blogging or whatever but I'd never successfully tried it with sewing. I decided to start with seven (7!) dresses. This wasn't too hard as I decided to use just two slightly different sewing patterns. However, the process was SLOW and I eventually hit a wall...right when it came time to put in sleeves (I HATE sleeves!). So Mitch suggested that I just start finishing one off, one by one. They were really so close to being done! For this dress, I spent about two hours just putting in the collar, hemming the circle skirt, attaching the bodice to the skirt and putting in the zipper. I managed to finish it off before 9am one summer morning. And here she is, The Stripe-y Masterpiece!
When sharing my sewing progress on Instagram, I always get a ton of sewing questions that I really don't feel qualified to answer. BUT I have sewn a lot of stuff in my day (I should count how many dresses sometimes...but some I know are no longer with us, may they rest in piece) so I do feel like I can help a wannabe sewer out. After all, that's what I am, a wanna be sewer! I had it in my mind FOR THE LONGEST TIME that I'd never be able to learn to sew actually for realz clothing and yet, here I am...in stripes that MATCH UP BEAUTIFULLY!
I MEAN. Just look at it. It's pretty magical.
I also get asked quite a bit about sewing patterns to use. What I recommend doing is deciding what you want to sew first: a dress? A skirt? Once you have that figured out, put on your very favorite dress or skirt or whateverness. What do you like about it? The way it fits? The fact that it has pockets? Those can then be what you are looking for in a pattern. Be sure and check out my video as I'm going to walk you thru patterns and finding one that's best for a newbie.
After sewing many dresses, my favorite to wear is a Fit and Flair. I like a fitted bodice or top and a flairy, flowy skirt. But that's me. That's what I'm comfortable in and flatters my 13 year old chest and my 44 year old hips. You find what works. Then use it. Over and over. At least that's what I do.
Also, sewing is supposedly about perfection and preciseness. I'm neither. If you can zoom in and get a little closer, you might see that the stripes at my waist are uneven. No bueno. But was it no bueno enough for me to fix it? Nah. Just put a belt on it. AIN'T NOBODY GONNA KNOW. Except you and me.
The best part about sewing is the pride you'll feel in having a unique garment that you created and NO ONE ELSE HAS! Yes! You are a true one of a kind so why shouldn't your clothing be?!
SPEAKING OF SEWING....my new book that is due out next month is now the #1 sewing book right here! Y'all best get to preorderin' and if you do, THANK YOU SO STINKIN' MUCH!!
Serving up the final installment of our 2019 art show for y'all today! This here is the 2D portion of our art show where every work of art that every kiddo has created all year long is on display! You can check out our Glow Gallery Tour and our Pirate Gallery Tour here! In this blog post, I thought I would share a link to each and every one of these lessons you see! This will give you an idea of what projects I teach (2D, that is) throughout the year. If you are interested in details on this art show: how it's hung, who does the hangin', how it's taken down and sent home, then you might want to watch this tour I created to answer those questions for you:
Please feel free to leave any questions about what you see here or on my YouTube channel and I'll be sure to answer them.
Let's take a tour of theses projects! We'll start with kindergarten. My kindergarteners always have the biggest amount of artwork because their lessons are shorter. I started the beginning of the year with my lessons on line. Those projects did not make it to the art show as they were sent home at the start of the school year. From there, we did the rainbow lesson and Mouse Paint project.
One of the more popular lessons for kindergarten on my blog is this one. This lesson is always followed by my Chicka Chicka Boom Boom project which you can find here.
Our snowmen were a lot of fun to create this year too. We learned all about the cold colors and painting spiral lines.
A new lesson I came up with this year were the heart prints. We were able to get many prints created and used our two favorites for our work of art.
With our printing plates, we created these beauties! Super fun and stunning!
The kindergarten gallery is almost always my favorite!
Although first grade sure does take a close second. Let's talk about their projects. One of my favorites this year were our Mad Scientists!
A classic that we've done many years in a row are our Royal Self-Portraits. I love that we have two selfies in this art show: one as royalty and one as kid-genius. Perfect for my kids!
We also did those heart weavings that you see with the stitched edge. With the heart we cut out from our construction paper for the weaving, we created these Romero Britto inspired pieces. You can see a variation of that lesson here.
All of the artwork and the kids who created them make me this happy.
Let's move on down to second grade! These kids had many works of art both in the Glow and Pirate Gallery that their wall seems a little empty. Don't let that fool you: we are always crankin' out some art!
Speaking of, let's move on down to third grade! You'll notice these kids also did the Chris Uphues lesson...in fact, all of my students did as it was a sub plan. One lesson of mine that was especially popular was the landscape project! I had run out of paper (omg, an art teacher without PAPER, hello!) and had a lot of cardboard pizza rounds...so we improvised! The kids also created those amazing Sandra Silberzweig-inspired self portraits!
My students did two kinds of weaving, tree weaving and circle weaving. Two kid favorites. These are also featured in my new book!
One lesson that I'll be sharing soon is this one! If you can't wait, then check out this blog post as this lesson is a variation.
This is another lesson that I'm excited to share with you soon!
This third grade display brings me so much happiness!
My fourth graders spent the start of their school year making pillows! We made pizza, donut and emoji pillows, all of which are in my sewing book.
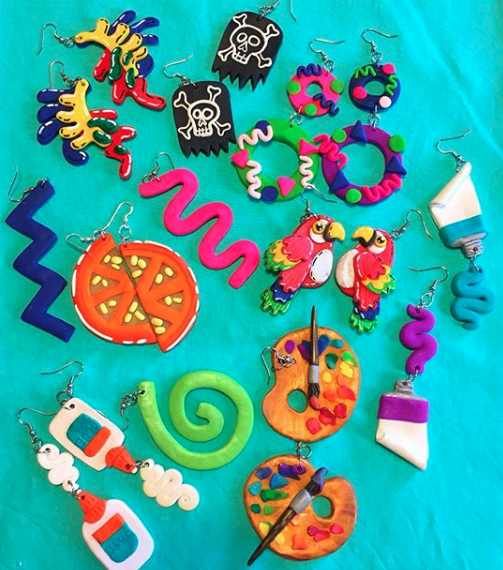
What lengths will you go to in order to avoid unpleasantries? Me, I go to great lengths to dodge sewing. The thing is, I get myself into this sewing pickle every single time. It always starts with the super cute fabric. Currently, I'm in to BIG AND BOLD prints that I usually score at IKEA. Case in point: that bold orange print you see in the background there. I'm currently working on sewing it into a dress but I'm closing in on zipper and hem time and I REALLY don't like zipper and hem time. So, I made earrings to go with my yet to be complete dress!
Polymer clay (I like to use the brand Sculpey) is a clay that comes in a variety of colors and you bake in the oven to harden. I used it a lot in this book. When I wrote that book, I really wanted to include that kind of clay because my students and I love it so much. I keep a stash at home for when I want to work with it because it's so stinkin' fun.
If you are new to polymer clay land, I thought I'd make a little video to walk you through how I made these earrings. Really the only supplies you'll need are the clay, some jump rings, French hook earrings and jewelry tools.
When making polymer clay earrings, just a couple things to remember:
* Polymer clay is self-adhesive. Meaning you don't have to use glue to get the pieces to stick together. Just press and go! * Keep them light! You wouldn't think these would make for heavy earrings but they can if you aren't careful. In fact, the palette ones below, while my fave, are the most heavy and can only be worn for a short while. * Don't put the hole too close to the edge of the design. I learned this the hard way. If you make it too close, the clay just might break when you are sliding the jump rings in. * Don't make the clay too thin. Okay, it's a balance...light enough to be wearable, but not so thin that they break when adding the earrings. * Allow the clay to cool completely. I have noticed that when I take the clay out of the toaster oven, it tends to still be a little bendy. It will harden as it cools. * Bake at a lower temp than suggested if using a toaster oven. I like to use a toaster oven because they heat up faster and require less energy than my oven. That being said, they do tend to bake stuff a lot hotter...and I've burnt my share of polymer creations because of it. For that reason, I'd say bake at 200 for about 5-7 minutes.
My little stash of polymer clay earrings.
I also dig using paint pens on them when they come out of the oven...although I have noticed that the paint does tend to rub off over time.