Sunday, February 9, 2014

What the Art Teacher Wore #89

2-Hour Delay Monday: I dunno about you, but I HATE me some school delays. I get it, the buses need time to warm up, the two specks of snow on the ground need to melt (remember, I live in Tennessee, snow is like our kryptonite here), whatevers. But I'm seriously more off-kilter and wacked-out on these days than normal. I needed a good POP! to get me going. sweater, skirt, tights: Target, they might still have the sweater on their sale rack, got mine for $12!; shoes: Dolls by Nina
So, if I might whine and carry on like a big baby for a minute (because I'm super good at it), this week has pretty much been One Fat Hairy Pain in the Patootie. Lemme give you the run down: we discovered a mystery leak in the kitchen that's causing our floor boards to buckle. So we've had two roofers and three plumbers out to investigate. Of course, the roofers say, "it's the plumbing!" and the plumbers say, "it's the roof!". There was more finger pointing going on than in a kindergarten class. So we threw bunches of money at 'em and our fingers are crossed that everything has been properly patched, caulked, installed and screwed. Insert your inappropriate comments here.

Just when we thought the drama was over, the downstairs heat decided to up and die. Yes, seriously. I've been wearing two pairs of fleece pajamas, three socks, a hat and fingerless gloves since Saturday. I'd snap an outfit photo for you but my camera is frozen. Sorry.

And just when my feel-sorry-for-myself-itis (side effects may include an annoying blog post and hairy legs) was in full swing, I get the news that my blog received...


Wait. WHAT?! 

Seriously, you guys. I was just so thrilled and honored to be nominated, I truly didn't expect to place within the top ten. I mean, did ya'll see who the nominees were? I read and gain so much from each of those art teachers! Please bookmark these blogs and spend some time perusing them. You won't regret it.

Also...I'd like to say thank you very much to those of you that nominated this blog and voted for it. It's meant so much to me, you guys! Especially after this leaky and heatless week!

Now, if you're new to this blog because The Art of Education brought you here, lemme tell you what happens here: weekly, I'll share a peak into my art room either with an art lesson or some other craziness; I'll post some creation of mine (hint: it's usually some tacky ensemble I've crafted); and I'll share what I've worn during the week which is what this post is all about. This week I decided to include my drawings from our One Drawing a Day book club adventure (go here and here to find out more and join the fun, kids!) and some fun-ness goin' down in the art room. If you are new, I'd love to hear from you! Feel free to shoot me an email or leave a message in the comments. Thanks, ya'll!
Drawing #1: A Still Life in Pen. Now, just cuz we are 7 days in to the book One Drawing a Day doesn't mean you can't join any ole time! In fact, don't tell the others, I'm behind by two days, whoops! Hoping to catch up this evening. But, really, the whole purpose of reading this book together is to get us all drawing and creating again. As art teachers, we have a bad habit of neglecting our own creativity. No more, I say!
Again, these tables. Suggestions on how to clean 'em really really well? They are whipped down daily by me and the kids...and still, this. And don't tell me Magic Eraser because I need a Super Magic Eraser to take care of this. In other news, look at that awesome Chinese calligraphy! Years ago I got a grant that paid for grinding stones, ink sticks and bamboo brushes. On this day, the kids were introduced to grinding the ink, properly holding the brush and writing in Chinese...all in our short 30 minutes of art. I love how this student really went to town.

School-Teachery Tuesday: I've been getting these lovely eye infections so I decided to give my balls a rest this week (that'd be EYEballs, ya perv). It's interesting all the (positive and negative) comments you receive from the little people when you suddenly appear in glasses. I also noticed that my wee friends in glasses were especially excited by the fact that I wear glasses too. sweater: Urban Outfitters, last year; dress: vintage; tights: dunno; shoes and pencil hair clip: DIY, go here

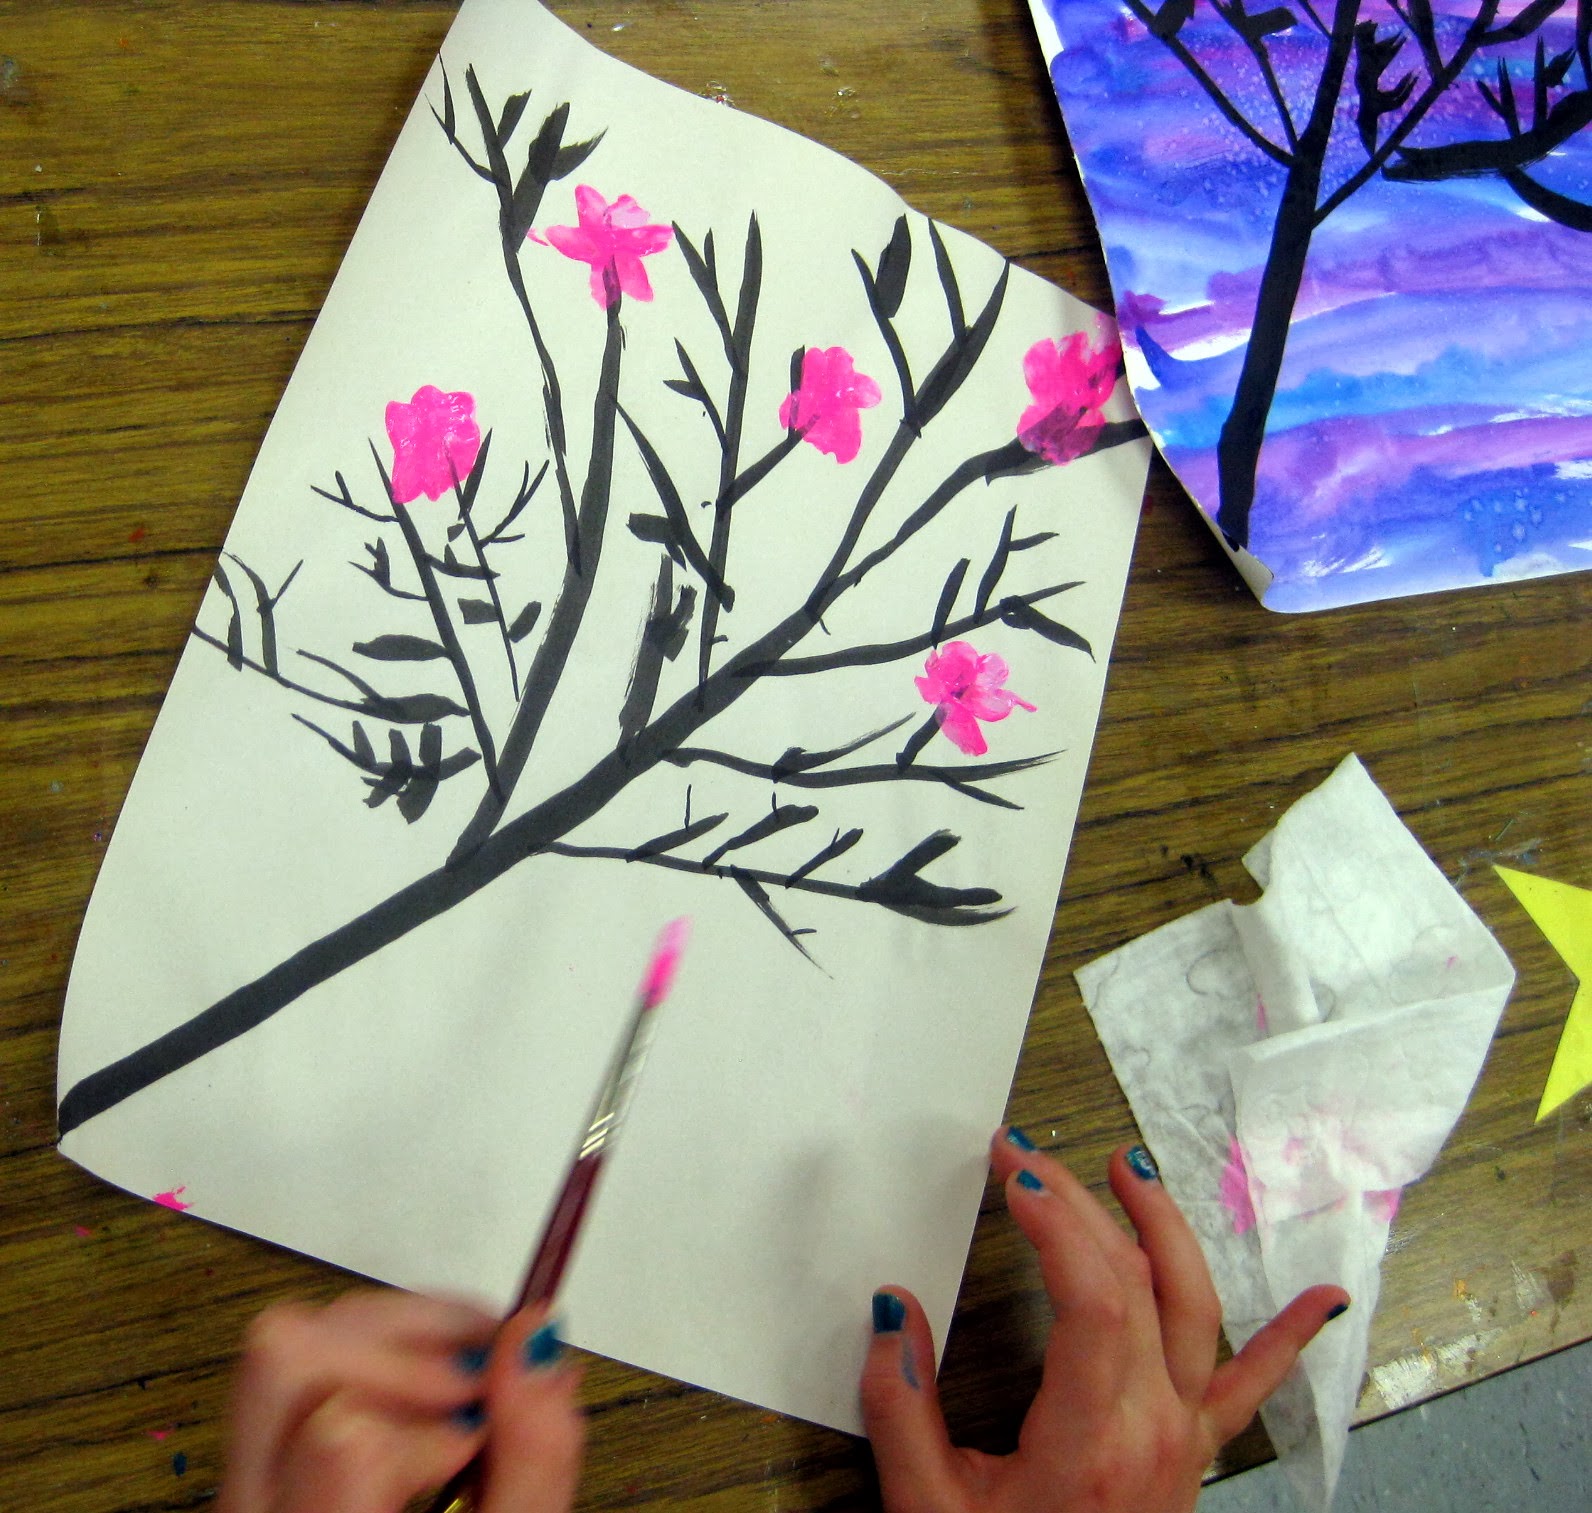
Last week, I shared with you the beginning stages of a 2nd grade painting project. This week we painted cherry blossoms on our practice sheet before painting them on our watercolor paper. The added bonus of having a practice sheet is that it's just as lovely as the finished product! P.S. don't you just love that little pinky up?!
Drawing #2: Organic Still Life in Calligraphy Pen. I keep noticing that when I'm drawing, I am either holding my breath or tensed up. I'm such a finicky artist that I'm hoping these exercises allow me to loosen up a bit.
"No Offense But You Don't Match, Mrs. Stephens" Wednesday: "I mean, you have orange on your legs and your shoes are two different colors," pointed out one well-meaning 4th grade boy. "She also never wears PANTS!" shouted one 4th grade girl from across the room. And my classroom management plan proceeded to fly out the window. sweater: Forever 21; dress and tights: Target; shoes and palette hair clip: made by me, shoe DIY here

I decided to try out something new in my art room this week that was suggest at the AOE Conference by Art Blog of the Year Finalist Art Teachers Hate Glitter. Instead of giving the kids "free draw" paper when they finish early (when, in my 30 minutes of art class, that usually means they have less than 5 minutes of free draw time), allow them to draw on dry erase boards. Holy cow, ya'll! This is genius! They absolutely love it and there's no wasted paper in my recycle bin. I found these dry erase boards at Walmart for about $2 each.
Day #3: Draw Someone with a Bamboo Pen. No bamboo pen on hand but I did have a feather quill. I much more comfortable drawing myself than hubs or the cat. I sit still much longer than they ever would.
My Favorite Colors Thursday: The inside of my dream airstream trailer will be covered in salmon pink and turquoise with a pop of coral and leopard print. dotted blouse: Old Navy; sweater and hair bows: Forever 21; dress: vintage; tights: Target; scarf: gift from a student

I started teaching an afternoon sewing class to 4th graders with a couple sewing buddies of mine. We have about 17 kids in the class and they are currently learning how to embroider and cross stitch. I'm excited to see them finish their name and sew on some buttons this week before we bust out the sewing machines and turn these into pillows!
Drawing #4: Use a Charcoal Stick to Draw a Still Life. No charcoal stick on hand but I did have a charcoal pencil. Not gonna lie, I loved working on this drawing of junk from my sewing room.
Drawing Day #5: Draw a Person Using a Variety of Values of Ink Washes. This was me on a Friday off from school so I could entertain the the roofers and plumbers that dropped by. As you can see from the drawing, I wasn't the happiest of hostesses.

Friday, February 7, 2014

In the Art Room: Winter Collage Landscapes by Kindergarten

Alright, to those of you in the Midwest, this looks awfully familiar, amirite?! I have buddies in Indiana whose children have missed so many days due to snow that they'll be in school until the end of June. THE END OF JUNE, PEOPLE! Meanwhile, in Tennessee, we've not had one single snow day. Like not even a speck o' snow. So it's a good thing my friends in kindergarten-land created these masterpieces as it seems this is the only snow we're gonna get.
Now, lemme give you the run down on my schedule with kindergarten. I see them for 45 minutes at a time every 6 days. And on that day, I have three classes of 'em back-to-back-to-Ima-bout-to-lose-my-mind-back. This project took us three of those art classes. Here's what each of those days looked like in brief:

Day #1: We looked at Vincent van Gogh's The Starry Night. We chatted about the time of day he portrayed, what season it might be, how the elements of a landscape are background, middleground and foreground and the back story of the painting. In kinder-friendly terms. Then I asked them what his painting might look like if it were winter? From there, each kiddo was given a 9" X 12" piece of white paper and a paint brush. They were to paint any kind of line near the middle of their paper with turquoise for the background. This was then mixed with white to create a snowy tint. They continued to paint down their paper with a line for middle and foreground. Once those were on the drying rack, we met again on the floor to read a book about van Gogh.
Day #2: I showed up wearing my Starry Night Light Up dress! This got a lot of cheers (and even an applause when I turned the lights on) from my wee friends. This time, we shifted our focus from the elements of a landscape to the sky van Gogh portrayed. We discussed how he loved to use bold lines and shape in his work to convey movement. We talked about how we can create our skies anyway we like...but sometimes it's okay to be inspired by other artists. After all, van Gogh was inspired by Japanese prints! Students were instructed to pick a sky color from an assortment of blues, black and violets. From there, they cut their land from their white paper, glued it to their chosen background paper and created their sky with oil pastels. I encouraged the little artists to practice sketching their moon and stars on the back before tackling the front.

Day #3: On this final day, we covered so freakin' much. Because the students would be using shapes to construct their houses, I did a little pre-assessment at the door. As the students entered, I showed them a colored-in shape. They were to tell me the name of the shape and color. This proved to be a wake-up call to me. Some of them didn't know their simple shapes! Review to do!

Once we were seated on the floor, we did a vocabulary review with a technique I learned a long time ago from my amazing Aunt Kimmy. She's a teacher and when I was a kid, she taught us something called the Number Game (was that what it was called, Kimmy?). I changed it up a bit...and I call it The Clap and Slap. For this, we review vocabulary, read vocabulary and count the syllables in our vocabulary words. It goes like this:

Sitting criss-cross (applesauce, because, after all, this is kindergarten), gently tap your legs twice, clap your hands twice and alternate snapping your fingers. Those alternating snaps will be used to count the syllables in the vocabulary words. For example, we slapped, clapped and snapped out the syllables of: land(snap)-scape(snap), back(snap)-ground(snap), middle(snap)-ground(snap), fore(snap)-ground(snap). After each clap/slap/snap, the children were to hold up the number of syllables we just counted with their fingers. We did this with all our vocabulary: Vincent van Gogh, The Starry Night, collage, scissors, paper, glue, square, rectangle, triangle.
With the review behind us, I introduced the kids to bit of math with their house collages. On their tables were tin trays filled with leftover painted paper scraps (ooooh, pretty! Thanks for the idea, Painted Paper!) I had cut the papers into three different sized squares: 3" X 3", 2" X 2" and 1" X 1". I held up a square and we chatted about how many sides it had, how many angles, etc...and then I asked, how could I turn this into a house? The first response was that it needed a roof. I had them tell me all the ways I could create a roof and then I presented them with this: I want to make a triangle roof but I only want to cut my square one time. Who can I do that?
One genius always guesses: by cutting it from one corner to the other! And, viola! I have a square cut in half! And a roof for me and a friend.

We did the same routine when cutting out a rectangle for our door. Some kids decided to use the other half of the rectangle for a chimney. Then I touched for just a moment on little details like door knobs or window panes...or anything else they came up with. 

Once the details of house making were discussed, we talked a bit about the placement of our houses. What sizes will the ones in the foreground be? How would that compare to the houses in the middle and back ground? The kids quickly picked up on the idea of creating houses in varying sizes. I asked them to create at least three houses in any size they liked.
"All of my houses are teeny tiny because they are in the far away background!" Making houses THAT small takes skill, people! I love this mini-villlage in the distance!
A whole lotta foreground houses.
When I asked this artist why there was a tiny house in the foreground, she said, "That's not a tiny house, that's the DOG'S house!"  Silly me.
I love everything about this whimsical piece, especially that hill and the big starry sky.
AND NOW FOR ONE LAST ANNOYING ATTEMPT AT SHAMELESS SELF-PROMOTION: I'm so thrilled to be nominated for Art Ed Blog of the Year...and I'd be super honored to have your vote. But you don't have to JUST vote for me, you can vote for multiple art blogs. If you've not checked out the line-up, there are some incredible blogs on the list! If you'd consider a vote for mine, I'd be just so super happy. 

VOTING ENDS TONIGHT, FRIDAY, FEBRUARY 7TH AT MIDNIGHT, EEEHH! 

 Visit here to check out those blogs and cast your vote.
Thanks, kids! Chat with you soon!

Wednesday, February 5, 2014

DIY: Broken Bowl Wall Pocket

You know, every now and then I make a super feeble attempt to shake my hoarder-habit ways. I start going through stuff, making piles upon piles of junk to either recycle, donate or "gift" to some unfortunate soul. In the middle of one said attempt some weeks ago, I went downstairs to grab a drink (of water, people. Although liquor definitely woulda been prefered) when hubs presented me with a broken bowl and a half broken cup.

Hubs: Here. I thought you might want these.

Me: Um. They're broken. Trash 'em.

Hubs: But you could make something out of them. They are broken clean in half. 

(me, taking dishes and walking over to the trash can.)

Hubs: I know you aren't going to throw those away. 

Me (with dishes poised above trash can): I KNOW! I can't seem to let them go (frantically shaking hands holding dishes over can). Argh! I can't throw away anything. What am I going to do with these?

Hubs: Eh, just glue them to a board or something and hang it up.

And, weeks later,  that's exactly what I did.
I found these wooden boards in my spare-bedroom/craft-storage/extra-clothing-space/ hoarder room. What, one of these rooms didn't come with your house? I originally picked 'em up at Hobby Lobby but I've since forgotten what I intended to do with 'em. Turns out, they were just waiting to become wall pockets.
(Big Hairy) BUT...before we get to all that, let's chat about these papers I used to cover my wall pocket boards. Without sounding too much like a bragasaurus, aren't they just the purtiest thing ev-er? Gee, thanks, I made them. I learned a technique where you can make oodles of collage paper with a super cheap supply: Deli Paper.
Back in November, I attended my state's art educator's conference. I took a two day collage workshop with just the coolest lady*. She showed us how to make that mountain of paper and use it for collage projects. However, I got so involved in the painted/printed paper process that I never did use mine to collage which left them available for this here wall pocket project. 

So just how did we create these amazing papers? I'll tell ya. We began with the supplies you see above. The white container is gesso. We mixed dullish/neutral colors with a touch of gesso. This allowed the paint to better adhere to the deli wax paper (which you can find at those Mega-Giant-Buy-the-World's-Largest-Jar-of-Peanut-Butter Stores that you have to be a member of. Which I'm not. I mean, why do I need a jar of peanut butter that big?! Oh yeah. Because peanut butter is the butter of the gods. Delish. Off to make a pb'n'j. Back in a minute).
Okay, I'm back. A dull color was used in the background so that you could build up layers of color and patterns with brighter and lighter colors.
The instructor used a foam roller to quickly cover sheet after sheet of the papers.
The paper had this cool iridescent look to it.
Once those papers were painted, we immediately started playing with the instructor's huge assortment of carved stamps. The deli papers dried so fast that you could print and over print right away.
Or stencil! The entire process was so relaxing and fun. Because we created tons of papers, you never worried about messing any of them up. It was all about experimenting which I loved. I'm looking forward to giving this a go in my art room.
After laying out my mountain of papers, I chose three that I thought would work for my wall pockets. I painted the edge of the boards to match a color on the paper, flipped the board over, traced and cut it out.
I then slathered Mod Podge all over the back of the paper, placed it on the board, smoothed out all the tiny air bubbles and then gave the paper a top coat of  the Podge.
Then I proceeded to adhere the cup and bowls to the wooden base with E600, aka The World's Smelliest Glue. Seriously, ya'll. That stuff smells like someone downed a Rubber Cement/Spray Paint cocktail and then farted up a storm. I huffed it for an hour. I should know (jk, I totally don't condone the act of huffing. Especially this stuff.)
And, done!

Yay-ness!
The prettiest, albeit the stinkiest, wall pockets ev-errr, ya'll.
 And now...where do I hang 'em?! I'm dying to put them in the kitchen...but I can't seem to justify hanging them there. Which I kinda have to do in my house because there's this dude who lives here that is constantly wincing when I hang stuff up. He's got Cracker-Barrel-Phobia. He just knows that I'm only a random-rake-hanging-on-the-wall breath away from over-decorating the crap outta our house. So...kitchen? Bathroom for holding the necklaces I currently have strewn all over the vanity? Use 'em for mini-flower pots and hang 'em anywhere?

By the way, they are currently in the garage as that aforementioned Rubber Cement/Spray Paint Fart Smell has yet to go away. I'll keep ya posted on where they land up. Until then, whatcha suggest?

ALSO! If you enjoyed reading this ridiculous post (and honestly, how could you not?) please consider voting for this here blog for Art Ed Blog of the Year. Go here, por favor, and cast your vote!

* Sorry, her name escapes me and the link I had to the conference is now broken. Does anyone who attended happen to know the instructor's name? I'd love to give her credit.

Tuesday, February 4, 2014

In the Art Room: The Magritte Project, Three

Whatcha got here is the finale to the Mega-Magritte Project. This was seriously like the project that kept on giving. Aaaaaaand giving. Which I loved because I could tie in so much. But I do believe the 3rd grade and I are ready to move on.
Now if you are new to this blog, welcome! I've noticed a wee spike in my views thanks to The Art of Education's nomination of this here blog for Art Ed Blog of the Year (What?! I know, right? I'm just as surprised as you). If you've not checked out the blogs nominated, you should. So many of those art teachers work tirelessly on their blog. You can vote for multiple blogs so, if you feel so inclined, I'd love your vote! Okay...shameless self-promotion over.

Aaaaand, what was I saying?

Ah, yeah, if you're new, welcome, pull up a chair, introduce yourself, grab a snack, sit back and relax. But, please, try not to fall asleep. The snoring becomes a little off-putting and makes it hard for the rest of the readers to doze off.

Okay. Seriously? HOW DID I GET OFF TOPIC AGAIN?!

Magritte! I began by introducing the dude with a coupla books, visuals and, of course, a costume...

Which was probably one of the worst artist costumes to date because I couldn't see anything; my annoying loud voice echoed off the back of the apple and hurt my ears; and, to top it all off, all I could smell was my own breath. Which smelled like coffee and the Altoids I consume to mask the smell. That I now know doesn't work.
We chatted a lot about this particular piece and just exactly what the meaning of Surrealism is. We decided that it was something that looked real but couldn't possibly be real. The book Dinner at Magritte's by Michael Garland had loads of examples of that.

I decided that the 3rd grade was going to create a Mega-Magritte Mural. You can see the full lesson and finished product here. To break it down for you, the kids painted a 12" X 18" piece of paper with a tint and shade of blue. Then they used oil pastels to add stars and clouds. On the backs of their paper, they were to trace two birds, one Day and one Night. Again, head here for clear details (I'm too tired to retype it all!).

For the mural, the kids were to donate one of their birds. Their spare bird was then used in a 9" X 12" tissue paper landscape collage. That lesson can be seen here.

We chatted bunches about analogous colors for the sky and how to decide upon a color palette that would best contrast their bird.
And then we were left with these amazing negative shaped papers after we cut our birds out. I couldn't bear just recycling them. So I turned it into a literary lesson which lead to the creation of something called The Compliment Game! Here's how it worked:
  • Each student was given a 6" X 10" piece of Rolyco's Color Diffusing paper. It has the look and feel (and does the exact same thing) as a coffee filter. The kids were to write their name and teacher code on the back. 
  • We chatted about what a compliment was. We also discussed character words. And similes. Then the kids were given one minute to fill their page with words that best described the person that they are. For this, they used warm colored water-based markers.
  • When the minute was up, they were to trade papers with their neighbors. Again, the timer was set and they were to write complimentary words that described their friend.
  • Once the timer went off, the kids swapped papers with the person across from them. They had to read the back of the paper to know who they were writing about.
  • Timer off. Swap with neighbor. One more round.
  • After the fourth and final round, the kids were given back their papers. And you should have seen them. They loved reading what their friends had written about them! It was so sweet. 
  • Then they were to chose the words that they felt best described them and make them permanent. For this, they traced the words in sharpie, still using the warm colors.
  • Lastly, the papers were placed on a styrofoam plate and painted with water. Below is the result.


Now, for the cool color paper, I tried a couple different things. We didn't play the game this time. Instead one class (the one you are seeing) wrote words that told the person they would like to become. What they dreamed they could be. Which was pretty cerebral for 'em. 

For another class, we wrote words that described what we are like on the outside since that was the opposite of the words that described our character. This seemed much easier for them. If they ran out of words, they could ask a friend. Although, you gotta be sure an emphasis compliment again as I do believe I read "stinky feet" on someone's paper. Thankfully, Senor Stinky Feet has a good sense of humor. The last paper was also traced in sharpie and painted.
For our final step, we added our wordy papers to our negative shaped birds. And, viola! We can finally close our Magritte-y Chapter. 

Until next time, kids, don't forget to go here and check out these amazing blogs and vote!