Showing posts with label cardboard printing. Show all posts

Wednesday, January 9, 2013

In the Art Room: Wait, Where Were We Again?

We were collage landscaping: My fantastic fourth grade students completed these landscapes just before winter break which was a kind of miracle. Thus far, this project involved painting the sky, oil pastel texturing paper for land and collaging. But the real excitement of constructing toilet paper tube castles began this week. I can honestly say I've never seen kids have more fun with ole tp tubes. You can see our inspiration here.
 Have you ever had one of those deep sleeps that when you wake up, you've no idea who/what/when/where you are? Kinda like that time during spring break when you took that trip down to that place and drank too much of that one stuff and you hung out with someone whose name you can't remember and you might have done somethings that probably aren't legal in most states...or maybe that's just me.

 Regardless, that's how going back to school this past week has been. No matter how organized I left my classroom (granted, my idea of organization being that stuff is stuffed into random cabinets and...shooooved...clooooosed...there! Whew!) I still come back in a fog. Thankfully, I snapped these photos right before we left so I'd remember what we'd been up to. And so I could share them with you. See how nice I am? 

If you are a teacher, I hope your return trip back this week has been a good one. If you aren't a teacher, say a little prayer for the rest of us, would you? Particularly that the kiddos don't open any of my cabinets and become buried underneath all of my "hey! I've been looking for that!"
We were surprising our art teacher: With their awesomeness. Seriously. I am so impressed by my students. I love their landscapes and cannot wait to see the end result. I'll be certain to share it with you.
We were cardboard printing: Ack! Would some responsible art teacher get this second grade kid an apron!? These prints were made with gold paint (sadly the metallic doesn't photograph well) and will be used as the background for our cuckoo clocks. You might have heard me mention those here and here.
We were printing patterns: You might notice that I tri-folded the construction paper. As they were printing, the kids were instructed to create one pattern in a column and then repeat that in the other two columns. Then, boom, you got a pattern. These folded lines really helped them keep their patterns in place and not just stamp randomly all over the paper. Although there was some of that.
We were cuckoo clocking: So the printed background will be the wall for us to hang our cuckoo clocks on. This project has been so much fun since we've learned how to write in Roman numeral and create a clock. Do you see the brown paper underneath? That is our wooden clock crafted from textured brown paper that we cut and wove. 
We were munching: We might have had some quasi German treats as our intro to all things Deutscheland-ish. The kids were required to say, "Brezel und gummibarchen, bitte. Danke!" Don't worry, I had some gluten free pretzels and the like for my friends with allergies. I'd hate to see them miss out. 
We were collaging: The first grade has been creating the Black Forest as a home for their gnome. We just started crafting our gnomes this week and they couldn't be more excited. In fact, I wore my gnome dress today because it was requested by one of my classes. So cute!
And some of us were seriously collaging trees: I mean, wow. First grade? Dude. Luckily she finished the other two off this week.
We were (and still are) asking about Jes: Silly guy is lost in the mail. He'll make it to his next destination. In the meantime, a concerned second grader created this Lost Jes poster with a pretty handsome reward.
 I'll share with you the complete lessons and the end result when(ever!) we get 'em done.

Chat soon!


Read more »

Wednesday, November 7, 2012

In the Art Room: Printed Paris

Goin' out with a bang! We are slowly wrapping up our unit on Paris, France and what better way to say goodbye than with fireworks.
As my third grade students were finishing up these printed and chalked Parisian pictures, I was so impressed, I thought I'd share them with you. They were mighty proud of them too which lead to the following back and forth:

Kids: Can we PLEASE take these home today?
Evil Art Teacher: No! I must keep all of these masterpieces for the end-of-the-school-year art show!
OTL Kid [OTL = Out To Lunch]: When's the end-of-the-school-year art show?
EAT: The end-of-the-school-year art show is next week. 
OTL Kid: Yay! What time?
The Rest of Us: face palm.
Once we got OTL straightened out, I convinced the kids that this kind of art activity is one they could easily do at home. All that is needed is the following:
  • cardboard cut into 1" X 2" rectangles. Be sure to cut it so that the wiggly corrugated cardboard line is visible on the 1" side. This will keep the cardboard sturdy enough for printing.
  • tempra paint
  • paper
I know, I know, paint on the floor? Really? I never claimed to be the Smartest Artist Teacher.
Group of finished third grade prints.
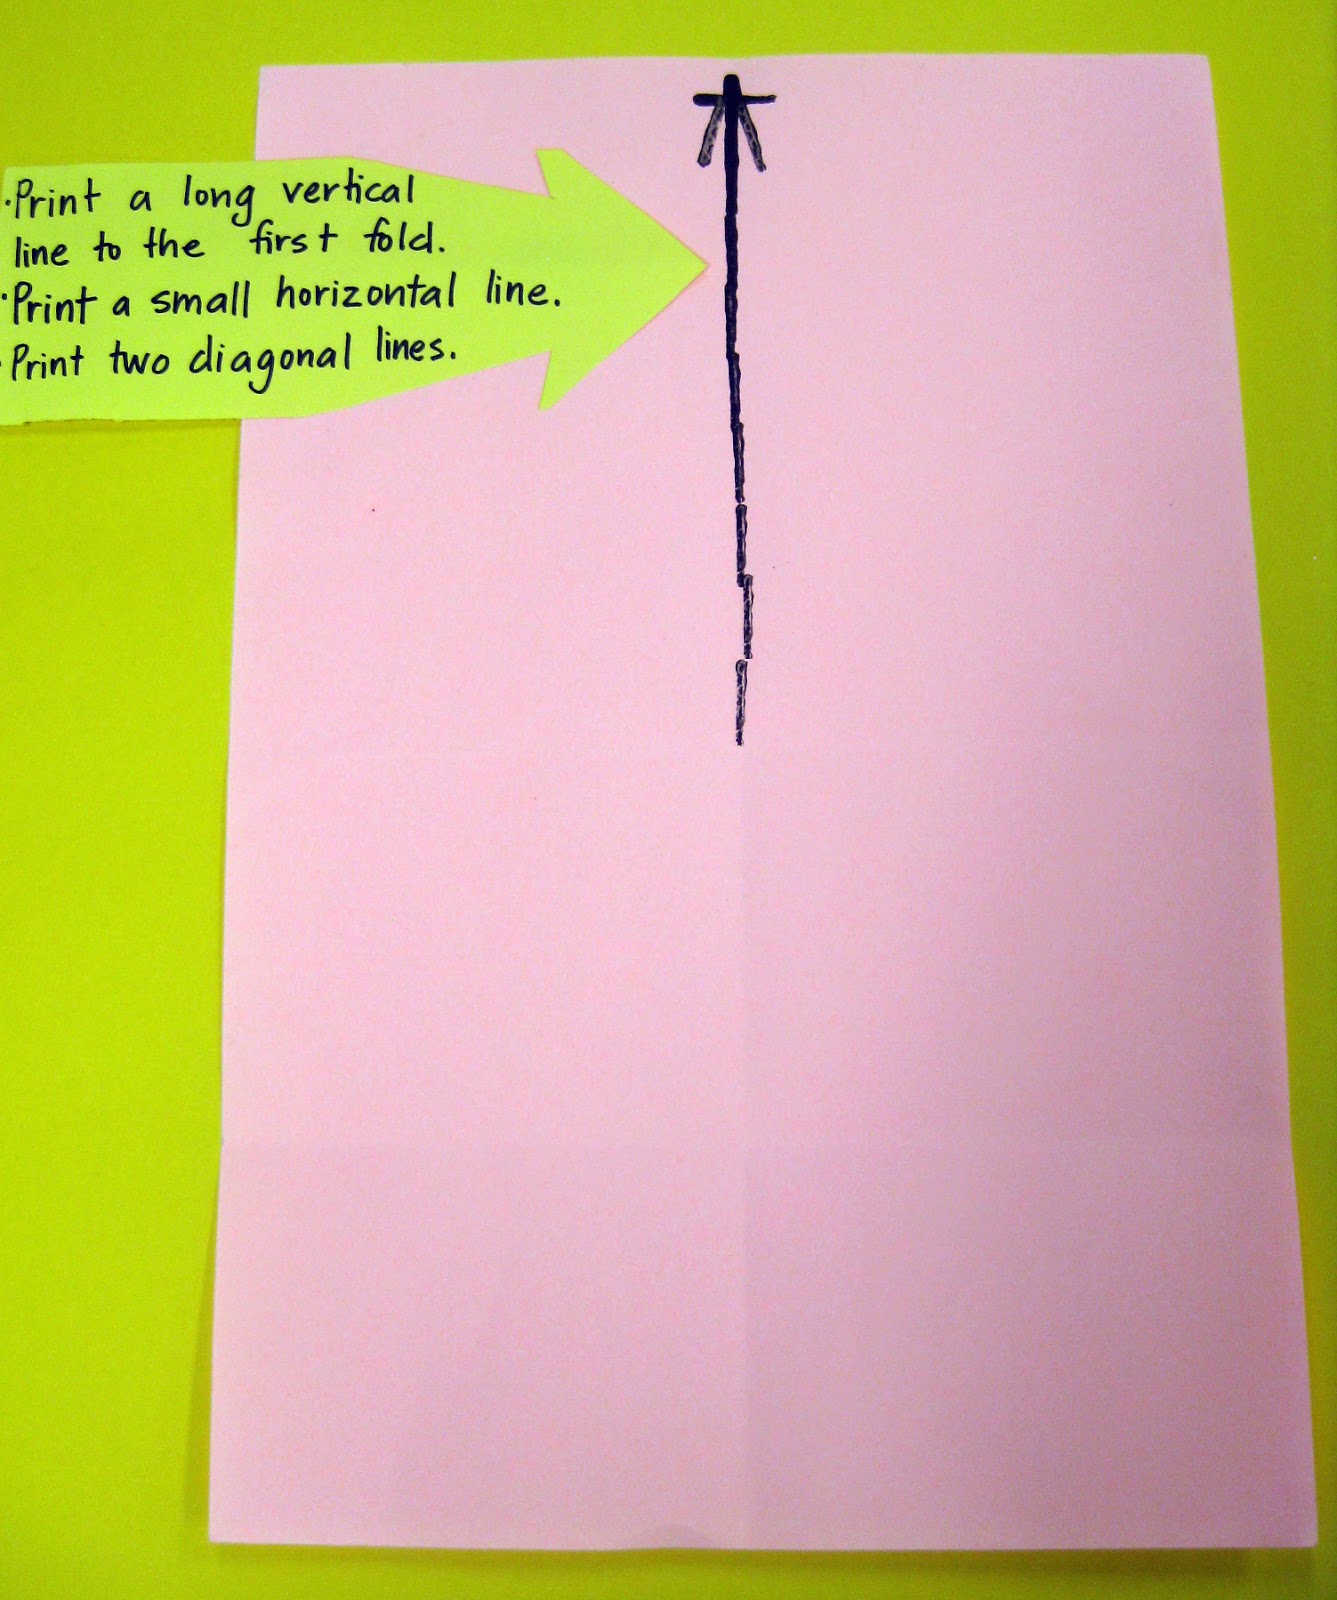
Want to make some printed Eiffel Towers of your own? Well, it's super easy. I thought I'd share with you the steps I had on display for the kids to follow.


  1. We began by folding our paper in half both vertically and horizontally. After unfolding the paper completely, we brought the bottom of the paper up to the middle line and created another fold.
  2. From there, we printed a vertical line from the top of the paper to the first horizontal crease. We added two diagonal lines and an intersecting horizontal line at the top.

3. We chatted about parallel lines and created two parallel lines from the ends of the diagonal lines. These were both the same length of the initial vertical line.
4. We crossed the initial vertical lines with intersecting horizontal lines. These were filled with diagonal lines that created X's.
5. All along we are learning factoids about the Eiffel Tower and it's creator Gustave Eiffel. We used the Eiffel Tower bulletin board and my windows as a helpful reminder. The second level of the tower was created with a printed rectangle shape.
6.  A triangle shape was created underneath that as were the long diagonal lines of the side of the towers legs.

7. From there, we created the arch and filled the legs of the tower with horizontal, vertical and intersecting diagonal lines.

And while I loved the end results of the prints, I wanted the kids to experience working in another medium and add their own personal flair to the project. Hence the chalking of their prints. I created the display of directions shown above to allow the kids to work independently on this portion of the project.

We also chatted about some of the famous structures in Paris that could be included in our chalked landscape like Sacre Coeur, Arc de Triumph and Notre Dame.
The key is not to let your paper move as you smudge the chalk upwards. If this happens, you might lose image in your design.
The kids had great fun with this project. I've already received a couple "I did this at home!" versions of both the prints and the chalk. Nothing makes this Evil Art Teacher happier. You'll have to let me know if you decide to give this a go. Just don't let me get my hands on your masterpiece...it's likely you won't get it back. That is until the end-of-the-year...which I could only dream was next week (just kidding...we have entirely too much fun in store!).


Read more »