Oh, y'all. Murals. Every time I have the kids create the pieces for one I think to myself: THIS HAS GOT TO END. The crawling on the floor, the hot glue burns, the accidental stapling of flesh (in my thigh? For real tho?). Then I hang it up and immediately forget the pain and suffering. I just stand back and absorb the awesomeness that is the work of my wee artists.
Like awww, y'all. These selfies created by my first through fourth grade students (with about a dozen missing as they still have some finishing up to do) are just about the best thing ever. And it already has me plotting and planning our next collaborative project. Because I'm a glutton for punishment.
In case you missed it, we started our school year with a monochromatic self-portrait project. You can see the finer details here. The above is the video that I shared with the kids.
And here is a look-see as to my set up. The covered tables signify the colors available at that table. The kids could use any ONE color they wanted (which meant for that first day, they sat where they liked) but if a table was filled up, then move along, Little Doggie. On the tables there were two bins filled with markers and colored pencils of one color in a range of values. There were also mirrors on each table.
At the end of the first week, I had a stockpile of these lovelies that I organized by color. Initially I was going to do something COMPLETELY different with these selfies. However, tried as I might to make the idea work (I was going to make a big ole peace sign), it just wasn't coming together. So I shelved the idea, allowed myself to let it go and I flipped my flop...
And went with this idea instead: The Many Faces of J.E.S.
Our students have a STONG sense of school pride. They are happy kids who truly love their school. Our school colors are yellow and blue. I think they are gonna totally dig this mural when they see it tomorrow!
But, like I said, the gluing, mounting, plotting and planning is what completely wears me out. I did this on a Sunday just so I could knock it out with plenty of uninterrupted time. And so no child could witness giant extension cords and hot glue guns on the ground. Is it any wonder why I am so accident prone? I set myself up for disaster. I truly am my own biggest enemy!
Next up: kindergarten still needs to create selfies. AND I had the posters that the kids created in this post laminated. I can't wait to hang them up alongside this mammoth masterpiece.
I'm also stoked that this is up two whole weeks before Open House! Now I just gotta get three grade levels of Dot Day artwork up...whew. That outta be a good time.
In the meantime, I'll just be hanging out with some colorful kids.
Who are so uniquely different. I love seeing the variety of creativity!
By the way...I may be a little spotty this week as I'm having a ROOT CANAL tomorrow. Be thinkin' of me y'all. And floss. A lot.
Well, hello there. This big toothy grin is brought to you by our mini-monochromatic self-portrait project! Our first project of the new school year is a collaborative one. Each of my four hundred-ish students will be making a 3" square selfie to contribute to a large mural. Y'all might have seen the rainbow portrait mural that was all the rage on Pinterest a couple years ago (in case you missed, it's the same process as what I'm sharing here. When complete, the portraits are hung in Roy G. Biv order which makes for a beautiful display). The last time I did a project like this (back in 2012), we hung the pieces to create a large world map. This go-round I have something different in mind which I hope to have ready to share with y'all real soon. In the meantime, let's chat monochromatic self-portraits!
I have my older students, third and fourth grade, for an hour. After watching the start of the video below, I allowed the students the choice of either participating in the guided drawing in the video or working on their own. My classes were pretty evenly split between those who preferred guided vs. independent. Some kids would draw along for a while until they felt comfortable then migrate to their chosen table (more on that in a sec) while others would decide they'd like a little guidance and join the kids on the floor.
Creating this video was great in that I could add vocabulary pop-ups when needed. I also think that the intro would work great with a variety of self-portrait projects. Feel free to show it in your art room, that's why I'm sharing it here! You can find many more videos like this on my YouTube channel. I add more videos weekly so if you subscribe, you can stay tuned.
My third graders (seen above) were able to bust these bad boys out in no time. I had only one rule when coloring: only use colored pencils on the face. I learned from experience that the dark markers will often cover too much of the face and the kids lose their beautiful details.
So, who did they know which colors to use?
I color coded the tables! I told the kids that the table cloth signified which color was available on the table. Inside those plastic bins were markers and colored pencils of only one color. I also had mirrors and "idea sheets" (with a variety of faces and facial features) drawn on them.
So on the first days of art, the kids sat where they liked, no assigned seats. This gave me a chance to see who would migrate together and who would not be able to sit with their buddy (more talkie than workie means new seatie for sweetie).
AH!! First grade! Their selfies made me smile!
For the wee ones, we did a guided drawing activity. We spent one day learning about self-portraits and drawing them together.
I love this activity because it's such a great assessment of student skill level at the start of the year. It also is gonna make a super sweet mural that I can pop up on the walls right away. And, who doesn't love a selfie? Especially when they are this cute.
Love to hear what y'all are doing for these first weeks back to school!
Hey, y'all! I'm super excited to share with you a project that my fourth graders started just last week when their certifiably insane art teacher decided that they outta create a present for the principals of our school. I've mentioned before that our school is participating in a Be Nice campaign. In the art room, I've been trying to post a weekly "Give Nice a Try" idea in my room each week. A coupla times, we've actually had the opportunity to make it happen in the art room. You can read about how we wrote Thank You notes to a local art museum after our field trip, created a Gallery of Gratitude for all the faculty and staff in the school and wrote kind notes to each other. This time, our Give Nice a Try was to give a gift (especially during the season when most kids are thinking about receiving). And this here Legacy Mural is the result of their hard work.
I got the idea for this mural at NAEA during a presentation by Janine Campbell (thanks, Janine! If you guys ever have a chance to see her present, do it, she's amazing). She had her middle school students paint on black canvases that she'd taped off the words ART onto. Then, when the kids were finished painting, she simply removed the tape. So smart, right? Well, being the crazy Last Minute Lassie that I am, I didn't bother with the masking bit. I just let the kids start attacking the black canvases with fluorescent paints.
Well, okay, "attacking" is a bit of a stretch. We kinda sorta did the whole circle painting thing. You know, paint circles and more circles and don't paint over anyone's circles but enhance them with more...wait for it...circles. I did give them the chance to enhance the designs with patterns and lines of their choice. I only had a coupla rules: 1. Don't paint over anyone's design. You can build upon their painting but you cannot cover it up. 2. Paint on dry areas. Painting over wet areas will muddy your colors because they'll become mixed. 3. This is your legacy as the out-going fourth grade! Do your very best to leave your mark behind.
At the end of four fourth grade classes working on 17 canvases for an hour at a time, we had this. It's like an acid trip on canvas. And I mean that in the best possible way. I'm dying to get my kitten mittens on a black light, y'all.
Oh! In case you are wondering, the black canvases came from Blick (are they just "Blick" now? Like, are the "Dick"less? [heehee, sorry, not sorry]) and the paint was by Sax. Because I'm now in love with Sax Versa Temp. It's my jam.
The amazing bookkeeper at my school worked out the canvas dimensions and was able to scrap together enough dinero to purchase 'em. She also was kind enough to print off the lettering. I originally had the genius idea to have a sign company print the letters. Then I could just slap 'em on top. However, that was gonna cost us well over a hundred smacks. Plan B was to use the printed letters. After the kids had completed the canvases, I traced the letters in yellow chalk and painted them in with India ink.
Obviously, it woulda been swell to have the kids paint the letters but I was in a time crunch. In fact, these letters were painted just last night. I did notice that the India ink was cracking on the surface in some spots so I sealed it with high gloss ModPodge. The happy accident there was that it gave the letters a great shine.
This morning, I got to school at the crack of dawn to hang the letters. My BFF the custodian helped out tremendously. Because this was a surprise to be revealed at the end of the day, he and I "wrapped" the present so the principals wouldn't see it until the unveiling.
During the unveiling time, I had all fourth grade classes gather in the lobby. The wrapping paper was removed and the principals were escorted out blindfolded. On the count of three, the blindfolds were removed, the kids shouted Merry Christmas! and the principals saw this.
To hang next to the mural will be this small golden sign. This was wrapped and given to the principals after the unveiling. It was a super exciting event, albeit a very crazy and noisy one. I don't do well with managing a crowd of over a hundred kids so it was a pinch cray but a happy kinda cray. And now on to the winner of yesterday's giveaway...
Yippie, Rachelle! I'll be in touch so I can ship that stash your way! And now...for today's goodness...
Four whole rolls of paint-splattered duck tape! Here's how you can enter to win: 1. Leave your email in the comments. 2. If you are an art teacher, I wanna know, what's been your fave group project to do with the kids? 3. Not an art teacher? Tell me what you plan to create with this tape stash! Good luck and I'll see you with another giveaway tomorrow!
Disclaimerness (please excuse me, but I have ness-disease. Meaning I must add a ness/ish/ify at the end of nearly every otherwise boring word or else I don't feel complete. Ish.): This here Light Up Mural was created last year and I never got around to sharing it with y'all. Since winter will be upon us before you know it, I thought now would be a super awesome glittery good time to post it. So there. Disclaimerism over. I know many of y'all create murals with your students. My students have created grid murals, collaged murals and one giant We-Are-the-World inspired self-portrait mural. They can be pretty labor-intensive for both the kids and the poor art teacher who has to crawl around on her knees hot gluin' the thing together but in the end, they are totes worth it. The visual impact is stunning, says me. And this here light up mural was one of my faves. But before we get to that, lemme show you some murals of mural-tastic past along with some linky-loos for your link-clicking pleasure.
This Monet-inspired mural was created by my kindergarten through second grade students. We created it at the end of the school year, using scraps and painted papers. This was a great mural to hang up at the end of the school year as it kept the school cheery throughout the summer and into the start of a new school year. All the details can be found here.
If you are an art teacher and you've been on pinterest for 5 minutes that you've seen that rainbow self-portrait mural. Shoot, you prolly even had your kids create one. I know I did. It was the start of my mural-makin' disease. This mural was created by my students the following year. We had a "travel the world" theme and this was how we kicked it off. Now, I ain't gonna lie, it was a beast to put together. That's why I happily passed that task off to some green college kids who came in to my room to "observe" (which for me translates to "cheap labor"). Full story here, friends.
If this flowery dot mural looks familiar, that's cuz we just made it this school year! It presently hangs outside my art room and I absolutely love it. It brings a smile my face every morning. And it truly was a snap to create. Read more here, please.
This mural was actually the inspiration for the light up mural. In fact, you can find even more details on how the light up mural was created by going here as I prolly did a better job of 'splainin things.
Grid murals are a good time if you like putting together puzzles (which I don't) where the pieces don't always match (fun-ness!). However, the visual impact is pretty rad. This one hung in our school cafeteria for a while until it was replaced by this bad boy last year...
My fave grid mural to date. And this one went together much easier than Starry Night. Not to mention that each class created it's own soup can so the kids could easily find "their piece" of the soup, so to speak. Deets here.
This mural still hangs outside my art room door and I love it. This mural project not only resulted in a giant collaborative work of art but also two separate art projects. It was like the gift that kept on giving. Lookie here and I'll show ya.
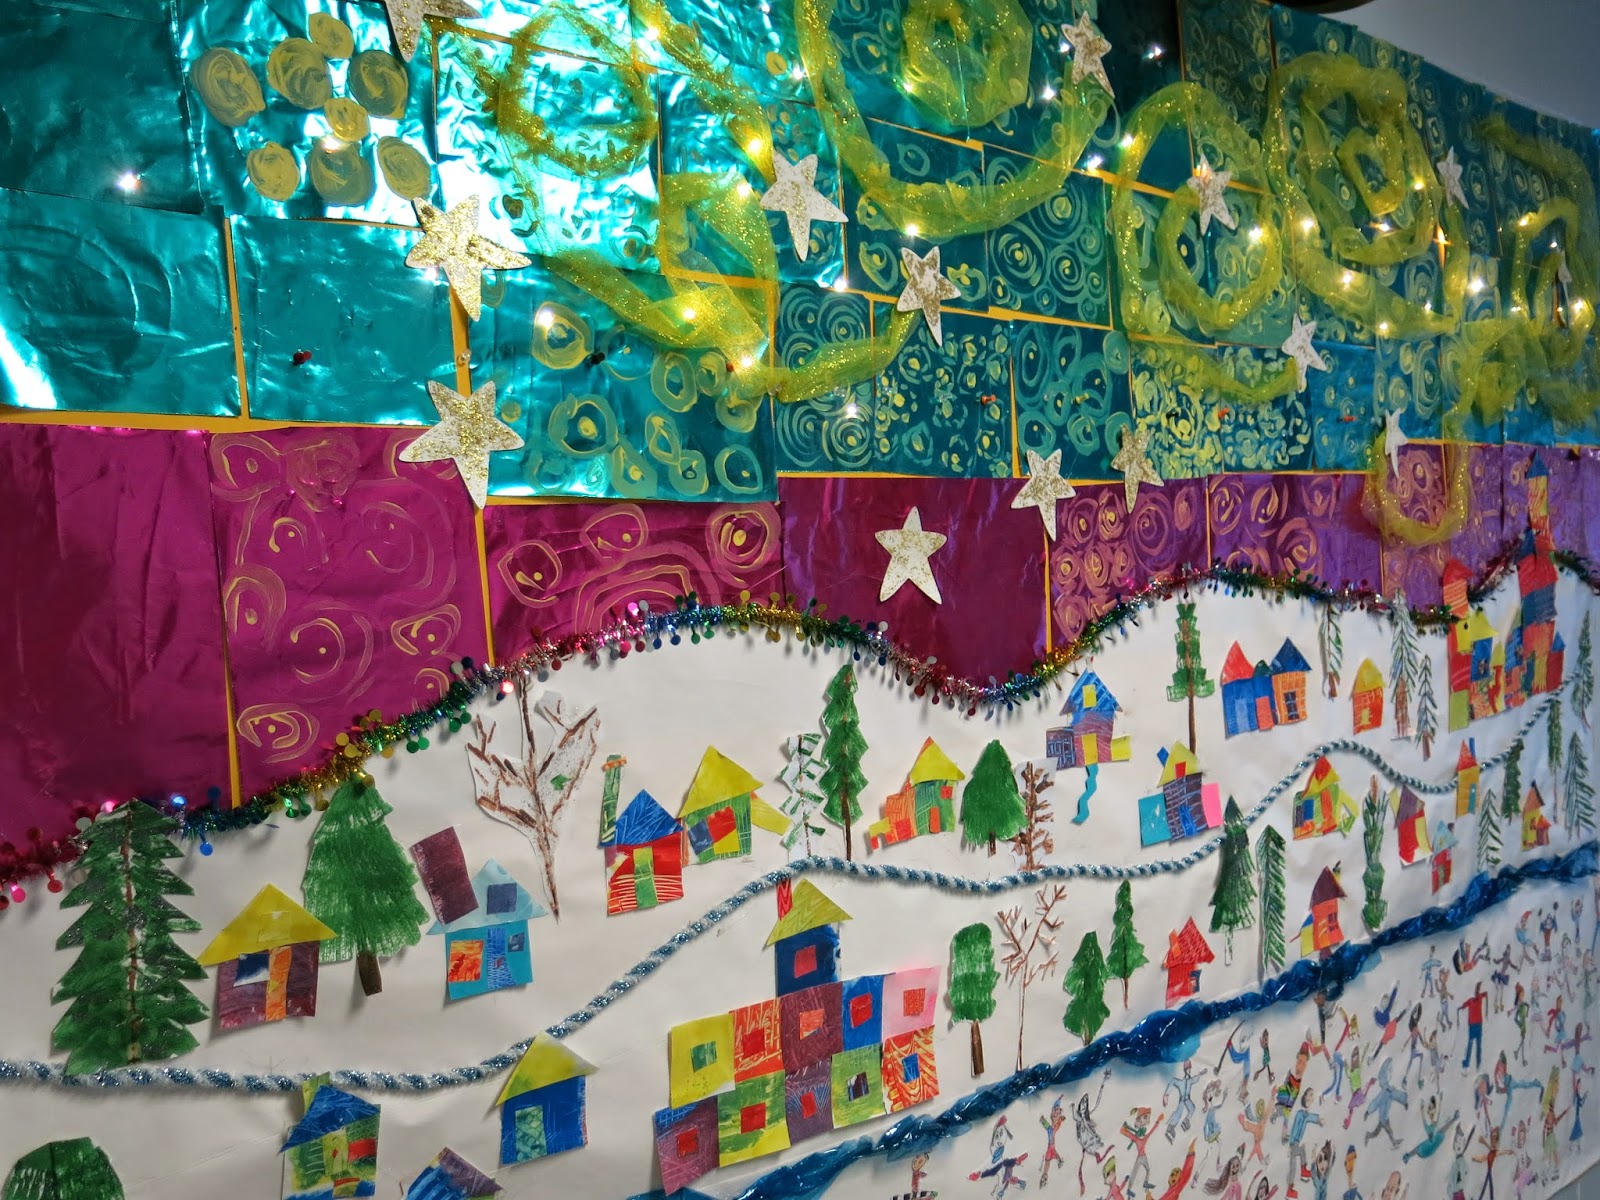
So, getting back to the mural at hand (thank you for indulging me in my stroll down Mural Memory Lane), lemme give you the rundown on who-did-whuh: kindergarten painted the sky papers after looking at a lil van Gogh; second grade created the printed trees during a short chat about texture and line; first grade made the lil collaged houses with some left over papers from a previous project and the third and fourth grade kids created the ice skaters.
Which they did by working on sketching their roller skating buddies in P.E. class. We walked down to P.E. with our clip boards and charcoal sticks and spent about 15 minutes drawing away. Mind you, this was after a chat about gesture drawing.
When we returned to art the following class, we chose our fave sketch, used a wooden mannequin to copy the pose seen in the sketch and created a more detailed drawing from that. Clothing was NOT optional (ahem) so that was added as well. Drawings were then traced in Sharpie and colored with colored pencils.
And then carefully cut out. Yes, we did have to tape some limps back on. I happens. We call it Art Room ER.
Dude, the cuteness. It's burning my eyes.
With the help of some super mom volunteers, the pieces of the mural puzzle were put together. Then the sky portion was folded down. I then started cutting slits into the paper and poking some LED lights through the openings.
Like this, see?
I know, it looks like a big ole stitched scar. That's why it's on the back, y'all.
But from the front, ooh-la-la! Sparkly. The light switches are kept in a pocket located to the side of the mural. Just outta kid-reach.
Most of the time, the mural is left unlit. However, I'm excited with out it will look during December. I think it will definitely bring some holiday cheer.
And there you have it! What murals have y'all done? Have you crazy kids attempted a ceiling tile grid mural type deal? If so, would you please come to my school and teach me and the kids how to create one? Pretty please and thank you!