What do you do when you need a present for an art teacherin' buddy? One who is just as adventurous in her crazy art teacher ensembles as you? Make her a couple wild and crazy hair clippies, of course!
If you've been around this blog for a hot minute then you know I have a thing for wearing a wee palette in my hair. It's kinda become my signature look. So much so that when the kids draw pictures of me I'm usually only recognizable by that lil palette in my 'do. Strangely enough, even tho I made my palette clip, I never did a proper DIY blog post about it. While making this clip for a friend (and one for YOU, dear readerz...deets in a minute), I decided to lay out the steps so you could make one of your own!
Because I was making two, one for my buddy and one for a winner of this here giveaway (okay, if you just can't wait, deets at the bottom of this here post), I simply folded the felt in half, drew a palette shape, pinned and cut them out. Oh, look. A photo of the pinning stage. Fascinating.
From there, I cut out "paint" shapes and used Witch Stitchery to hold them in place. If you aren't familiar with the magic that is The Witch then, WHERE HAVE YOU BEEN?! Yes, I'm shouting. And you will be to once you discover the amazement of this hold-in-place-without-pinning magicness.
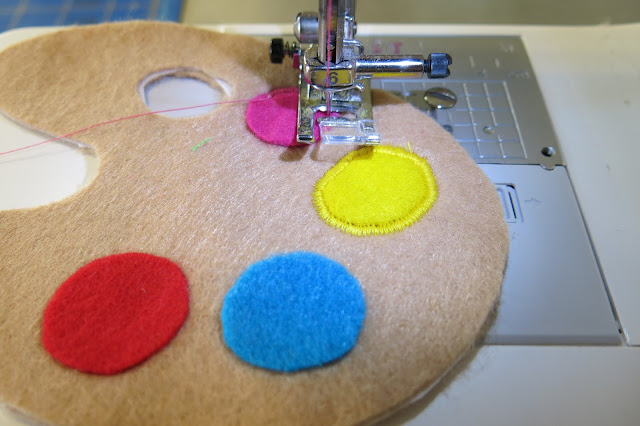
Okay. When it comes to stitching, you don't need a fancy machine to impress your friends with your mad stitchin' skillz. What you do need to do is set your machine to the zigzag stitch, change the width of the stitch so it is medium width for the smaller shapes (for zample, the paint blobbies and the palette hole opening) and the widest stitch for the outer edges of the palette.
The needle will hop back and fourth on either side of the paint blob. It's hard to turn those round shapes but don't you worry your pretty little head about perfection. It is a paint blob, after all.
For the outer edges, set your machine to it's widest stitch. This time, when you sew, allow the needle to go to the very edge of the shape and back in. This may feel odd but this will seal in the edge.

AND done! Time to add the brush and clip. I done told you perfection was overrated. The paint brush and your massive 'do will hide any mishaps.
I used hot glue to adhere the paint brushes to the back of the palette.
As well as an alligator clip. Now time to stick it in that top knot!
But wait, why stop there? Let's make a Box O' Crayons clip too!
Also, would you please take a moment to appreciate that sweater of mine? Because, let's face it. It looks like crayon worms are crawling all over me. And what could be more creepy/bizarre/fantastical than that?Alrightie, so, kinda repeat of the palette. Folded fabric, trace, cut out, cut out a piece of interfacing, you get the idea.
So that I'd have my designs placed correctly, I cut out my template and traced the places I knew I'd want to stitch certain lines.
Does it look like that box of crayons is wearing a diaper or is it just me?
Oh, my. Somebody is definitely bikini ready.
Crayons cut...
And tacked into place with Witch Stitchery.
And the sewing commenced.
Without the tight curves of the palette, sewing the boxes of crayons was a lot easier.
I did add a small stitch around the tops of the crayons just to add more of a design and further adhere them. Clips were hot glued to the back at a diagonal.
And viola! Certifiable Crazy Art Teacher Hair Clippie! Let's talk about how you can get your hands on One Palette Hair Clip:
1. Leave a comment about your fave gift you ever created for a friend or loved one. DON'T FORGET TO INCLUDE YOUR EMAIL ADDRESS so I can let you know if you are the lucky winner!
2. If you are on Instagram and don't currently follow moi, I'd love it if you would!
That's it! Looking forward to hearing from you and sending the lucky winner their new head ornament.


