Thursday, May 19, 2016

In the Art Room: Crayon and Pencil Sculptures

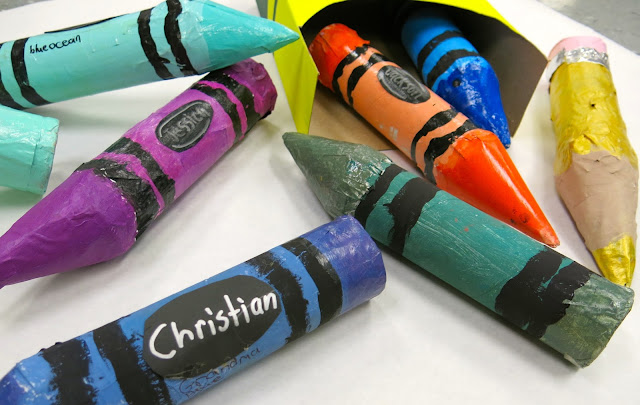
Because I'm a clay-loving art teacher with clay-loving students, I don't often venture down Papier Mache Avenue for sculpture projects. However, I knew I wanted my students to create giant-size art supplies for their fourth grade legacy. The only problem was, I knew they'd love their pencils and crayons so much that they'd wanna take it home. So my compromise was that they make one big one for the school (details on that in the near future) and one for themselves!
And I'm totally smitten with these! This project, like many of my others, morphed into a couple different projects from a group crayon mural to a sweet little photo op with some writing fun. In this clip, I walk you thru the construction of the armature for these bad boys. 
Because so many of us have different recipes and methods for papier mache, I left that out of the video. However, I can give y'all the dirty deets here. We used Art Paste and newspaper (that I rapidly cut on my paper cutter) to cover the taped bottom to about 2" up the bottom of the pencil. We completely covered the tag board at the top to about 2" down. Covering the tube was not necessary unless the kids just wanted to do it. For me, it was just important that they get the papier mache portion complete in one hour class period. 
The following class, we primed the sculptures which took all of 7 minutes. Knowing that, I created the Crayon Collaborative lesson (video below). This proved to be a great tie-in and just so much fun!
 The following class, the painting began. Students had to decide if they were creating a pencil, a crayon or a colored pencil. Once the colors were mixed, the kids set to painting. Early finishers resumed work on their collaboratives.
Finally, we added the sweet little details. The metal tooling for the pencil band and the labels for the crayons. Modpodge was also added to seal and protect (and add a little shine!). Again, every time we had a spare moment, we went back to our other project. It made for a chaotic and messy class time but, eh, that's what art is all about, right?
The kids came up with the most creative names for their crayons, it cracked me up!
Like, whuh? Grannie really digs a certain blue, perhaps? Maybe it's the color of her hair? I need to find out!
Here's a peak at the collaboratives they worked on as well. 
We used chalk...but I'm sure oil pastels would work really well for this process. And less dusty!
 By the way, not all chalk is created equal. I'm a big fan of Koss brand chalk. It's not cheap but that's because it's good. 
Save that pastel-y chalk for the sidewalk, y'all. 
 Can you guess which gender created this set of crayons? 
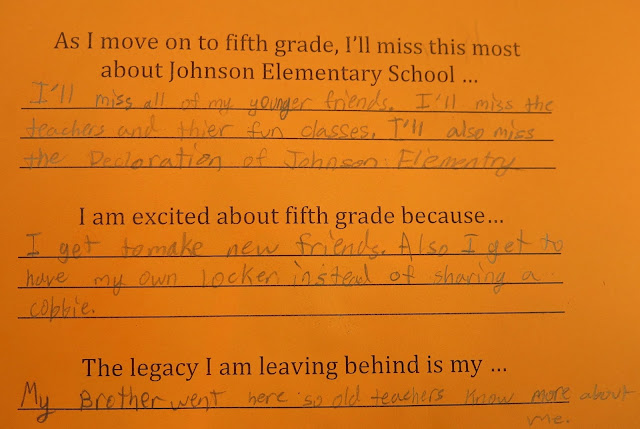
 It's my sweet fourth graders last year at my school. I've taught these children art for five years! I'm going to miss them and I know they are going to miss our school. So I created a little cloudy background, got a big lined piece of paper and had them pandomining writing their thoughts on the past and future. 
These images, along with their writing, were on display in the halls of the art show. It was hung next to their artwork for the year. Meanwhile, their sculptures were featured in the art room. 
 Of course, I had to read what they wrote! I do not know what "crazyness" this kid speaks of. 
 My younger students are fascinated with these giant art supplies and keep asking if they will be making them. I don't often repeat lessons out of sheer boredom...so I told 'em I wasn't making any promises but I did explain the process to them. 
 That last line, geesh. So sweet. 
 Here's a peak at one of the larger pencils that were created. These are staying behind with the school. Some of them are HUGE!
Let's hope brother has a good reputation! Until next time, y'all! 
 photo signature_zpsd10b3273.png

Wednesday, May 18, 2016

Art Teacherin' 101: Episode 3

In last week's Art Teacherin' 101, I chatted about my three big tips of putting together an art show: deer mesh, parent volunteers and a day off the day of the show. Next week, I'll share with y'all how incredible the two-dimensional displays the parents put up of all the students' work from all year. I have been greatly over-sharing here sneak peaks of the 1950's Diner theme for our clay displays. Well, it all went down last night and I gotta tell ya, it was BANANAZ in the best possible way. To best explain it to y'all, I thought I'd give you a guided tour of our JES Diner in this week's Art Teacherin' 101!
This was our first thematic art show and I daresay I'm totally addicted (as are the young artists, faculty and staff who all joined in on the fun). Not sure what I'll dream up to top this one! Here are a handful of snaps from the clay displays. 
To build excitement, I shared a countdown to the Diner opening on Twitter, Facebook and Instagram. Gotta get that social media buzz going, y'all!
Even with the day off the day of, I found myself struggling to get everything I dreamed up ready. Thankfully, I had my helper mamas, my OWN mama and some former students who are now in middle school help me. They put finishing touches on the mural, created displays, made labels and helped me hang the paper chains...all at the eleventh hour. It takes a village, people. And, sometimes, even The Village People if they know how to handle a hot glue gun. Let's talk projects!
We all learned about the artist Peter Anton who creates large realistic sculptures of food. Here you see my Kindergarten Tacos!
I put out an email for displays to the teachers and I got cake stands, cupcake holders and these chip and dip platters which were perfect for our taco displays. 
First grade town made these precious coffee and donuts. We even used our little weavings as small placemats. 
Cups and saucers were glazed and re-fired while donuts were painted with tempera and puffy paint (a crowd favorite). 
Although, in first grade town, it's referred to as "puppy paint". Y'all. It's not made from puppies!
Second grade made cupcake containers with two pinch pots. 
All clay projects were create in one week known as CLAY {CRAY} WEEK. To make my life a little easier, I did film all of my clay lessons and show them to the kids. This freed me up to prep clay while they watched. You can see more of that video-watching-demo-doing here
For third grade, I wanted to do both hamburgers AND pancakes...so I split the lesson. Meaning two of my classes did burgers (and anything extra, time permitting) and and two did pancakes (and, again, anything extra. Only requirement was that it be a food). 
The burgers HAD to be displayed in these sweet paper wrappers and trays, right?! I mean, that was a no brainer. By the way, when one of my students pretended to eat his fake food, I got the idea to snap photos of the kids with their food either as a chef, a server or a customer. All photos were printed and the kids used those to create advertisements for the show (seen above)...
I then dropped all of the photos into a vintage-esque slide show which played on a loop during the art show. Along with some 50's tunes, of course!
Both the burgers and pancakes are containers! Many students painted their plates as well, which I loved. 
Some were so realistic it was pretty crazy!
I mean...awesome, much? 
For fourth grade, I had them create pizza, pie and cake containers. These really blew me away. We looked at a ton of cake photos which inspired many. 
I mean, just looking around would give you cavities! Many of the kids took their projects home today and they were so excited.
Another class made pies. I am loving the detailed crust of this one. 
Key lime pie is actually my fave...how did she know?!
Displaying them in pie pans from the Dollar Store really set these off. 
Sbarro at the Cool Springs Galleria donated pizza boxes for this display! Big shout out to them, thank you so much. It really made our display so much more pizza-y. 
Extra food by fourth was created and added to the displays as well. 
 Before the art show, I created a video lesson on what a diner is (you can view that here) and we looked at images of clothing worn during that time. All students and faculty were encouraged to dress for the big day. I brought in a ton of clothing, scarves, sweaters and brooches to "dress" the staff. On the left you see my awesome specials teammates and on the right you might recognize my Christmas Tree Skirt friends!
We have close to 400 students in our school...we had over 600 folks show up to the art show! My room was so insanely crowded (as were the halls) that my husband who took these photos could hardly move! 
I saw later on Facebook, so many families sharing photos of their children dressed and happily smiling with their art...it really made me so happy. Makes the exhaustion worth it!
Check out these sweet kindergarten artists! Y'all can see the skirt I'm wearing that the kids helped to splatter paint here
I can't wait to share their two dimensional hall displays with you as they are incredible! Until then, I'm just gonna sit here with my feets up. 
 photo signature_zpsd10b3273.png

Monday, May 16, 2016

DIY: A Kid-Created Paint Splattery 1950's Circle Skirt

Do you know anyone who suffers from the And-Ands? Unclear as to what this ailment entails? Lemme paint a picture for you. Those suffering from the And-Ands might find themselves in a situation such as this:

"I'm going to have all the kids create clay food sculptures for the art show. AND we're going to have a 1950's diner theme to showcase their work. AND I'm gonna get them all soda jerk hats. AND I'm going to encourage them to get all 1950's-ized for the art show. AND I'm gonna make an outfit for the occasion. AND I'M GONNA HAVE THEM SPLATTER PAINT THE FABRIC BEFOREHAND." 

Symptoms may include: waking up in the middle of the night with another AND; interrupting conversations by shouting, "Oh! I have another idea!" and running away abruptly only to return with a wad of Christmas lights (deets to come); constant lip biting and talking to oneself. Sometimes in tongues. 

When to see a doctor: When you look like this...

So, yeah. I got the And-Ands. I think this time of year does it to many of us art teacherin' types. We just have so much more we wanna do and have so little time to do it in. Not that I want more time, I'm beyond ready for summer, y'all. That was just a silly figure of speech. 
My case of the And-Ands spiraled completely outta control when I was in JoAnn's a couple weekends ago stocking up on the ushe: puffy paint and glitter. I happened by the pattern department and decided to plop down and flip thru their books. I spied a 1950's poodle skirt costume and was all EUREKA! I need to make one of those! It was then I remembered the drop clothes I had purchased from Walmart EXACTLY a year ago. This lead me to the idea of having the kids do this outside my art room door...
Just after my trip to JoAnn's, I hit Home Depot in Franklin. I'm telling you the exact location because this is seriously The Best Home Depot there is. I met a very kind gentleman named Dave who not only helped me pick and mix the colors of paint I wanted but, after I explained the project to him, he also generously gave me a discount. As a teacher, I don't often ask for any sort of discount (duh, gonna start now!). I loved that Dave, Miss Mary and QT were excited to help a crazy art teacher out. BIG shout out to them, they have a customer for life!
Word to the Wise: If you are gonna do splatter painting with non-washable paint and children, have them suit up in aprons and go barefoot. Even that won't keep them clean but it will help just a pinch.
Once I got the fabric home, I threw it down in our living room just to start planning my next course of action. Of course, Inspector Asha had to take a walking tour of the fabric. 
Busted, kitten!
I wanted to use as much of the fabric as possible to really showcase the kid's splattering. For that reason, I settled on my vintage Simplicity 4884 that I picked up from Etsy a while back. I used it to stitch this shower curtain into a skirt last summer. 
Are you gettin' just how BIG this piece of fabric is? A circle skirt requires a lotta fabric but, like, not this much. Which can only mean one thing: I get to stitch more stuff out of it! I'm thinking a handbag and a tote and a jacket AND, AND, AND...(oh my goodness, it's starting again!)
For now, the only extra thing I did make was a hair bow. 
For fear that I'd be busting sewing needles right and left, I did invest in a couple industrial strength needles. I only had a few times when my sewing machine sounded like it wanted to die. So, really, no more than normal. 
Did I mention that I also have the And-Ands when it comes to shopping? Um, yeah. It's bad. "I'm gonna need saddle shoes and poodle socks and a new crinoline and pink cat eye glasses..." 
The temp has dropped a pinch here in Tennessee (just heard from a buddy that is SNOWED in Michigan this weekend. It's May, Michigan. Get with the freakin' program). So I just might have to wear my snazzy Gap Kids jacket to complete my ensemb.
Which, by the way, wasn't spluttery painted enough for me...so I added some more drips and drops. 
AND there you have it! I'm so looking forward to sharing the art show with y'all...and kicking this case of the And-Ands until next art show time!
 photo signature_zpsd10b3273.png