Vintage Monday: Some of my fave vintage duds rarely see the light of day so this week I made a point to bust 'em out. This dress was one of my first vintage purchases that I dyed hot pink a coupla years back to hide some stains. Now that I think about it, Tuesday's dress is a dye-job too! dress: vintage; belt: Pin Up Girl Clothing; sandals: gift from a friend
Hello, kids! I hope that this sunshiny week has treated you swimmingly. Mine entailed feeble attempts at working in my art room (I can only manage about 3 hours a day before I start to whine "but it's summerrrrrr, I'm not supposed to be at schoooooooll!") and weak pursuits of stitching up some Back-to-School duds (I keep starting one dress and then another and then another. I really need meds for my self-diagonsed ADHD because self-medicating with coffee and chocolate only lead to a worse case of "look, SQUIRREL!"-itis). On top of that, I've been reading up on our Artsy Book Club choices and dreaming up ideas for an Apron Sew-a-Long (deets below, y'all). And to think that this week was supposed to be the calm before the Back-to-Schoolin' storm, pshaw!
I still cannot believe I start back to school in a matter of days. In fact, I know it's not sunk in as the Back-to-School nightmares have yet to begin (anyone else have these? Over-crowded art class, rowdy kids, paint everywhere, ticked off classroom teacher waiting outside the door with her kids in tow, me screaming for some semblance of control...oh, what am I talking about, that's no nightmare, that's my daily life!). To top it off, hubs and I headed out of town on Friday to spend our last vacation in California. When we return, I'll be hittin' the teachin' ground running. It's gonna be an interesting Back-to-Schoolin', I can already tell.
With returning to school in mind, I thought I'd share with you some of my Back-to-School projects and purchases. This is the kinda stuff that really gets me excited about returning to see my lil artist friends. Whuh about you, non-teachers and teacher-buds? What is/was your fave part about returning to school? Aside from huffing that brand new pack of Sharpies, as that's just a given. Whatever it may be, I hope it helps make the transition from easy-summer-days to kid-filled-artsy-craze a good one. Until next time, y'all!
Y'all recall that SmART! Craft Supply place I mentioned a coupla blog posts back? Well, they have a crazy assortment of sewing patterns (most being from the late 70's an 80's which is not my fave fashion era) and I scored this gem. I usually begin my sewing projects with a quick and crappy sketch just to wrap my head around where I'm going. I've decided to use a different pattern for the skirt portion (I didn't love the maxi vs. mini options. In fact, I hate maxis in the art room because every time I squat down, I ALWAYS step on my hem, attempt to stand up, get caught on stepped-on-hem and fall over. It's quite classy to see in action, I gotta tell ya). Here's hoping those angel-wing-sleeve-thingies don't look too angel-wing-y. Though pretty sure I'll be fine as I've never been confused for anything close to angelic. I'll keep ya's posted.
True Detective Tuesday: Since hubs has been home this week, we've spent some time hiking, reading and catching up on shows we've heard so much about. We decided to give True Detective a go this week. Have y'all watched this show? It's good...but unsettling. I find that I'm totally absorbed when watching it but feeling pretty funky afterwards. How bout y'all? dress: vintage, dyed purple by moi; shoes: Crocs, thrifted
What does Back-to-School Shopping mean to you? For me, it means FABRIC! And it's a wee bit outta control, as you can see. By the way, I recently threw the idea out there on Facebook (you can follow me here if you wanna) of hosting an Apron-Sew-Along on this here blog and got a great response. If you aren't familiar with a sew-along, it's where a blogger presents and teaches a sewing project over the course of several weeks and those that are interested, well, sew along. In the end, all projects are presented in a blog post and shared with the interwebbin' world. If you are interested...please let me know in the comments or on my Facebook page. I plan to share the details sometime next week.
In the meantime, I've go some sewing to do! I've currently got three dresses in varying stages of completion and I need to get my behind in gear. I'm really hoping to have that one on the right ready by the first day of school. It's the one I'm using the angel-wing-sleeve-thingie dress pattern on. Wish me luck.
Butt Ugly But I Like It Wednesday: Seriously. When I found this get up at the thrift store a while back, I was so stoked. The hubs, well, not so much. two-piece crop top and cropped pants: vintage; bakelite bangles: gifts; shoes: Crocs
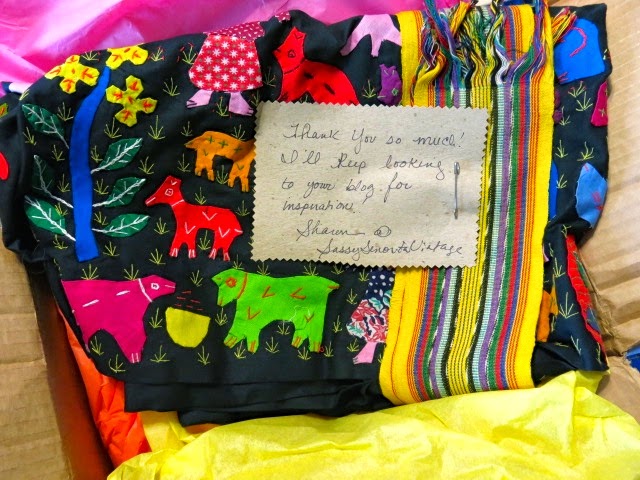
Back-to-School Shopping also entails scouring the interwebs for vintage clothing that reflects the culture I plan to teach. I found this super amazing skirt from this super amazing etsy seller Sassy Señorita Vintage. Y'all, this here awesome seller is why I love shopping on etsy. Not only is her shop fab but the shipping was fast. And when I sent her an email telling her I was an art teacher she threw in an extra goodie and packed it all in the most colorful of tissue paper that you know I'll be reusing in the art room. Thank you, Sassy Señorita!
The amount of work that went into the skirt is amazing. I've been studying the embroidery and the appliqué technique...thinking of trying my hand at this happy and colorful process.
Thursday Goodness: I ran errands like a crazy person Thursday in preparation to head outta town. Isn't it funny how crazy things are before vacay? And then, when you get home, you need a vacay from the vacay! Which I totally won't get as we return home at midnight on Wednesday and start back to school bright and early Thursday, yikes! We'll see what state I'm in come next week. dress, bangles, brooch: vintage; rope sandals: Nomadic State of Mind
What else does Back-to-School Shopping mean? Bargains, 'course. Fact: I do have a shopping problemo. Howevers: I counter that buy only shopping used or cheap. For zample, I found these bad boys at Michael's Craft Joint for half off of $8 with the letters being a coupla bucks each. Add that 25% off coupon from my phone and BAM! I've got some happiness for the art room. Now, what to do with em...I'll keep you posted.
Flyin Out Friday: My apologies for not only the goofball pose but the grainy photo. One of these days I'll quit this outfit photo biznatch and put you all out of your misery, ha! sweater: vintage; bike dress: Anthropologie; necklaces: made by me, DIY here
Don't let the sign fool you, we're actually in Anaheim, California at Disneyland, the Happiest Place on Earth. Hubs and I spent Saturday night at both California Adventure and Disneyland with plans to head back this evening. I'll share that adventure with you in an upcoming post if I recover from this vacay, heading back to school and getting all those dresses stitched up!
Until then, y'all enjoy your summer days! May they be slllooooooow and super happy!
Well, kids, whatcha see here is prolly the most tackiest of my DIY's to date. And that's really saying sumpin, having created such tacky-tastic gems as this and that and, oh, a lil bit of WTFunk-is-that?! But, when I got it in my head that I needed to create some woven mobiles for my art room (I have no earthly idea where these ideas come from but I seriously blame the high voltage of sugary cereals that I consumed as a child. Some folks have LSD flashbacks, I have Cap'n Crunch Cranium, y'all), for some reason, weaving on an embroidery hoop came to mind. Which is kinda odd seeing as how 1. Weaving is not my most favorite thing as it's repetitiveness bores the crap outta me (even though it's my fave thing to teach!) and 2. This DIY looks so 1970's and, well, I just don't dig the '70's, y'all.
But let us first talk about where this idea came from, shall we? Y'all might recall that my seriously awesome second graders created these circle loom weavings this year. Whilst decluttering this summer (which only lasted a day before I put everything back and decided I needed to keep it alllllll as we hoarders are prone to do), I stumbled upon my cache of embroidery hoops. I set aside a class set and just kinda had a staring contest with the rest.
"What am I gonna do with you, hoops?"
"DUH, make us into something totally tacky. It's what you do."
Embroidery hoops, these days, I tell ya. No respect for their hoarders.
Speaking of starring contest, if you look deep into those kitten eyes and say "Asha!" three times you'll soon find yourself under her magical cat spell and feeding her way more than her daily allowance of cat food, cheese and whipped cream. True Story: I left a container of pesto unattended for a full 30 seconds on the kitchen table and this fat cat was face deep in the stuff. Word of Advice: Don't eat the pesto at mi casa, ermkay?
If you decide that you need some totes tacky weaving wonders in your life, you'll need to scrounge up the following:
* Embroidery hoopage
* Yarn. I liked using the thicker stuff because it made the weaving process go by a lot faster.
* Um, that's it! Let's do this people!
Since warping el loom-o can be a touch confusing (and if you don't know what "warping" means, no worries! Ima getting there), I thought I'd lay this whole process out for you in a coupla formats. Just below you'll find I made a short clip of me warping the loom and starting the weaving process. However, if you're like me, you also like step-by-step visuals which I've also provided. Because I'm a giver, y'all.
Video footage-ness. I do hope I made something close to sense although my money is on nonsense.
If you didn't understand the video or just can't stand the sound of my voice (you and my husband both), then lemme lay it out for you step-by-step style, kay? Here we go:
1. Begin by tucking the end of the yarn under the hoop's screw (heehee), wrapping the yarn around the back to the bottom, wrapping it around the front again and tying the long end to the short end in a double knot. See photo, please, as that sentence made no sense.
2. Yay, double knot! Adjust the knot so that it is centered. What we're gonna do now is warp the loom. That's fancy talk for wrapping a buncha strings around the embroidery hoop for us to weave over and under. So, to get started, flip the hoop over so that the knot is on the back.
3. Like so.
4. Now, let's begin rapping, ermay, Eminem? To do this, you'll be wrapping the yarn around the hoop. I have not cut the yarn from the skein as I don't know how much I'll need. You can cut it when you are finished.
5. As I'm wrapping, I'm bringing the yarn around the loom. As I go, I'm pulling it just tight enough to hold the yarn in place. Since the wooden hoop has a little tooth to it, it holds the yarn in place as I go. However, I can adjust it and evenly space the yarn by simply scooting it around the hoop.
6. The goal is to end up with an odd number of strings wrapped around the loom. It doesn't matter what that odd number is so you can experiment to see which look you prefer. For the first timer, I'd go with a lower odd number so that there aren't so many warp stings to weave over and under. I decided to do 13 so Ima gonna keep going till I get there.
7. Still going...
8. And, viola!, I've got 13 wraps around my loom! Now take a moment to cut your warping yarn (I cut mine the length of my loom and about 3") and evenly space out your warp stings.
9. Now that our loom is warped and ready to go, let's weave, kay? That rogue piece that you cut free from the yarn is now your weaving yarn or weft yarn if we're gonna use our vocab correctly. When you begin to weave, it does not matter if you go clockwise or counter. However, whichever direction you decide to go, be sure to stick with it! In this photo, I'm weaving counter clockwise and staring by going over the first set of warp strings (both top and bottom of the warp strings) and then under.
10. Keep going over and under...
11. And then pull that weft yarn tightly so that what you've woven gathers in the middle and looks like a mess. And then resume weaving.
12. When you run outta yarn, simply tie your new piece of yarn to the last. And keep going until you have a big fat furry weaving like this one...
13. BOOM! Super Tacky Woven Delight. Your inner hippie love child will thank you. By the way, to end this, simply tie the last piece of yarn you are weaving with to one of those weft strings and you're finished! I plan to loop a piece of yarn though the top of the hoop and hang these fun furry guys in my art room. We'll see how the Fire Marshall feels about that, ahem.
OH! I just wanna mention that those step-by-step photos wouldn't have been possible without the hubs. He's on vacation this week which means a coupla things:
1. He's on blog photography duty.
2. He's honing his DIYing skills. Which, you gotta admit, could use some work. When I told him I'd broken my glasses he informed me, "I'll fix them!"...and this is how they were returned to me. When I gave him a questioning "Are you for realz?!" look, it was met with a "BOOM! Nailed it."
Yeah, much like I did these Totes Tacky Wild -n- Wacky Woven Wallhangings...BOOM! Nailed it!
For more weaving fun, you can check out these blog posts:
My sincerest apologies for the very end of this clip (well, for the whole thing, really). I meant to edit out the part where I spin the camera around to turn it off. So, if you're prone to vertigo or dizzy-fainting spells, skip the end, kiddies.
Hi, cats and kittens! I hope that y'all have decided to join the Artsy Book Clubbin' Party because it's a-gonna be just that, a par-tay of epic book clubbin' proportions (cuz you know those book clubbers, they loves to party). Just so I can wrap my pea brain around who's in on the fun, I'd love it if you'd take a hot second to answer the poll on the right (sorry, smartphone readers, I believe the poll only appears if you are on your craptop). Remember!You can join this party any ole time, no pressure here. Shoot, I'll probably stop reading these books and completely forget about this whole thang in a matter of dayzz so, there's that. (Just kidding! Unlike my LAST Artsy Book Club book, I do hope to make it at least half way through these bad boys).
So, if you were brave enough to watch the above clip, I suggested that if you are reading Printmaking Unleashed, why not aim for 3 printmaking techniques a week? The reason I started this book club was so we could share our ideas and thoughts...so I'd love it if you'd share what you created on the Artsy Book Club Facebook page! This way we can learn from each other as well as the book. To get the ball rolling, I toyed around with 3 processes from the book this afternoon and thought I'd share 'em with ya here.
If you are (also) reading Teach Like a Pirate, there are no "activities" (unless you count adding "arrr, matey!" after every sentence when reading the book). But I thought I'd throw some discussions questions out there. This week, I'm going to aim to read 1/2 of Part 1: Teach Like a Pirate! In Part 1, Dave Burgess breaks down the word PIRATE and gives meaning to each letter. I plan to read the "P"assion, "I"mmersion and "R"apport sections. I'd love to hear your thoughts as you read though these chapters. Whatcha say we chat about this:
* The author is a high school history teacher (I think, I've not gotten that far!). Does this change the way you approach this book? Meaning, do you think that what he is presenting will not work in your classroom setting? Can you somehow make it work?
* Dave Burgess begins his first three days of school without presenting rules, routines (well, not in the normal way) but by capturing the hearts and minds of his students. Has this gotten you thinking about a different way you might approach the start of your school year? What might you do differently with this in mind?
I'm so excited to hear your response! I do hope you'll take the second to drop a line...even if it is to say "PUH-lease don't make any more video clips. Ev-errrrrr."
Now, let's chat Printmaking Unleashed. Y'all. I'm a little, I don't know, bummed. I mean, I like the book a lot and the projects have me excited but...has anyone else had trouble rustling up the resources? I mean, the very first project called for Teflon sheets and I ain't got a clue where to get my kitten mittens on those. The projects after that also called for stuff I didn't have on hand which is saying something being that I am: 1. An Art Teacher and 2. A World Class Hoarder. That being said, I settled on three projects that I did happen to have the supplies for (well, mostly).
Now, before we chat about this project, I have to tell you that I've decided to print on muslin instead of paper. I really have this idea in my head that the kids should create their own fabrics this year so that's why I'm on fabric and not paper. This first project called for lace and fiber paste (um, no clue) which I substituted for fabric paint. I first decided to use the lace like a stencil using a makeup sponge as my pouncer-thingie (what is that thing called, y'all?) and the results were pretty suck-tastic, if I do say so myself.
In the book, the author recommends using an embroidery hoop to hold the fabric taunt so I gave that a go...
And, again, suck-gasim.
On a whim, I decided to try this very thin and flimsy spider web lace I'd had left over from Halloween. I just knew this wouldn't work because I thought the paint would simply blob all over the fabric. Much to my surprise, it worked great! I really love the effect, don't you? And I think that the embroidery hoop is a great idea when doing this with the kids. So, even though I didn't have fiber paste nor did I go about this the way the author suggested, I think it turned out pretty cool.
Next up, gluing rando stuff to cardboard and making printing plates. Nothing really new here although the author did glue a buncha raffia and other odds and ends to her cardboard. I'm in the middle of a wacky weaving project (post to come!) so I happened to have all this fun leftover yarn for the cause. I hot glued the yarn onto the cardboard...
And decided to use a stamp pad to ink them up. This worked great as it applied the color evenly, unlike brushed-on paint...
Yeah, not so much. Not only that, but moving my brush around caused my yarn design to get all jacked up. And don't nobody like a jacked up yarn design, y'all. If I were to do this with the kids, I think they could glue their own design with yarn scraps (regular glue would be fine) and use large stamping sponges. Then, when finished, they could cover their designs with foil and create a cool repousee-esque piece.
Now, this last idea is an alteration of what is presented in the book. The author has this really cool idea of creating a designed surface with puffy paint. Her idea is to allow the design to dry and then use that as a rubbing or printing surface.
Recently, on one of my fave blogs, Alisa Burke used puffy paint to print with so I decided to give that a go. I thought the effect was fun...but you do have to be gentle as the puffy paint does spread considerable when pressing on the back side. You can see Alisa's idea here, it's fantastical.
Just Another Manic Monday: But it was a good kind of manic, if you know what I mean. Arts Academy was in the morning and it was fantastical. That evening, I was reunited with a buddy of mine that I'd not seen in seven years -- not since we attended the Japan Fulbright Memorial Fund Teacher Program (I'm thinking they need to shorten that. That's more than a mouthful of sushi right there). We spent hours catching up over plates of sushi and just having the best of time. palette hair clip: made by me; felted ballz necklace: The Paper Source; Jackson Pollock-y dress: made by me, DIY here; sandals: Target
Well, hello there friends, old and new! I come to you thoroughly exhausted and yet somehow extremely energized thanks to some "ridiculously relevant professional development" (has Jessica of AOE gotten that trademarked yet, cuz she needs to!) and to my annual week-long gig as a facilitator (read: errand-runner) at the Tennessee Arts Academy. Y'all, this week was so thrillingly exhausting that I collapsed on the couch at 5pm on Friday only to awake hours later to find myself still wearing my Crayon shoes and contacts. And the only reason I was roused was cuz of an obese kitty sitting on my chest demanding a lil dinner. Me-oooowwww, kitty!
Did y'all attend the aforementioned ridiculously relevant AOE online conference? Because I was also attending (and teaching a mini-course in weaving!) the Arts Academy, I could only attend the AOE conference during my presentation to answer questions. I'm slowly making my way through the presentations and loving them all. So many great ideas and just in the nick of time as we start back to school in a matter of (gulp!) weeks.
Now some of y'all might be scratching your noggin, wondering "what in the world is Tennessee Arts Academy?" Well, lemme first of all tell ya that it's not just of us Tennesseans. In fact, a buddy of mine came all the way from Seattle (hi, Julie!) to attend. Because it's really that amazing, y'all. It's a week of art-making, performance-attending, Ted Talk-esque lecturing and, my personal favorite, eating. Lots of eating. I'll be sharing an official blog post about the event with y'all later this week but for now, I've sprinkled a bit throughout this post. Enjoy and I'll be back Monday so we can chat Artsy Book Club!
Okay, y'all. I apologize if you are viewing this here image bright and early in the morning as this sight will give you a jolt stronger than a cuppa coffee. Lemme give you the story behind the Behind: on Sunday evening, the Tennessee Arts Academy had a fancy opening reception with a performance, hors d'oeuvres and a run down of the week. The Academy has a photographer who documents the week and posts photos on Facebook. I had no idea this photo was even taken until a coupla buddies told me they had seen it on FB (one telling me she knew it was me because of my "grandma purse" and my "Mr. T in my Pocket" keychain, ha!). I thought it was quite hilarious until the fancy banquet that was held Wednesday night. At the banquet, they have two huge movie screens where a slideshow of images is shown. Whilst enjoying my lobster (yes, the Academy feeds you LOBSTER, y'all!), I hear someone say, "Cassie, your butt!" only to look up and find THIS IMAGE on two large movie screens. Yeah, always keepin' it classy.
Soup-er Tuesday: Usually the week of the Academy is unbearably hot, being in the middle of July in Tennessee. Howevers, on Tuesday, some much needed rainy weather rolled in and brought glorious lower temps with it. I decided it was a soup-er day for some, well, soup. necklace and black t-shirt: Target; shoes: the perfect shoe for a rainy day that includes walking across a college campus, Crocs; Campbell's Soup Dress: DIY, made by me after Andy Warhol
On Monday and Tuesday of the Academy, I took a clay class with the awesome art educator and clay artist Gus Miranda. He and his talented and hilarious wife Miranda own a clay studio in Miami, Florida where they teach classes when they aren't at their art educating day jobs. More details on this project soon...I can't wait to share it with you, it was so much fun!
Screamin' Wednesday: During the Arts Academy, they offer short classes called "interludes". Me and several other art educators taught these 50 minute classes and it was so much fun albeit intimidating. It's always a little spooky being a teacher teaching teachers (say that 10 times fast!). The Scream Dress: made by me, DIY here.
I had a great group of art teachers show up ready to weave. Over the course of two sessions, they created a woven pouch, sewed on a button and created/attached a cord. For a complete set of those directions, you can visit here.
Y'all might remember my art teacher buddy Stephanie on the left, she was my Pee-wee Baby Shower co-host! AND, you recall I mentioned someone coming all the way from Seattle? That's Julie there in the middle, all lemon-y fresh. You can find details of my Starry Night dress here, if you wanna.
Still Standing Thursday: The AOE Conference was on this day and I had to be available to field questions about my short session. That was really tough, ya'll. Answering questions about my kinda-sorta controversial prezzie (I chatted for 14 minutes about why I don't believe in having the kids work with technology in MY art room) was difficult especially when some of the questions weren't always friendly. Turns out saying, "because I'm right and you're wrong!" isn't the way to go. I shoulda known, that line doesn't work on el hubbo either. sweater: thrifted; palette pin: gift from a friend, thanks, Paul!; shoes: Shoe Carnival; Great Wave Dress: made by me, deets here
You wanna know what's worse than sticking sharp sticks under your fingernails? Listening to your own presentation. That's what.
Last Day of the Academy Friday: I'm, like, literally asleep here, kids. By the way, it's funny the different kind of responses one gets when wearing a get-up like this. At the Arts Academy, among art teachers, it's great! Take one step inside that hipster coffee shop and they're all "OMGaahhhh, is the circus in town?!" crayon clip: made by me; necklace: the Paper Source; crayon dress: made by me, details here; crayon shoes:made by me, details here
After the Academy ended Friday afternoon, I decided, in my delirious state of exhaustion to go to SMART!, Scrap Made ART Supplies in the Berry Hill area of Nashville. You guys, this place is AMAZING! Here's what they state on their website: "SmART! Supplies is a repurposed art supply store where artists, school teachers, craftspeople, seamstresses and anyone in between can purchase unique, recycled items for any arts and crafts project. Along with providing a cool new art store for Nashville, SmART! will benefit Progress Inc.'s mission of giving people with intellectual disabilities meaningful employment opportunities."
And here's just a small peak inside. The place hosts two rooms full of INSANELY ORGANIZED boxes of popsicle sticks, bottle caps, fabric, patterns (sewers, this really is the place for you!), cigar boxes, yarn, stamps, stamp pads -- y'all, if you need it, this place has it! I've been there twice now (in three days) and have walked out with armfuls of goodies under $15. In the future SmART! plans to hold art classes and provide gallery space.
And that's all, folks! Be back attcha soon. Til then, enjoy the rest of your weekend, kids!