Hello there, long lost friends! Sorry I vanished for a pinch, I was living it up at NAEA Chicago. I promise I'll share with y'all that fun and fab experience (although if you are an art teacher and have been on any sort of social media for a hot minute then you've prolly seen it all!). Today I thought I'd give y'all a smorgasbord of some super sewing, weaving and fiber arts projects!
Every year, when we return from winter break, we start our big fat -n- fuzzy fiberin' units. I think we all have those areas of art teaherin' that we absolutely love and for me, this is it. From embroidery to needle-felting and weaving, all of my students seam seem to eat it up (sorry, that was my sad attempt at sewing humor). Last year, my third graders got a taste of embroidery with the Our School Has Heart mural. My current thirdies are working on a different kind of embroidery project which I'll be certain to share with you soon. Here's an Intro to Embroidery video I made just for them (and y'all, of course!).
Burlap is my fabric of choice when it comes to kids and embroidery because it's inexpensive and the blunt needles work perfectly with this hole-y fabric. However, because burlap is woven, it does like to unravel easily. For that reason, when prepping burlap for stitching, either draw a line of glue around the outer edges the day before sewing (which locks the fibers in place) or simply tape the bottom and top of the fabric with masking tape. Embroidery hoops aren't necessary...but I do love to give the kids the complete experience. For me, that means embroidery hoops! You can find 'em super cheap at the thrift stores or craft shops. Shoot, send out a school email and I'm guessing you'll end up with a stock pile!
Last year I also gave needle felting a go with my fourth graders! Because the kids work with very sharp needles, be certain you work with kids who are responsible. This would also be fun with small groups or with parent volunteers in the room. More here.
I remember the summer my grandma taught me to embroider and cross stitch. I was instantly hooked and I do believe that's what's made me such a lover of all things fiber arts since. I have taught several after school sewing classes over the years and this embroidered and stitched pillow was one of 'em!
This time gingham fabric, embroidery floss and sharp needles were used.
And sewing machines! I have been fortunate enough to have about a half dozen machines for my art room. The kids LOVE using them!
Another project I did as a kid that I recently introduced my students to is string art. I remember making one of these in fifth grade and it being just about the best thing ever. My fourth grade students loved making these last year!
We created these in celebration of Dot Day but I'm pretty sure you could make 'em whenever. I can't wait to do this project again!
What's that? You've never taught fiber arts before? Friend, don't you sweat it. Here's a great project to ease your students (and yourself) into the concept of fiber arts: paper weaving! Not only is this project great at introducing your students to the look and process of weaving but you can also throw in so much math and literacy (there are so many fab books on weaving, y'all!).
Use this loom-making lesson to focus on math skills...and make sure it's a day you are being evaluated. It's all sorts of STEAM-y. You'll look good, trust me!
Word to the wise: some students will understand the concept of weaving immediately while others will struggle.
For that reason, I often introduce weaving on an oversized loom made from laminated paper. More info here.
And I do a whole lotta peer tutoring. The kids are much better at explaining things to each other than I often am!
The following year, I introduce my second graders to circle loom weaving. This project is one that is a HIT with those kids who usually don't dig painting or drawing but do love working with their hands (boys are the BIGGEST fans of weaving, ya'll!). There will be frustration in the beginning but I make sure to warn the kids: This is something new. You've never done this before. Be patient with yourself, me and your friends. We'll ALL get there, I promise!
I have my second grade kids for 30 minutes, twice a week. After spending two art classes painting their plates, we notch our loom as seen in the video above...
And warp our loom. That usually takes us one 30 minute class.
And then we spend the next couple of classes weaving. Hint: if you use the thicker yarn, weaving goes a whole lot faster!
Tree weaving is a slightly different spin on circle loom weaving. I have done this project with my third graders and I love it because I can also teach the concepts of landscape painting. These are always so pretty when complete!
If the kids have completed the circle loom weaving the year before, they'll understand the concept of tree weaving.
Straw weaving is easily the class hit! I mean, who doesn't love to drink yarn, y'all!?
What to do with finished straw weavings? The kids have made them into bracelets, belts and even little people. Really, the fun is in this making.
Dunno if you have a stock pile of old CDs like me, but I've been hoarding them for this reason: CD weaving!
I was kinda leery of CD weaving for the longest time thinking that the slickness of the CD would cause the warp strings to move. Not so! It's so easy and fun to do. AND it's a quick alternative to circle loom weaving if you are sort on time (and patience as the warping process is MUCH easier).
Ojos de Dios weaving is just as popular as straw weaving in my art room. The kids could crank these out all day long! Once they've gotten the concept down, you might wanna consider expanding on their expertise. Just google Ojos de Dios and you'll see the wonderful ideas out there.
Right?! Cake! Watch out, you'll end up with mountains of these in your art room.
Pouch weaving is a project I reserve for my fourth graders. It is def a project you wanna build on from previous years as it's a lil advanced. AND time consuming. I usually allow my students to take this project home to get further ahead on. No videos on this project however, if you follow that link above, I'll hold your hand and walk you thru the process. Weaving the cord is my favorite part...
And it's a nice break from regular weaving. I love having the kids add the cord as it really finishes the piece.
Now if you are feeling inspired (or have older/advanced students), you might wanna try tapestry weaving! It's so fun but does require some focus. However, you won't regret the end results.
And that's all folks! I'd LOVE to hear your fave fiber arts lessons as I'm always on the lookout for more. Please lemme know what you and your students love to create in your art room or at home.
Hello, friends! I've been packing and preparing for my upcoming trip to Chicago for NAEA and I'm so excited. While I do love me some art teacherin' conferencing, I don't love the multi-day sub plan preppin' it entails. The subs I've lined up are super-fab and I know they will have fun creating with the kids. However, they aren't art teachers by trade so I do like to have sub plans that are not only easy for them to follow but ones they can do with all my classes. This means less confusion for them and less supply prep for me! I think I've come up with a plan and I thought I'd share it with y'all in case you wanna use it too.
It's an autobiographical three-dimensional star! Our school-wide art show is coming up and I love to have the kids do a little writing about themselves. What better way to let their star's shine than with this fun project?
I mean, check out that three-dimensional star, y'all! I created both a sub video AND a photographed step-by-step. This way, if technology-town decides to be uncooperative, my sub-o can use the visuals. I'm printing each of the following photos with directions and plan to have them posted for both the students and the sub to refer to. But, before I get to all that...LET'S TALK ABOUT NAEA 2016!
I'll be presenting a handful of times and meeting y'all at the AOE "Meet the Bloggers" event! Here are the deets... * "Come Blog with Us - Three Art Ed Bloggers Share Tips" Thursday, March 17th // 12 - 12:50pm McCormick Place, North Building, N426c, Level 4 A presentation I'll be doing with some of my fave bloggy friends, Laura Lohmann and Phyllis Brown! Thursday, March 17th // 12 - 12:50 // McCormick Place, North Building, N426c, Level 4 * "Dress Like a Masterpiece: Needle Felting Wearable Art!" Thursday, March 17th // 1:30 - 3:20pm McCormick Place, Lakeside Center, E272b, Leve 2 PLEASE NOTE: This is a ticketed event. It is currently sold out. Sorry, buddies! * "Leaving a Legacy Without Losing Your Mind" Friday, March 18th // 8- 8:50am McCormick Place, North Building, N227a, Level 2 I'm so excited to present with Janine about something we are both passionate about: school-wide collaboratives! For some reason, NAEA has me listed as Cassandra Stephens (which, technically, is my name but I ain't fancy so I never use it!). * "Meet Your Fave Art Teacherin' Bloggers!" I'm super excited to meet y'all and my fave art bloggers! Here are the deets in a super cute graphic that I didn't create (thanks, Alecia and AOE!)...
I'm seriously cannot wait to see/meet/chat/high five all y'all! But until then, let's sort out these subbie plans, shall we? Below is the video I am leaving with the sub. I don't anticipate that she'll get thru the entire lesson while I'm away. However, this will be a super great way for me to ease back into things, what with the kids all working on the same project. I like a mellow-comeback after being gone for a spell, don't you? Here's a wee list of supplies used in this here art makerin':
* Copy paper cut to a square 8.5" X 8.5" * Sharpies * Markers * 12" X 12" black construction paper * Metallic markers * Glue * Chalk
This project was inspired by my current obsession with Sly and the Family Stone and the song Everybody is a Star. Take a look-see!
And here's my sub plan video! (By the way, in case this sub plan doesn't suit your fancy, check this one. Also, I'm always sharing video'ed plans here so you might wanna subscribe). Sidenote: I am going to have my sub create a stockpile of these stars for my kindergarten friends and for any kids who have a hard time following the directions. We don't wanna leave any artist behind!
(Please ignore the crazy image...and the fact that I have blue chalk smeared on my cheek for about 1/8th of the video). In case the video isn't the best format for y'all, I also snapped step-by-step photos because I'm such a giver. Here you go!
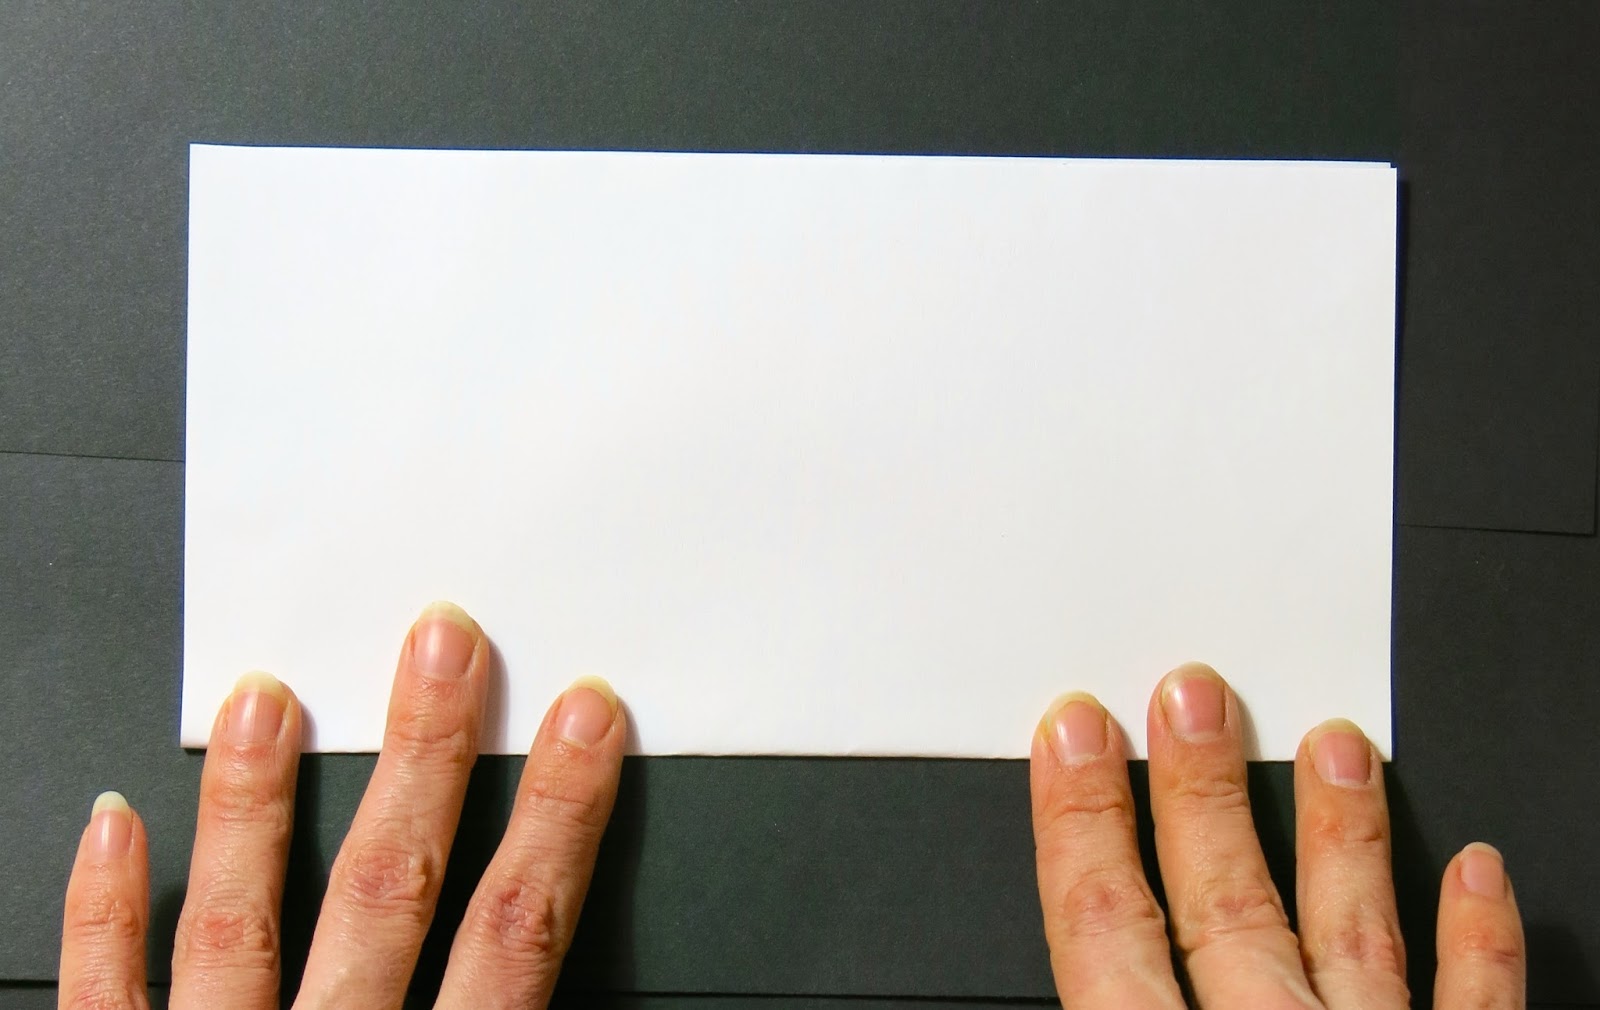
1. Fold copy paper square in half.
2. Be sure to press the fold down firmly.
3. Each corner has been labeled (my apologies for the blurry photo).
4. Take corner C and bring it to the middle of the line segment between corners A and D.
It should look like this. Press the fold firmly.
5. Then bring D up and fold a small triangle.
Press firmly.
It should look like this!
6. Now bring the left hand side over to the right.
It might be difficult to fold all of those papers. Be patient with yourself and your paper!
It should look like this.
7. Now, using a pencil, put a dot in the corner of the two angle lines on the left side...
and another dot on the other side just a little below the middle of that line segment.
Like this!
8. Connect the dots with a cut line and...
Snip!
9. Open it up and you are now the proud owner of a three dimensional star! Congratulations!
10. Now, using a Sharpie, start in the middle of your star and trace each creased line that you made with all of that folding.
You'll end up with ten sections to your star. Each section you can decorate with a different pattern and design.
Here are some ideas for you!
11. Draw your designs in each section.
12. Use markers to add color.
13. Once you are finished, place your star in the middle of a piece of black paper and trace it.
Your pencil lines will be barely visible and that's perfect!
14. Let's write about what makes us a star! As you write, be sure to hop over the outline of the star. You might want to begin each sentence with "I am a star because..."
Fill up that whole page!
15. To get your star to pop out, all you have to do is fold along the long lines of the star.
The long lines of the star should be folded up (that's called a mountain fold) and the short lines of the star should be folded down (that's called a valley fold!).
16. Add a tiny dot of glue to each tip of the star.
17. Press each tip of the star and hold for about 10 seconds to get it to stick.
18. Use chalk to color on your pencil line of the star.
Which should look a little like this when you are done.
19. Use your finger to push the chalk away from the star.
20. Let's do the same thing to the outside edge of the square! Color...
Then smear and viola! You are finished and YOU are a STAR!
Art teacherin' friends, I do hope to see y'all real soon! PLEASE feel free to use this lesson. I'd love to see what your kids create. You can always snap a pic and share it on instagram (you can find me here) with the hashtag #everybodyisastar.