Showing posts with label art room tour. Show all posts

Monday, September 16, 2019

DIY: Super Simple Way to Paint Furniture!

 Last week I got a wild hair and decided that I needed to paint not one piece of furniture for my art room but three. And the process was so stinkin' easy, I thought I'd share it with you. Here you go:
A while back, I created a couple of murals for my art room and I didn't end up using all of the paint. I kept the paint and I'm so glad I did (I mean, what else was I gonna do with it?! I'm an art teacher AND a hoarder, HELLOOO!). Now I can make sure that, despite all of the different crazy patterns, everything kinda-sorta goes together because the colors tie it all. Says me. 
 All this madness actually started with a cabinet that I'm now calling Sketchbook Town (see below). But then on Friday afternoon, I just couldn't stop! I repainted my easel that had become sad and ugly with just blobs of the cold colors. Thinking I'll paint the reverse with the warm colors. That cabinet was a score from the teacher's lounge. The space below that table was just begging for something to fill it AND this little cabinet does the trick. It currently holds my dry erase boards, markers and erasers as we use those everyday...but they were taking up too much space on the table above. We call that The Store and it's the supply-gathering area. I try to keep it clear but I also have a terrible habit of cluttering it up. So getting those dry erase supplies outta the way will (hopefully) help. 
 So all this painting mayhem started when I decided I wanted to create Sketchbook Town. I'll be filling you in on this later (so much to share!! I'm excited). But here is a sneak peak. Oh yeah, I also painted three paintings in this dotted style. I think I actually caught Dot Day fever, y'all! 
 Here's my sketchbook cabinet. If you are wondering where all this furniture came from, lemme just tell you, in your school there is ALWAYS furniture that folks are wanting to part with. Ours is kept in a spare classroom or sometimes it's dropped in the teacher's lounge. Also...if you need furniture, be sure and stop by that local thrift store. You never know what thrift you are gonna score. 
 These are the murals I painted in my art room a couple years ago. You can read more about this mural here...
And the mural that started it all! You can read about that one here.

Okay...I seriously had a million things to do last week...but sometimes, you just need to slap some paint on stuff. Trust me. Carve out some time and do it. You won't regret it. 
 photo signature_zpsd10b3273.png
Read more »

Monday, July 23, 2018

2018-19 Art Room Tour!

Well, it's that time of year: Back to School Time! I know what you are thinking...already?! Yes. On my end of the universe, we head back August 1st and the kiddos return about a week after. For once in my life, I decided to get my room together EARLY so as not to be running around right before the kids walk in the door. I thought this might leave me some more time to lesson plan...or stay in my pjs until 1:35pm as I am currently doing. But, whatever! This place is GOOD.TO.GO. Here's just a lil time-lapse of all that you can accomplish when you drink two POTS of coffee:
Yeah, I was so motivated! I wanted to get as much done as possible in just two days and managed to knock out the bulk of it in one. I have been working this summer to declutter and clean closets...and while I have not completely finished those, it was nice to walk in to a tidy-ish space. That made setting up so much easier. The second day, I did finish organizing books, sorting supplies and clearing off my counter. If the kids walked in today, I'd be ready to teach! WHAT I'd teach 'em, I dunno...but we'd be ready. Here's a quick room tour:
I will most certainly give you a detailed tour of each space next week. So stay tuned, y'all! This week, I'll be posting on all of the DIY decor I've created since last year. My room was looking drastically different just one year ago. 
 For the curious, I have pulled up my room tours from years past! This should be interesting:
This is from 2016...right before the fire marshall came in and told me to take down all of my fun stuff. This video was created for my kindergarten thru second grade kids...so pardon me for talking to you like a little. 
And this one is from 2014. I've gone thru some changes, y'all!
 Having been in this space for 15 years, I was ready for an update. I was tired of just hanging up posters and silly stuff on my walls in an effort to just decorate the space. In the end, it just looked junky and cluttered. It was not a happy or calming place...not that it's calming now but I can say it makes me happy!
The magic of a couple of cans of paint and rainbows. Like I said, I'll be posting A LOT of info on how all of these were made this week...and next week, a more in-depth tour of each area. However, feel free to leave me questions below if you have any!
 It's getting to be a packed house, even without the kids! 
 Thank you so much, y'all, for letting me taking you on a tour. Best of wishes getting your art rooms to their happy places!
It can be an overwhelming task. Just take your time and enjoy that journey. Listen to what the kids respond to and go from there.
 photo signature_zpsd10b3273.png
Read more »

Sunday, March 4, 2018

DIY: Do it Yourself Crayola Bins!

Yay! I made something for my art room! It's been, like, 10 minutes, since I last made something for my most favoritest space, so why not, right?!
I'm currently on an All-Things-Rainbows bender and let's just hope I like it for a VERY long time. It had been YEARS since I'd moved in to my art room (nearly 15!) and I hadn't really changed anything until this year...meaning, I just kept piling poster on top of poster until it was just a cluttered disaster. This past summer, I tore it all down and told myself I was redecorating, rearranging and organizing the entire space. Six months later, I'm STILL in the middle of it all but I can't tell you how excited I am everyday when I walk into my art room. In fact, I've been spending entirely too many Sundays in my art room, sprucing the place up. Now that I've got the revamp bug, I'm looking forward to tackling my home this summer. But, I'm getting off track. Crayola bins!
 I was inspired to create these bins after someone shared THESE bins with me:

They sell these online nearly everywhere if you just search Crayola Bin: Bed, Bath and Beyond, Amazon, Target, you name it. However, every place sold them for $14.95...EACH. I was like, surely that can't be right. That's gotta be 15 smackers for three of them? Nope. Each, y'all. There was no way I was gonna shell out that kind of dough even if they are as cute as can be. 
 On a recent trip to Target, I found these colorful bins for $4 each. I bought one of every color they had (why no yellow and orange, Target?) and decided to make my own. 
I created a poster board template and painted each with acrylic paint. Not super sure if that was the best move as the fabric soaked up the paint...it was like painting on a sponge. It was time consuming but I do love them so.
 I have the perfect shelf for them in my art room in my fiber arts area. I'm thinking they could hold our fiber arts supplies like small looms, yarn, felt...not super sure yet, but when I find something, I'll have the cutest bins to store 'em in!
When I shared in my Instagram, several folks shared other ideas: use black felt and glue that one; create a screen print with freezer paper; use a Cricket cutter to make the design. All super duper ideas! 
I hope my kiddos love these as much as I do! 
 photo signature_zpsd10b3273.png
Read more »

Thursday, December 21, 2017

In the Art Room: Color Coded Trash Cans!


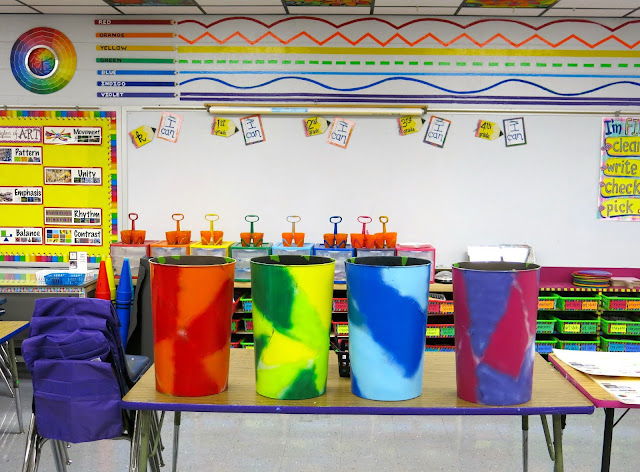
As y'all know, I'm revamping and rainbow-izing the art room. NOTHING stands a chance at not getting spray painted (my hands included) and I couldn't be happier. I mean, maybe it's the paint fumes a-talkin' but don't these trash cans look so stinkin' happy?!
I actually picked these cans up a couple of years ago and was going to use them as planters (say what now?) and then never did. So in my garage they sat. Meanwhile, the art room seriously had ONE little trashcan that overflowed on the daily. So I brought in these bad boys and they are great. I have four color coded connected tables (see last pic) and I love having one trash can at the end of each table. However, what drives me bonkers is how much they seem to move around my room. I find myself constantly bumping in to them and asking "where does THIS can go?!" Now, no more. But first, lemme walk you thru how easy peasy this was!
I started by just taping the cans off. I used a painters tape called Frog as I heard it was the best. I'd had it on hand for painting the murals in my room. That took me about 20 minutes. I didn't have any rhyme or reason, just started taping.
 My tables are red/orange, yellow/green, blue/indigo, purple/magenta. I used that color combo to paint the cans. I did prime them before painting them. 
 After pealing the tape, I did some touch ups with black house paint. I know that seems nit-picky but I just knew those little color bleeds would drive me bonkers. 
 Today was a 2-hour day before winter break...it's been so nice to crank my tunes and get some stuff done! 
 My tables each have a drying rack and now a trash can at the end. 
 Color-coded cuteness!
They look like fun stained glass windows...I'm in love! I hope the kids dig 'em when they return from winter break. 
 photo signature_zpsd10b3273.png
Read more »

Sunday, August 20, 2017

In the Art Room: A Color Family Display

So there are some things I decided shortly before school started. Let's start with the first: I had too much purposeless decor in my art room. I'm an over-decorator. Just take a peak into my sewing room or my crafting space (yes, these are two separate rooms and yes, I'm spoiled rotten) and you'll know I ain't lyin'. When it comes to my art room, I tend to overdo it there as well. I have a bad habit of getting sucked into the vortex that is the Target Dollar Spot and purchasing every cute thing under the sun. When I bring these colorful happies to my art room, I don't think: Is this going to benefit the art makin' of my students? Is this going to educate and not just decorate? Oh no. Instead I'm all: WHERE'S AN EMPTY SPACE, I MUST FILL IT MEOW. 

I realized the error of my ways over the summer when I came in to grab some things and I took a good look around. All I saw was clutter. Cute, colorful clutter. And in a fit of coffee-fueled redecorating rage, I tore down posters of unicorns, giant maps (why three? WHY?) and reference images that I never, er, referenced. I crumbled it all up into a big heaping wad and stepped back. Immediately I was horrified. What had I done?! My room looked so bare! And that's when I came to my second conclusion:

Eh, you'll figure out what you need as you go. Your room DOES NOT have to look PERFECT on the very first day...week...shoot, man, even month! of school.
Since then, I've slowly started rethinking my decor and redecorating my art room. I made the following decisions: what I use to decorate must also educate; if I can't find what I'm looking for, I'll make it; more 3-D and less 2-D when it comes to visuals. Basically, I want my art room to be a space that really inspires my kids without cluttering their creativity. 
So, what have I created so far? Why, I'm so happy you asked. Here you go:

* My ART room rules that are (hopefully) life rules and inspired by growth mindsets.

* The large color wheel I created from painted oars found at the craft store.

* And this here Color Family set of crayons!

I was inspired by art teacher Katie Lynn. She shared this image of a color family on the Elementary Art Teachers page on Facebook. 
I thought her idea was GENIUS...and decided to create a set of my own. Her drawings are so stinkin' cute, they are inspired by the book The Day the Crayons Quit, a kid fave. Big shout out to Katie Lynn for the inspo!
Since I had these "crayon boxes" left over from an art display, I decided to borrow her idea and create this 3-D color family. My kiddos did this very project a couple of years ago and it was a HUGE hit. I'm thinking I need to bring this project back this year...but I'll definitely be going about it a different (and much easier!) way. I'll share that below. In the meantime, here's a video I created back then for this project. 
So what did I do differently this time around? I skipped the papier mache and used plaster strips instead. But let's start at the start, shall we?
 My good buddy the custodian started collecting the paper towel tubes at my school. I like these better than you standard paper towel tube as they are much sturdier. Added bonus: upcycling! (can we please just go back to calling it REcycling? I dunno why, new words for old things always drives me bonkers).
My very artsy mom-in-law was visiting this weekend and I knew she'd be up for the crafting challenge. I cut rectangles of used tagboard (lookie, more recycling!) while she cut the strips of plaster. We found the plaster strips at our local craft store. After I rolled the tag board into a cone shape, I added a bit of tape, fitted the cone over the tube, cut tabs for easy folding and added a few more bits of tape just to hold. 
While I did that, Diana took to plastering. I loved this so much more than papier mache because it dries faster, harder and isn't a snotty, slimy mess. 
 With her help, creating these 12 crayons went by in a blink!
We did find that one roll of plaster just didn't cut it. We ended up using two. We didn't cover the tube completely as the paint would take care of hiding the fact that we didn't. Also, when I hang these at school, I plan to display them hanging up with the crayons in the box...so no one will see the bottom. Altho, now that I say that, it might be fun to make them removable to make them interactive. I'll have to think on that idea.
 I burned a little too much of the midnight oil (2am, ahem) getting them painted and STILL didn't quite get them complete. Diana helped me finish painting the "paper" and the crayon part.
 I used a flat paint brush and watered down black paint for the stripes.
 Done, son! 
 You better believe I contemplated making ANOTHER color wheel with these guys. But I forced myself to stick with my plan. 
 Initially, these boxes were created for the kids' display a couple years ago. I'm so glad I hung on to them. They were created from cereal boxes. 
I just cut off the top, cut a curve, gessoed them a few times before adding the paint. 
 Since they needed "labels", I just painted a black oval and used white for the color fam names. 
 I'm excited to hang these in my art room next week! I'll use Command Velcro strips and they should do the trick. These guys are pretty light weight. The strips have done a bang up job holding up my painted oars!
 I know my older kids are going to be so stoked when I tell them that they'll be creating their own versions of these as well. I foresee a TON of giant plaster art supplies in their future (eep!).
Take that, Target Dollar Spot. Get thee behind me, Satan, er, Target!
I'm so happy I decided to wait and only decorate when I feel it will educate...and it is necessary. More to come. Just know: your art room, if you are lucky enough to have one, doesn't have to be perfect on the first day of school. Go with what is pleasing and needed by your kiddos. You know best! 
 photo signature_zpsd10b3273.png
Read more »