Y'all can tell it's the craziest time of the year when I start multi-tasking my blog posts. Allow me to introduce to you the first ever (and hopefully the last) What the Art Teacher Wore/Art Teacherin' 101/All Sorts of Other Stuff blog post! Yay! It's kinda like when your mama has too many small portion leftovers and decides that throwin' them all into a pot, heatin' 'em up and callin' it Goulash is making dinner. Welcome to my Bloggy Goulash. Grab your Tums.
First order of business I want to share with y'all is that Other Stuff...I'll now be sharing one-minute videos on my Instagram, Monday through Friday!
I decided to do this because I remember what it was like my very first year teaching, in a portable (aka a trailer), isolated from the other teachers and definitely out of touch with other art teachers. I had so many questions! Now that I have almost 20 years under my sparkly belt, I thought I'd give back what I have learned (and am still learning!) along the way. If there are ANY questions you have for me, please feel free to leave them in the comments or shoot me an email (my address is to the right of this post). I'd love to hear any feedback about this new adventure, y'all!
Now, on to this week's Art Teacherin' 101...LETTING GO OF NEGATIVITY.
I know I've been sharing with you recently my feelings of stress and how I'm attempting to address it. This week things really hit the proverbial fan with an art show added to the mix. Don't get me wrong, working with Artome was A DREAM (blog post to come, y'all!). However, I was on the receiving end of some not super polite comments from colleagues and, I gotta say, I really allowed that to darken my day.
This was compounded with some other things that have happened recently. I discovered an entire conversation about me that was happening in a private art teachers group and let's just say there were some very personal and unpleasant words spoken about me. That really wore me out. Unfortunately, I have the habit of allowing negativity to play on loop in my head. Shoot, the words typed out in this email from many moons ago by a fellow art teacher still ring in my ears: It appears your priorities of late are to make a costume a day and write your blog. That is fantastic and shows what a dynamic artist you are, but it leads me to ask, "Do you have time to be a FSSD Art teacher and honor those obligations?"
So all that to say, we are ALL going through stuff. Everyone's got negativity to deal with. The best we can do is try our hardest to let it go. The black balloon visual works really well for me. Another thing we can do is NOT BE A BLACK BALLOON. Remember what your mama taught you: if you've not got anything nice to say then shut it.
It's also good to know that you aren't alone. Keep that in mind when things start to wear you down. This time of year, everyone is tired and irritable. Just keep your head in the art teacherin' game and focus on the little artists who make you happy. Speaking of, I love these snowfolks created in one day by my firsties!
A good cry always helps. Mine have been coming in waves, sometimes out of no where. Just go with it. You'll feel so much better, I promise!
Retail therapy always helps me...which is why I hit the thrift store so often, it's guilt free! Seriously, y'all, happy holidays. Stay positive, let go of that negativity and know that you aren't alone. Love y'all!
Merry Christmas, all y'all! This Christmas, I'm thankful for Sudafed, tissues with lotion added to them (can we please give the inventor of that monumental awesomeness a metal or something? Those Puffs with Vick's are my JAM) and your kind words and well wishes after my sickly last post. I'm feeling so much better! The hubs and I just returned from a pre-Christmas trip to the Smoky Mountains (I've shared oodles of photos here) where we hiked with buddies, dined on gloriously delicious carbs that only the folks in the South know how to prepare and shopped. I'll be sure to share all that with y'all in an upcoming post. But, until then, Merry Christmas and One Last Tree-Skirt-to-Lady-Skirt Hurrah!
This would be my second tree-skirt transformation for this year (I've lost count of how many of these bad boys I've made over the years but you can see 'em here) and I gotta tell ya, this one almost didn't happen. I seemed to run outta gas that last week of school so this sat on my cutting table for a while. Which was just plain silly as making one of these takes no more that 45 minutes. Seriously.
All ya gotta do is start with a tree skirt. I found this one (it was actually a table covering) at an estate sale this year for a whopping $2. The ones my teacher buddies and I made for tacky sweater day were scored from Big Lots for a mere $7. Wait for those after-Christmas sales and start stockin' up, kids.
Of course, my personal rule of thumb is the kitsch-y-er, the better. Make sure the length is decent. This is the shortest one I've made and it is 19" in length.
I like to work from a pattern so I used a circle skirt pattern from Anna Maria Horner because I feel comfortable with it.
I will say I did cut some corners out of sheer laziness. It saved on time and anguish. Rule #1 of Tree-Skirt-to-Lady-Skirt Club: There Shall Be NO Anguish.
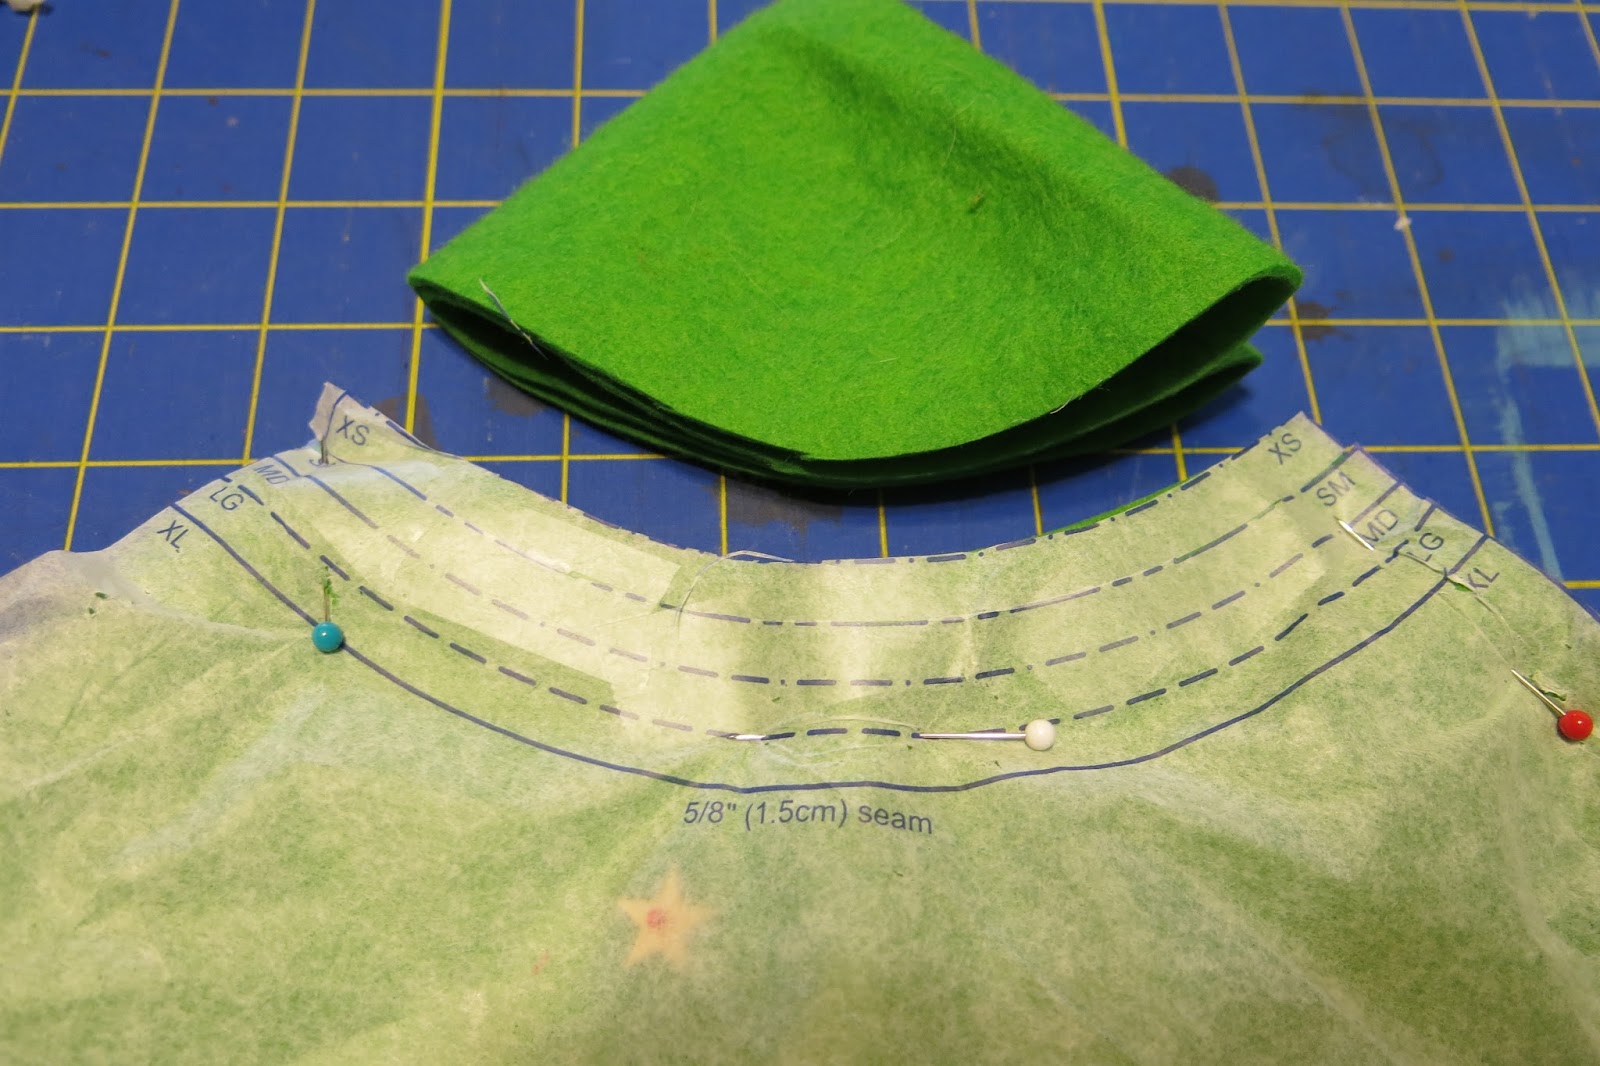
Following the pattern, I simply folded my skirt twice, pinned the pattern and place and commenced cutting.
By the way, always check your sizing. I'm not an XS in the shops at the mall (especially For-never21) but according to this pattern, I am. Which is why Anna Maria Horner is my personal hero and I've built an XS shrine to her. Bless you, Anna Maria!
From there, I cut an opening along the edge of the fabric.
Using the pattern, I cut out a waistband, added some interfacing and stitched it with a 5/8" seam with right sides together. The pattern actually calls for you to install the zipper first then do the waistband. If you go this route, the zip stops at the waistband and a hook and eye is stitched in to keep the waistband closed. I decided to have my zipper go all the way to the very top of my skirt. For that reason, I put the waist band in and then added the zipper.
Stitch the skirt back together with a regular stitch from the bottom all the way to where the zipper install will begin (I used a 9" zipper so I measured 9" down from the waistband). Then switch your stitch setting to a basting stitch as those stitches will be ripped out once the zipper is in place. You can see my terribly easy and horribly tacky way of installing a zipper with Scotch Tape here.
Here's a peek at the final zipper-y product.
Let's just hope I don't eat too much more pie so that I don't have a zipper that decides to slide itself down.
Obligatory skirt twirl. One must do this in a circle skirt. It's, like, the law, y'all.
Meanwhile, it's Christmas day...and there seems to be plenty of this happening at Casa de Cassie.
The hubs did good this year with this present. I can't wait to try it out. Although that 12 needles thing sounds like it could end in a bloody mess, I ain't gonna lie.
I hope Santa treated you right, this year! Happy Holidays, y'all!