Showing posts with label flowers. Show all posts

Tuesday, June 6, 2017

In the Art Room: Salt Dough Sunflowers!

Here's a way to introduce your kiddos to clay even if you don't have a kiln: Salt Dough Clay! Last summer, when I was writing my book Clay Lab for Kids, I had to come up with kid-friendly clay recipes. You see, the book is divided into three parts: projects created with air dry clays available at craft stores; polymer clay projects and clay projects created with homemade clays. There are several clay recipes in my book (including an edible clay!) and this salt dough clay is one of my favorites. Here's how to make it and create a Salt Dough Sunflower (a project not found in my book, just for you!):
Here's the recipe which would be enough clay to create a half dozen flowers:
(Allergy warning! If you are allergic to gluten, this is not the project for you.)

* 2 cups all-purpose flour
* 1/2 cup salt
* 3/4 cup water

Mix all of the ingredients together in a bowl. Dump out ingredients onto wax paper or plastic and continue to knead until a soft dough forms. When creating, be sure to work on a plastic covered surface as this stuff is sticky! Also, when making this flower, use a styrofoam bowl or a bowl covered in plastic wrap so that the flower pops out easily when dry. 

Also, any clay not used, simply wrap in plastic wrap and store in the refrigerator for later use. 
I placed my flower in front of a fan to dry overnight. Just so you know: this is a dough so it will rise a bit! Don't be surprised if your flower looks a little fluffy once dry. 

Salt dough can also be cured by baking in the oven at 200. Keep an eye on it as the goal is simply to dry it out, not burn it. I have cooked mine for 15-30 minutes depending on the dampness of the clay. 

I painted my flower with acrylic paint but tempra could also be used. Be sure to cover with a coat of ModPodge to insure that it will not break. 
If you don't subscribe already, I update my YouTube channel with videos like this and all things art teachery pretty frequently. You are always welcome to use my videos and lessons...I just always appreciate a shout out. 

In other news, I'll be presenting at Art Ed NOW on August 3rd on...you guessed it, all things clay! I'll be sharing a TON of no-kiln clay projects for the elementary and middle school set. 

And if you've picked up my clay book and you have a spare moment, a review here would be so very much appreciated. Thank you so much, y'all!

 photo signature_zpsd10b3273.png
Read more »

Thursday, March 9, 2017

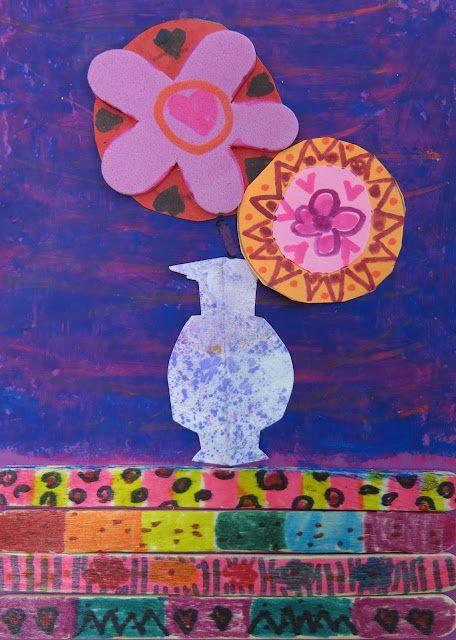
In the Art Room: Folk Art Still Life

 Hey, y'all! A handful of my second graders got really close to being finished with their Folk Art Still Life which was my sub plan while I was out last week. I am so thrilled with their hard work (as are they) that I just had to share. Many of them are still adding flowers and leaves so I'm only sharing a handful. Their next step is adding small details with puffy paint which you know I love as much as they do. Here is the lesson video that my sub used with all of my students, kindergarten thru fourth grade:
Speaking of sub, if you need any tips, tricks and/or sub plans, I just hosted a Facebook LIVE chat last night on that very topic! The chat and all of the commentary is archived on my official Facebook page if you are interested. We have been doing those live chats for the last couple of months and they are blast. Well over 100 art teachers join in each time and it's a great way to share. So if you aren't busy on Wednesday night at 8pm CST, be sure and pop by!
While they were with the sub, some of my students had one 30 minute art class while others had two. So what the sub was able to accomplish was beyond her control. What I love about having a recorded lesson (and a project that the kids are in progress) is that when I return, I don't have to scramble to slap together lesson plans. I can just pick up where the sub left off. 
 With the sub, my students were able to get their sticks done and glued down to the background. When I came back this week, my students worked on their vases and flowers. By next week, they should have all of their flowers and leaves complete and be ready to add some puffy paint. 
One thing that was not in the video was the oil pastel background. One of the kids added color to the background with the bright oil pastels and we all lost our minds...brilliant! So we all had to do the same. You know how that goes, right?!
I know they aren't complete...but I just had to share! I think these are so pretty and perfect for spring and Mother's Day. If you give this project a go, you'll have to let me know. 

 photo signature_zpsd10b3273.png
Read more »

Sunday, April 24, 2016

In the Art Room: Chalked Flower Ceiling Tiles

It all started last year, when we had a visiting artist who is a street painter (aka a sidewalk chalk artist). The kids were supposed to go outside and work on their own taped off portion of sidewalk. And then...rain. With my small brain frantically searching for ideas where the kids could still work on a sidewalk-esque surface but remain indoors, the Chalked Ceiling Tile project was born! 
My super awesome administration had been asking me for a while to do some artwork on ceiling tiles. I'd put the project off as I just didn't know how to go about it. But when rain was predicted the eve before our sidewalk chalk event, the idea to have students chalk tiles came to me. After toying around a bit, I found that the reverse side of the tiles actually worked much better than the front!
Last year, second graders create these butterfly ceiling tiles as it was apart of their curriculum. This year, it isn't. So I decided to have them create something that would look nice with the butterflies: flowers! 
This year, I decided to try something a little different. I've been showing demo videos on the regular in my art room and the kids have responded really well. Because I was going to be teaching an entire grade level of second graders in a loud multi-purpose room, I thought this would be the perfect time to use a filmed lesson. I've been adding videos regularly so feel free to subscribe to my channel if you wanna. Here's the video the kids watched:
You'll notice that the video is broken down into four sections: drawing out the flowers, coloring in the flowers, adding a background, outlining and autographing. I had the students work on these from roughly 9:30 to 11am. They are used to 30 minute art classes! So, I would show a small snippet of the video and allow them to work. They knew to gather back on the floor when they were finished. Of course, they all finish at different rates. When I had about a dozen or more students gathered on the floor, I would ring my chime (yes, that was a shameless plug for my husband's company) which would signal ALL students, finished or not, to gather on the floor to hear the next snippet. I do this in my art room when we have several steps, so the kids are kinda used to this routine.
Not gonna lie, this was no small undertaking but it is so totally worth it. If you wanna do a chalked ceiling tile project with your students, you'll need the following:

* Chalk. I love KOSS brand. It's not cheap but it is rich in color. I bought 20 boxes last year and we were able to use them again this year. I will probably only need to purchase 10 more boxes for next year's tiles. We've also used them for other projects throughout the year.  
* Bowls. I had a sweet high school student shadow me the other day and I put her on the task of making a bowl of warm color chalk and cool per every two students. 
* Ceiling Tiles. One per kiddo. Ask your friendly custodian for access to his/her stash.
* Foam Brush Thingies. Get them in the variety pack at your fave hardware store. These are perfect for blending chalk.
* Bulletin Board Paper. To cover the floors. We worked in the multi-purpose room which was great for a large group of kids. Once we were finished and the tiles were stacked on a dolly, we simply rolled up the paper and recycled it!
* Baby wipes. We only used these at the very end. I mean, your hands are just gonna get dirty again, right?! Don't clean 'em til you are finished. 
* Cheap Hairspray. Get the good stuff. You know, like AquaNet.
* Fabulous Parent Volunteers. These folks are the backbone to my art program. They hang the art show. They help with clay projects. They get things done. Y'all gotta get you some. And special thanks to mine, I love y'all!
To organize this event, I simply messaged second grade and special area teachers to give them some dates. Once we landed on one that worked, I asked if they'd kindly pop in the multi-purpose room in 30 minute shifts to help the kids if needed. During that hour and a half time slot, I usually have second grade classes and a planning...so none of my other kids missed their regularly scheduled art classes, which was great! 
Once floral designs were drawn, the kids moved on to the next phase which was adding color. 
For some, this took some time as they drew their flowers small. This was fine with me! However, I did notice some artist-fatigue...so having the kids stop, move and watch the next step via video was good. It meant they went back to their work spot with renewed energy.
I think I would like to do a different theme with the students each year. Because these tiles will remain in the ceiling for a long time, a different theme would mean they could easily find their tiles and remember their classes theme! I had thought of taking down last year's tiles and returning them to the current 3rd grade...but I quickly changed my mind when some of those children said, "you aren't taking down OUR tiles, are you?!" I might be fun to build on this idea and add more tiles each year. So that's the plan, for now.
About an hour in, and most kids were finishing their flowers and ready for the background. 
 Our last phase was outlining and signing our name with black. At this point, students were finishing at different speeds and getting a wee bit squirrelly. To remedy that, I had them baby wipe their hands and go to the floor where we watched an art education video. 
Once the majority of children were finished, a teacher took them outside for recess. This left me and parent volunteers to clean up and allowed those kids who were still working to continue creating. Those are usually my pokey-lil-perfectionists. I'm never gonna ask them to hurry up! 
Once these lovelies were complete, we busted out the Aqua Net and commenced spraying them like it was 1985.
Personal fave back in the day. Mostly because of the Mondrian design!
After cleaning up and cleaning the tiles outta the multi-purpose room, I loaded them onto a cart and wheeled them down to my room. Our fabulous custodian Mr. Scruggs will hang them next week...I'll be sure to share a pic! If you follow me here, you'll see it real soon! 
 Love the composition of this one!
Check out the knees of the kid on the right. Next year, we should just take them outside and hose them down!
 After the kids, before the clean up. So much colorful happiness!
 My buddy the music teachers suggested that each year, for our theme, we have the kids decorate tiles that correlate to the location in the hallway. For example, outside of the gym, the kids chalk sports equipment. And outside of the music room, music-themed designs. I love that idea!
 
Now that this massive undertaking is complete, I can focus on Art Show Land. 
Have y'all done ceiling tile projects? What did you do? I'd love to hear about it in the comments. xo!
 photo signature_zpsd10b3273.png
Read more »