Showing posts with label halloween diy. Show all posts

Friday, October 13, 2023

DIY: Pumpkin Planter!

Hey, y'all! Last week I shared that I created this Skull Planter. While at the same time I was makin' that mess, I also created this cutie! I finally got around to painting it and thought I'd share the process with you.

If you are looking for the supplies I used, mainly, Celluclay, you can find it here

Okay, now for the process!


Now I don't plan on keeping him out all year like my skull planter so...I did just drop a plant inside that was already in a smaller planter. That way, when the season is sadly over, I can just take it out. However...I love his happy face so much that I may keep him out past Halloween!
In case you would like to see more things I've crafted from Celluclay (and maybe a little inspo for spooky crafts), check out this blog post! 
Everything about this season makes me so happy. Including this guy!
Thanks for letting me share!
photo signature_zpsd10b3273.png
Read more »

Thursday, October 26, 2017

Halloween Crafts: How to Make a Monster Head!

First of all, can I just tell you how SAD I am that next Tuesday is Halloween?! I still have two more Halloween DIY's in the queue to share with y'all! If you are looking for some spooky crafts this weekend, look no further...I've got you covered! I'll be sharing a dozen or more in this here blog post. I kinda went bananas with the Halloween crafts this year...but it truly is my most favorite thing ever. I'm gonna be super sad to pack all of this up next week. Tho, let's be honest, it will probably stay up a pinch beyond Halloween. I mean, there is Day of the Dead to consider, after all!

But, on with the craftin' of these Monster Mash Heads!
 Let's talk supplies:

* Styro Monster Heads. I picked mine up here last year after Halloween for next to nuthin. They still have them this year too! 

* Sta-Flo Liquid Starch. This stuff is my jam, y'all. I have used it for that super fabulous chalk project and for a MILLION Halloweenie crafts. I've been asked where to get it...I found it on the cheap here

* Cheesecloth. You can find this both at the craft stores and at the grocery. It's probably the cheapest online. 

* Acrylic Paint. Durable and leaves a shine...I love the stuff. Even the cheap stuff!
Now I did mention Halloween crafts...I thought I crafted hard for the spooky holidays last year. Well, this year, really went all out. Lemme share with y'all what I created:
Draculas! These dudes just might be my favorite.
Chatter teeth were super easy to create. 
No, wait. These dudes were def my favorite!
Although these eyeballs were definitely the most easy to crank out.
If you need a fun, fast and easy craft, check this one out!
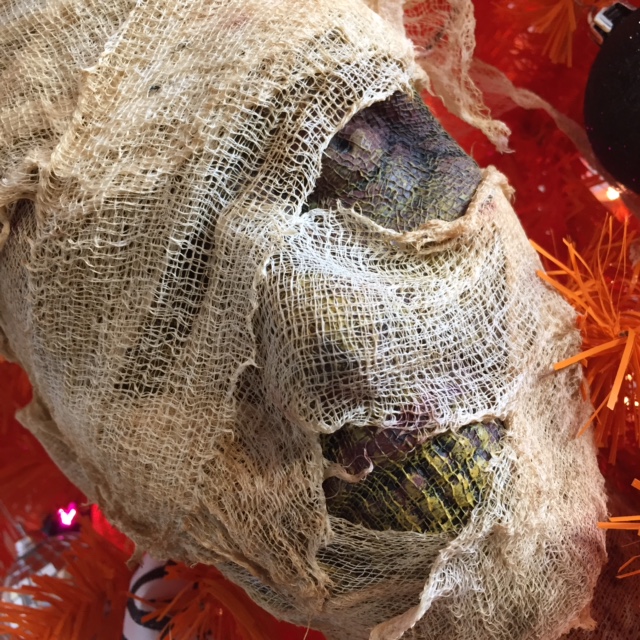
 Okay, the hubs takes total credit for how The Mummy came to be. I think the original intention of that styrofoam head is for it to be a zombie...but zombies weren't in my vintage movie line up. So hubs suggested wrapping him in strips of cheesecloth and YES! Look! He's so stinkin' spooky!
 Who's your dentist, bro? You might wanna ask for a refund.
 Frank is quite the looker, don't you think? Bride didn't know what she had, silly girl!
 Best part about having these in my tree was that I didn't have to hang them or do anything...just place them on the branches!
 I love using the cheesecloth because I love the effect I can get with the textured surface. Painting the entire thing black and then going over it with a dry brush is my new favorite thing on the planet. It's so freeing for an uptight and particular artist like me. 
Oh, what's that? You need more Halloween crafts? Here you go!
Check out my Top Ten Halloween Crafts from last year, right here! 

 photo signature_zpsd10b3273.png
Read more »

Tuesday, October 17, 2017

DIY: Halloween Crafts, Dracula!

News Flash! I have a Halloween Crafting Addition! 
Oh, wait, that's nothing new. Now, I vant to show you how to do dis super simple craft. But first I must count out the supplies...for that I'll need a little help.
Okay, not gonna lie: when I first started these Dracula's, I totally had The Count in mind...I knew I didn't want to portray them super realistically as the surface of the Celluclay doesn't really lend itself to painting easily. So, I decided to go the silly kind of cartoon route and The Count was what came to mind. BUT I suppose I'm getting head of myself. Let's count out the supplies for making this super easy blood-sucker!

1. Aluminum foil! I like the cheap precut sheets you can find at the Dollar Make You Hollar Tree.

2. Celluclay! Y'all know I love the stuff. You do have to mix it yourself...just don't ask me what the measurements are. I don't measure stuff because math is gross and makes my head hurt.

3. Rigid Wrap! I love this stuff and it adheres to the Celluclay without any glue.

4. Acrylic Paint! 

5. Extra: Black Sparkly Glitter! It makes everything better. 

Now, on with the show: 
Seriously, it's that easy! Don't forget to dry in front of a fan and rotate often. Otherwise, mold. And that's just nasty.
Now, when I started to paint the faces, I had no intention of going to mobster-town but, what can I say, they gave me an offer I couldn't refuse. Maybe it's because of my summertime bender of re-watching all the Godfather movies and Goodfellas...who knows? All I know is, when I started to paint, these faces appeared and I just went with it. Cuz, why not?
 I started by mixing up a light tint of purple and creating a large T shape for the forehead and the nose. Then I used black for the beady eyes and the eyebrows. From there, I painted a slash for the mouth and some fangs...
 Once the paint dried a pinch more, I went back and added more details: darker purple under the eyes and more highlights to the face. 
 I love it when art takes you to unexpected and unintended places! This is totally not what I had in mind and yet I totally dig it!
A little pinstripe for the paints and white for the socks and I was done. Oh and glitter because, duh, glitter. That fine black sparkle glitter is where it's at, man.
 I added the glitter with some glue and some sprinkling. I will officially be finding black glitter in my house for the rest of time. 
 There's a reason I keep that stuff far, far away in my art room. But at home, I'm all LET THE GLITTER FLY! 
 I'm sure the Godfather would approve. 
 So, up next for these guys, I'll be adding a hanger to the back and adding them to my Candy Corn Tree...where I can find the space. By the way, if you are looking for some Halloween Crafts, I'm uploading more all the time on my YouTube channel...I have a serious backlog of stuff for y'all! 
Until I get the rest of the goblins and ghouls uploaded on this here blog, I'll leave you with these lovelies. 
 Blood-suckingly handsome, don't you think?

 photo signature_zpsd10b3273.png
Read more »

Sunday, October 30, 2016

DIY: Cheesecloth Makeover for The Bride and Frank

Happy Halloween, kids! If you are a parent or a teacher, bless you. You know that this day is just completely a wash as the kids are gonna either be jacked up on sugar or hitting some intense withdraw. Either way, brace yourself. Might I recommend digging the chocolate outta the treat bags and holing up in a dark, quite place for the next five days? Cuz things about to get real.
While you're off in a quiet corner with your Snickers and Reese Pumpkins, how bout getting your crafting on? That's what I did this weekend when I discovered the wonderment that is cheesecloth and starch (wow. Did I really just refer to cheesecloth and starch as "wonderment"? I really need to get out more).
In my previous post, I mentioned that I went on a wee thrift shop bender this week. Don't you judge. It's how I cope with the struggles of being a crazy art teacher. I'd already had it in my head that I wanted to spookify some bottles for Halloween. I'd seen some online tutes featuring cheesecloth and starch that was used to antique bottles. When I was poking around at the thrift, I spotted several items I thought would be fun to cover in cheesecloth (again, not a sentence I thought I would ever say but whateves). And these sweet Made in China figurines were one of 'em. 
And Holy Candy Corn! If you don't mind me saying so, look at that transformation!
For this fun craft, all you'll need is over-priced cheesecloth (why you gotta charge $3 for this stuff, craft stores? WHY.) and liquid starch. I prefer Sta-flo because I appreciate their abuse of the English language. Keep that Flo, Sta. You'll also need whatever grubby goods your thrift store can provide and an active imagination. Here, lemme show you:
Like, whuh?! Did you hear how excited I got? I think I mightah said "the possibilities are endless" about a half dozen times. I repeat: I NEED TO GET OUT MORE. 
Because we are friends from way back, I ain't even gonna lie to you: covering this thang in el queso-cloth (OMG, I'm totally gonna refer to cheesecloth as that here on out just so you know) was not my most favorite thing in the world as it had a lotta nooks and crannies. 
There was a lotta cutting and shoving el queso-cloth into parts unknown. It didn't take long...but the slick surface of the statue made the cloth slide around a bit which was not cool. Once I got it all in place, I set it in front of a fan and it was dry within an hour.
 Creep-tastic. By the way, my initial idea was to simply paint the faces of these guys with skulls, a la el dia de los muertos. However, as I was checking out at the thrift store, the gal behind the counter said, "I think you should do the Bride of Frankenstein and Frank" and I was all, "OMG. YOU ARE A GENIUS. YES!" So, shout out to Our Thrift Store and their imaginative staff. 
From there, I covered the entire thing in white acrylic paint and plopped it back in front of the fan.
And then the painting commenced. Y'all might remember that I have a thing for The Bride. I really wanted to keep her in a range of gray as a nod to the black and white film. However, I thought Frank deserved a punch of color so I went with a purple and lime green palette for him. 
And I kinda love how they turned out! In an unrelated side note: I ALWAYS have Netflix running on my laptop while I'm working. I just finished Sons of Anarchy (late to the party much, Stephens?) and I'm hungry for a similar show. I just started Peaky Blinders which is like the post-WWI sister show. What are y'all watching now that I need check out?
 Just a lil detail of the sides. Seriously, this was such fun. The thrift store had a ton of these figurines...I so wish I had another month of October. 
I guess I'll just have to find out what el queso-cloth and starch can do for my Christmas decor. Until then, Happy Halloween, y'all! 
 photo signature_zpsd10b3273.png
Read more »