Monday, September 23, 2013

What the Art Teachers Wore #78

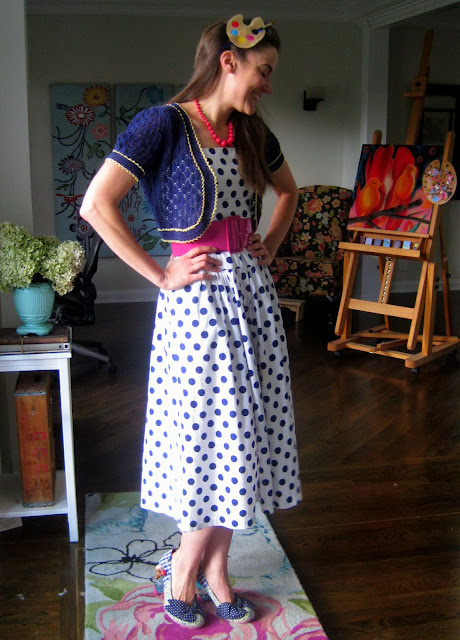
Dots and Stripes Monday: There was once this teacher poll that went around my school where we could vote for each other, senior year style. You know, like "Best Dressed" (which I'm still ticked I didn't get, some people just don't know style) and "Best Hair". Guess who was "Most Likely to Wear Dots and Stripes Together"? That's right...dress: vintage, thrifted; sweater: Betsy Johnson, Plato's Closet; sandals: Shoe Carnival
I know what you're thinking, "Didn't I just hear from this crazy yesterday?!" Well, you'll have to forgive me, but I've got a bit of a blog backlog I'm trying to catch up with. I've got oodles of DIY's, art lessons, an ear wax extraction story that's not to be missed and, believe it or not, a whole post full of advice-giving goodness. No, I'm not kidding about that last part. Yes, some folks have been asking me, me of all unsane people, for life-living tips.

 Stop. Laughing. And pointing. That's just rude and it hurts my feelings. Jerk.

In other news (ahem, changing the subject in hopes that you'll stop the heckling), this here's the final installment of all things dot-gasmic.  You might recall, I've managed to wear nuthing but dots for the last two weeks in honor of Peter H. Reynold's The Dot. More on that here and here. Turns out I had just enough clothes to make it until the very dotted end with one spotted skirt to spare. And to think I thought I just wouldn't make it. I underestimated my own hoarding powers.

To wrap up all this dotted'ness, I thought I'd share with you some of my fave dotted paintings. I hope you dig 'em. Until next time!
Wassily Kandinsky, Several Circles, 1926 This series of trippy dot paintings are among my favorites of his. I like them better than his heavier looking works like the painting below...
Kandinsky, Concentric Circles, 1913


Feelin' Groovy Tuesday: This four dollar antique store dress always makes me feel so 1960's hip. dress: vintage; tights and belt: Target; shoes: Clarks; poodle pin: gift from a friend

Rebecca and I were so busy this week that we rarely remembered to take outfit photos this week...not to mention find out the details of her outfit. Pretty sure more of her wardrobe is Target or Anthro. Can't go wrong with either.

Are you familiar with the modern day pop artist Ryan McGinness? I love his work, especially these black light pieces from 2009. The overlapping script lines are so beautiful to me and the pop of color against the back is stunning. Now if only he could get the circles to rotate like a kaleidoscope, my mind would be blown.

Seriously. I've now got an art-craving to bust out my calligraphy pens and doodle like mad.

Betsy Johnson-Wannabe Wednesday: I found this dotted dress at Plato's Closet for $3 and I had to have it in my life. Sadly, the thing was just too short. So I added the leopard jersey print to the bottom and suddenly it was just a smidge less inappropriate. Success! dress and belt: Plato's Closet; shoes: ancient Anthro

Daw, she so cute.

Dan Christensen, O-Zone, 1988. I recently stumbled upon this artist and, I gotta tell you, I love his stuff, especially those dotted pieces below. He's apart of a group of artists called the Color Field movement. These artists were interested in exactly what it sounds like: large fields of color. And alternative means of applying color to their canvas. Here it looks like he might have used a giant airbrush to me.

Gah, I could stare at this all day. Well, not all day, I might go a little mental(-er) but I do love them. Especially how the dots seem to vibrate and move.

Like a circus without the creepy clowns, corn dogs and cotton candy.

Open House Thursday: Otherwise known as The Day Without End. But it was so much fun seeing the kids and chatting with their parents. dress: vintage, thrifted; shoes: Irregular Choice

So Gary Andrew Clark is the artist behind these dotted works. They remind me of Warhol meets Chuck Close on some sort of Alternate Universe Futuristic Planet. What I really like about these is that you can scoop 'em up for about $40 a pop here.
Who dat lady?!
FRIDAY, You Finally Made It!: It only took you forever. dress: ancient, Francesca's; shoes: Anthro

I know those happy pants came from Anthro. Aren't they adorbs? And, yes, I just used the word "adorbs". Deal wit it.

So I don't suppose I can go a whole post talking about dots and NOT mention Georges Seurat. I mean, dude put in his hours of pointillizing the daylights outta this canvas, I gotta give him a shout out for that. On a totally different subject, I bet that lady with the umbrella could out-twerk Miley any day, dontcha think?

On that note, I'll end this here post. Before the train to inappropriate town makes another stop to you's-about-to-lose-yer-job land. Later!

Sunday, September 22, 2013

In the Art Room: The Dot

Hey there, long lost friends! I've finally recovered from what I dubbed The Longest Week of the Year and I'm ready to share just a bit of it with you. I'll spare you the passing-out-at-7:45pm-after-an-insane-Open-House//waking-up-in-full-makeup-and-school-clothes-at-5am-the-next-morn//consideration-of-simply-putting-on-shoes-and-going-to-school-in-aforementioned-slept-in-attire. Because that would just make me sound pathetic. 

What I've got for you today is just one of the three displays Rebecca, some super sweet volunteer moms and I prepared for Open House. This here is our The Dot display created for International Dot Day which I blerged about here, in case you need a refresher. For our contribution, we hung all of the coffee filter dots the children created (details on that shortly), hung the collaborative oil pastel dot designs created by the fourth grade and wrote out an abbreviated version of Peter H. Reynolds' story. I was so thrilled with how this all came together, I just had to show you!

This here is the long slide of a hallway to the art room. Dude, you don't even know how badly I wanna get my mitts on some skates and disco boogie down those ramps. On the right is my art room door (you might remember The Great Wave painting I created from this post). As you can see, I've got a ton of display space outside my room. Sadly, I'm kinda sucktastic when it comes to putting up art work. I tend to hoard it all until the end-of-the-year art show. This time, we took full advantage of our space.
Here you can see the backgrounds our 4th grade created. Each of the six tables in my room was covered in black bulletin board paper and prepped with a tray of oil pastels. The kids were already using the oil pastels to finish off a separate mural project (which I cannot wait to show you this upcoming week!) so this was a good transitional project. After reading The Dot, we chatted about the variety of dots Vashti created and set to creating our own unique versions.
I have two 1/2 hour 4th grade classes back to back. So when the next group of kids were seated, they were looking at the previous class' dots...which stumped them a bit. They seemed to only want to create their own dots so a chat about enhancing the dots and working collaboratively was muy importante.
This palette was a different collaborative project from last year that we had in the front lobby for the art show. Because the kids have created a new display for the lobby (soon to make an appearance on el bloggo), I moved the palette to outside my door.
By writing out the story, I thought visitors would have a better understanding of our display. I did notice several families reading the story at Open House which made me pretty happy. I've also noticed some big time hallway loiterers reading the story as well. And I just don't have the heart to holler at 'em to get to class.
I used the kids' "messy mats" as the storybook paper. At first I thought I could write out the entire story...but the cramping of my hand told me otherwise. So, sorry, Peter H. Reynolds! I did what my wimpy ole painting hand would allow.
When I was reading this story to one 4th grade class and we got to the very last page where is says, "Vashti stared at the boy's squiggle. And then she said..." one of the kids ventured a guess and said, "IT'S TERRIBLE!" Which, I ain't gonna lie, I kinda thought was funny. BUT I didn't tell him that.

In case you are wondering how these coffee filters were hung, it took some thinking. Yes, seriously. Originally, I thought we could simply just paper clip them together without putting holes in the filters. However, the weight of the chain of filters prevented that from being an option. So we resorted to puncturing them with one clip, connecting the second and puncturing that through the second filter. Easy.
If you've never done the painting-coffee-filters thing, it's simple. Because the kids are eventually going to be using these as kimonos in an upcoming project, they were using colors that reminded them of their favorite seasons. We left the center blank so we could see their name. Once colored in with water soluble markers, the students placed their filter on a styrofoam plate and painted it entirely with water. From there, they brought them to Rebecca who removed them from the plate and placed them on sheets of plastic.

Once on the plastic, the filters were sprinkled with coarse salt to give it that groovy speckled look.
Our largest display is in front of a bank of windows.
And there you have it, our Dot-tastic display!


Monday, September 16, 2013

What the Art Teachers Wore #77

Dot-Tastic Monday: Okay, I gotta admit, it was by total accident that I wore this polka dotted dress on Monday...which proceeded to inspire my wardrobe for the next coupla weeks. All for the love of The Dot. dress: vintage, Wasteland in San Francisco; shoes: Swedish Hasbeens, Anthro; belt: Pin Up Girl Clothing; necklace: Target
Have ya'll read the book The Dot by Peter H. Reynolds? Well, I have. And so has Rebecca. Like, 24 times. Once for each class we see. And, I gotta admit, I never tire of the book. It's that great. So when I found out that there was something called International Dot Day, I knew we had to participate. Rebecca suggested we hang the kids' painted coffee filters (created for a future art project) and, viola! We dot-a-sized the entire school. More details on our project later this week.

For the occasion, I've decided to wear a polka dotted outfit until our school's Open House this Thursday. Which means, when all is said and done, I will have worn dots for 10 days. At first I didn't think I could pull it off and thought I'd be doing some dot-tastic DIY's but, as it turns out, this hoarder's wardrobe is just full of dots. It's a little nuts. Someone might have a problem. Just sayin.

But back to the dot. All week, we've been stressing the theme of The Dot which is to inspire. Without ruining the plot, an art teacher inspires a student who then inspires an aspiring artist in return. During deep convo about this theme with my first grade students, this happened:

Me: So! What do you think would happen if this story continued...?

First Grade Dude: That little boy in the story will be expired.

Me (without correcting him because I'm dying to see where this goes): Oh yeah? And what do you think will happen when everyone sees our dots on display for Open House?

F.G.D.: Then our family will expire, our friends will be expired and, well, everyone will expire!

Yeah, so. Let's hope nothing that dramatic happens. I'll keep you posted. Until then, I hope your week is dot-tastic!

Dontcha love this dress? Girl traveled all over Europe this summer and picked this dress up in Stockholm. How many people get to say that? "Oh, this ole thang? Stockholm, baby. Stock-I'm-a-World-Traveler-holm."
Not read The Dot? Why not let youtube read it for you?
1960's Does Dots Tuesday: There's this little thrift store I rarely go to and on the day I do, I find this sweet 1960's two piece. What you can't see is the sweet bow at the neck and the delicate buttons down the back. Can you tell I love it? shoes: vintage, thrifted; daisy necklace and earrings: gift from a friend

I love those sandals. They will more than likely come up missing from her closet. Don't tell her.


Art teacher buds, have you ever participated in International Dot Day? This was my first time...and I loved it! I can't wait to share with you what else we've created to celebrate this awesome book.

Dotted Window Wednesday: Chaining these coffee filters together took some trouble shooting. I'll have so spare you the trouble and show you are secrets this week. dress: thrifted; sweater: ebay
Not gonna lie, this colorful window makes me pretty happy.
Picture Day Thursday: Yay! Nothing like remembering it's Picture Day until you are walking out the door. So I just stuck a palette in my hair and called it a day. dress: Target; belt: Plato's Closet

Oops, he forgot "Be Expired!"

PANTS! Friday: Seriously. I have more students make comments when I wear pants than any other day. It's kinda craycray. blouse: gift from a friend; jeans: Target; shoes: Anthro

Guess who got her hairs did?! I love it, don't you? When it's straight, she's got an Ariel vibe and when it's curly, she's totally that girl from Brave. The kids love it. And check out that awesome hair bow. Her mom created that for her when she was a kid...the kids and I love it's sparkly awesomeness.

And, in celebration of a good book, it's Book Fair Week at our school! This year the book fair has an Egyptian theme (where were they two years ago?!). So to kick it off, we dressed a lil crazy and caused a ruckus on the school's morning announcements. That's one of my dear teacher buddies wrapped up in toilet paper. She's such an awesome sport.

Thursday, September 12, 2013

In the Art Room: Painting Processes

Precious first grade friends sharing paint and getting ready to try their (messy) hands at sponge painitng.
Hello and welcome to The Art Room. 

Which, during the week of Painting Processes, could have easily been dubbed The Day the Paint Factory Vomited...or maybe What Happens When You Give Children Double Espressos and Paint Brushes. Although just calling it The Day the Art Teacher Taught a Half Dozen Painting Techniques in a 1/2 Hour Because She's Nutz would probably be the most accurate.

Yet, despite the Big Fat Hairy mess, we had fun, the kids learned tons and their paintings look fantastical. Lemme tell you how it all went down.
How student teacher Rebecca Tenpenny and I set up the tables for the day.
I'm a huge fan of the blog Painted Paper. If you are an art teacher, you gotta get yourself over to Laura's blog because it's beyond inspiring. It's aspiring. In fact, it gets me so excited with it's awesomeness, I often find myself perspiring. Because that's what every blogger wants to hear, right? "Your blog is so amazing it makes me sweat!" I'm sure at this point, if she's reading, Laura is like, "um...thanks?"

Anyway, before this gets awkward (oops, too late), what Laura does at the start of each school year is have students create dozens of painted papers (hence the title of her blog, ya'll). The kids then have these amazing papers to use in their works of art throughout the year. GENIUS, right?! So Rebecca and I decided to totally steal, er, heavily borrow, that idea. 

If you wanna give this wild and crazy ride a go, here are the supplies needed per child:
  • one 12" X 18" paper, quarter folded
  • one large bristle brush and one small bristle brush
  • one large sponge and one small sponge
  • one texture comb
  • one toothbrush and piece of cardboard
  • a stencil
  • an apron
  • no chairs
And here's a student's painted piece to show you the processes covered during that 1/2 hour:
  • dry brush painting using a cross hatch pattern (upper left)
  • sponge painting using a stencil (bottom left)
  • texture combing with paint splatter (right)
As soon as the students entered the room, I had them grab a piece of pre-folded paper from the "store" (you can go here for more details on how we gather supplies in the art room), take it to their seat, jot down their name and teacher code, throw on an apron and gather around a table for demonstration. Once each student was at the demo table, I demonstrated how each painted process was executed. Because our time is so limited, I told the kids that they'd be working quickly but not crazy and that our painting time would be controlled by the toot of my trusty train whistle. 

Here's how I explained each process to the children before they set to work:
 Dry Brush Painting with Cross-Hatch Pattern: Believe it or not, this was one of the hardest painting processes for the kids to grasp. I found that the best way to explain it to them was like this...how would you describe the texture of a broom? It's dry, right? Well, imagine that this white rectangle is your bedroom and your mom told you to sweep it. Using any color you want, dip your brush but just barely because we want the brush to be dry. Now, using diagonal lines, sweep your brush all the way across your paper. Be sure to sweep your whole rectangle. Imagine how upset your mom would be if she found you only swept one part of your room! Once you are down sweeping with that color, pick a different color and sweep in the opposite direction. See how the lines cross over each other? That's called cross-hatching!
Now the kids didn't actually go to their seats and set to work until after I'd demonstrated all the techniques so the sequence of these photos isn't accurate. Sorry. However, I did want you to see the kids in action. So here's some dry brush painting by one of the experts.
Sponge Printing and Stenciling: Next I demonstrated using the larger sponge, picking one color and sponge printing. I emphasize that it's called printing and not painting because I want the kids to know that they are creating a texture by pressing the sponge down and picking it back up. As opposed to just wiping the sponge all over the paper. Once that rectangle is covered in the color of their choice, I show them how to stencil with a smaller sponge and this collection of holey scraps (which included a brief chat about how sparkly confetti is made!). The key here is to use very little paint. A concept that is akin to rocket science for some.
When we ran out of those little round sponges with the handle, we created these guys with a clothes pin and a cosmetic sponge. We so smart.

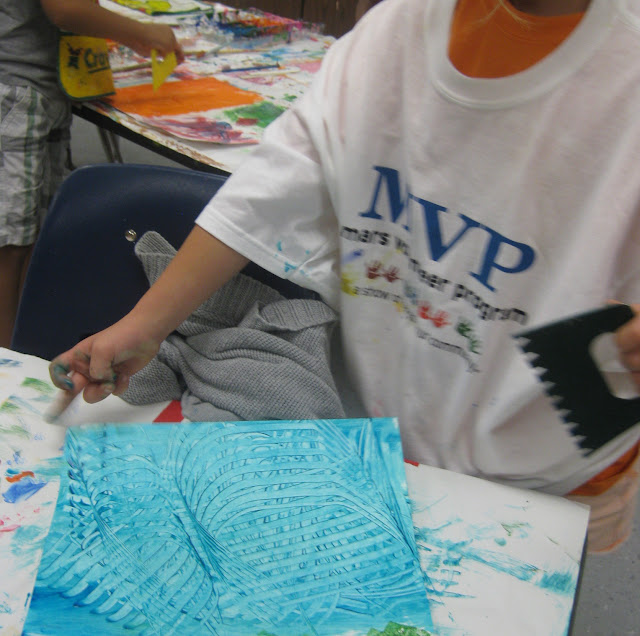
Texture Comb with Paint Splatter: For this, the kids painted the entire half of the paper. I really had to emphasize that for this process, they'd have to work the opposite of the dry brush painting in that their paper needed to be super duper wet with paint. So I told them to paint quickly and thickly but not crazily. I painted with the larger brush and only used one color. I told them that their paper should have a shiny and wet look to it before using the texture comb. Once the texture comb was used, I then showed the correct way to splatter paint. Which, as it turns out, no matter how many times you show them, they are going to attempt many other ways of splatter painting. Ways that might include splattering their face, their neighbor and the floor. Jackson Pollock woulda been proud

Painting quickly and thickly but not crazily.
I picked up these texture combs from Sax after years of cutting them out of cardboard. By the way, I don't believe flipping you the bird was intentional. But I could be wrong.
For splattering, I showed the kids how to dip their toothbrush into any color and scrap the bristles away from themselves and toward their paper. They were allowed to chose as many different colors as they liked. By the way...this technique was part of the inspiration for this dress.
After the demo, I had the kids do a quick "repeat after me" run through of the processes. From there, they were asked to return to their tables and hold up the small brush for dry brush painting. Once all brushes were in the air, I blew the train whistle which was their signal to begin that process. When the whistle was blown again about 2 minutes later, that was their signal to put all dry brushes down and hold up their large sponge. Again, whistle blows and...begin sponging. This routine was continued until all processes were complete.
At this point, we were closing in on the end of the 1/2 hour. Quickly the students took their paintings to the drying rack, put their aprons back on their tables and met me at the door to line up and receive a baby wipe ... which did little to nothing for their artsy hands. But we finished! And they loved it. And now we have all of these amazing papers for our upcoming collage projects. I couldn't be more excited. Have you tried any of these painting processes with your students? I'd love to hear more ideas! Rebecca and I are planning a water color painting processes in the near future. I'll be sure to keep you posted. Until then, special thanks to Painted Paper for the inspiration!