I hope this here blog post finds you either on summer vacation or getting dangerously close. Either way, you may find yourself asking "wait, why am I reading an art teacherin' blog?!" Because you are just so dedicated, that's why! Or delusional. Either way, welcome!
You might know that I occasionally work with Prang Art Supplies to craft supplies for you and your students. A couple of years ago, when I was painstakingly cutting out circles for my students to use for Dot Day, with hands cramped, I reached out to my buddies at Prang and said,
"You know what would be REALLY great? If y'all made some round paper outta that good paper you have."
And so...they did!
It's the perfect paper for Dot Day but also...ANYTHING that happens to be round! I thought I'd share not only my fave Dot Day lessons here (I'm only 6 months early as Dot Day is usually celebrated September 15th) but also a FREE download for your artists to brainstorm all the round things.
I created a FREE download for you and a video that will walk your students through drawing both a pizza and a donut! If you'd like that AND a free lesson plan, just click here!
In need of some Dot Day inspo? Then check out this lesson plan! It's one I have used with students as young as kindergarten for years!
Need some more Dot Day inspo? I created a blog post of my 14 very favorite Dot Day lessons which pair perfectly with this here round paper! You can find them all here.
And, of course, if you need a good book on SHAPE to reinforce all things dotty and round, then don't forget to check out my book Alfred the Ape Knows his Shapes!
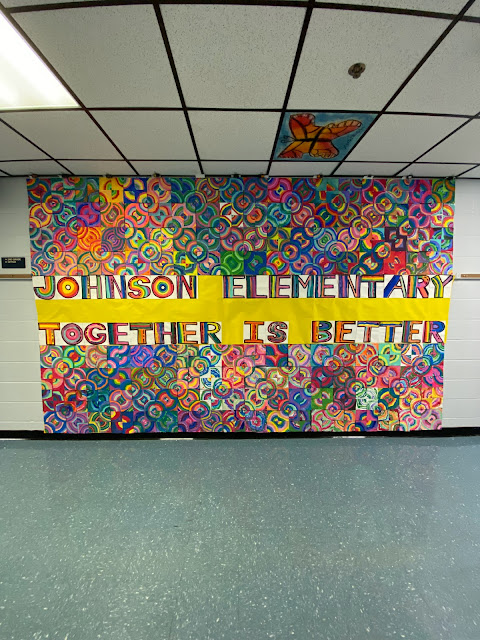
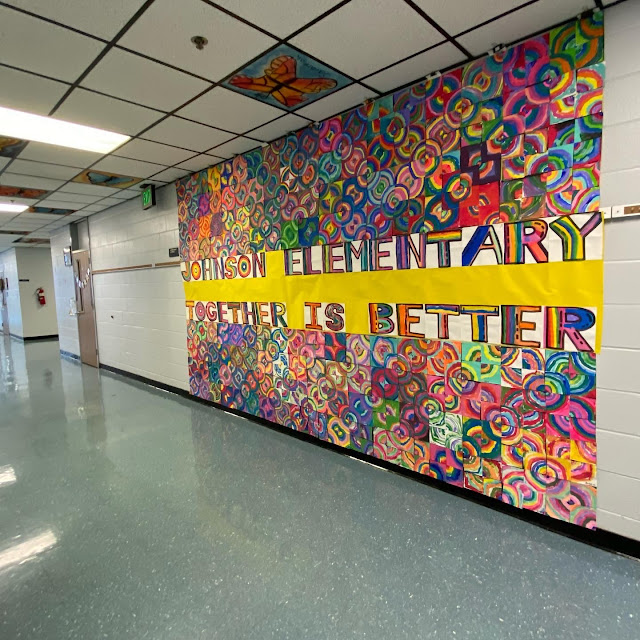
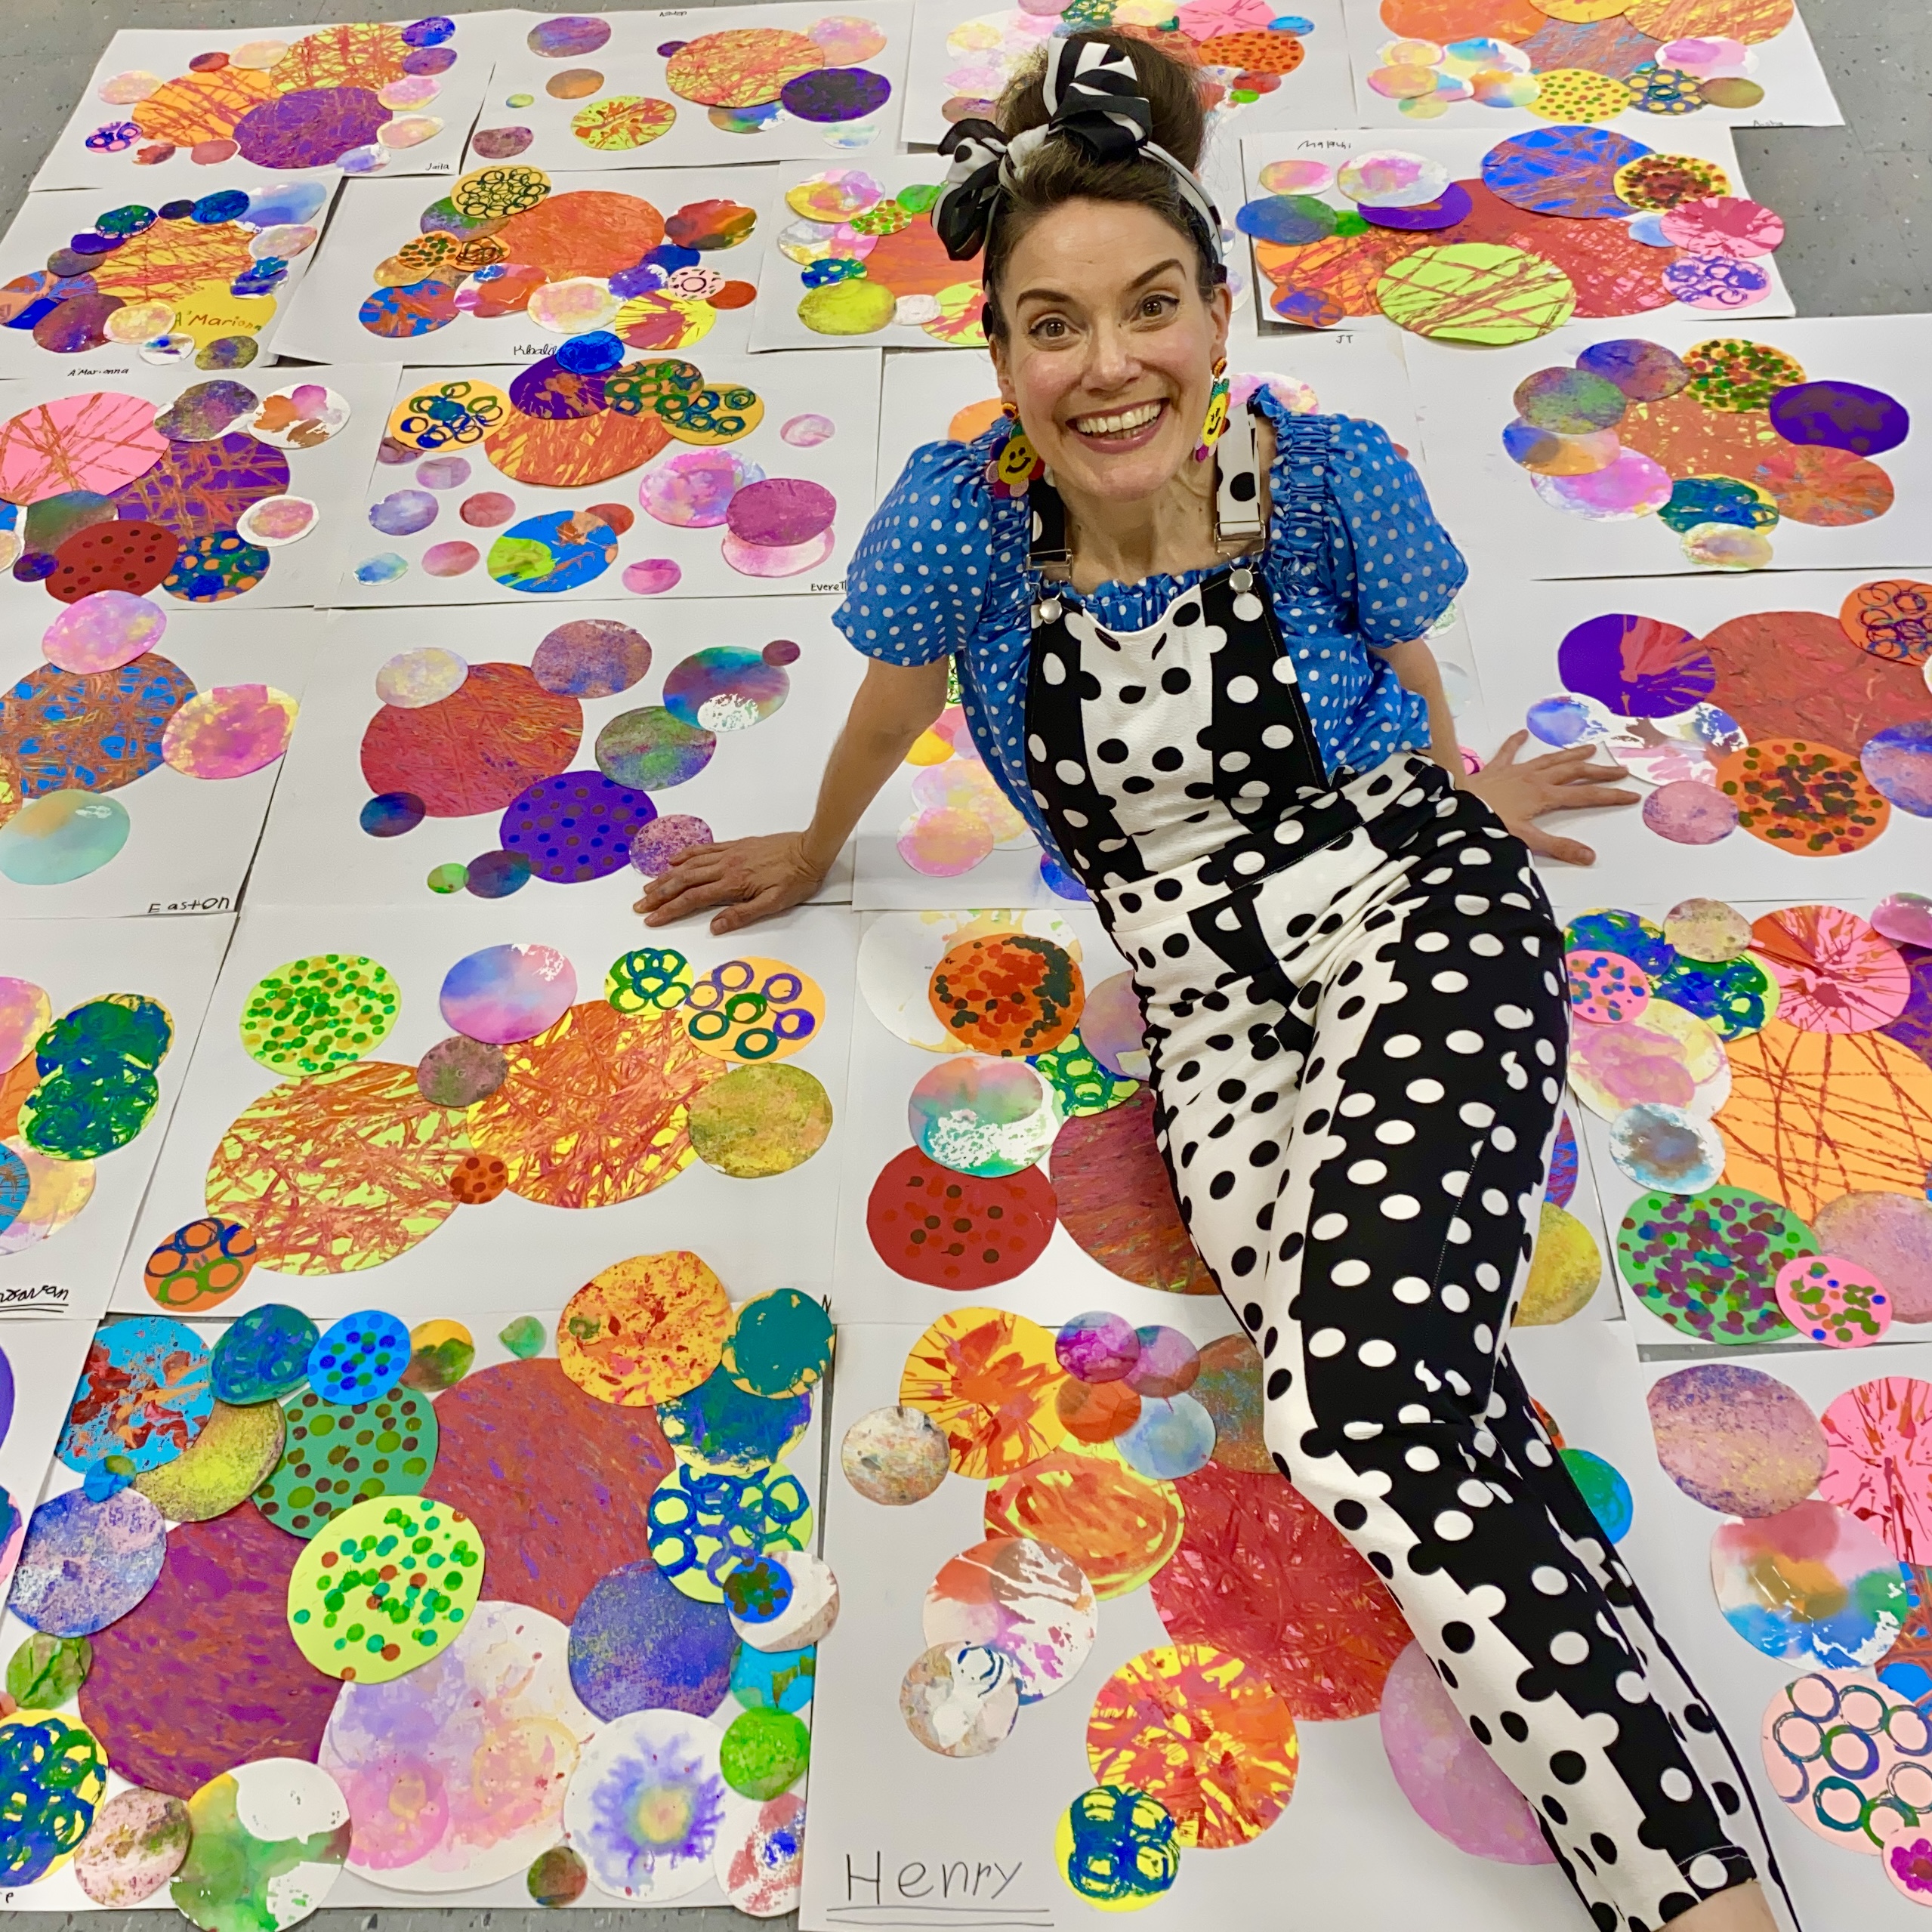
Hello, friends! I'm excited to share that the school-wide collaborative my first through fourth grade students created at THE BEGINNING of the school year (yikes!) is finally installed. Like, finally.
Y'all, while I do love having all students creating a collab at the start of the school year, why do I do it to myself? It's so much work on my end! All the attaching to bulletin board paper and hanging...it's so much! AND I always procrastinate! And yet I do it year after year. Such a glutton for punishment, I guess.
Here's a look inside the process of hanging this beast with some of my tips:
When hanging something this heavy, it takes everything in your tool belt (as well as a helpful music teacherin' friend). Check out my tip on binder clips and long tabs of paper. It helps!
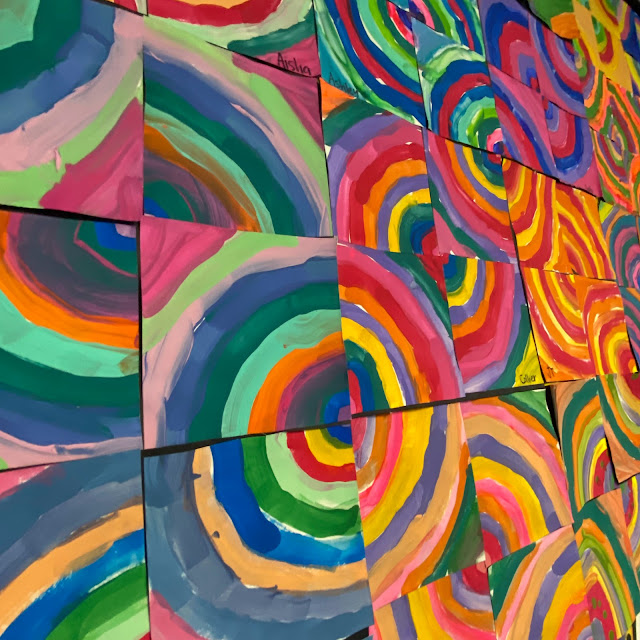
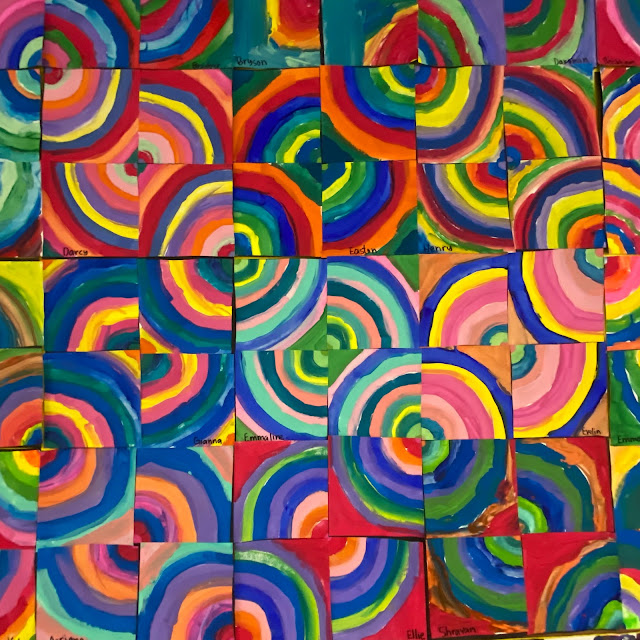
I've not done an official post on how we created these dot paintings but I'll tell you: it was super easy! In fact, it's one of my fave kindergarten lessons which you can find the details on here.
All students began with a dot in the middle of their paper. The paper was prefolded so that each dot was exactly in the middle. Meaning I quarter folded the paper, once in half one way and then in half the other. Dot was placed at the intersection of those two folded lines.
Like the kidnergarten lesson, each student was then instructed to paint concentric circles around their dot using any colors of tempera paint they liked!
Once dry, the paintings were cut along those folded lines. They were then rearranged and glued to a black piece of construction paper. This part was tricky so students helped one another.
Early finishers painted the wording of the sign!
And then the beast was hung...where it shall stay for a LONG, LONG time. Or the end of the school year where I'll have the students cut it apart to take home their circles (maybe. Or I may leave it up until next year!).
In my last blog post, I shared that my students were spending a couple of days rotating between four different art makin' stations. We spent two days doing that and ended up with a TON of dots! We are now assembling our dots in a large collage on 18"X24" inch paper. Here is the video I created to walk them through assembling their work:
Of course we had to take Vashti's advice and 'sign it' before calling it complete. I love how each one is so unique and amazing, just like the artists who created them.
When I asked the kids which dot-makin' center they liked the best, they couldn't decide, they really enjoyed them all. I plan to do rotations of art makin' like this in the future, it's so much fun!
Every year, Dot Day creeps up on me and I find myself scrambling for ideas. This year, I decided to create Dot Day Stations for my students to travel to in my 30 minute art class. I had four tables set up with four different activities of dot makin' mayhem and the kids LOVED IT! So much so that I decided to extend the activities to next week! We'll use our dots to create a collage (like what's seen in the image above). Added bonus: the kids are exploring 12 different art making techniques! Here is what we did on the first day:
The following day, students rotated between these stations:
And my older students did these activities:
I did this with my first through fourth grade students and, seriously, they had the best time. Here's a little short of us in action:
Not even gonna lie to you: no matter how "prepared" I am, I spend most of my plan time running around like a crazy person prepping supplies, setting up the room, getting videos cued up or visuals displayed. I call it the Art Teacherin' Hustle. And most of the time, my hustle is spent SEARCHING for stuff. From my luke warm coffee to my half eaten Lara bar to the Sharpie markers or the funky monkey scissors, the hustle is strong with this one, y'all. But NOT for grade level examples and visuals. Nope. I always know where that stuff is, thanks to today's Art Teacherin' 101 tip:
How's that for easy? I'm a firm believer in Keep It Simple, Stupid cuz I'm pretty heavy on the stupid. But, you gotta admit, keeping up with all of this art biz is tough! I'm currently digging myself out of all things Dot Day and putting them up on the walls...(or, in the case of the very first photo, putting them around necks. My students also made Dot Day shrink plastic necklaces!)
In case you missed these snaps over on my Instagram, here is just a sprinkling of all the projects (and project examples) that I attempt to keep up with using my lil system. By the way, you can find this lesson with video here.
I've always wanted to do this extension project with printing plates. More on this process later this week. I love when a project lends it self to more fun lessons!
By the way, my second graders framed out their texture relief pieces with some painted cardboard pizza rounds. I did notice that their texture pieces were looking a little lackluster. So I had them brush a thin coat of ModPodge over them and I'm super happy with how much they pop now.
And this third grade lesson can be found here! I swear one of these days I'm gonna get FUR REALZ organized...but until then, I'll keep offering y'all my super simple tips. Have a great week, kids!
Well, now that our Monochromatic Selifes are finished and we are impatiently waiting for that art teacher to hang them up (can I contract out for that? I'm buried under cute and colorful self-portraits!), it's time for us all to move on to our next masterpiece: Texture Relief Dots for Dot Day!
Each of my grade levels, kindergarten thru fourth grade, we are creating a dot-based work of art inspired by Peter H. Reynold's The Dot. We're doing all new Dot Day projects this year...if you like to check out all the Dot projects we've done over the years, check here.
This year, for second grade, I decided to give one of my most popular blog posts a reboot and focus on texture.
Filming my lessons over the weekend means I have a shorter weekend...but a much smoother week. I am loving this new method. I actually feel like the kids are learning so much more as I don't forget valuable vocabulary and information. I just hope I have the stamina to keep it up! I also enjoy sharing them with you. Please feel free to use in your art rooms.
For this project, we used the following: * 8" Cardboard Circles purchased from Amazon * 3M Spray Adhesive * $1 a can matte spray paint from Home Depot. Be sure and get the cheap stuff, it rubs off the best. * The finest of steel wool, 000 * Textured items like leaves, burlap, twine, lace, etc. * Aluminum foil. I found boxes of sheets of foil that worked really well because it was the perfect size. It is then and may tear so tell the kids to be careful.
Before the kids arrived, I sprayed each of their circles with the adhesive. This way, they were ready to start applying their textured items. When finished, they brought them to me. I sprayed again, added the foil and sent them to their seat to rub the foil and reveal the texture.
Once it was rubbed, the kids trimmed off the excess and folded it underneath. That took up all of our 30 minutes of art class.
I took all of the circles outside today and spray painted them black.
The kids watched the bit of video about burnishing. We definitely did have some small holes and tears happen. A thicker foil might have helped but it would have given us a less detailed texture design.
I mean...
How cool is that? After the burnishing was complete and our hands were washed, we chatted some more about texture and the difference between real and implied. This was such a fun and quick lesson that gave us beautiful results.
I really like how they look on their messy mats, we just might have to frame them out that way!
I'm interested to know what other textures y'all might recommend we use in the future. I'd love to add more to this fun project!
Okay, I know what you're thinking: Holy crap, Stephens, Dot Day ended, like, a month ago! Y'all. I know. But I never did tell ya the whys and hows and who's-its of these here Reversible Dot Paintings. So don't gimme none of that "holy crap" biznatch, ya hear?
Way back when I started dreaming up ideas for Dot Day, I knew I wanted to use some cardboard pizza rounds. I dunno why. You know how it is when you get an idea stuck in your head for no reasonable reason and you just can't get rid of it. Kinda like herpes. Well that was me with this cardboard pizza round thing. So I ordered a hundred of 'em from School Specialty and got the notion that we'd make some reversible abstract paintings out of 'em.
What gave me that thought was the movie Six Degrees of Separation (if you've heard me tell this tale before, sorry for the repeat. I'm a repeat-asaurus, it's what I do). I knew I wanted the kids to learn about Kandinsky because he's got a big fat showing at our local art museum. And then I recalled this movie clip and was all: YES! REVERSIBLE KANDINSKY PAINTINGS. I'M. A. GENIUS. That is until I found out that Kandinsky never actually did paint any reversible painting. Which could only lead me to one conclusion: The Prince of Bel Air is a LIAR (okay, so it was Donald Sutherland in the clip, whateves).
I still thought the idea was a good one and a fun way to start the school year so I went with it any ole way. Whatcha see above is one child's reversible painting. I love how different one side is from the other. Lemme tell you how we did it. It all started on the first day of school...
Yeah, I know. You've prolly seen this thing too. Told ya I'm a repeat-asaurus. Just ask my students.
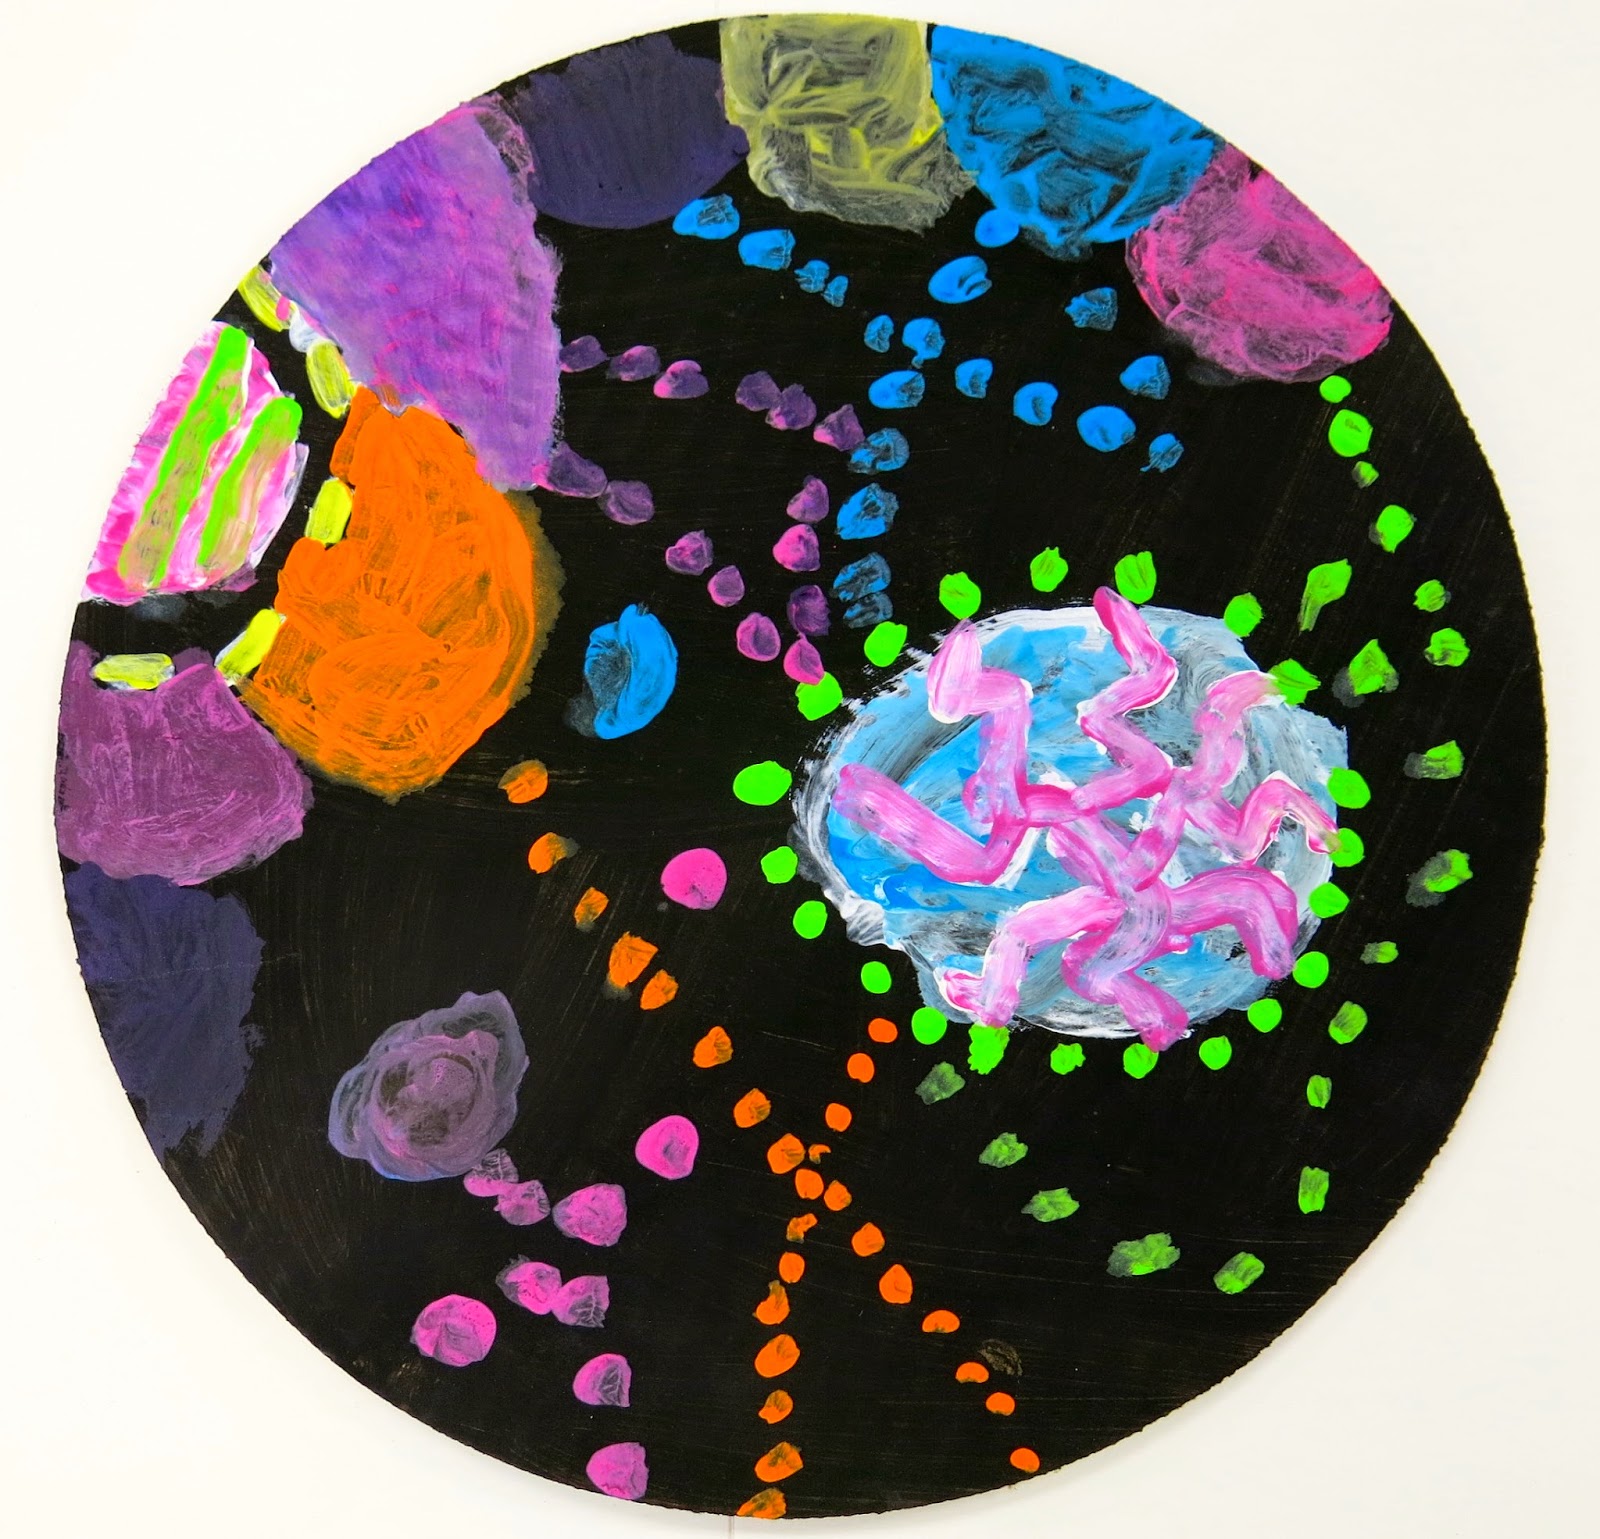
On our first days of art class, after our chats about Kandinsky and his painting to music, we tackled our own abstract paintings. We listened to music and musical instruments to inspire a variety of lines. Our first Word of the Week was "artist" which we all decided we most definitely are.
The following classes were spent painting and our word of the week was "unique". I really wanted to emphasize that our paintings are all going to be different, no one better than the other. We also talked about how color could evoke mood and that was the focus behind our color choices. This wasn't a color mixing lesson, per se (gah, I've always wanted to say "per se" on this blog. Today's my lucky day, I dare per se!). If the kids created new colors, HURRAY!, we celebrated that. But our focus was on using colors to show emotion.
And by the looks of things we were all pretty happy. By the way, the paint we were using was whatever-was-left-over-from-last-school-year. My art supply order hadn't arrived yet (because, um, I forgot to place it. Der.) so we may have been scraping the bottom of some bottles. I do have to tell you that upon YOUR recommendations, I ordered VersaTemp from Sax and, y'all. I LOVE IT. Best paint I've used with the kids yet. I can't wait for you to see their new paintings! But, um, back to this.
I think a kid's personality really shines in an abstract painting. This dude is very meticulous, organized and precise.
And this little girl is very free and comfortable with her sense of expression. She's already decided she's an artist now and when she grows up (gotta love that!).
I see a landscape painter every time I look at this painting.
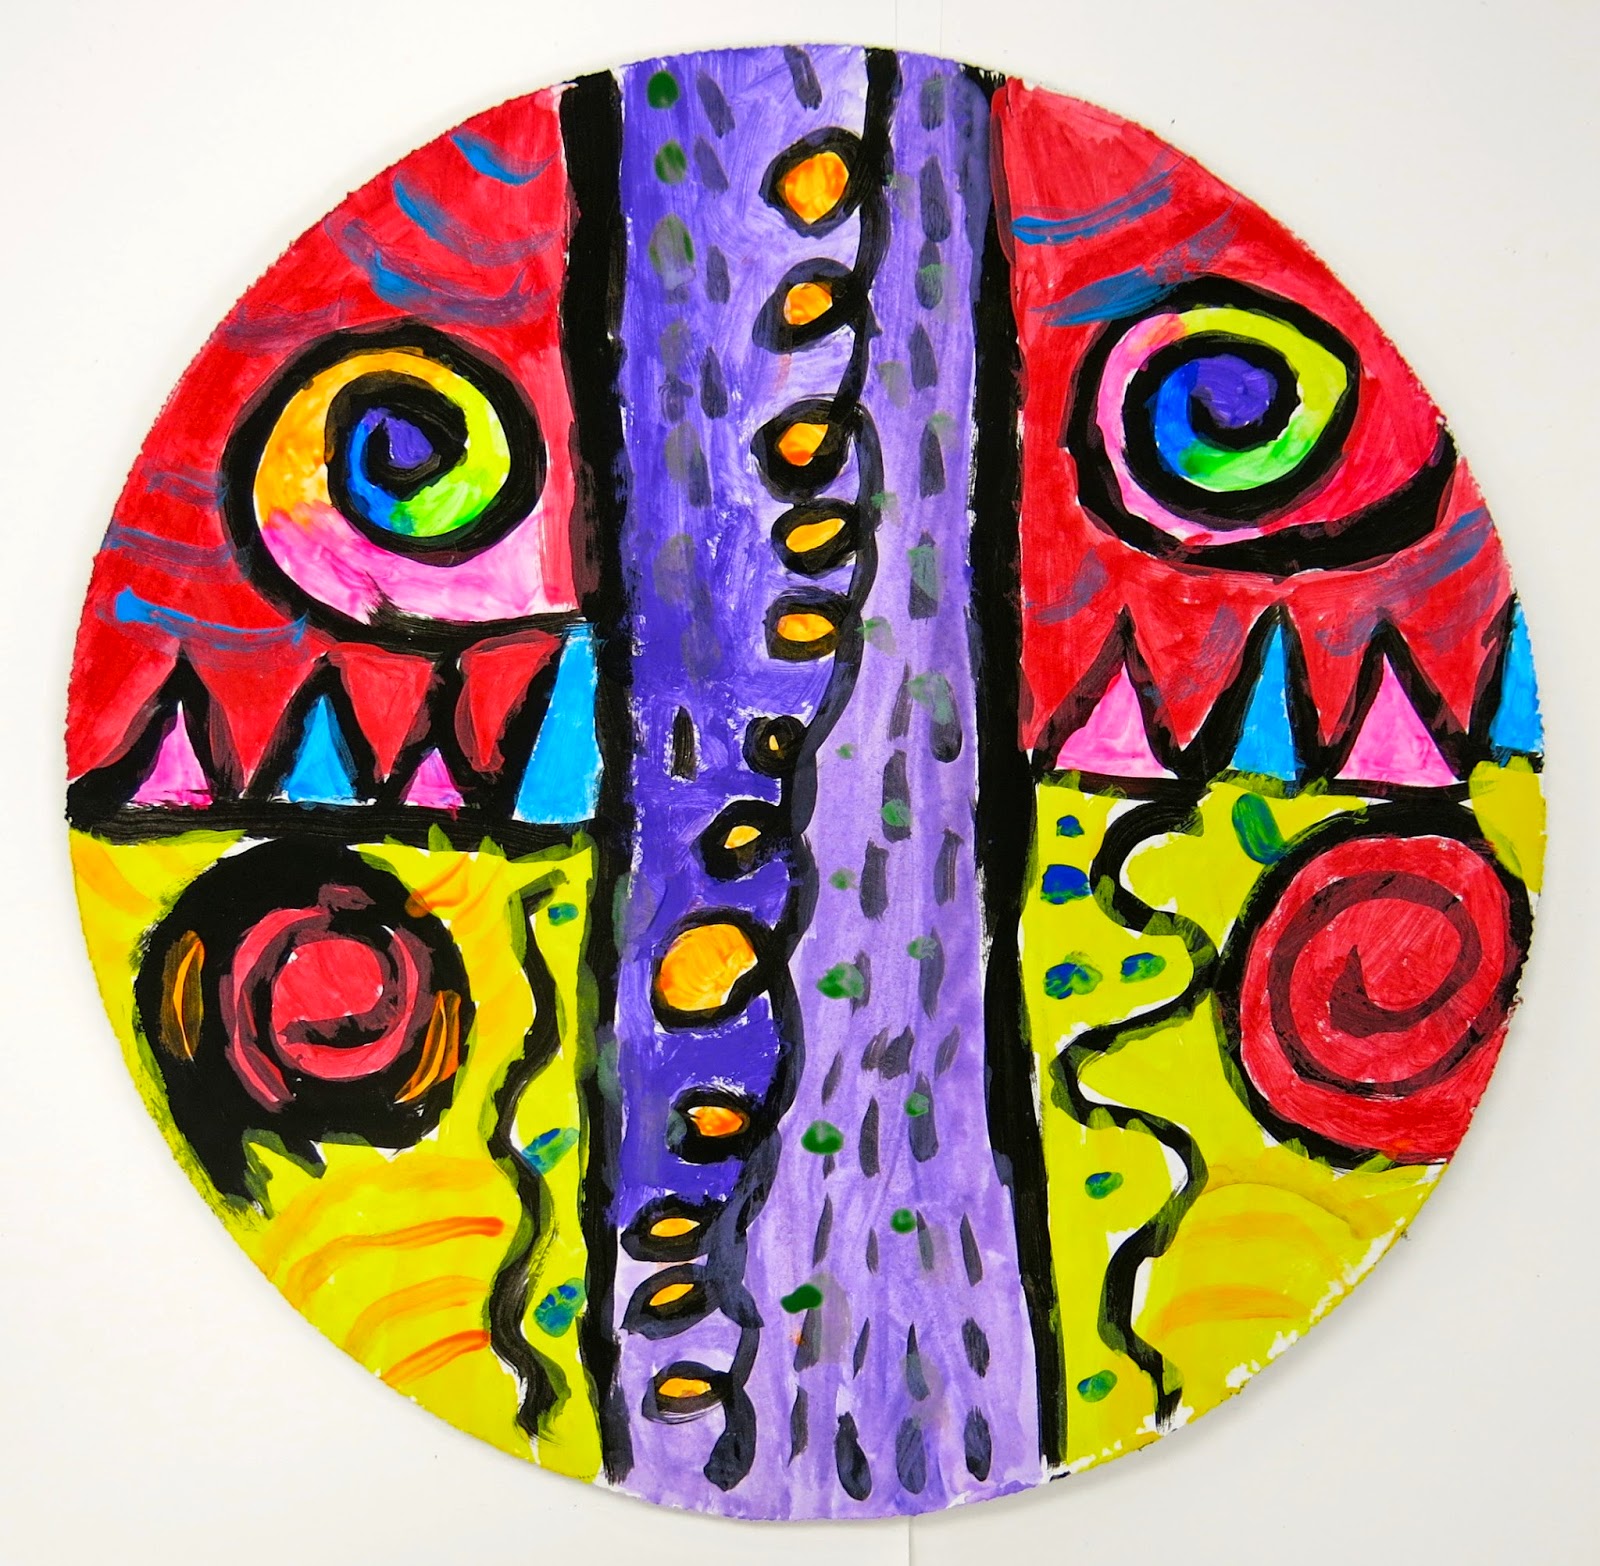
Because I thought the boards should be the opposite on the back, I did go ahead and paint them all black. Which really didn't take as long as it sounds...but I didn't want the kids to use one of their precious art classes painting something black. We looked at a couple of Kandinsky's circle paintings and I gave the kids a "creative challenge" ("creative" being our Word of the Week): Create a painting using only circles.
Because the surface was black, the kids did have to paint the circles white first and then add color. Which was great because then we could learn all about tints and value.
I see a budding Edvard Munch, don't you?
So clever, I love it!
The week of Dot Day, our word was "inspire". This was because our beautiful reversible paintings were to inspire the school just as Peter H. Reynolds had inspired our dot theme. To hang, I simply punched a super small hole in the top and bottom of each painting and paper clipped them together.
And the serve as this super colorful reminder of the unique and creative artists that made them. They're so happy, I think I'll leave 'em up for a while. By the way, I now have a thing for cardboard pizza rounds. I gotta know, what have y'all ever used 'em for? Until next time!


 In need of some Dot Day inspo? Then check out this lesson plan! It's one I have used with students as young as kindergarten for years!
 Need some more Dot Day inspo? I created a blog post of my 14 very favorite Dot Day lessons which pair perfectly with this here round paper! You can find them all here.


.jpg)


