Wednesday, June 4, 2014

In the Art Room: The Art Show, Part 2

 It's kinda funny to think that just a couple weeks ago, my school's hallways looked like this. Of course, now that school's out, the halls resemble some sort of institution (which, let's be honest, those last couple of weeks, we coulda all be institutionalized. The kids, the teachers, shoot even the class pets, were all a wee bit bonkers.) As I mentioned in my last art show post, all artwork that all students have created all year is hung for this show which is like hundreds of masterpieces. The World's Most Amazing Parental Volunteers hang everie-thang, can you believe that? I'm a lucky girl, this I know.

In my last art show post, I shared with ya'll the work of the wee ones in kindergarten through 2nd grade. I've yet to share with you the clay projects that were also displayed at the art show because I'm slowly putting together the how-to posts on those babies. When that's done, I'll wrap up this art show series. Oh! And if you wanna see some art shows of the past, you can see last year's show here and here.

And now, without further jibber-jabber, I present to you the masterpieces of 3rd and 4th grade with loads of linky-loos to lessons...
 For the art show, the parent volunteers hang the work outside the classroom. I don't give any directions on how to hang...just cross your fingers and use enough sticky tack to make it stay. I love how each volunteer hangs the work differently.
 In third grade, we started out the year learning about Norway and Vikings. My amazing student teacher Rebecca had just returned from a trip to Norway and this was a lesson created by her (and influenced by Painted Paper!). I wrote up a blog post all about Rebecca's adventures and this lesson here.
 My goal for this past school year was to create a mural with each grade level. I only partially achieved that goal (my younger kiddos did a collaborative mural to be shared in an upcoming post). My 3rd grade created a Magritte-inspired mural that proved to be the art project that just kept on giving. You can see examples of that in the work at the bottom of this photo.
 Here's one part of the Magritte project with tissue paper collaged landscape backgrounds.

This enormous beast of a mural hangs right outside of my art room. I think it's there to stay a while, I love seeing it when I walk out of my art room. The details of creating this mural are here.
 The paper we used to create the birds for the mural and our collage landscapes were so cool we decided to use them in yet another Magritte-y project. Final installment of Magritte series here.

 After all that Viking and Magritte-ness, I introduced the kids to the world of Asian art with a heavy dose of Ming vases and cherry blossom trees.
 This was a super fun lesson that incorporated so many thing. A review of watercolor techniques, symmetrical vase design, drawing a narrative, shading/shadow making and new ink painting methods. Full lesson here.

 
Both 3rd and 4th grade were introduced to Chinese calligraphy. We learned to grind out own ink and paint with sumi-e bamboo brushes. This was a big hit and we seriously painted tons of these characters. After a couple of classes doing that, the kids picked their fave to mount, label and frame.
 My 4th grade this year was like a dream group. We had such a good thing going, as they loved being in art as much as I did having them. Which was a bit of a problem as I was therefore always late sending them back to class. Seeing them go at the end of this school year was very hard for me, sniff. I'll miss them so much!
They kicked off the start of this school year creating this huge mural for a canned food drive. Full details here.
 I think this Viking project was one of my favorite lessons this year. I simply love all the watercolor techniques that the kids incorporated into their work. I will definitely be doing a redo of this here lesson in the future (I have a bad habit of doing a lesson only once as I get a little bored with repeats).
 Again, another lesson with many layers of stuff taught. It's like an onion, this project. Without the onion breath.
 These guys also did some Chinese calligraphy. However, theirs included a hanger with Sculptey beads on the end of a wooden dowel and a red stamp.
 Like with the wee ones, I also have these kids write an artist biography. These are slightly different though in that they are to also have friends add comments about them. I'll share more details about those bios in an upcoming post (I keep saying that, I hope I can keep up with all this "up-coming" posting!).
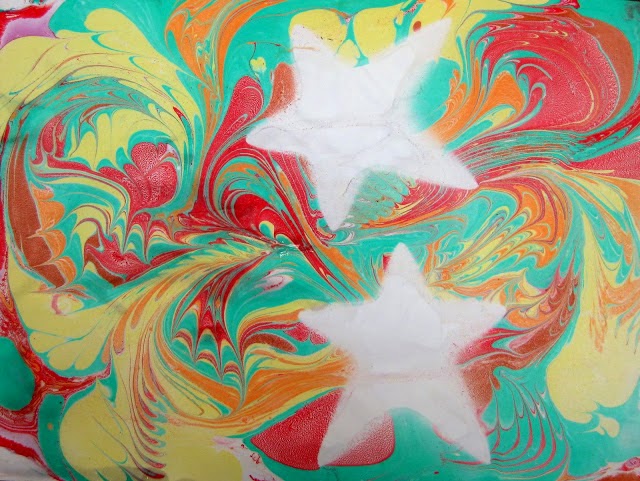
 When learning about Asia, we did some Suminigashi which is Japanese paper marbling. Details here.
 When I ran outta paper marbling supplies mid-way through the lesson (don't you hate that?! Argh!) I did a quick switch to chalk marbling...which I kinda liked even better!
 With those stars we used in the chalk stenciling, we created some fun narrative collages.
 Near the end of the school year, we put our sumi-e painting techniques to good use with these paintings. Students could create either bamboo, cherry blossom or pine trees after practicing on newsprint.
 I've not written up a lesson on this project yet...it's on my summertime to-do.
 A favorite was adding the tissue paper leaves or flowers. They just couldn't stop adding these, loved 'em so!
 Of course, in my absence at NAEA, the kids drew these adorable Chinese pandas. When I returned, they put their watercolor painting skills to work on the background. Lesson here.
 The day before the art show, in 30 minutes, the kids created these sweet things. On the night of the art show, we also host an ice cream social. The kids painted these for the occasion and I managed to get them up the day of the show! This was seriously the easiest 30 minute lesson ever. I'll be sharing the details in an upcoming post,

And there you have it, ya'll! The 2014 Art Show! Stay tuned for the final installment of the show which will include kid clay projects. Until then!


Tuesday, June 3, 2014

What the Art Teacher Wore #101 and Some Happenins

Memorial Day Monday: My first official day of summer. I'm so glad it's here...although every time I look at my calendar, I wonder "where is all my free time?!" it seems I've done a fine job of overbooking myself, sigh. dress: Anthropologie, last year; belt: made by me; anchor sandals: Sperry
Well, howdy, strangers! I wasn't really intending on taking that mini-hiatus but it seems that I've been consumed by summer vacay. Ya see, the hubs and I are currently in California (him: work; me: what's work?), taking to some local hiking trails by day and doin' time at Disneyland by night. I'm so glad we were able to make it since last Monday, when I busted my ankle and thought it broken, I assumed I was gonna be couch-bound with a cast and (fingers crossed) good meds. Thankfully, no broken ankle (as mentioned here, it turned out to be a bruised bone). When I told the doc I felt kinda foolish even bothering him with something so silly he said, "The other day a guy came in because he saw white dots on his tongue. I told him, 'those are called tastebuds. Go home, eat something and use those white dots.'" So, I supposed I coulda been Taste Bud Man.

In other non-swollen-ankle/Ima-on-vacation news, I've got some exciting things planned this summer that I thought I'd share with you! Things that are sure to keep me busy and off the streets which is a good thing says my parole officer. 

So now I wanna know what are you up to this summer?! Fun vacays planned? Super awesome classes you are taking? Crafty projects you are dying to dig your hands into? Dude! I wanna know! Until next time, have fun, whatever you are up to.
I'm excited to announce that I'll be presenting once again at an AOE conference! I had so much fun attending the last conference and I learned so stinkin' much. Not to mention I loved the live chatting, my typing fingers could seriously not keep up! This conference I'll be talking about a topic that it seems you are either for or against: Having a Tech Free Art Room. I'm looking forward to sharing my thoughts on this topic and having an open convo during the live chat. So, who's attending with me?
Bruised Bone Tuesday: Yeah, I'm still whining about it. But it was so silly how it happened that I'm just confounded. I was walking through our disturbingly disastrous garage when my ankle bumped into the wheel of a suitcase. But what it really felt like was my suitcase shoved a red hot dagger into my ankle bone. Instantly that ankle swelled to the size of tennis ball while a slew of unfortunate words came outta my mouth. I had to wear these lovely flippy-floppies for the next coupla days. dress: vintage
Have ya'll heard of The Skillery? It's this groovy Nashville-based community that offers space for creative folks to either work independently or come together and learn from each other. And this gal is teaching a needle felting class there!
If you've been around this blog for a hot minute, you know I love me some needle felting. One of my fave projects was this portrait I created of my cat Asha! You can go here for all the gory kitty cat details. 
Finally Healed-Up Friday: Just in time to grab a crepe breakfast with one buddy and an ice cream lunch date with another. Because meeting -n- eating is what summertime is all about, says me. dress: vintage, Buffalo Exchange; necklace: Pangea, Nashville; shoes: BC Shoes 
Aside from art education blogs, my fave blogs to read are those written by my fellow sewing sistahs. And Erin of Seamstress Erin is one of my go-to reads. I love Erin's blog because she's not your average sewer. This girl is like a super-genius with a great wit! So when she contacted me, along with some AMAZINGLY talented sewers (don't even ask how I got into this group!) saying that she had some acquired some turbans from the movie Rambo III and would I like to partake in a sew-along? I was all "yes, puhlease!" You can read her blog post all about it here.
I've already started working on the dress (oops, spoiler alert!)...here's to hoping Rambo approves! You can see what one sewer did with her fab turban fabric here.
Flying to LA Saturday: It's a four hour plus flight, ya'll. My goal is to always be comfy and to have plenty of layers. Those flights can get ice cold and this one was no exception. Glad I brought a scarf with me! dress: thrifted, Target; belt and cardigan: Anthropologie; necklace: Forever 21; sandals: Target
Aside from the conference, the class and that sew-along, I do hope to squeeze in some Back to School Sewing this month! I've been buying up these fun art teacher fabrics when I see them. Now! I need some one-on-one time with my sewing machine to get to work!
So many pretty pattern choices to choose from, ah! You don't even know how much time I waste staring at patterns and dreaming up dresses. Hours, people. Hours.
A Boulder-tastic Hike at Black Star Canyon: Dude, we climbed over giant boulders with notion that there'd be this amazing waterfall at the end. Of our 13 mile hike. Yeah, it was dried up. Oh well, lil exercise never killed anyone although it came real close since hubs was the one that picked this particular trail. Humph.


Thursday, May 29, 2014

DIY: Stenciled Embroidery

 I don't know if you know this about me, but I'm a songwriter. It's true. Do you really think Emimen came up with all those lyrics on his own? I'm the real Real Slim Shady, ermkay. Don't believe me? Well then, lemme share with you a song I've been workin' on. It's a little tune I like to call The Thus Far Days of Summer Vacay: 

On the first day of vacay,
My summer gave to me
A busted ankle swollen to the size of a panda babe-ee.

On the second of vacay,
My summer gave to me
Flashbacks of last summer when I dropped a food processing blade on the same foot
and a busted ankle swollen to the size of a cat babe-ee 
(which I know is called a kitten but that didn't rhyme so bear with me)

On the third day of vacay
My summer gave to me
A visit to the doctor who said I bruised my ankle bone (what?!)
Flashbacks of last summer when I dropped a food processing blade on the same foot
and a busted ankle swollen to the size of, well, nothing. It healed. End of song.
I do hope your summer is off to a better bruised-boneless start, ya'll!

The hubs and I, when not busting ankles, have found ourselves on the road aplenty thus far. And, as I've chatted about before, one of my fave travel crafts is embroidery (you can read all sorts of fascinating embroideryness here, here and here, kids). Howevers, at the time of said hittin'-the-road-ness, I had nothing in the works. So, on a whim, I grabbed this thrifted stenciled piece with the idea that I'd improve upon it's half-a##'ed stencil-ness as seen above.
 Whatcha see here is a half embroidered piece. On the left side is the original state and on the right is the embroidered upon. Not to sound like a bragosaurus but, despite what the photo shows, the embroidery is a big improvement to the formerly just-stenciled state of the fabric.
See? I told ya's.

Which got me thinking. When I gave my students an End of the School Year survey (an In the Art Room post to come, ya'll), many of them wrote that they wanted to learn more weaving, sewing and "handcrafts", as one put it. I was thrilled to hear that since I loves me some fiber arts (and totally enjoyed teaching it this year!). However, teaching embroidery takes 4.Eve.Rrr...R. And sometimes the results are small due to the size of the stitching and the limited amount of patience (on behalf of both artist and art teacher). 

So, after working on this piece, I had the thought, "Why not have them stencil a design then embroider?" Actually, that's not what I thought at all. What I really thought was, "Why am I thinking about school, IT'S SUMMER!" And then I reminded myself that this is a blog where I pretend that I eat, drink and breathe art education and I needed to shut up before those five folks that read this catch on. 

Oops. Too late.
Ahem. What was I saying? It appears that I fell asleep and that some evil Summer-Loving Art Teacher Maniac took over for a moment. My apologies. 

For this here activity, you're gonna need to gather up the following:
  • Stencils. I had these pre-mades from JoAnn's in my stash
  • Fabric Paint. Left overs from this dress
  • Fabric. I just used random bits from my scrap bin.
  • Embroidery hoops.
  • Stencil sponges. In a pinch, I used my makeup wedges as that's all I had on hand.
  • Embroidery floss.
  • Embroidery needle.

 Because just stenciling one color would be a snooze-fest, I decided to do a little color blend. I think the kids could handle that. Well. Maybe.
 The trick is watching where you stamp so you don't flip that wedge. Because a flipped wedgie just sounds terrible.
 Here's something interesting I noticed: the thicker the plastic stencil, the more underneath bleeding of the paint. The super thin stencils actually worked much better and produced a much more crisp image. Hmm. Not what I was expecting.
 Have you ever embroidered before? I'm gonna assume you've not. So lemme introduce to you The Running Stitch:

1.  Embroidery floss comes in strands of 6 pieces of floss (or thread). Cut your desired length (I usually go from hand to shoulder and clip) and separate 2 strands of floss from the 6. Do this slowly as the floss loves to tangle.

2. Ideally, you should run those two combined strands of embroidery floss over a lump of wax. Bee's wax is preferred. This will prevent the floss from tangling. And tangling sux.

3. Thread your needle with those bee's wax-y stands of floss and double knot one end. Frame your piece in an embroidery hoop. Starting from the back, poke your needle up at your starting point.

 4.  Go about a quart inch and dive your needle down. I'm using mine to outline the edge of the flower. You do whatever you want. Make veins for your leaves, fill in a shape, whatevers. Just be certain to pull that needle down until the knot on the back stops it.
 5.  Now for the next stitch, jump ahead a quarter inch and pop up pulling completely.
 6. And go backward to fill in that gap.
 7.  For your third stitch, pop up from the end of your last stitch. The reason you didn't do this previously is because you would be taking a stitch out. You see, you can never have your needle come out of a hole it just went into, it will take the stitch out. However, it works here because your previous stitch had gone backward. Say what? I don't know, I'm just as confused as you are. Let's keep stitching.
 8.  When you get to the point where your thread is as long as half the length of your hand, it's time to tie off and reload your needle. To tie off, flip your embroidery to the back. Slide your needle under a nearby stitch.
 9.  Pull slightly until there is only a loop of embroidery floss left. Then reverse that needle and go through that loop. Do this twice. That will create a secure knot.

Confused? Me too. Youtube it, kids.
 And there you go! You are on your way to a stenciled embroidery! I'm really excited to play around with this idea of combining these two techniques into one project for the kids. 

What are your thoughts? Got any awesome ideas you'd like to share? Please enlighten this bruised-bone barbarian, would ya?! 


Wednesday, May 28, 2014

In the Art Room: Ceramic Painted Elephants of India

My kids busted out the most adorable clay pieces this year, not gonna lie. This project, created by my fourth graders and inspired by the painted elephants of India, was a fave of mine.
Each year in my art room, I like to focus on a particular country and/or continent and introduce the kids to the sights (lots of groovy cast-off souvenirs from the thrift store), sounds (a wee introduction to the languages) and tastes (this year that involved making candy sushi) of that place. The previous school year, we "traveled" to Europe with an emphasis on Paris. At the end of that particular school year, I had a third grade student ask, "Can we please travel to India next year?!"
Photos from National Geographic taken during an annual Elephant Festival in Jaipur, India. Elephants have long been revered in India which has helped them survive in greater numbers than any other country in Asia. That being said, there are roughly 3000 elephants currently held in captivity as apart of illegal animal trafficking. It sucks how, as humans, if we can capture and keep something, no matter how big or how much respect we claim to have for it, we will. Thankfully, the elephants shown in these photos live in a large open area created just for them.

I agreed to the little dude's request, "Sure! Let's learn about India!" and then, weeks later, turned my art room into this...aka NOT India. At our registration night preceding the first day of school, after viewing my art room, said student marched up to me, totally ticked. 

"You said we were gonna learn about India!"

Me (realizing my Big Fat Hair Mistake and thinking fast): "Oh! We are! We're learning about Asia this year."

"Asia IS NOT India."

Me (noting that it was a good think we'd be studying geography): "Well, India is in Asia. So we'll cover it, I promise." 

Little Dude, crossing arms: "We better!"

And, Every. Single. Time. I saw that kid, I swear to you, he asked me, "When are we gonna learn about India?"
Photographing these elephants proved to be tough as it was hard to showcase all of the details some kids put into their work. Like this bowing elephant who is carrying a colorful box with a baby elephant, covered by an umbrella, inside. Both balancing peanuts, by the way. I guess they are those gag-tastic orange Circle Peanuts, hence the color choice.
So then I got an idea. Usually when I introduce the kids to a country that I've not been to, I do a whole lotta homework. But here I had a kid that was not only Indian-American but had also been to India several times! So I asked him to put together a list of the Top 10 Most Important Facts We Should Know about India. Days later, he returned with a list of 20 things as well as a large bag full of beautiful saris and other clothing. 
I've gotten into this habit that if the kids have extra time, they can make whatever they like outta clay. But they have to remember to follow the clay rules: No clay should be thicker than an Oreo cookie; Slip and score everything; If your clay project is wiggly like a loose tooth, it won't make it to the kiln. It'll go to the Clay Fairy. This class was so interested in making elephants that many of them created babies to match. I love the sweet gaze on this mama elephant's face.
With my student ready to present, I had to come up with a coordinating lesson. I didn't want my student to simply present to his classmates and then not have a project tie-in. It was then that I remembered this awesome Painted Elephant lesson created by an art teacher buddy of mine (hey, Debbie!) featured in Arts and Activities a couple years ago. 
This is the elephant created by the student who inspired the lesson!

So just how did this presentation go down in 30 minute art classes when clay elephant makin' was involved? Well, I had the kids gather around our demo table (which is just a rando table in the room. It's crowded but I've found that the Elmo doesn't led itself to demos as it has a hard time focusing on constant movement. Yay, technology.) I told my little presenter that he had 5 minutes at the beginning of each art class to read and explain a bit from his list. When finished, I would jump in and explain the first phase of the project.

Ya'll. This kid was amazing. His passion for his country and culture was so inspiring and touching. The kids were thrilled to learn more about their classmate and asked so many awesome questions. I hated to stop him but told the kids that we'd be learning more in the next coupla weeks. Then we did this:


(In case you didn't know, my classes are 30 minutes in length. Here's what we did the first day:)

1. Divide your clay into two equal spheres (I stopped saying "BALLS" a loooong time ago, ahem) and make two pinch pots of relatively equal size. In an upcoming post, I'll share with you how I teach pinch pot making. Until then, stick your thumb in the sphere, take it out and pinch the sides evenly. 
2. Crumple up a page from one of those countless art supply catalogs you are hoarding and stuff inside one pot.
3. Argh! It's a Monster with Poor Dental Hygiene! Use an old toothbrush and a cup of water to slip and score the rim of both pinch pots. Place one pot atop the other.
4. And close by smearing the clay. If there are gaps, seal those with a clay Band-Aid or a smashed piece of clay that can seal those gaps.
5. Roll that pot back and fourth until it is smooth. Yeah, I know there's paper inside. It's there to stay. Now, wrap a damp paper towel around that bad boy, pop it into a ZipLock bag with your name on it and I'll smell ya later.

6. The next art class, after my student's chat, we were back at it. I gave a super rough example as to how I would make an elephant. However, I emphasized that it was how I would do it...you're a different and much more creative artist than me. I know you'll think of something way better. Smash a sphere of clay into a cookie size for the face. Cut another smashed sphere of clay in half for the ears.
Poor elephant staring at his disembodied legs. Explains the surprised expression.

7. With rulers on the tables, the kids were requested to make four legs as thick as a hot dog and 2" in length. Heads were attached to bodies but we held off on the legs. At the end of Round 2, we put what you see above in the bags. By the way, a whole lotta kids didn't get that far. No worries. The kids know art class is super short and are used to our little sing-song: "Art class is Oooh-ver, But I'm not finished yet!, That is Oooh-kay, We'll finish next time!" 
8. The following class, the kids were ready to add all the fun details to their elephants. I printed off those pics from the National Geographic website and placed them on tables. This really inspired the kids. One thing I pointed out was how many of the elephants were draped in fabric. We looked at the lovely fabrics of the outfits my student brought in. I had tons of textured fabrics on the tables (from doilies to burlap and placements) and showed this kids how to pound the clay onto the texture. this texture could then be used for the fabric on the elephants back. Notice that the clay is super thin. This is because it will be attached to another piece. If it were a thick piece attached to another thick piece, it would explode in the kiln.
9. On our fourth and final day, the kids were allowed to use whatever amount of clay they needed to finish. They added baskets, jewelry, babies, umbrellas, you name it. Once the legs were attached to the bottom, I jabbed a bunch of holes to prevent that sphere from exploding (because an enclosed piece of clay will blow up). Again, we left the newspaper inside. It didn't harm the kiln or the firing. 
I let these guys dry a long time. Like a week and a half. My room was pretty warm and dry due to the constant running of the kiln. But I wasn't taking any chances with these guys exploding.
When this student's umbrella proved to be too top heavy and fell off, we improvised with this drink brolly. She said the holes in the ears of her elephant were going to hold her earrings. Genius.

Once these guys were out of the kiln, the kids were given two art classes to glaze them (although some took a class longer). I give the kids two brush sizes: medium and The World's Smallest Paint Brush. I encourage them to use that wee one for the tiny details and I think they did a good job of that. Also, I am in love with Mayco's Stroke and Coat glazes. I give the kids a wide variety of colors and they love them. Two coats gives a great shine and the color is very vibrant.
Some students opted not to have their elephants so brightly colored. Just a bit of blue eyeshadow to accent my eyes, thank you very much.
And other kids took it to the extreme. I love that bright yellow with the orange earrings!
This girl may have worked on her elephant forever. But look at it! It's amazing! From the basket to the detail of the baby, such awesomeness.
On our last day of All-Things-India, our kid-presenter told us a bit about the clothing he brought. He explained that some of the clothing would be worn at an Indian wedding and that those were big parties that lasted for days.

Me: Oh! I wanna come! Will you invite your favorite art teacher to your wedding party, please?!

Kid-Presenter: Haha! No! You won't be around any more. You'll be old! And probably dead.

Wow. Comments like that make me happy it's summer. Time to live it up before the Grim Reaper arrives!

Until next time, go make yo'self a painted elephant, they're super fun, ya'll!