Sunday, November 6, 2016

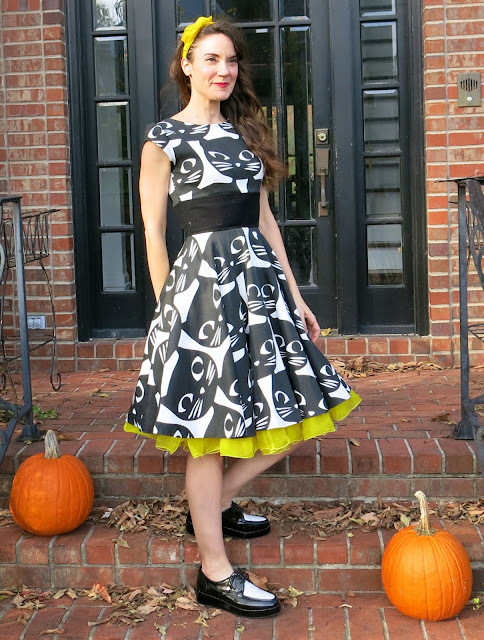
DIY: IKEA Curtain Cat Print Dress

Yeah, yeah so pumpkins and black cats are so, like, a week ago (I've already busted out the Christmas decor, you don't have to tell me!) but, to my credit, I did finish this black cat dress a coupla weeks ago. It's just taken me until now to share it with y'all here!
I scooped up the fabric for this dress from IKEA and I'm in love. It's actually curtain fabric which means I'm like the Scarlett O'Hara of the sewing world. They did have this same print in orange with smaller cats but I really liked theses big bold babies and the black and white motif. So I picked up the last package of curtains and, when I was heading to the checkout (which took me 35 minutes because, you know, IKEA is about three miles long), I noticed that there was a hole in the curtains. The hole wasn't going to affect my sewing but, if it's anything I've learned from my mama-in-law, it never hurts to ask for a discount. And am I ever glad I did as the $25 price was dropped to $5! I only used one curtain panel for the dress which means, if you are super groovy at simple math like me, this dress only cost me $2.50. Sweet!
I warned y'all last time that I'd learned to create gifs. And I already apologized for it. So suck it up, buttercup. 
Now if you've seen one dress from me, you've pretty much seen them all as I FREAKIN' LOVE this style: large band at the waist, fit and flair. I have found this to be the most flattering for my body type and I have a hard time straying from sewing anything else. 
I often do a lotta gathered skirts but lately I'm kind of tired of them. Of course, gathering a fabric as stiff as curtain fabric wasn't gonna work in this sitch. Also, with a gathered skirt, I just can't get the fullness I dig. So circle skirts have become my new fave. In fact, the last dress I made, this Vincent van Gogh number, is almost identical to this one, sans bow. 
So, lately, life has been rather busy, to say the least. I've been so stinkin' fortunate to be asked to travel to the Wisconsin art conference as well as the one in Illinois (details on that this week, it was A BLAST!) to be their keynote speaker and present fiber arts workshops. I've loved every minute of it. And I'm getting ready to head to Texas for theirs in a matter of days. However, that means I've had to take a wee hiatus from sewing. I've missed it! I'm looking forward to getting back into my sewing room and making more messes soon.
OHHHH, yeah. I forgot to tell ya, those cats were a bit of a pain to work with as their faces are not exactly symmetrical. That means trying to match and align them was a total headache. The bodice I'm wearing is actually the second one I created as the first had cock-eyed cats...which is totally going to be the name of my first band: CASSIE AND THE COCK-EYED CATS!...but not a great look for a dress. 
When el hubbo and I recently traveled to Disneyland, I snapped photos in Cars Land. I flippin' love Cars Land and if only for the ambience. It has a whole Route 66/1950's vibe that I totally adore, especially at night. 
They have these fabulous neon lights that I love. Cars Land was my inspiration for the 1950's Diner Art Show we had last year!
 I mean, how cute are these signs?! Total inspo for this project
 One of my favorite shows growing up was Alice. I loved Flo and her "kiss my grits!" attitude. 
The food at the diner is very good and they have a great vegetarian Shepard's Pie option that we love. Must better than your usual lukewarm pizza park food. 
Because of how graphic this dress is, it gets a lotta comments when I wear it. I scooped up a lot of big and bold print from IKEA on my last trip. I'm looking forward to time in my sewing room to create more of these wacky and wild dresses.
And just because it's catty doesn't mean it's limited to Halloween, does it? I mean, shoot, I'm catty all year 'round!
 I really love it with these ska-wannabe kicks I recently picked up. 
It's super fun to wear. I just need to get better at that whole twirling thing...
Obviously. Pretty sure the neighbors know I'm crazy! 
 photo signature_zpsd10b3273.png

Wednesday, November 2, 2016

In the Art Room: Romero Britto Inspired Self Portraits

If you follow me here, then you already know that all my kids are currently creating self-portraits for our upcoming winter art show with Artome. I shared what my third graders are up to here (Y'ALL. THEY ARE TURNING OUT SO AMAZING). My second graders are making a variation of this Super Hero Selfie project that I did with my fourth grade last year...I'll be certain to share those with you soon. My firsties are becoming royal with these Royal Self Portraits while kindergarten is doing a variation of Ain't Gonna Paint No More selfies. Because the Artome frames fit 9" X 12" artwork and I usually have my kids work twice that size, I've had to really rethink and adjust some of these projects. I'll be sure to share them with you in the near future. To get the ball rolling, I thought I'd share with you this videoed Romero Britto lesson and the fourth graders' results. 
In case you don't know, Romero Britto is a Brazilian neo-pop artist who lives in Miami. I have shared his colorful work with my students when we did this project:
My fourth grade kids are so great at creating colorful designs and patterns that I thought this project would be perfect for them. 
 But I had to give 'em a little inspo first...
Before diving in to the video:
Here's what we cranked out the first day!
They did a bang up job and were pretty stinkin' proud. I teach doubled up fourth grade classes (meaning there are about 35 kids in the room). After doing the first portion of the video independently at our seats, we returned to the floor with clipboards, our papers and pencils to do a guided drawing together. I really liked having them watch the video as there were less interruptions. I did pause it every now and then to reexplain or allow the kids to catch up.

Once we were finished drawing on the floor together, the kids had mirrors at their seats. I told them that the guided drawing was a kind of template for them that they should alter and change once at their seats. I encouraged them to really study their faces, freckles, glasses and details and add them to their selfies. Once completed in pencil, they traced over their lines in Sharpie.
I really thought the kids would get further along than this...but they were so into drawing their likeness that I didn't want to rush them ahead. Next up, I'll provide them with some pattern idea sheets for them to draw their designs before adding color. 
I really can't wait to see how these turn out!
I have noticed that teaching self portrait drawing to older kids is pretty tough. Not cuz they can't handle it but because they are so hard on themselves! So I really REALLY discourage any erasing until they are back at their seats. I tell them that it is "just practice" and that they are learning something new...and to go easy on themselves. Only when they return to their seats are they allowed to change and erase...but I don't allow them to get another piece of paper. When I had a students say, "I don't like mine," I asked, "what do you not like?" When she replied with an "everything!" I told her to pick one thing she liked the least and we worked on that. Then we picked the next thing and we worked on that. Within five minutes, she was much happier with her drawing. It's a process with this age group. You gotta do what works without letting them throw in the towel. 
Next up, we'll add patterns of things that interest us (I used paint splatters and music notes in mine to give them some ideas) as well as color. 
I'll be sure to share our progress! Until then, feel free to use this video and lesson in your art teacherin' world. I'd love to see what your kids create! Shoot me an email if you do. 
 photo signature_zpsd10b3273.png

Art Teacherin' 101: Episode 23 KINDERGARTENLAND

Ah, yes. Kindergarten. If it's one group of people that have my complete respect, it's the kindergarten teacherin' crowd. K-town comes to us all over the place: some have been in school, others have not; some know how to follow directions, others would rather roll around the floor (I mean, who wouldn't). You get the idea, it's a Big Ole Mixed Bag o' Fun. Ish. Ness. So I thought we could talk about that herd of cats we call Kindergarten in this week's 101. AND I thought I'd give you a sneak peak into a 5 minute chat with a group of 'em: 
What works the best for me: Call and Response. I use that trick with EVERY grade level, kindergarten up to fourth. It really works wonders for grabbing attention and getting kids to remember vocabulary, directions and steps to follow. Here's how I introduce it to the kids:
With kindergarten, I really like the happy/sad board. It's an instant visual and it's something easy I can keep up with. Again, I use it with everyone...but I notice I reference it most with the littles. By the time they are older, I hardly use it unless one of them reminds me. And then I'm all, "sure, would you mind keeping track of it for me?" I'm all about the distribution of power (aka, getting someone else to do my job). Here are the deets on that:
Another method I use with the wee ones is palming. I mention this in the video but you can see it in action here: 
Because we're chatting about kindergarten in this here post, I thought I'd share my most favorite lessons as well. If you've been around here long enough, you've heard my Larry the Line poem that I start my kindergarten school year with:
Larry the Lines leads us to our very first art project: Line Sculptures. From there we continue with a unit on line. You can find that entire unit here
I love using books with kindergarten, as I know many of us do, and one of my favorites is Mouse Paint. It's a great way to introduce color theory...and review lines to create shapes like these sweet mice! 
I love to introduce a unit on shape as you can see here. One of my favorite self portrait projects come from the artists in kindergarten land and you can see more of that here. I almost always do a variation of this landscape lesson each year
When it comes to clay, I LOVE introducing textures into clay creating. Check out these fun birds! We also had a lot of fun creating these clay butterflies

I'd love to hear what some of your favorite kindie lessons are. They are a group that is NEVER short on excitement...and if you can harness that, you've got gold. By the way, I often update my YouTube account before I share here so if you subscribe, you can get the latest, if you like! 
 photo signature_zpsd10b3273.png

Sunday, October 30, 2016

DIY: Cheesecloth Makeover for The Bride and Frank

Happy Halloween, kids! If you are a parent or a teacher, bless you. You know that this day is just completely a wash as the kids are gonna either be jacked up on sugar or hitting some intense withdraw. Either way, brace yourself. Might I recommend digging the chocolate outta the treat bags and holing up in a dark, quite place for the next five days? Cuz things about to get real.
While you're off in a quiet corner with your Snickers and Reese Pumpkins, how bout getting your crafting on? That's what I did this weekend when I discovered the wonderment that is cheesecloth and starch (wow. Did I really just refer to cheesecloth and starch as "wonderment"? I really need to get out more).
In my previous post, I mentioned that I went on a wee thrift shop bender this week. Don't you judge. It's how I cope with the struggles of being a crazy art teacher. I'd already had it in my head that I wanted to spookify some bottles for Halloween. I'd seen some online tutes featuring cheesecloth and starch that was used to antique bottles. When I was poking around at the thrift, I spotted several items I thought would be fun to cover in cheesecloth (again, not a sentence I thought I would ever say but whateves). And these sweet Made in China figurines were one of 'em. 
And Holy Candy Corn! If you don't mind me saying so, look at that transformation!
For this fun craft, all you'll need is over-priced cheesecloth (why you gotta charge $3 for this stuff, craft stores? WHY.) and liquid starch. I prefer Sta-flo because I appreciate their abuse of the English language. Keep that Flo, Sta. You'll also need whatever grubby goods your thrift store can provide and an active imagination. Here, lemme show you:
Like, whuh?! Did you hear how excited I got? I think I mightah said "the possibilities are endless" about a half dozen times. I repeat: I NEED TO GET OUT MORE. 
Because we are friends from way back, I ain't even gonna lie to you: covering this thang in el queso-cloth (OMG, I'm totally gonna refer to cheesecloth as that here on out just so you know) was not my most favorite thing in the world as it had a lotta nooks and crannies. 
There was a lotta cutting and shoving el queso-cloth into parts unknown. It didn't take long...but the slick surface of the statue made the cloth slide around a bit which was not cool. Once I got it all in place, I set it in front of a fan and it was dry within an hour.
 Creep-tastic. By the way, my initial idea was to simply paint the faces of these guys with skulls, a la el dia de los muertos. However, as I was checking out at the thrift store, the gal behind the counter said, "I think you should do the Bride of Frankenstein and Frank" and I was all, "OMG. YOU ARE A GENIUS. YES!" So, shout out to Our Thrift Store and their imaginative staff. 
From there, I covered the entire thing in white acrylic paint and plopped it back in front of the fan.
And then the painting commenced. Y'all might remember that I have a thing for The Bride. I really wanted to keep her in a range of gray as a nod to the black and white film. However, I thought Frank deserved a punch of color so I went with a purple and lime green palette for him. 
And I kinda love how they turned out! In an unrelated side note: I ALWAYS have Netflix running on my laptop while I'm working. I just finished Sons of Anarchy (late to the party much, Stephens?) and I'm hungry for a similar show. I just started Peaky Blinders which is like the post-WWI sister show. What are y'all watching now that I need check out?
 Just a lil detail of the sides. Seriously, this was such fun. The thrift store had a ton of these figurines...I so wish I had another month of October. 
I guess I'll just have to find out what el queso-cloth and starch can do for my Christmas decor. Until then, Happy Halloween, y'all! 
 photo signature_zpsd10b3273.png