

Today I'm sharing my 25 Favorite Valentines/Love-Themed art lessons! From sub plans with handouts to clay and plaster projects, I've got something for everyone...including printmaking with kindergarten! Most of these lessons include kid-friendly videos, some have handouts and all are FREE! I hope you enjoy and...
Happy New Year!

 One of my all-time favorite things to teach first grade is...paper weaving! And I know what some of you may be thinking: SERIOUSLY?! Yes...because I got it down to a science! They make the looms, we weave together on a big loom I created, we do this on the floor and help one another...it's so fun! Here's the full lesson!
 Nearly all of these lessons here are inspired by artists! Which means that students learn a little about both contemporary artists as well as artists of the past with these projects. Here we learned about Jen Stark!
 For me, back to school after a long break meant back to the basics...a review of rules, routines and expectations. I cover all of that in my book Art Teacherin' 101...it's always a good time to get a handle on classroom management. No matter how could it is, it could ALWAYS be better, right? I share all of my tips and tricks in that book, if you are interested!
 Of course, back to school usually means PD meetings. One year, I convinced my admin to let me lead a workshop on creating these clay hearts with wings! I loved doing workshops with my faculty. It was a fun way to get everyone together in a relaxed way (which we never seem to do!) and enjoy creating and each other's company. To teach such a large group, I created a how-to video.
 As you know, teachers are some of the worst students (I'd insert a laugh emoji but we all know it's true!) so having a pre-recorded video will help!
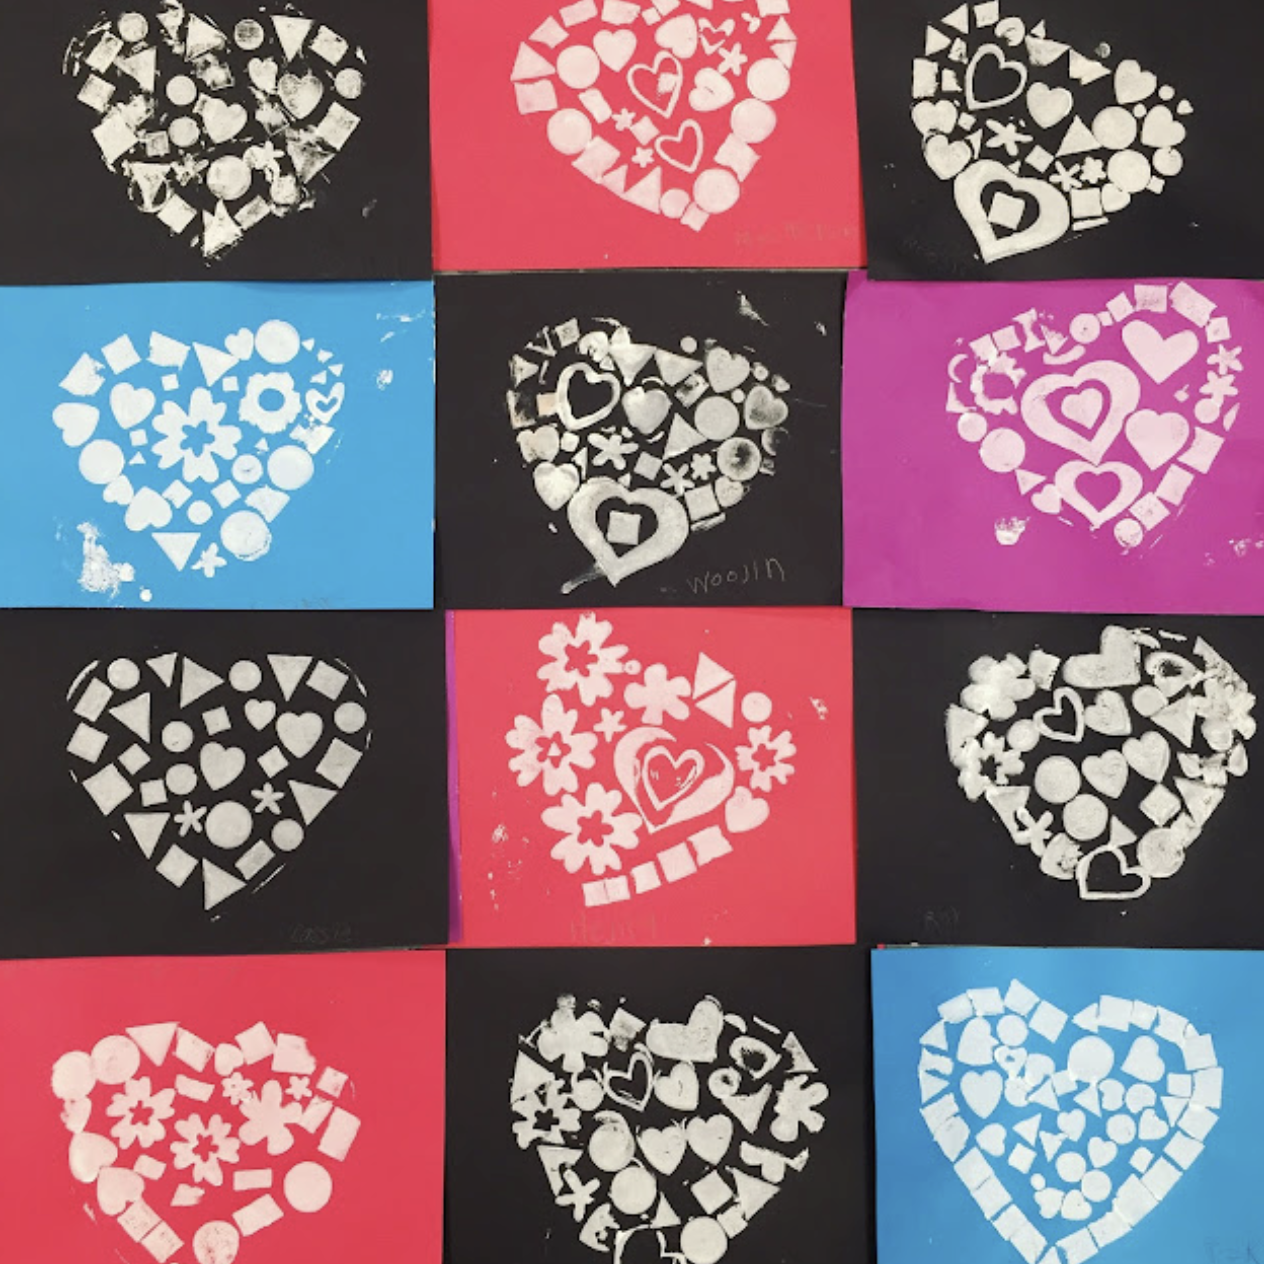
 I've never met a kid who didn't LOVE printmaking! But it can be daunting and super messy...which means a lot of clean up for us. However...you CAN do printmaking with just markers and Styrofoam. Let me show you how we made these!
 This lesson is probably one of my most popular Valentine's projects! I show you how to draw each of these cuties in videos you can find here.
 I'll also show you how to make easy heart stamps with scraps!
 Wanna make these?! My fourth graders loved creating these giant candy hearts! I created a video for them (and you!) here.
  Speaking of candy hearts...complete video to share with your students can be found here!
 This is a project I did with my second graders and they loved it! You can check out the video tutorial and lesson details right here!
 Here's a fun lesson I put together to do in one class period! Well, for me, it took 2 classes as my class period is 30 minutes long. I did this with my fourth graders as a way to introduce them to four different artists...in one lesson! Check it out here.
 Did we have fun with this one! We used old candy heart boxes and plaster to create our own faux chocolates. We also used tagboard and newspaper to create our candy boxes. It was so stinkin' fun. Full lesson here.
  Look how realistic! Did I mention we used puffy paint?! Everything is better with puffy paint.
 I really like to work big with my students. The bigger the paper, the better! It's a challenge with storage...but it's so worth it. These hearts were created on huge squares of paper. We chatted about Britto and did a line review...
 Big thanks to all of you that have purchased a copy and left a review! 83 5-star reviews is so amazing! Thank you all so much for the love and support. Okay, back to the lessons...
 Another super popular lesson on my blog: My Chris Uphues Lesson! This one is perfect for a sub plan as it comes with a free handout.
 Looking for a school-wide project? I have a ton of collaborative ideas on my blog (check out this post). This one involved each grade level creating a heart with a different medium!
This Britto-inspired lesson was another collaborative we did and...it was a sub plan! Check out the lesson video and process here. Looking for an easy one day lesson!? Look no further, I got you right here!
 Check out these scrappy hearts made by first grade! This was actually a lesson with a focus on positive and negative space. The kids were so excited by the negative space their cut out hearts created that we filled the space with tissue paper on plastic. More here.
 Aren't they so pretty up close?
 And this is what we did with the hearts we cut out! Just black and white painted designs. Simple and so pretty!
 Do you want to explore printmaking with kindergarten students but you don't know where to start?! Try this easy and fun lesson on for size!
 Once your students are done printmaking, you can take the hearts and create THESE! Aren't they so pretty?!
Got scraps of painted paper laying about?! You're an art teacher, of course you do! Spend some time teaching the kids how to cute out hearts and create these cuties! Use them to hang as mobiles, put them in windows, send to faculty as love notes...the possibilities are endless. Details here. Last but not least...check out these James Rizzi birds! Full lesson with video here.


I know next week means heading back to school...and it's just so hard to do after weeks off. I thought I'd try and ease the sting a little by offering up to you my favorite fun and easy lessons for celebrating LOVE as Valentine's Day is on the horizon. It's never too soon to start those Valentine's themed lessons and NEVER NOT a great opportunity to celebrate all things lovey dovey. Many of these lessons here come with a kid-friendly how-to video and, best of all, they're free! Just tap the highlighted link for more!
The above is a lesson I created for my kindergarten friends but it was so fun that I ended up doing it with several grade levels. It's that time of year when you really just wanna ease on back into art teacherin', right? So why not do so with a project where you just gotta get out one art supply (tempera paint and black oil pastels) and call it a day? It's much more relaxing that way...and when you are happy and relaxed, it will reflect in your teaching (and, hopefully, the students).


With that being said, I often just used simple supplies like markers when we return to school. But 'just markers' doesn't mean you can't do something super cool! Check out the video here on how we created these optical illusion hearts!
 Of course, sometimes it's fun to just jump right back in with big and exciting projects! I've been all about the plaster and Celluclay in my own artwork lately...and kids do love it! More here.


Wow! Did we LOVE creating these (see what I did there?!) And I have an easy method for you to make each one successful. You can check it out here!


Speaking of line...if you need a book to teach (or review) line with your students, did you hear I wrote a children's book!? Yep! it's called Larry the Line. If you are familiar with my Larry the Line poem, let me tell you this is the longer more in-depth version with idea sheets to be printed and shared in the back! You can pick up a copy here.


This Britto-inspired lesson was another collaborative we did and...it was a sub plan! Check out the lesson video and process here.


Got scraps of painted paper laying about?! You're an art teacher, of course you do! Spend some time teaching the kids how to cute out hearts and create these cuties! Use them to hang as mobiles, put them in windows, send to faculty as love notes...the possibilities are endless. Details here.

Thanks for dropping by, y'all! Know that it's TOTALLY OKAY to ease on in to this new school year. The slow you go...the more they will GROW, I promise! Slow it down, focus on what matters and enjoy art teacherin!
Love ya!
.jpg)


