Showing posts with label clay for kids. Show all posts

Sunday, April 3, 2022

Clay Mugs for Kids!

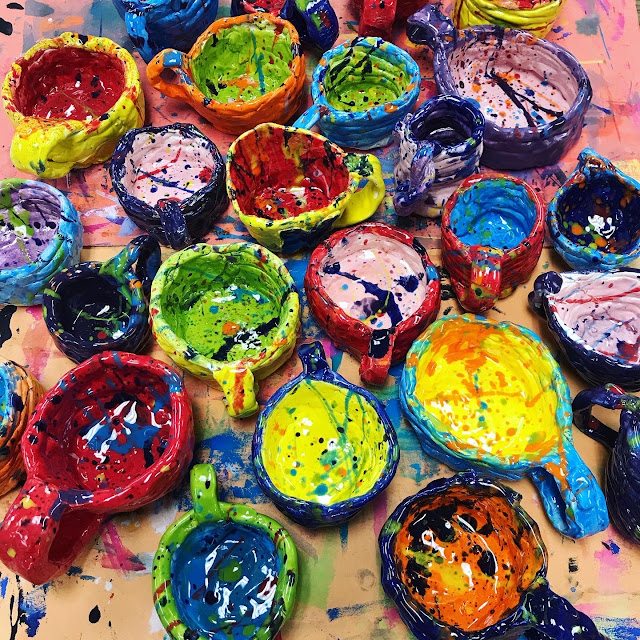
Hi, friends! My students are wrapping up one of the clay projects they created and I thought I'd share. Last year, my first through fourth created clay mugs and it was easily everyone's favorite clay project. When I shared that we were working with clay again, a few weeks ago, their first question was "are we making mugs again?!" I had already planned on it...so they were excited to hear the answer. Once mugs are complete, we celebrate by drinking hot chocolate out of them...so it's a whole lot of fun. 

This year, I created a video to share with them. Because I have 30 minute art classes, I only showed the pinch pot portion and a bit of coil making for the first class. The second class, we did a brief coil making reminder and then watched the portion about creating a handle. The video helped them trouble shoot and get their mugs completed in just two 30 minute classes!
This week, we started glazing! They were told they could use any two colors of glaze, one for the inside and one for the outside. They were to do at least three coats of their chosen colors and not to glaze the bottom. Once complete, they could join me at the splatter glaze station!

When my students were finished glazing, they could help a friend or work on the large banners I created to announce our upcoming art show! 

We used Prang's Creativity Street Tempera Sticks to color these with.
The glaze we used are from two companies and I like them both: Mayco's Stroke and Coat and Amaco's Teacher's Palette. Both are food safe and fire to cone 06.
When introducing clay to your students, you might find this video fun to share:


Read more »

Monday, May 19, 2014

In the Art Room: Kindergarten Clay Butterflies

Ya'll. I got this genius idea about a month and a half ago that all 400+ of my students should be working with clay. At the same time. And while this made for easy set up/clean up (read: We're 5 minutes late, ya'll -- Stop, Drop and Get Out! The next class is using the same thing!), all that clay left my room covered in a lovely layer of dust. Which, if you are an art teacher then you know, means two things:

1. The kids will figure skate across your dust-covered floor much to your pretend dismay (because, let's face it, you do the same thing when they're not in the room).

2. The kids will leave a path of dust covered foot prints leading a slightly disgruntled custodian to your door (ha, I totally kid as I have the most understanding custodial buddies around). 
Despite the dust-bowl-esque appearance of the art room, I love teaching clay as much as the kids do working with it. Seeing what creations they come up with is always so much fun. Howevers, with the wee ones in kindergarten-town, I like to start with the basics of hand building construction (slab, coil, sphere) in a pretty structured way.

Which leads me to this here Clay Butterfly project. If you're new to teaching clay or you simply need a quick project that teaches the basics of clay construction in a fool-proof-ish kind of way then this big bad butterfly is the thing for you. Here's what you'll need:
  • Low Fire Clay (I use cone 06)
  • No kiln to fire the clay? No worries. Try this out with air dry clay or Sculptey, available at craft stores.
  • Skewer
  • Toothbrush and cup of water
  • Texture for the butterfly. We use a lot of lace, doilies and placemats in my art room.
  • A butterfly template, optional
  • Crayons
  • Watercolor paint
 When I introduce clay, I have the kids gather around a table and do a demo from start to finish. Then I run through the entire thing again, this time having them repeat the directions after me. I thought I'd share with ya'll the start-to-finish routine...but don't worry, I won't make you repeat it back.

On auto-repeat, I tell the kids: You can make ANYTHING outta clay as long as you can make a Slab, a Coil and Sphere. With those three things, anything is possible. First, I have 'em make a slab.

1. Begin by squishing the clay as hard as you can between your two hands. Then thump it down onto your textured surface (this thumping-down business is always a hit, no matter what the age) and begin pounding the daylights outta that clay. Now, you're gonna have to remind the kids that the goal is not to punch they clay too much, it's not your brother after all. The end result should be a clay that is a consistent cookie thickness.
 Sometimes you can pound and pound that clay and it just won't get wide enough. So I tell the kids to pound their clay at a diagonal to help the clay stretch and become the desired width.
 The end result should have the texture of your pounding and be consistently cookie thick.
 2. Peal that clay off of your texture like a Fruit Roll-Up. I have to tell the kids that otherwise they'll simply dig at it with their fingernails. If you show them how to pull the clay and the texture away from each other, it's much easier. Also, isn't that texture rad? Clay is so receptive to texture that I'm always showing kids ways to incorporate that into their clay piece. Lace is my personal fave.
3. Once the clay has been pealed off of the texture, have the kids trace a butterfly template (not shown, duh). Or, if you are a Template Hater, don't. I use templates for this activity as the focus is on working with clay. If I can remove the frustration of drawing and redrawing a butterfly onto clay, them Ima gonna do it. When the kids cut into the clay, show them how to properly use that skewer stick. It should stand up vertically, like a solider. If the kids hold it like a pencil, they either just saw through the clay (leaving behind a chewed up looking edge) or don't cut all the way through. 
3. Smooth out those clay boogers. I know those rough edges aren't sharp now...but just you wait until you run your hand over that bad boy after a good bisque firing (that's a first fire for you first timers). I've sliced my hand up on such a surface. I always emphasize running a finger over the edges to smooth 'em.
4. Once they've gotten that slab butterfly body made, I teach 'em how to make a coil. For them, that's old hat. That's like the very first thing all kids make outta clay: a snake! Using my extra clay, I roll out a coil that is as long as the center of the butterfly. If I make it too long, I cut it to size with my skewer.

5. Now, I don't use a scoring tool, I use a toothbrush. I do use the terminology "slip and score" and explain to them that it's the glue that binds it all together. Without it, your clay project is sure to fall apart and you'll be so super sad. Don't let it happen to you.

 6. Stick that coil to the slab. In my demos, we chatted for a hot minute about the three parts of the butterflies body and used our pinching fingers to create them.
 7. Using spheres, we created eyes for our butterfly. Again, we toothbrushes because we didn't want our eyes to fall off. It totes sucks when that happens. Eyelashes (because all butterflies have 'em, right?) and mouthes were added along with anything else the kinderkiddos might imagine.
8.  When they brought their finished pieces to me, I wrote their names on the back and stuck two holes in the head for antennae and a hole in each wing for hanging. You might not want to do this in front of the children, especially if you fail to tell 'em what you're doing as stabbing their clay project proves to be a traumatic experience for some...not that I've ever done it or anything. Ahem.
Now, bisque or first firing these guys was cake because I could just stack 'em up on my kiln shelves. But I knew that glaze firing would involve many rounds of loading and unloading the kiln because of the flat and wide nature of the pieces (in case I'm not speaking your language: you cannot stack glazed pieces in the kiln as they'll stick together once fired). If you recall from earlier in this here post I mentioned that EVERYONE in the UNIVERSE was making something out of clay so glaze firing all of these really would have slowed my firing to a snail's pace. Therefore, I knew I had to find a glazing alternative.
I gave the kids watercolor paint and we had a chat about crayon resist. It helped that we'd dabbled in this in a previous lesson so the kids kinda got the concept. I told 'em that bright colors worked the best and that coloring super hard was the key to making this work. I likened it to putting a raincoat on the butterfly so that when it got wet with the paint, the paint would roll right off the rain coat. We also chatted about the symmetrical nature of a butterfly's design which inspired some kids. For others, they either weren't interested in that or their texture pattern made it too difficult to create a symmetrical design.
Once the crayon coloring business was through, the kids were free to paint. I asked them to pick one color (my friend above chose not to but the end result is lovely) and really like really had to stress painting away the white spots. The key is to have a moppy wet brush and to paint slow enough for the paint to sink into the crevices. Once complete, I slapped some ModPodge on 'em and my fourth grade morning helpers added the hanger. I added a dot of hot glue inside each opening at the top, inserted the antennae and, viola! Kindergarten Clay Butterfly!

What are some of your fave kindergarten clay projects? I'd love to hear, ya'll!


Read more »

Tuesday, January 1, 2013

12 Favorites of 2012

Favorite Memories: Star Wars Weekends at Disney. We had so much fun that plans to return are already in the works. This dress I crafted from my childhood bedsheets got some serious attention with complete strangers asking if they could snap photos of it. Sketches of the next SW dress are underway. 
 Happiest of New Years to you! I hope you managed to ring in the new year in style. And, if your style is anything like mine, you were in your pj's fast asleep wondering who was blowing up your cell phone at midnight. I know, I'm such a party animal. 

Since I woke up feeling all reminiscent-y, I thought I'd share with you my 12 faves of 2012. I started this blog back up again a year ago as one of my resolutions of 2012. I wanted a place to share my DIY's, the art projects of my students, what I wore and, just, life stuff. While scrolling through my blog this morning, I picked out some of my favorites and thought I'd share them with you. So, here they are, 12 of my Favorite Memories, What I Wore, DIY's and Art Class Projects of 2012.
Favorite Memories: A Day Trip to Graceland: I have been a big follower of both Quincy and Emma's blogs for a while. So when the stars aligned for us to all take a day trip to Memphis, I was thrilled. One of the funniest things that happened was at the end of the tour, we decided to have our photos taken. Suddenly, a newspaper dude came up and started snapping away. And then some publicity guy for Graceland. And then complete strangers who asked to have their photos taken with us. It was a hilarious moment I won't soon forget.
Favorite Memories: A European Vacation: Well, for me anyway. Hubs spent most of his days working while I tooled around Germany in my VW exploring cities, eating entirely too much gelato and shopping for souvenirs. We did spend several days vacationing in the Netherlands with Amsterdam being my favorite
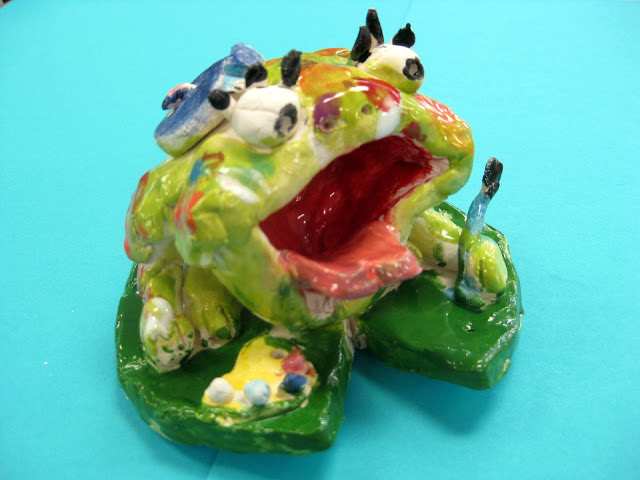
In the Art Room: Fantastic Frogs: Our clay theme for the end of last year's school year was Monet's Garden and these frogs created by my third grade artists were such a hit. I love the different personalities of each frog and how much it reflected that of the artist.
In the Art Room: Leaf Printing. I learned about this process from a fabulous art instructor at the Tennessee Arts Academy. The results of each print was just breath taking and such a wonderful learning experience for positive and negative space, printing, texture and nature. Complete details of the project here.
In the Art Room: Pouch Weaving. Not to be confused with purse-weaving as the boys would never go in for this project. And it turns out that this one is always a hit, especially with the boys. Each year my fourth grade students complete these pouches as a rite of passage. I wrote out the many steps to completing these pouches in my weaving posts. You can find the first installment here.
DIY: The Blue Christmas Light Up Dress. One of my resolutions for 2012 was to sew my own clothing. Before this year, I'd only sewn one dress completely on my own. This year, I sewed nine! This light up dress was one of my favorites, from it's adorable fabric to the pattern and, most especially, the lights at the bottom (which was my genius hubs idea!).
DIY: Memories of Marilyn. I began creating these ceramic paper doll dresses after finding a bunch of photos of my maternal grandmother Marilyn. I wasn't sure what I was going to do with the dresses but I created about a dozen of them and shared a tutorial here. When a friend mentioned putting them in a shadow box with the photos that inspired them, I knew that was the answer. You can see more of the end result here. I think my grandma Marilyn would have loved this tribute to her.
DIY: Pencil Skirt and Shoes. Okay, I'll just go ahead and admit it: I've got a little bit of an applique addiction. It's kinda my version of be-dazzling something. Got a dull skirt? How about a blank apron? Need to jazz up that boring dress? Just applique the crap outta it! And you'll notice I've got the same issue with painting on shoes. Oh well. My students loved this end result.
What I Wore: Madeline for Halloween. Since the kids were learning all about Paris, France at the beginning of the school year, I decided to go all Madeline on them. This tied in so nicely with the beautiful bulletin board created by one of my practicum students. How I miss those awesome girls!
What We Wore: Dressing like Monet's Garden meets the 1950's. I had the pleasure of having one of the most incredible student teachers this year. We shared the same goofy brain and often dressed alike to teach our lessons. Her middle school students are very lucky to have such a talented and dedicated art teacher.
What I Wore: Read Across America Rainbow. Don't let my expression fool you, you know I'm lovin' this ridiculousness. This photo was taken during Read Across America week and on this day it was silly hat day. The best part about this hat was that I managed to cloud slap anyone that got to close with just the turn of the head.
  Another thing I have loved about this past year is getting to know so many of you! I have been thrilled with your comments, words of encouragement and the discovery of so many other like-minded folk. Thank you for following my blog and my dorkiness. I truly appreciate all of you. 

Happy New Year!


Read more »

Wednesday, April 25, 2012

In the Artroom: Fabulous Frogs

Painterly Frog: This here is a froggy artist that really gets into her work. Notice the sweet details like the paint brush, palette, blue beret and, of course, the paint splatters.
I can't tell you how much fun it has been to go to school, open the kiln and be greeted by these guys each morning. While learning about all things Claude Monet, my third grade students contributed to our school's Mammoth Monet Mural with their frog-tastic drawings. When brainstorming their upcoming clay projects, I thought it would be good to continue our Monet theme. So my second graders created ceramic waterlilies and my third, these frogs!
Redneck Frog: Oh my, can you believe those teeth?! I am so in love with this backwards-baseball-cap-wearing, orange-eyebrows-on-the-outside-of-the-baseball-cap wigglin', mysterious-black-bug-eating Hillbilly Frog!
Obviously, the kids really enjoyed creating these unique frogs. They have been so pleased with them, as they should be. I loved this lesson because, once the kids followed the steps of sculpting their frog, they were free create any sort of frog imaginable. And they did.
Fashionista Frog: That was actually the name given to the frog by the artist. Apparently, Fashionista's hobbies include"being pretty, being sassy, hopping and teasing the poor fish." Hmmm, sounds a lot like the artist herself!
For this Fabulous Frog creation, we used the following:
Artistically-Inclined Frog: I was really concerned about the stability of this frogs easel that is precariously straddling the lily pad but it made it out of the kiln unscathed. Notice the little beret, the palette and the paintbrush.
Because I have half hour classes, I taught this lesson in several classes. On Day #1, we:
  1. Twisted our grapefruit sized piece of clay into two equal pieces. 
  2. With one piece, we pounded the clay flat into Oreo-cookie thickness and traced a template that was in the shape of a lily pad. We wrote our names on the bottom of this clay, wrapped it in a wet paper towel and placed it in a zip lock bag with our names written on it.
  3. With the other half of the grapefruit, we created a pinch pot for the frog's mouth and body.
  4. With the leftover clay from cutting out the lily pad, we rolled coils for the legs and attached them to the pinch pot with the toothbrush and water.
  5. The pinch pot with legs was then wrapped in a wet paper towel and placed inside the ziplock bag on top of the lily pad until next time.
As the kids were working, they were constantly coming up with names and quirky stories about their frog. So, once the frogs were out of the kiln, I had them do a little froggy biography.
Day #2:
  1. I demonstrated to the kids how to add eyes and a tongue.
  2. I explained to the kids that all things can be created out of clay with the use of a sphere, a coil or a slab.
  3. We brainstormed different ideas for frogs and froggy accessories and discussed how they could be created.
  4. Students completed their frogs (just barely in a half an hour!) and attached them to their lily pads.
Standardized Test Taking Frog: Yep, it's the time of year. Notice the #2 pencil. What you can't see is that this frog is also wearing a fabulous red and blue backpack.
Day #3 and 4: Once the clay projects have been fired, we begin glazing. I tell the kids I only have two rules for glazing: don't glaze the bottom (it will adhere to the shelf in the kiln) and no glazing your clay projects five thousand colors. We spend one day just blocking in the colors with at least two coats of glaze.
Rock Star Frog: Gotta love a frog that dyes his mohawk to match is guitar.
On the second day of glazing, we use smaller brushes and begin to add details like dots, stripes or just delicate lines.
Special Agent Frog: Ma'am, I believe I found the dragonfly you were looking for...

And here was our final task: writing about our fabulous frogs. The kids don't get to take their frogs home for a couple of weeks due to our school-wide art show. But they were dying to see them and chat about them. So, we filled out this sheet in pencil and traced over our pencil lines in skinny sharpie. This paper is actually a folded card. When we display the frogs at the art show, this little placard will sit next to the artist's frog.

Paint-Brush-in-my-Mouth Frog
This project really brought out the kids artsy side...which is why I think they created so many Artist Frogs! It also brought out more of their crazy humor...I learned that during this exchange:

Me: Hmmm...it says on your sheet that your frog loves to eat "pizza, sushi and ... frog legs?"
Kid #1: Yep!
Me: You do realize that you made a frog. And he likes to eat other frog's legs?
Kid #1: Yep, he's got cannibalistic tendencies.

Ya gotta love 'em!
Read more »