Showing posts with label kids and clay. Show all posts

Sunday, December 1, 2019

In the Art Room: All Things Clay!

When I first started teaching, teaching clay was in my curriculum and I FREAKED.THE.FUNK.OUT. I didn't take a single clay class in college and only made a couple of pieces in high school. I managed to melt down a kiln, explode hundreds of pieces and even drop my share of masterpieces. Despite all of that, after teaching art, clay and kiddos for over 20 years now (and having written a book on the topic!), I feel like I can finally share my (semi-limited) wealth of knowledge on all things clay!
While my book was written for children who don't have access to a kiln, many of the projects can be used with kiln fire clay! 
Over the last three weeks, I have shared everything I know about kiln fire clay on my podcast! It's so much...that I had to break the series into three episodes just to squeeze it all in. So, if you'd like to take a listen here, here you go:


But wait, there's more...


AND just a pinch more...


In case you need a visual, as I often do, here's a video of some of the clay tips I mentioned. For the complete blog post, you can visit here. 
 More details on my favorite tools and how I set up for clay in the video and my podcast!
Part 3 of this series is all about glaze and glaze alternatives. If you'd like a video with more, check this one out:
The blog post with more details on glaze can be found here. 
And if you need a visual of the clay projects I mentioned or just some clay project ideas, then check out this post with my very favorite clay projects! Have fun! 
 photo signature_zpsd10b3273.png
Read more »

Tuesday, April 25, 2017

In the Art Room: Bobble Head Pets UPDATE!

BRACE YOURSELF FOR THE CUTE. This is just a handful of the Bobble Head Pets that my fourth graders created and each one is so stinkin' adorable! If I had any patience at all, I would have waited until the next crop of cute was unloaded from the kiln before blogging but I just couldn't wait (one being fired now has a monocle and a top hat while another has a spiked collar...I'll just have to do a follow up post to this here follow up post)! The kids loved this project...and the results from each are just precious. 
We learned some things along the way: keep the point at the top of the body very pointy as that helps the head rotate and bobble better. Glazing both the inside of the head and the top of the point also makes for a better bobble. 
These creations took us three one-hour art classes to create. On the first day, we made the body. MANY of the bodies were so thick that I just KNEW they were going to explode in the kiln...but none of them did! Stay tuned for a long overdue Art Teacherin' 101 this week on my fave clay tips and I'll share with you how I prevented explosions. 

On the second day, we made the head. With extra time and extra clay we made doggie dishes, toys, mice for our cats, you name it, they created it. On our final day, after a bisque firing, we glazed! Here's the demo video I created and used. Feel free to use in your art teacherin' adventures! 
This lesson was also shared in my book! You'll have to buy the book to see just what animal I made bobble.
You can pick up your book here...keep in mind that the release date isn't until June. A fun summer surprise in your mailbox, ha! 

All the projects in my book were created with air dry, oven bake or homemade clay...but many of them could be done with kiln fired clay, like this project! I'll be exploring all kinds of clay projects next month during my LIVE craft nights! You should join the fun, you can create with ANY clay. But I'll be exploring a variety of air dry, plaster and homemade clay...
Pick up your clay kit here and get ready to craft with me LIVE on Facebook at 8 pm CST next week! 

So, true facts: not all of the heads bobble freely. Many of them are pretty stationary. BUT...the kids are having so much fun gently rotating the heads and getting them to tilt just like a real pup or kitten. Just moving them a little totally changes the look of the sculpture!
 Many of the kids created their beloved pets. 
 We use Mayco's Stroke and Coat. I give the kids EVERY color in the rainbow because, well, who doesn't want to have a lot of options. I picked up tons of ice cube trays from the Dollar Tree and put a different color in each slot. I labeled each slot on the tray so that the kids would know what color they were using since the colors can change so drastically in the kiln. I encourage at least three coats of glaze for just the right amount of shine. We also have our dog dishes (ha!) of water and sponge for cleaning brushes. I recently had a teacher ask how I teach the kids not to mix colors. I usually do something like this: DON'T MIX THE COLORS! And that works. 
Seriously, my kids have been painting since kindergarten. They know that we always keep our paint brushes pointy by painting with just the tip; we always clean our brush in the water and dry on the sponge before changing colors. It's rare that I have kids mix colors...especially my older students. I encourage pride in artwork and I think they know that taking care of art supplies will create a beautiful masterpiece. 
And, again, I say: DON'T MIX THE COLORS! Usually one talking to and explanation as to why we don't do that does the trick. And, if all else fails, take the paint away. If you can't use the supplies correctly, so sorry, you are done for the day. 
 Rant over! Back to the cute.
As y'all know, we are having a pet shop theme for our art show. These guys are in charge of the cats and dogs. Now we just have to work on transforming the art room into a pet shop! We have some ideas cooking about how to make that happen. 
These kids have made so many 3-D works this year: bobble heads, candy hearts, sewn monsters! They are going to dominate at the art show. 
 I swear their eyes follow me around the art room!
 Have y'all done bobble heads before? What did you do differently?
Until next time! 
 photo signature_zpsd10b3273.png
Read more »

Tuesday, April 18, 2017

In the Art Room: Clay Chameleons, Update Part 2

Y'all. When I opened the kiln this morning (which I had no right doing as that big ole lug was still flashing 600 degrees), I let out a squeal. Who snuck into the art room and put a bunch of cute-ified chameleons in my kiln?! I mean, really. Can you even handle...THIS?
 I know I can't. I'm so excited to share these with the kids next week. Their hard work sculpting and glazing paid off. Here's the video that I created to teach my sweet third graders this fun lesson:
The kids have loved this lesson! Having taught art (and clay!) for nearly 20 years, I've learned a thing or two along the way. My biggest tip for those working with kiln-fire clay: LET THE FINISHED PIECES DRY FOR LONGER THAN YOU'D EVER IMAGINE.
I was always led to believe that the reason clay exploded in the kiln (and I've had my share of 'splosions) was because of air bubbles. I call baloney on that theory. The reason there are explosions is: the clay is still WET. I allow my clay projects to dry in the kiln room which is both hot (due to the kiln) and well ventilated (as they should be) for TWO WEEKS. That's right, you heard me. Here's the deal: if there are any water molecules in the clay, as they are heated up in the kiln, they begin to move, faster and faster, until they cause an explosion. However, if you wait...every last one of those water molecules will evaporate and diminish your chance of breakage. One way to test and see if greenware (unfired clay) is ready to be fired? Touch it. If it feels damp, even slightly, it is still holding water and needs to dry.

The problem is...if your students' clay projects are thick (and some of these chameleons were very thick!) there might be water trapped within the clay project that you cannot feel with touch. My suggestion? Fire on the slowest setting possible. This will help air out the clay before ramping up to firing mode. 

In other words: When in doubt, DRY IT OUT. 

Can someone please help me off this firing soap box?! It's hot up here!
Now, when it comes to glazing, that's a whole 'nother story. Glazed pieces can be fired on the fastest setting as they have already been fired once and are not going to explode. In case you are curious, I use Cone 06 clay and glaze. 
 I don't always glaze with my students. After all, two firings is super time consuming. However, I do think that the glazing experience is important for kids to be exposed to at least once. It's truly magical. Imagine: little pieces of glass that are going to transform your dull clay project into a shining, sparkling masterpiece!
My favorite glazes are Mayco's Stroke and Coat. I love their color variety. I did order some of their Jungle Gems to add a bit of spots and sparkle to their projects...and I was a touch disappointed. I don't think I shook the bottles up enough because I don't see too much of the spotted and speckled effect. Perhaps my next crop of chameleons will be more speckled as their glaze is near the bottom of the bottle where all the glass has settled. 
 Oh! And if you follow me here...you might have seen that I received a copy of my book
This lesson is NOT featured in my book...which is why I can share it and the video for free with you here. Many of the project directions from last year's art show were not shared here...because I was under contract with the book publisher. Little known fact: when you are writing a book, they "own" the rights to your ideas! All that to say...all of the lessons I share in the book have not been released here. So 52 NEW art projects for you and your kiddos...that can be used with both no-kiln and kiln-fired clays! 
 ALSO...in case you didn't know, I've been hosting weekly #creatingwithcassie craft nights right here. Currently, we are felting but next month, we are exploring clay! 
If you'd like to join the fun and explore some fun new materials, pick up your clay kit here...no kiln required! 
 Now...this is just the beginning of clay themed posts as I've declared the month of May, the month of CLAY! So brace yourself...lots of clay posts ahead!
Until then!

 photo signature_zpsd10b3273.png
Read more »

Saturday, April 4, 2015

What the Art Teacher Wore #135

Retro-Lovin' Monday: So my time in NOLA may or may not have involved some heavy credit card exercising on Magazine. That street was just full of block after block of shopper's delights. My fave? Trashy Diva (thank you, Annette, for taking me!). I walked right out with this dress and a hat to match! shoes: vintage Fluevogs; fishnets: Target

How are all y'all? If you celebrate Easter, I hope you've had a delightful one. If you're experiencing spring, I hope you've had time to absorb some vitamin D. And if you're anything like me, you waited entirely too long to cut your grass and you've spent your weekend tossing grass clippings into your neighbor's yard (oh! I kid! Ish!). Seriously, y'all. I hope you are fab.

I thought I'd share with ya this week a lil bit of What I Wore and What Went Down in Art Teacherin'ville. It's been a wild week. I taught four awesome kindergarten classes in one day and lived to tell about it; I endured an hour long stint in the pie-in-yo-face booth at the school carnival and I hosted two lovely art teachers from Chicago (hi, Michelle and Pat!). I'm so thankful for the extra day to recoup. 

I'll be back with you this week to share my 10 Exciting Tips to Teaching Vocabulary in the Art Room (brace yourselves, y'all!) as well as a DIY (lawd, I hope.). Until then, I do hope your week is a magical My-Lil-Pony one! 
And just like that, I now have a thing for hats. I've actually had it in my mind to start creating hats to go with my outfits for some time. I'm excited to say that me and a coupla other art teacherin' buddies are taking a hat making class at the end of this month. I'm already dreaming up ideas.
Totally Pencilly Tuesday: With all of our snow days this year (a glorious 10 days that we don't have to make up!), I was able to stitch up so many art teacherin' dresses! The prob? I've not had a chance to wear 'em to school. So this lil number complete with my first bolero made it's debut this week. dress: DIY, details here; turquoise tights: Target; florescent fishnets: Free! I found them in our teacher's lounge! Our local grocery store donates items that don't sell and these were Halloween has-beens; flats: dunno; "artsy" necklace: crafted from Scrabble tiles by my blogger buddy Phyl
So way back in Feb I shared this post with y'all. Every student in my school created a wee lil 3" X 3" heart to be used for a school wide "Our School has Heart!" mural. Unfortunately our mountain of snow days (and my intense case of the lazy-es) prevented me from gluing down all these masterpieces in a timely fashion. This week, I did make some progress and get one portion of the mural complete! It's my goal to finish off the rest on Monday and have it up by the end of the week. So stay tuned, kids!
Gentlemen, Start Your Crayons Wednesday: The temps are getting warmer here in Tennessee and I gotta tell ya, I don't trust 'em. Because every spring I've lived here, it's like clockwork: lovely flower-planting weather then BOOM! a hard flower-freezing night. So I'm still clutching to my sweaters until the bitter mid-April end. needle-felted crayon sweater: DIY, here; dress: Anthro; tights: Target; crayon pumps: DIY here
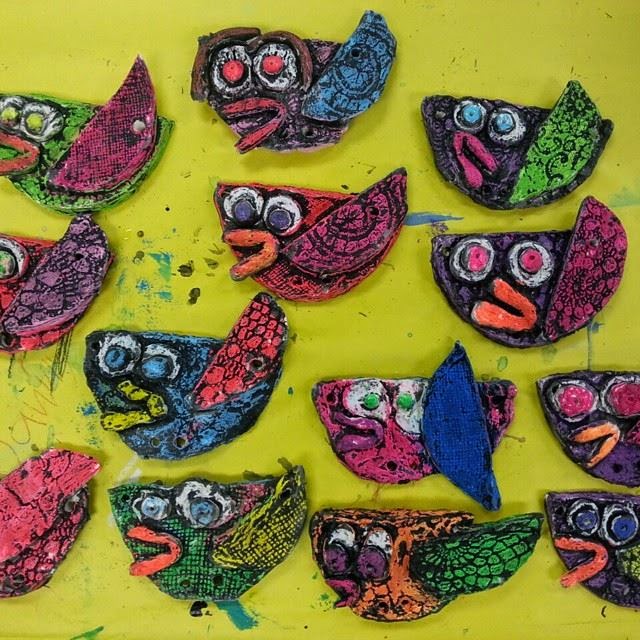
The week before my spring break was Clay Week (or Cray Week as I dubbed it). Now that we're back, my kindergarteners began the finishing process for their clay birds. We did that whole oil pastel/watered down India ink method and I was super stoked to see the result. This coming week, the kinder-kids will be adding legs to their feathered friends. I'll be sharing a series of clay posts (with video clips!) very soon. 
A Thursday that's my Friday!: Gotta love a short week, y'all. Especially one that involves a full moon, an upcoming holiday AND a school carnival event. I mean, whut are we, nutz?! I do believe if we didn't have Friday off, an "emotionally unstable day" woulda been in order. school supply dress: DIY here; crinoline: Amazon; tights: Target; shoes: Fluevog
The parent volunteers at my school do this school carnival every year and it's simply amazing. I'm very fortunate to teach children whose parents are so involved in their education. As a way to say thanks, I opted to go a full hour in the pie-in-the-face booth. And, as much as I love those parents and their kids, I dunno if I can handle that scandal again. I've had the smell of curdled milk up my nose all weekend long!
A Good Friday for Brunching and Shopping: Ah, a glorious day to catch up with a good friend over brunch and money-spending. I'm proud to say that one trip to Anthropologie involved the purchase of a $9 sweater (like, whuh?!). My fave part of the day was running into so many buddies who were also out enjoying their time off even if we were in the midst of a tornado warning (it's spring in the South...when are we NOT about to get swept away to Oz?). dress: vintage find in NOLA; necklace: Franklin farmer's market; flower hair clip: made by me
I love mail. And I really love getting sweet and thoughtful gifties in the mail. My sweet Aunt Kimmy and Uncle Keith sent these bad boys my way. I love 'em so! I can't wait to wear 'em with this number
 photo signature_zpsd10b3273.png
Read more »