Showing posts with label school wide collaborative. Show all posts

Saturday, October 29, 2022

The Dot School-Wide Collaborative

Hello, friends! I'm excited to share that the school-wide collaborative my first through fourth grade students created at THE BEGINNING of the school year (yikes!) is finally installed. Like, finally.

Y'all, while I do love having all students creating a collab at the start of the school year, why do I do it to myself? It's so much work on my end! All the attaching to bulletin board paper and hanging...it's so much! AND I always procrastinate! And yet I do it year after year. Such a glutton for punishment, I guess.

Here's a look inside the process of hanging this beast with some of my tips:


When hanging something this heavy, it takes everything in your tool belt (as well as a helpful music teacherin' friend). Check out my tip on binder clips and long tabs of paper. It helps!


I've not done an official post on how we created these dot paintings but I'll tell you: it was super easy! In fact, it's one of my fave kindergarten lessons which you can find the details on here

All students began with a dot in the middle of their paper. The paper was prefolded so that each dot was exactly in the middle. Meaning I quarter folded the paper, once in half one way and then in half the other. Dot was placed at the intersection of those two folded lines. 

Like the kidnergarten lesson, each student was then instructed to paint concentric circles around their dot using any colors of tempera paint they liked!
Once dry, the paintings were cut along those folded lines. They were then rearranged and glued to a black piece of construction paper. This part was tricky so students helped one another. 

Early finishers painted the wording of the sign!
And then the beast was hung...where it shall stay for a LONG, LONG time. Or the end of the school year where I'll have the students cut it apart to take home their circles (maybe. Or I may leave it up until next year!). 


photo signature_zpsd10b3273.png
Read more »

Wednesday, September 4, 2019

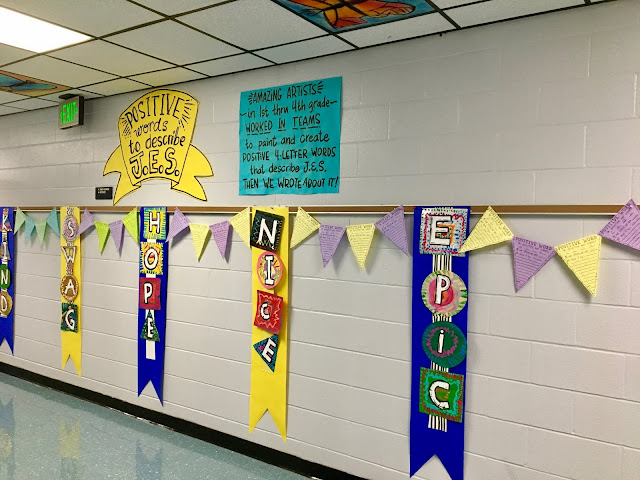
School-Wide Collaborative: Positive Four Letter Word to Describe Our School

Every year, I like to start my students with a school-wide collaborative. In fact, you can find a ton of our back to school collaboratives right here, just use that search bar! You can also see my third grader's school wide collaborative here. 
To kick off the school year, on the third day of art, all of my first through fourth grade students began painting. I picked up packs of large paper shapes from IKEA on a recent trip. Any construction paper would work great though. The paper from IKEA was thin so it wasn't the best for painting. It did, however, give us a variety of shapes to paint on. 
If you want  to hear more about my painting setup and how I introduce painting to all of my students, you can check out this blog post. Here's the break down of the lesson (keep in mind, my classes are 30 minutes in length):

Day 1 and 2: Painting! We painted patterns all over our letters. My focus for those two days was introducing my painting procedures.
Day 3: Working together in table teams, the teams of four kids had to come up with a positive four letter word to describe our school. Each table team had a dry erase board and had to write down three things: what their word was, who was going to construct what letter and what color of paper they were going to use for the letter. 

The letters were created from strips of paper. Students who finished early helped their teammates. Any tables that had fewer than four kids still had to create a four letter word...they just had the help of early finishers.

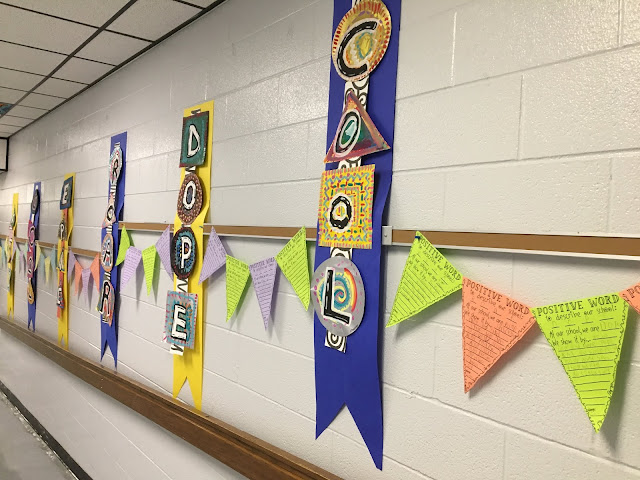
Day 4: Assemble the word! For this, the kids again worked in teams. They had to glue two long strips of cut posterboard together Then they laid out their words and glued it down. This only took a short amount of time. Once complete, they wrote about their chosen word!
 If you are interested in doing this lesson and would like a free copy of this bunting, here you go! 
To display, I stapled four triangles together to create a pattern bunting. 
 The bunting was then hung between the displays.
Because I didn't want their words to get lost on the boring wall colors, I cut out flags to go behind them. Yellow and blue are the colors of our school. Yes, that was time consuming but I really like the look. Also, the bunting and the integration of writing in my art room makes me so happy!
FOR FIRST GRADE: Okay, full disclosure, getting first graders (who are really still kindergarteners) to dream up a word and create it was gonna be super difficult. So, instead, I assigned each class a word that we voted and agreed on. One class did NICE while another did KIND. These were then hung by string in the hallway.
 I was so impressed by the artists during this lesson. The words are now hung throughout our school. The message they send really makes me happy.
 The kids dreamed up so many wonderful words. They did outline the letters in the opposite color of paint once complete. 
 I love the choice of SWAG. I also had one group come up with the word ZANY which I totally hung by the art room door!
 If you do this lesson, I'd love to hear from you! I can think of some things I would change...but for now, they look lovely, especially for our upcoming Open House.
 And it got all of the kids painting nearly right away!
 This would be the perfect project to use up any scraps of paper too. Those papers could be used as the paper for the letter making or the background shapes. 
 And how we have moved on to our sketchbooks. I am loving that lesson too! More to come on that soon.
 The ramp that leads to my room created some difficulty when it came to hanging these. 
 So I made sure to hang them a little higher...and at varying heights so they could be seen. This way of hanging them ended up being my favorite!


Thanks for letting me share this fun lesson with you all!
 photo signature_zpsd10b3273.png
Read more »

Monday, May 28, 2018

In the Art Room: A Collaborative Painting for Field Day!

Disclaimer: Since discovering Instagram and my love for it, I've gotten super bad about snapping photos with my camera and simply using my phone. So what you have in this blog post are phone photos and for that, I apologize. If you'd like to see me overshare my art room happenings (as well as just my hot mess of a life), you can find me here

In my last post, I shared what we did for the art station portion of Field Day...when I thought it was going to be rained out. The night before Field Day, while I was head scratching what we could do, I thought creating a collaborative canvas painting would be fun (this is what happens when your brain is fried, y'all). So I pulled this giant canvas out of my closet and went to town. 
 I've had this canvas for years. I had started a painting on it years ago and never did anything with it. So I simply painted over it with a cream color paint (cuz that's all I had on hand) and used watered down black acrylic paint to create this. Why watered down acrylic? Because it has better viscosity that way. I began by sketching out four wavy lines across the canvas. Then I wrote out the letters of our school. Once I was happy with the placement, I painted it with a flat brush and called it a night. 
 Along with our other painting station, I let the kids go to town on this. My only "rule" was that one color go in one space...and TRY to stay within the lines. As you can see above, that was a struggle. But it was field day, we were wound up and I knew I could lean up the lines by simply going back over them. So no worries. 
 This was after the first day. I was tempted to leave it this way...and then I added the little pattern on the top and thought it would be fun for the kids to add patterns the following day. 
 Again, so sorry for the grainy photo. My only rule for the patterns was that the kids had to pick one pattern and color and stick with it. For the dots, they used wine corks dipped in paint (fave part of the day? A kid saying, "oh my mom has TONS of these!" Ha!) and thin brushes for the designs. Again, other than that, little direction was given. This was on the last day of school where I had free choice centers set up around the room. This just happened to be one of them. 
 Once dry, I went back over the black to once again clean up the edges. Then I thought it might be fun to add some white highlights to make the letters pop. Look, even the edge got painted!
The admin had no idea we were creating this painting. When I was sharing it with them, our school librarian saw it and LOVED IT. It was decided that this painting would go in the library for everyone to see. AND I'm really excited to share that now the librarian and I are collaborating to create an entire ALPHABET WALL in this style! The kids will kick off the new school year painting a canvas for each letter in the alphabet to showcase in the library. Y'all I'm so stoked! This project was so easy, colorful, happy and fun. I'm looking forward to making more. LOVE to hear if you give this a go! 
 photo signature_zpsd10b3273.png
Read more »
Tuesday, June 9, 2015

In the Art Room: School-Wide Collaborative Series, Our School has Heart, Part II and A Giveaway!

 Hi, kidz! Welcome to the second installment of postings from my school-wide collaborative series (btw, I've decided "school-wide collaborative" is just too much work for my mouth. Hence forth, it will go by it's abbreviated and funner name: scollab. Pronounced skoal-lab, not school-lab. Cuz art class in a school lab is just bound to end in 'splosions and flames. Which actually sounds super funner-er.) In this here post, Ima share with you one of the happiest scollabs we did this year: Our School has Heart Mural!
If this looks vaguely familiar to you, that's because I blerged about the first phase of this project here. This lovely scollab masterpiece hangs happily in the front office of my school. Previously, the front office was referred to as the DMV for it's warm and welcoming wall color (what is that, Sherwin William's "Institution White"? "Padded Room Gray"? "The Last Color I See Before My Date with the Principal Blue"?). It was mentioned that some art might cheer the place up and that's all it took for my ears to prick up. ART?! Did somebody say...art?!
We started this project way back at the start of February so love was in the air. Which explains the smell. I decided that each kiddo was gonna contribute and each grade level would do a little something different. I'll give you the quickie version here but you can visit this post for the full story

The kindergarteners were given a paper heart template to trace in black oil pastel. Then they doodled in warm or cool colors and then proceeded to water color the daylights outta that thing in either warm or cool. 
The first graders were given 3" square pieces of felt in whatever color they liked. Then they traced that same hear template in chalk and painted with tempera. Painting on felt is really rad cuz it gives the piece this almost oil painted appearance. If the kids painted the hear with warm colors, they were to reverse that color scheme for the background. Puffy paint was added because why not?! Puffy paint is the jam.
Second grade town created these pipe cleaner hearts that they yarn bombed and bead attacked. I had the pleasure of hot gluing them to the felt of their choosing. 
Third grade thought that Christmas came early when I showed them how to embroider. Every last one of them enjoyed this so much and was able to complete their stitching (and button sewing!) in one hour long class. 
 Needle felting was introduced to my fourth grade students. We really enjoyed this and only had one bleeder (those needle felting tools are both sharp and serrated, y'all. They ain't for sissies). 
As the students completed their work, I started to lay them out on two pieces of foam core. I happened to have two 3' X 6' pieces of foam core to my name because, well, why not? I originally thought of doing a value gradation but rainbow order ended up looking the best. 
Hot gluing over 400 hearts wasn't exactly my idea of a good time. The upside is I no longer have finger prints and the cops will never find me! Take that, coppers! 
Once all the gluing was complete, I took the two boards to the office and my super awesome bookkeeper buddy and my radical rockstar custodian friend hung them up for all to see. 


Don't miss! I'll be presenting on school-wide collaboratives at the AOE conference this summer
And now, let's talk GIVEAWAY! Last week's winner is Lil! When asked what her fave collaborative project was, she wrote:

This year my third grader class created large, beautiful, textured and patterned frogs. Then each table created their own scene on huge mural paper. There was an outdoor birthday party, with an airplane toting a birthday wish sign. One group made a water theme park setting with a lazy river - one frog was definitely relaxin' on his tube!! Another group made a nail salon - now who doesn't like a good froggie pedi??! Oh my gosh, the kids absolutely loved working together on such a huge creation. Do you think it was because they got to spread out on the floor to paint and cut and create??!!!!


Congrats, Lil! I hope you enjoy the artsy t-shirts!

Now, I know most of y'all are enjoying your summer days. How 'bout you spend some time creating with a good book? To enter this giveaway, just do the following:

* Tell me what dream scollab you would create with your students. A permanent mural? A tile project? I'd love to hear! Maybe if we start dreaming big now, we'll have the energy to make it happen come this fall!

* Leave your email address in your comments so I can contact you.
 photo signature_zpsd10b3273.png
Read more »