Showing posts with label weaving with children. Show all posts

Monday, July 22, 2019

String and Stitch Lab for Kids is...HERE!


ANNOUNCEMENT: I'll be doing a book launch at Parnassus Books in Nashville on Sunday, August 11th at 2pm. If you'd like to join the fun, please RSVP here. Let's PLEASE support our local book stores by purchasing my book at Parnassus. LOVE to see you there!

I CAN'T EVEN BELIEVE IT MYSELF...Stitch and String Lab for Kids is finally (like, FINALLY) here! And I cannot wait for you to see what's inside!
When I was a kid, fiber arts was my favorite. I didn't have art class in elementary school. So I had to get my art-makin' fix elsewhere. I learned straw weaving in Vacation Bible School. My grandma taught me how to embroider and cross-stitch. And my favorite teacher taught me how to do string art (shown above). As an adult, I've carried with me that love for fibers. When I have free time, y'all know I'm usually sewing up a dress or needle felting some wearable art. It didn't take me long to bring my love of fibers into the art room. Twenty years later...my students have experienced all forms of weaving, needle felting, wet felting, sewing, embroidery and more. I packed ALL of my favorite kid-approved lessons into this book...and I'm so happy. I want to share my love for fibers with you and your kiddos!
For that reason...I thought it would be fun to bring back the ole Facebook LIVE Craft Nights. I actually STOPPED doing FB/IG LIVES when I was so busy...writing this book. With that behind me, I'd love to get back to crafting with you. Since school is starting soon and I've got a couple other obligations happening, I can currently commit to these three dates. We'll see where we go from there. Here's the line up:
Mark your calendars and set your alarms! I'll be sharing the supply list shortly. I know if you are anything like me, if I give it to you too far in advance, y'all are just gonna forget all about it. So stay tuned here, follow me here and I'll keep you posted. 

TO CELEBRATE THE BOOK LAUNCH...I created a podcast episode just for you. Have you ever wanted to write a book? Well then I'm spilling the beans on the who, what, when, where, why and HOW in this episode:

By the way, if these photos are sparking your interest, they are projects from my book. There are 44 projects in my book...quite a bit! If you'd like to see me share more about my book and see some super easy projects for the youngin's, you can see my interview on Nashville's Talk of the Town here. 
If you do receive my book and like it, a review here would be AMAZING! You don't even know just how much a review (preferably a good one!) can mean to me. I would truly appreciate it! The amount of work that goes into making a book is bananas. So a kind word and review is a wonderful thing.

Also! I cannot forget to mention that my first book Clay Lab for Kids is also available here...and again, reviews welcome and much appreciated! 
Read more »

Tuesday, January 6, 2015

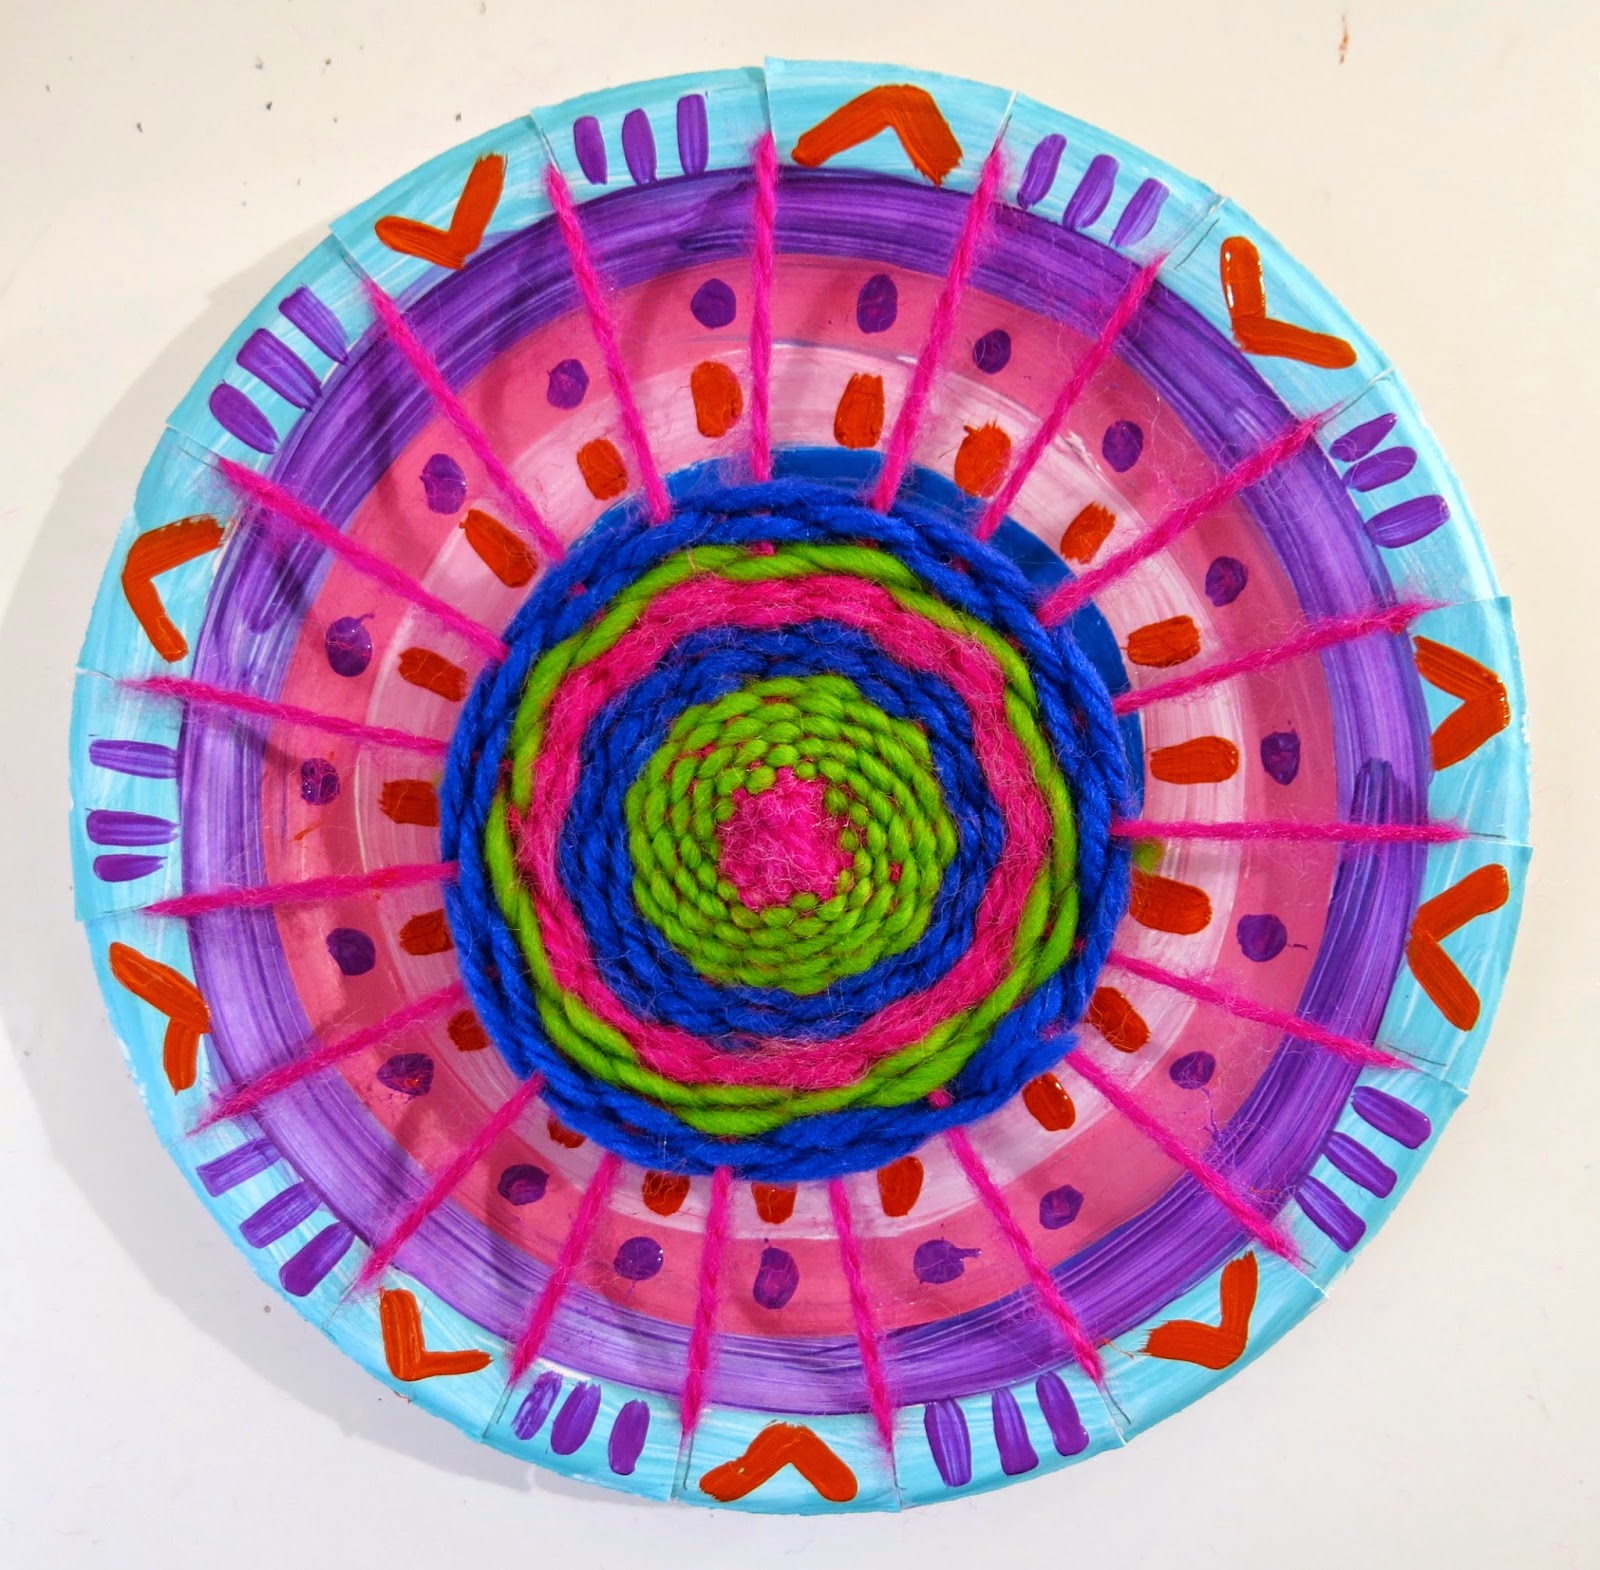
In the Art Room: Circle Loom Weaving

Wuz happening, my wild and wacky weavers?! I hope the return to art teacherin' (if that's your bag) has been a smooth one. Personally, I find it a cruel joke to return to school the week of a full moon but, once again, the powers that be neglected to ask my opinion. When will they ever learn?

So, show of hands, how many of y'all decided to go down Weaving Street this month? If you need a refresher, you can start with this paper weaving lesson then transition to this super fun straw weaving project. I just had my fourth graders start their pouch weaving and they were beside themselves with excitement. Like, they were all, "enough with the History of Weaving prezi, lady, let's weeaaavvveee." I'll be sharing that prezi with y'all later this week (still tweaking it) but you can find the complete steps for pouch weaving starting here
But let's talk Circle Loom Weaving, shall we? This lesson I do with my second grade kids but if you've never taught weaving to your students before, I recommend teaching this to third grade. Again, always start with that basic paper loom weaving as it teaches all the vocabulary and techniques making all weaving projects that follow much easier. 
Supplies:

Chinet Plates: When plate weaving, I always use these. They are the thickest and most durable plates. I like to use the smaller size.

Yarn: Any kind will do. Funky yarn is fun but only use that for the actual weaving portion. For warping, use regular yarn.

A Loom Template: I have two for each of my five tables so the kids can share. Each template has 19 notches on it.

Masking Tape: You'll need this to tape down the initial warp strand. And for closing the mouths of those "I Can't Do It" kids. Oh, I kid! Kinda.
Last year I typed out all the steps which you can find here. I'm hoping that you'll find the video even more helpful. If you still have any questions, please ask in the comments and I'll get back to you.
For those of you that don't like video, here's some pitchers and werds. Place the loom template on the painted plate. Trace and cut the 19 notches. I always encourage the kids to count and be certain they have 19 lines drawn before cutting (as some will end up with 190 which is not what you're going for).
NOT GONNA LIE: Warping is the least fun part. Especially when some of the kids stop listening and get stuck on repeat: I Don't Get It. When that happens, I have everyone put everything down, we stand up, we stretch, we shake it off. Then, I tell 'em that they are going to sit back down, not touch a thing, and listen to me. Again. 

I have also found that peer tutoring is priceless. These kids speak the same language. Have them help each other, they communicate much better with each other I have found!
Once you are beyond the warping hump (um, the whuh?), the weaving portion is much easier. That is WHEN you get beyond that initial confusion I mention in the second clip. However, if you do that little trick that I share with you, I think you'll find that the kids get it and will really take off with weaving. They love to sit on the floor and weave and chat. I let them sit with buddies, sometimes we go outside if the weather permits. It's just such a fun, relaxing project...once you are beyond the warping and initial day of learning to weave. Stick with it, you'll find that you and the kids will love the process! 
Granted, this weaving project does take time. However on Thursday I'm going to share with you a similar weaving project that takes have the amount of time for those of you that are limited. 

Until then, I do hope you found this helpful and will consider giving weaving a go! And I'd love to know, what weaving projects do you just love to do? 

 photo signature_zpsd10b3273.png

Read more »

Sunday, January 4, 2015

In the Art Room: Straw Loom Weaving

Hello, weaving friends! Welcome to the second installment of The Weaving Series during this Wonderful World of Weaving month formerly known as "January". In case you didn't know, I'll be sharing with y'all some of my favorite weaving projects all this month each complete with step-by-step photos and short video clips. So, what's in store today? Drinking Straw Loom Weaving!

Straw Loom Weaving is a great follow up project to Paper Loom Weaving as it builds on all of the previously learned skills. The youngest grade level I've done this sort of weaving with is second grade. However, I believe upper grades would enjoy this fun, easy and totes educational weaving project as well. Let's get started, y'all! 
Supplies:

Large Drinking Straws: I like the big ones without the bend in them. I've scored them at fast food joints and the grocery. I cut the straws in half. Each kid will need four straws.

Scotch Tape: You'll need this to adhere the yarn to the straw. I like this kind of tape better than masking because it can lie flat against the straw and not impede on the weaving process. And don't nobody like their weaving process to be impeded upon.

Yarn: Four strands cut to the desired length of the finished weaving. In this demo, mine was cut to about 9". 

Even More Yarn: For weaving. Let's get started!
You'll begin by warping your loom. This is the fun part, at least according to the kids, a you'll be "drinking" the yarn. If you watch my clip, you'll bet an even better idea on the process. Start by holding the end of the yarn at the bottom the straw. Place your mouth on the opposite end and inhale. The yarn will pop out the other side! Warning: do NOT inhale too much as you'll end up with a yucky mouthful of yarn. 
Yee-ouch, nice nails. Tape down that little yarn tale with some Scotch tape.
And do that four more times.
Tie all the ends together with an overhand knot.
Once you're warped (and, admit it, you've always been warped), you're ready to weave! If you watch this short clip, you'll get the process.
Hold the straws together in your non-dominate hand with a tiny bit of space between 'em. Use your thumb to hold the end of the warp string while your other hand begins the process of over and under.
When you reach the end of the row of straws, go around the end straw and begin the process again.
Lookie there, just like the paper weaving
In this final clip, I'll show you how to finish off the weaving and remove it from the straw loom. Take heed: the kids will often want to slide their weavings completely off their straw loom as they weave. It's important that they do not! Their weaving should slide off the ends of the straws naturally as they are weaving along. Also, they will freak out when their weaving begins to slide off because it will look a little loose. Set their minds as ease and tell 'em that it's perfectly normal. No need to freak out.
So what do you do with a straw loom weaving once it's complete? Well, my kids love to make them into bracelets by simply tying the ends of the warp strings together. They've also made belts, bookmarks and wallhangings. I'm personally dying to get some yellow and blue yarn and create woven Minons. 

What about you? Have you done this kind of weaving with your kids before? If so, what have y'all created! Please keep the convo going in the comments, kids.

ALSO! ARTSY BOOK CLUBBIN' KIDS (that's you, you can join the fun here!) don't forget that we'll be reading The Art Spirit by Robert Henri beginning Monday, January 12th! 

The winner of the Artsy Book Club Giveaway is...Leah! Congrats, buddy! 
 photo signature_zpsd10b3273.png
Read more »

Friday, June 15, 2012

In the Art Room: Weaving, Part 1

Woven pouches created by fourth grade artists. You can see more of their masterpieces at our school-wide art show here and here.

Since I shared with you photos from our art show, I've had several questions about the woven pouches that were featured. Because this project is so easy and fun, I thought I'd share it now that the kids are out of school and getting a little...well...restless. It's the perfect summer what-can-we-do-now-? craft.

In the art room, this project has become a rite of passage for my fourth grade students but can easily be created by kids as young as second grade.  Because this craft involves multiple steps, I've divided it up into four posts: Weaving Part 1: Getting Started; Part 2: Weaving the Flap; Part 3: Removing the Weaving and Finishing; Part 4: Weaving a Cord

Please, fellow art teachers and parents, leave comments below on how you teach this lesson differently. And, of course, questions if you got 'em. Have fun!
 Supplies: 
  • Scissors
  • Tape
  • a loom. I purchase ours through Sax but you can create your own with thick cardboard.
  • Thin cotton string. This was bought for a couple bucks at Walmart but in a pinch, you could use yarn.
  • Big-eyed needles. Again, Walmart would carry these in their craft department.
 Preparing your loom:

These looms that I purchase through Sax have notches in them that are too far apart. When you weave with them like this, it creates a pouch that is a little too loosely woven, in my opinion. So I have the kids cut the part that sticks up (we call them "teeth") in half. It's a struggle because the cardboard is thick and there is some moaning and groaning but they can do it. 

If you are creating your own loom from cardboard, you will want to space your notches about 1/4" apart. I'm not really into exact measurements, so I say just eyeball it. However, make sure that you have the same number of notches on the top as the bottom.
 Warping your loom:

Warping your loom is the process in which you are putting the string on your loom that you will weave over and under. To do this, start at one corner of your loom and tape your warping string into place. I have the kids put the tape at the bottom of the notches. This will prevent the kids from accidentally weaving over or under this small string.
Now begin wrapping the warp string all the way around the loom. For example, from the taped end, go down to the bottom cut notch, wrap string around the back and up to the top notch and then go to the bottom again. You should have strings on both sides of your loom, making certain not to skip any of the pre-cut or notches-you-cut.

While you are warping, keep the string attached to the cone. I do not allow the kids to cut the string from the cone unless I have checked their loom. If they have skipped a notch, this allows them to go back and fix it without wasting any warping string.
 Once you've checked the loom and are certain no notches were skipped, cut the string and tape it down. Again, tape as close to the notches as possible. Use your creepy bending finger (shown above) to scoot those other warp stings over to tape the string underneath.
 Weaving:

The process of weaving is that of going over and under the warp strings in an A-B pattern. The string you weave with is called the weft. No long needle like this one? Tape your string to the end of a pencil or skewer stick.
 Pull yarn through until you have left behind a 1" tail. Turn the loom over and weave over and under on the back. Once finished with that side, turn loom over to the original side.
 Now, this time, weave the opposite of the previous string. For example, in the photo above, I wove over and under because the string underneath was under and over.
 You know you are weaving correctly when you see something like this. Looks a little like the netting of a tennis racket.
 But it's too loose. Do you see all of those white warp strings through your weaving? Well, you don't want to. Use a fork to pack down your weaving until those warp strings disappear and all you see are the weft strings.
 Adding a new weft: 

Okay, this one is debatable. Technically, you are not to tie two stings together but overlap the strings to add another. Or something. But at this point, if I throw one more piece of info at the kids, they are likely to have an aneurysm. So, we simply double knot tie a new string to the old, snip the "tails" and keep on weaving.
 Incorrect weaving: 

How do you know if you are weaving incorrectly? Well, you'll see a lot of vertical warp strings, like you see in the yellow portion of my weaving above. This happens when you are not weaving the opposite of the previous string, but weaving the same over and over again. If you see this, you have to take it out and redo.
 Weaving away...

I tell the kids that their weaving must be somewhere in between 4-7" tall. This allows room at the top of the loom for weaving the flap and tying off the weaving. This should keep those kiddos all tied up (heehee, tempting, right?) until next week. I plan to take mine on an upcoming trip to keep me occupied.

Remember, you are weaving on both sides of the loom, front and back. Ya hear?
 So stay tuned!

Next week, we'll learn how to weave that flap. Again, feel free to leave any questions or comments and happy weaving!

Read more »