 |
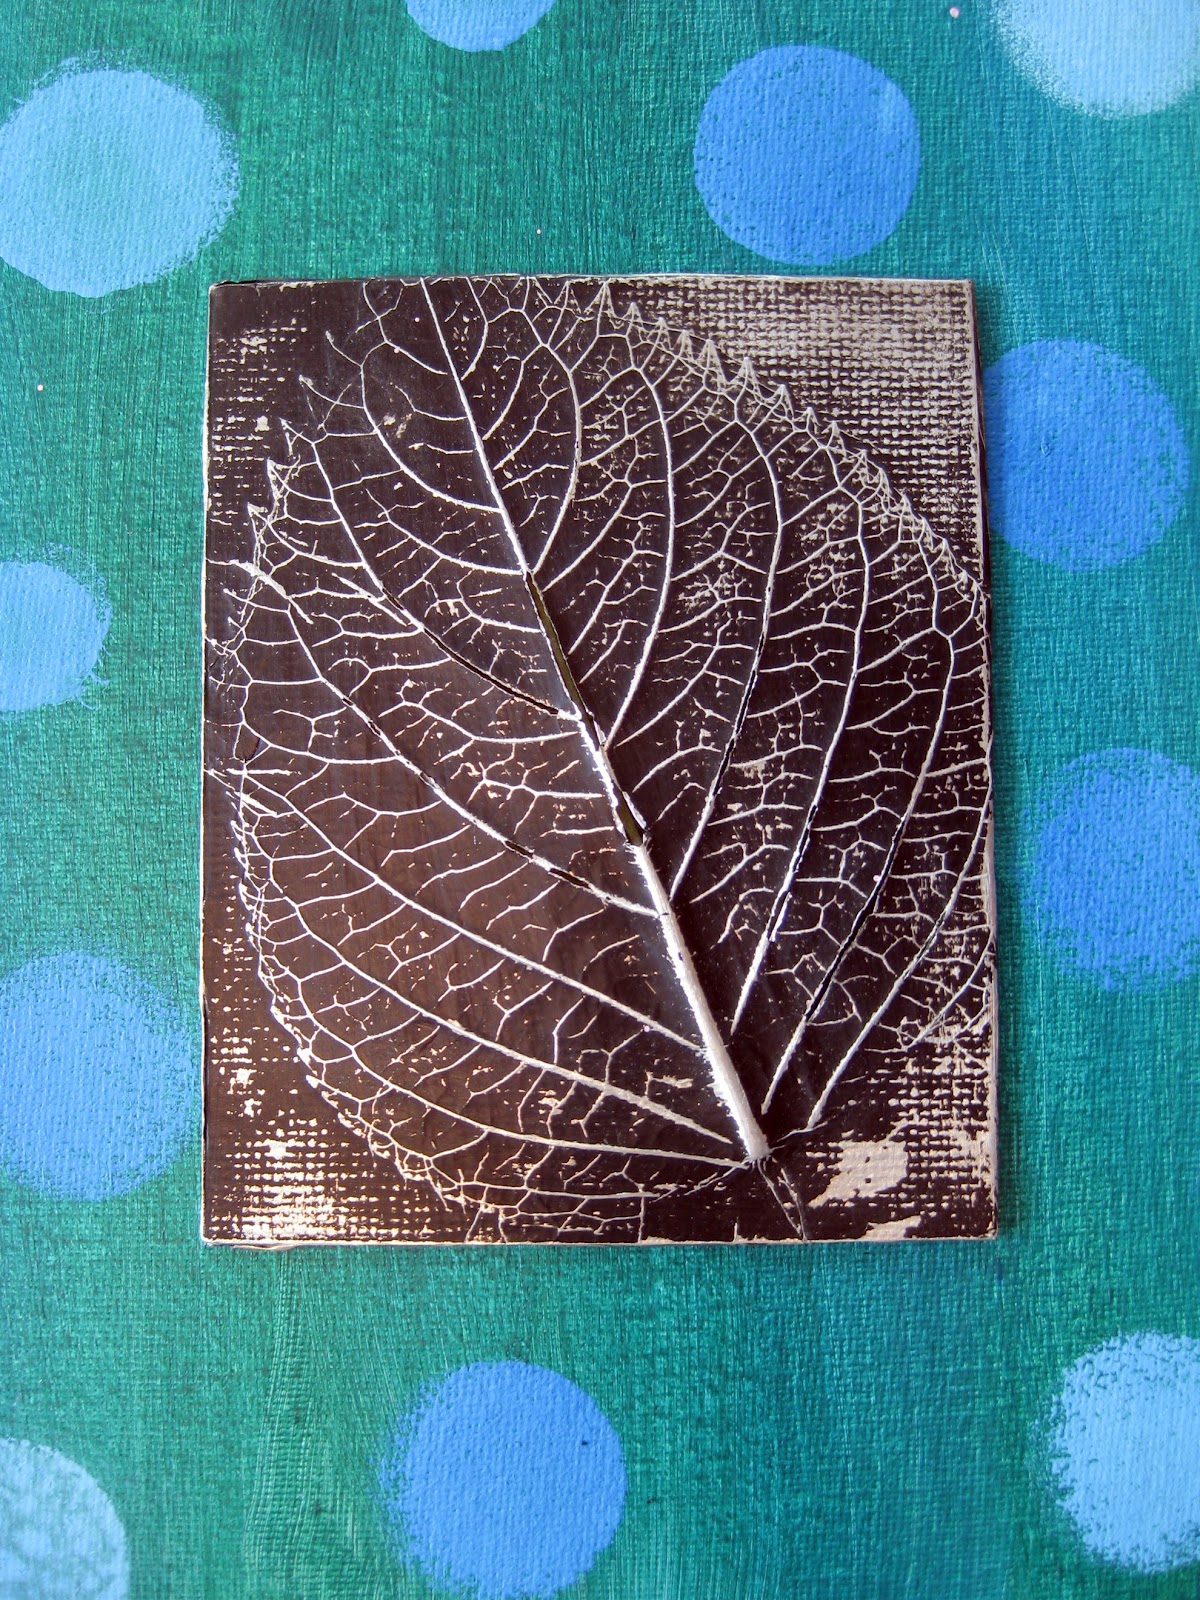
| A lovely leaf relief with a dotted background by one of my former students. |
|
Hey guys! This post has been very popular...if you are interested in other leaf related projects, be sure to look at this Leaf Printing post and my Leaf Press Project. Thanks!
While second grade was completing that project, I was working with my third graders on these Leaf Reliefs. It's a very spring/summer kind of project, so I thought I'd share it with you.
 |
| A close up of one of the 3" X 4" reliefs. I love that this artist chose a less than perfect leaf. |
I like that I can talk about all of the elements of art when looking at something as simple as a leaf: the
shape of the leaf; the
lines and
texture of the veins; the varying
colors of each leaf; the cylinder
form of the tree that the leaf came from. And when we complete this project, we chat about the
values we created and the positive and negative
space of
the leaf. I do a lot of what's called "call and response" in my classroom which is where I say something and the kids finish my phrase. For example, when I point out an "element of..." they all respond "aaahhrt". Because we are fancy artists that speak with funny accents. Whatever helps them to remember, right?
 |
| Completed by an adult during an art afternoon I hosted a while back. I love that she chose to use a dandelion. |
For this project, you'll need to gather the following:
- matte board ... I used 3" X 4"
- leaves, delicate flowers, lace ... really anything flat with some sort of texture
- 3M Spray Glue
- inexpensive aluminum foil
- the $1 a can matte black spray paint found at Home Depot ... seriously, you want the cheap stuff
- 0000 steel wool
- canvas, matte board or even cardboard for the background
 |
| One adult used impatiens and they turned out beautifully. I like that she even added some color to the foil with watered down acrylic paint. |
In the art room, I had the kids gather around a table, pick a piece of matte board and lay it in front of them. Then I would lightly spray the glue on the board. The kids then chose from a pile of leaves laying their leaves on the sticky board veiny side up. I then sprayed the board again, laid a piece of tin foil over the board
shiny side up and sent the kids back to their seats. At their seat, they used their finger to rub the surface of the board and reveal the texture underneath.
Once that was complete, we took our boards, a large drop cloth and some cheapo spray paint outside. I attempted to let the kids spray paint but I ended up giving the boards a final coat to insure complete coverage. We let their boards dry until the following art class.
 |
| Rubbing the spray paint off of the matte board to reveal the textured leaf underneath. |
Using the softest of steel wool, the kids burnished their leaf reliefs. Some kids chose to burnish the boards completely while others liked the variety of values. And even though I emphasized not to rub too hard, we still had several incidences where the kids tore their foil. Usually they noticed right away and the foil could be gently glued back into place. In other cases, we repaired by using a black or silver sharpie to camouflage the tear.
For the background, I have tried a variety of things. In the classroom, we have used canvas boards that we've painted (after a long chat about color theory and mixing, of course) and applied a texture with our texture combs. Not familiar with texture combs? I picked mine up from an art supply catalog however they can easily be made by using either a plastic comb or cutting notches into cardboard.
 |
| I picked up a ton of matte board at a local framing shop when it was going out of business. I'm sure any such shop would make a donation. I love the burlap texture on this matte board. |
 |
| This background here was created by an adult using a leaf stencil. I love the combination of two reliefs. |
Once paintings and reliefs were complete, I hot glued the metal work onto the canvas. I gave the kids the opportunity to either have their reliefs flat or popping up by adding a bit of stryofoam to the back of the relief.
 |
| Another adult example. I love her use of type and found objects. So many possibilities! |
| |
The works of art were a real show stopper once hung in the hall as a group. What I loved so much about this project was that I was able to start the year with a solid introduction to the elements of art. Not only that but all children were successful which is a huge ego bust. In fact, my principal-at-the-time loved them so much, she stayed after school with me for a couple of days so I could teach the lesson to her! Her leaf reliefs are now proudly displayed in her home. Gotta love a project that inspires everyone!
Hopefully this will inspire you as well. Enjoy your weekend!


So you're just the coolest art teacher in town, aren't you? I'm 27 now, but I remember that in elementary school I absolutely treasured art class. I have never been naturally good at math and in second grade I had a teacher who would literally ridicule me in front of her entire class after math tests if I did poorly or for asking too many questions. Math was a tense hour for me, and it made me hate school. Luckily for me, immediately after math I had ART and a wonderful ART TEACHER named Mr. Turner. Oh how I LOVED his class!!! And I was GOOD at art! There were no wrong answers in Mr Turner's class and there were no wrong ways to draw or paint. Just different ways to express yourself. He was wonderful and he made making it through math class worth it. Art teachers are angels, honestly. They provide much-needed relief in school, a way to creatively express and decompress. Not to mention, art teachers usually end up, just by dint of personality, being the coolest people in school. :o) You seem like a wonderful teacher and I hope that you know that what you really does matter SO very much.
ReplyDeleteim answering a post from long ago, but to everyone, I just wanted to state that our whole world is mathematical...from the structure of a leaf to the atoms in aluminum foil. We would all be better off if as youngsters we would be introduced to math through the nature of our world. The work above is art, but it is also math.
DeleteThese are beautiful!! Thanks for sharing!
ReplyDeleteAnd so super easy, hope you'll give it a go. Thanks for visiting! ...Cassie
DeleteIs there a particular famous artist that I can reference that uses this type of art?
DeleteI would talk about what relief sculpture is and examine some examples with your students. They could look at the relief sculptures on monuments, perhaps.
DeleteI am so inspired by your blog and videos!!! You are amazing! Thank you so much for everything..
DeleteIn answer to Maggie Roschel, I might reference Max Ernst...
These are fantastic! I am hoping to make a move back to the midwest and take on a position in an elementary school. I have been teaching art and AP Art History in a high school in the SF Bay Area for the past 5 years, and so I am excited about the potential to shift back to elementary where the kids have yet to be told that they are not "good artists" so less afraid to be "wrong". As a high school teacher I spend a good deal of my time with the kids trying to undo years of damage to their creativity. :-(
DeleteIn reference to Maggie and along the lines of your reply, I would actually reference repousse (even though it is not technically the same) as the results are similar and the idea of working a metal-like surface to capture texture is something that can be demonstrated historically by looking at, for example, The Funerary Mask of Agamemnon (Mycenaen), taotie of Broze Age China, or the small metalworks of the Vikings.
I hope that this is helpful for those hoping to tie this to an historical piece or pieces (my BFA is in Jewelry/Metals, so this is something I can get pretty excited about! I do not mean to take over, only help).
Awesome!! Thank you and congrats on your new adventures in art teacherin'!
DeleteAbsolutely wonderful! Love these!
ReplyDeleteReally lovely - I must try this! thank you for sharing :)
ReplyDeleteI love the texture on these leaf prints! Stunning! Thanks for sharing them!
ReplyDeleteNfl shop:-Your Shoping Blog is very cool and nice . Thanx for my sumit my link.
ReplyDeleteLet me say, I love art teachers! I had to try this because they are so lovely.
ReplyDeleteI love these! I plan to use this technique in some collages of my own.
ReplyDeleteThank you so much for sharing!
hi Cassie, love the art projects on your site, so creative and the results are inspiring for all ages.
ReplyDeleteNote: I assume you meant to say a "huge ego boost" and not "a huge ego bust" :-)
WOW I LOVE THEM all ,, I wished i knew how you made them ... help .
ReplyDeleteMaryR
Can you tell me in what order the process was done for the Impatiens piece? It's sooo lovely!
ReplyDeleteThese came out beautiful and are so delicate looking! I have had classes make collagraphs with cardboard shapes or string on a background, print them and then cover them with foil which they colored with permanent colored markers.
ReplyDeletehttp://floridacreate.blogspot.com/2009/10/collagraphs.html
I like the idea of the spray glue for the leaves and spray paint for the foil-
Thanks for sharing-you seem like a FUN art teacher!
This looks like a fun project! Thank you for sharing the instructions. Do the leaves that are sandwiched between the matt board and the foil ever mildew or cause a problem when they dry up?
ReplyDeleteLove it!
ReplyDeleteI assume the leaves and flowers were press dried prior to glueing?
ReplyDeleteNot really. I mean, I picked them that morning, squished 'em between some books and used them in class that day.
DeleteI only have my art class once a month at the library for 45 minutes, which wouldn't allow time for the spray painti to dry.
ReplyDeleteDo you think the kids could color the foil with a black sharpie instead (which would dry faster than paint) and then burnish them?
Thanks--lovey project!
Maybe...? Not sure, perhaps you outta test that one out before hand. Another idea would be india ink...but that would also take time to dry. The spray paint only needs about 7 minutes max on a dry day. You could demo the burnishing step to the kids while their paint dries? Just a thought :)
DeleteThe leaf reliefs turned out beautifully, and the kids were so proud of their project. I did end up using the spray paint, and as you said it dried very quickly. We were able to complete the project within the 45 minutes, and clean up was easy.
DeleteThanks so much!
what grade levels are you doing this lesson with?? (or would you suggest doing it with? I teach K-5...
DeleteI did the project with my third grade students. I would say 3rd and up would be fine :)
DeleteIs the matte board necessary of would some thicker construction paper or something similar work? Trying to keep it at minimal cost. LOVE the idea though!
ReplyDeleteWhat about cardboard cut from cardboard boxes? My school recycles tons daily as do the local grocery stores, you could look there. Tag board is pretty heavy so that might also work. Just to be safe, maybe try it on your own first? Let me know how it goes and have fun!
Deletehow about show polish (covering it with black shoe polish, let it set for a few minutes them wiping off the excess)? Would that give the same effect? We meet just 2 times per month...........
ReplyDeletegracias, fantástica idea relacionada además con el mundo natural!!
ReplyDeleteThis is incredible. Must try it before the snowfall, thank you so much!
ReplyDeleteI just love this project, all of them turned out beautiful! Thanks for sharing!
ReplyDeleteI love this art! It looks amazing!! :)
ReplyDeleteTechniques to create beautiful art
ReplyDeleteimpressive result, fell in love with this work
I have a question What is the foil or paper towels in?
I make art with plastic pet I invite you to my blog http://yadidborjasarteconbotellaspet.blogspot.mx/
ReplyDeleteyadidborjas@gmail.com
About how many matte boards can you hit with each can of spray glue (so I know about how many to buy)? Totallllly doing this project with my 4th grade! They're just now finishing up some oil pastel/watercolor resist leaf drawings (that honestly look wayyy too young for them, too easy, so they're ready for something cool and fun!) and this would follow nicely!
ReplyDeleteThank you for sharing , this is a great activity for all ages. I will try it with my group! (they are women aged between 18 and 75 years old!)
ReplyDeleteCassie, I am considering doing this during our parent/student art night. Do you know of a way to do this with out having to wait for paint to dry?
ReplyDeleteWell, you could mount the leaves on the boards, cover in foil, spray them and THEN give them out but that sounds like a lot of work on your end. If you did it that way, then people could simply pick a small board to rub the spray paint off of. If you got a volunteer to help you out, I bet you could make it happen. If you are talking about the paint on the canvas board, just substitute the canvas board for something else like a nice piece of matte board. Then they could mount their artwork on that. I hope that helps!
DeleteI did this a few months ago at a family art night at school. I pre-sprayed the aluminum foil, then pre-cut it into smaller pieces for kids to use. Worked great. There was no drying time and students/parents could finish their project in 15 minutes or so (we skipped the background paper).
DeleteI love reading your blog, you crack me up! This project is gorgeous and I am unashamedly going to steal it, thank you!
ReplyDeleteI wonder what it would look like with a snowflake underneath?
ReplyDeleteJust what I needed for a galley opening activity where leaves are featured a great deal in an art of blacksmithing exhibit. I'm using acrylic paint instead due to the fact that it can't be outside. Thanks for the great project:)
ReplyDeleteHi Cassie - this project is amazing, and you have so many great ideas! I am considering using this project in a large scale format to be used as an auctioned art project at my kids' elementary school. I am wondering if you had any problem with the leaves after doing the project - or if the spray adhesive essentially serves as a "cure" for the leaves. Thinking of using matte board, and wanting to make sure we won't have an issue with the leaves rotting out, or moisture absorbing into the matte. Projects at our school can sell well into the thousands, so I want to make sure we're on top of having it be a long lasting masterpiece! Thanks for any feedback you can offer!
ReplyDeletetotally awesome project... I'm addicted to it! Thank you for this so much.
ReplyDeleteI'm using this project for a whole school fundraiser and I've been experimenting, and having some trouble. After I spray the boards with spray paint and begin to burnish with steel wool, the paint isn't coming off well - any idea why? I've tried using different base pieces - cardboard, regular paper, etc. I will order the mat board if you think that could be the culprit, but I didn't think that mattered since it's covered with foil. I've tried using different spray paints. Usually I spray paint the boards and then burnish them with steel wool the next day. Also, if students want to add color on the foil before painting, what type of paint do you recommend? I've tried using acrylic and when I burnish them after painting, the color doesn't come through. Help!!
ReplyDeleteHey Kami! I think I know the prob: You're using the wrong spray paint. If you are near a Home Depot, purchase their nasty cheapo $1 a can MATTE spray paint. If you are using glossy, it is harder to remove. Stick with the matte stuff. If that doesn't work, perhaps go one up in roughness on your steel wool...(?). I really think the spray paint is the problem. Please keep me posted!! Thank you!
DeleteThe spray paint I used is the one you recommend. It worked a little better when I only waited 10 minutes after spray painting them vs. overnight. I still am not able to get the paint colors underneath to come through. Do you water down the paint or use it as is? What kind of paint did you use? I'm assuming you wait for it to dry before you spray paint on top of it? The paint I'm using is acrylic - the cylinder shaped small tubes you can find at Walmart or any craft store. I also did try going up a level, then 2 on the steel wool with no change :( Thanks so much for your help!
DeleteThe leafs look fabulous. Amazing results.
ReplyDeleteWhat a great technique! This would look fabulous in a nature journal I will be starting soon. Thanks so much for your ideas!
ReplyDeleteHey Cassie!
ReplyDeleteI want to do this as a inspired project. I am practicing at home and it is just not coming out right. My leaves are not "popping out." They are almost camouflaged by the folds that are created in the tin foil. Am I not using thick enough leaves? Thanks!
Hi! Okay...yes, I think maybe your leaves are too thick. You can actually use small leaves with delicate lines and still have a great result. Be sure to place the leaves vein side up...lay the foil on top...and only rub with your fingers (not your nails). If the foil is wrinkly, rub that hard with your finger tips to smooth it out. Stay away from leaves with a thick stem as that will def pop out of the foil. I hope that helps!!
DeleteThank you!!!!! I did some more experimenting and it came out great! Can't wait to do this when school starts in a few weeks! Love your site:)
DeleteThx for sharing. I. Am older person 67 and I will be into this as soon as spring leaves come. I think it is lovely. Well done!!!
ReplyDeleteGREAT THANKS for such an inspiring project
ReplyDeleteThis is lovely! I am wanting to try it with very thin sticks & twigs to look like little trees. Would it work? Or would it all just come apart? Please reply, as i really want to try it! Thanks!
ReplyDeleteHi friend! If you do this with twigs and sticks I think that would work if you used a thicker foil...I used the cheapo stuff and even the stem of the leaves were poking right thru. So, pay a lil more, get the good stuff and it should work. When you use the steel wool, don't press too hard and you should be fine. Please let me know how it goes!
Deletexo!
Cassie, I am a new art teacher and I was trying this out using regular aluminum foil. It doesn't seem to be thick enough. I feel I probably need to get the heavy duty foil... and do you ever remove the leaves and twigs from under the project, especially after the paint is applied?
ReplyDeleteI loved your post so much that I did the project with twin 10 year old boys. they generally do not enjoy art, perfering sorts of any kind but they loved it. framed them for their mom. They were so excited to give them to her, so THANK YOU for the inspiration!
ReplyDeleteI was just wondering if I could use the backs of old lino boards .We have loads of them in school as we are big into lino printing .The hessian backing on the lino has such a good texture .
ReplyDeleteIt seems like that would work, the matt board is just for stiffness, right Cassie? I love the idea of recylcing those boards. I have used cereal boxes in a pinch.
DeleteI am trying this project this weekend to do with my art class next week. I love these type of things. Thank you for sharing the project Cassie.
ReplyDeleteHi Cassie,
ReplyDeleteWanted to drop a quick note to say I've been hanging onto this for months and am about to get started with my "leaf reliefing" My Mom died a few months ago and she was into dried flower crafting SO I have tons of dried flowers,leaves,matboards,etc and I hope to make a bunch framed and sell them over the holidays. I also am a graphic designer by trade, so I'm working on some raised lettering to add scripture, quotes,etc to them. I appreciate this lesson and something fun to look forward to do over a long winter!
Linda
Hi Cassie
ReplyDeleteWhen in process do we add acrylic paint to achieve result shown in impatients photo? And can we use other materials besides filter foil? Is there copper foil? Some of the pieces look copper colored. Thanks for making a difference!
Hi! I believe the paint was added right after the spray paint was sanded off :) I think you could use other metals IF they were thin enough...anything too thick would not work. We only used the junkiest/thinnest of tin foils. I hope that helps!
DeleteHi Anonymous, there are different colors of foils, some are expensive, but can be found online at joann fabrics, eve better is ebay, lots of options.
DeleteHi Cassie,
DeleteThank you so very much for sharing your wonderful ideas with the world!! You are so inspiring!! I do have a quick question about the leaf rubbings - did you have textured mat board to glue leaves and then foil on? Or did you put burlap onto boards and then glue leaves/foil? The textured background of the leaves is just beautiful! I have also used black shoe polish on foil - works great! Again, thank you so much!!
I really love this project! I made a series of four, mounted on 12x12 canvasses with leaves from the trees in my garden, that came out beautifully! They are taking the place of a fall wreath over my brick fireplace (wreath deconstructed!). I'm using this project for my latest Art Afternoon with girlfriends... and wine! The MOST fun! I wanted to add to all the comments that the 3M brand of spray adhesive you recommend is definitely the best. (I learned this the hard and expensive way). And in the case of different color foils, I just tried an experiment using The Jim Holtz Adirondak Alcohol Inks in metallic copper ($3.49 from a local craft shop). I wiped some ink a on the foil of a spray painted and rubbed piece, wiped it off with a soft rag and it left a very nice burnished copper finish. This product comes in many colors and could be used in many ways to add color. Once again, great project, thanks!
ReplyDeleteOH!! Thank you for the tip about he diff colored foils! I will DEFINITELY be doing that! So glad you loved this project!
DeleteCan you use other ink? What if I am on a limited budget and I only have Tempera Paint? I only have the kids for 20 minutes twice a week. Can I have them paint with Tempera paint then next week take it off? Thank you.
ReplyDeleteIn the art room, kids gather around a table, pick a piece of matte board and lay it in front of them, then would lightly spray the glue on the board.
ReplyDeleteinter date sheet 2016
Hi I just love your happy , up beat spirit! Your projects are amazing. I'm in my 3rd year teaching art but 15th year teaching. How do you managing prepping all those materials for those amazing art projects?
DeleteHello....wonderful idea here....I would like to do this with my ladies in our craft sessions. BUT I am from England and finding some of the materials a little difficult...Matte board - is this like a mounting board, or does it have a texture one side of it? or? and steel wool...what might this be known as in English ;) WE both speak the same language but according to google, matte board isn't in the UK! Help would really be gratefully appreciated
ReplyDeleteHi friend! Sent you an email (unless there is another Sarah from the UK with THE EXACT SAME QUESTIONS which would be super weird!). Lemme know if you have any other questions!
DeleteSARAH, I AM SURE YOU MUST HAVE CUSTOM FRAME SHOPS IN THE UK, TRY GOING THERE AND ASKING IF THEY HAVE ANY SCRAP PIECES THAT THEY WOULD EITHER DONATE OR SELL FOR A REASONABLE PRICE. I WAS A CUSTOM FRAMER AND WE ALWAYS HAD PLENTY OF SCRAPS. THE LARGER PIECES WE KEPT, BUT THE EXTRA SMALL WE JUST THREW AWAY. THOSE SMALL PIECES WOULD BE PERFECT FOR YOUR PROJECTS.
DeleteHi Cassie, I am so excited to have found this technique using foil. I have been teaching arts and crafts at a retirement home for some time. I am always looking for new ideas. This week we are going to make a metal look using brown paper bags and Tacky glue. The results are fantastic and easy. The directions are on you tube. Now I have found your wonderful idea and that will be my next lesson. Thank you so much!! Mary Ann Brundidge( Solvang Calif.)
ReplyDeleteThanks for the lesson idea. I did this with a group of second graders during the last two days of summer school. I posted pics of their work on the Art Teachers Facebook group (I think you're a member), and gave you credit for the idea. - We had enough time to go out and look for and collect our own leaves for it. I really liked the overlapped leaves. (J.M. Peculiar, MO)
ReplyDeleteHi Cassie -
ReplyDeleteLove the art! Was experimenting with this using corrugated cardboard to create buildings creating a city scape. Do you have any suggestions regarding technique when applying the foil, so that I get harder edges around the buildings?
Thanks so much,
Mike
Cassie, I have been reading comments on your beautiful leaf and foil pictures and wanted to let you know that I am a retired custom framer and had a client bring in artwork their young students had done to be auctioned off at a school benefit. They wanted them matted and framed. I matted them out to fit a standard frame to save on cost over a custom frame. The school made a little over one hundred thousand dollars on that auction. I think your method of foil and leaves would work even better. Make a 5x7 on matte board and matte out to a 8x10 (final size.) This way you can buy 8x10 ready made frames pretty reasonable. I just made a couple and put a black mat on each one. If you would be lucky and be able to find a silver ready made 8x10 frame that would be stunning.
ReplyDeleteCassie it's me again the retired custom framer. I forgot to mention that the students age that did the artwork was between 5,6,7 years of age. As you know they were so colorful and free of spirit. I picked out a color that was dominant in each painting and put that color mat on it and framed everyone in a black frame. The artwork itself was done on basic 8 1/2 x 11 piece of watercolor paper so when they were matted they all came out the same size. I matted each out to fit a 11 x14 frame. I guess the foil pictures could be made the same size. It was such a success because (of course) the parents bought their own child's picture and paid a good price since it was for a good cause.. There was even a bidding war on some.
ReplyDeleteMy project turned out amazingly. I first sprayed the foil with a nicer gold spray paint, then pet it dry. Then I did as the rest of the instructions suggest. It gave it a cool antique brassy look. I'm very happy with it. I can't figure out how to share the picture :( to show you.
ReplyDelete*let (not pet)
DeleteYour pictures are amazing. My problem is that I cannot get the definition of the leaf veins as you do. Yours have such very fine detail to them.Or does that only come when you do the burnishing?
ReplyDeleteHmmm...I wonder: are you using the cheapo thin foil? Because it work best. Also, are your leaves veiny side up? And, yes, you'll see much more detail when burnishing with the steel wool. Hope that helps!
Deletecan I use steel wool with a #000 gauge or #00000, i cant get the #0000 type
ReplyDeleteI used tacky glue with a little water instead of spray adhesive, black acrylic ceramcoat paint instead of matte spray paint, 1/4" foam board scraps instead of matte board. I liked a little heavier aluminum foil than the real thin kind. Looks good!
ReplyDeleteYou are teacher can you don't know that the word you want is "Ensure"?
ReplyDelete"I ended up giving the boards a final coat to insure complete coverage" Poor show Teach!
Wowza, my apologies for my mistake. By the way, your first sentence, "You are teacher can you don't know that the word you want is "Ensure"? " I think you meant to write "You are A teacher AND you don't know..." JUST SAYIN'... ;)
Deletetouché
DeleteI would like to thank you for the efforts you have made in writing this article. I am hoping the same best work from you in the future as well..
ReplyDeleteאלומיניום
Cassie, Love your videos. I am a homeschool mom. I loved art in public school and took some art in college. I am blessed now to teach three art classes to homeschool kids. Sometimes I need inspiration to break out of a rut and I turn to you. This week one of my classes did the Eloise Renouf inspired landscape. What fun. I have to work the leaf relief in soon. Thanks for sharing your ideas!
ReplyDeleteI really like the idea of the project and I want to try it. But I need to ask, I think that it will be fine too if the glue is not spray glue right? I mean I have tubes of liquid glue, the only difference is that it wont dry that fast but I dont mind. Tell me what you think also if someone did it like that. And also can you just spray with paint and right away wipe with damp cloth or something when you want to erase the paint.. or just like washig sponge (the rough part of it)?
ReplyDeleteI love these! I plan to use this technique in some collages of my own.
ReplyDeleteThank you so much for sharing!
หนังดราม่า
your knowledge about art is fantastic and the techniques used are marvelous could you review my blog at "https://www.artculturefestival.in/five-artworks-stirred-world/"
ReplyDeletealso plz email me the same
شركة تنظيف بالباحة - شركة التمييز
ReplyDeleteشركة تنظيف خزانات بالباحه- شركة التمييز
شركة مكافحة حشرات بالباحه - شركة التمييز
شركه تنظيف مجالس بالباحة - شركة التمييز
I’m really impressed with your article, such great & usefull knowledge you mentioned here. Thank you for sharing such a good and useful information here in the blog
ReplyDeleteKindly visit us @
SATHYA TECHNOSOFT (I) PVT LTD
Social Media Marketing Company | SMO Company India
Social Media Marketing Packages in India
PPC Campaign Price | Google Adwords Pricing in india
PPC Company in India | PPC Services India
Google Adwords company in India | Google Adwords Services in India
Best SEO Company in india | SEO Services in India
Bulk SMS Service India | Bulk SMS India
While working with your QuickBooks accounting software, you may get QuickBooks com error when you open or email invoices, other transactions, or reports. This issue can be fixed by updating Outlook to monthly channel version 1805 (build 9330.2118) and higher. Read More about QuickBooks Crash Com Error.
ReplyDelete