We've done a TON over the years and I thought I'd put them all together in one big ole blog post. So, here you go: my 20 Favorite Collabortive Projects. Be sure and click on the links, many of these have how-to videos.
 Check out this blog post on how we created several canvases in this style for our school and the school library!

A fun mural based on the book You Be You was created by nearly all of my students. You can learn about the process of creating our fish here. Read all about the making of the mural itself here!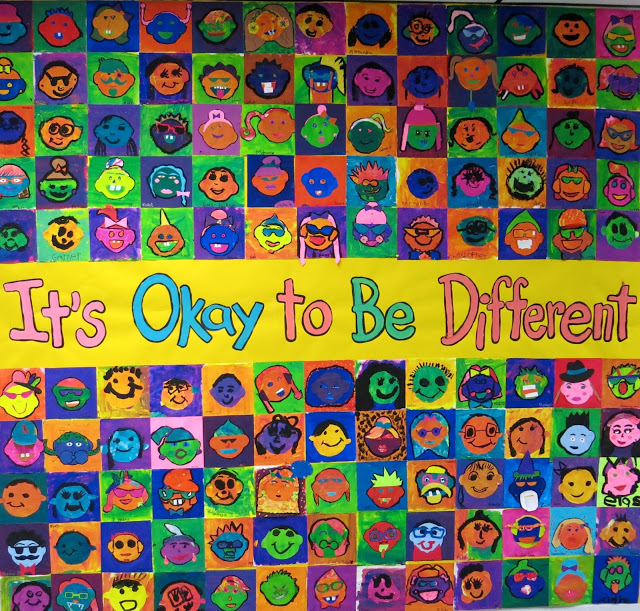
Another book we used for inspiration is the book by Todd Parr called It's Okay to be Different. You can check out how we created these collages here!
The Our School Has Heart mural was a piece with a contribution from each student in the school. You can see the breakdown of who created what in this blog post. Our clay collaborative mural is a bright and shiny beauty that hangs in a prominent place in our school. Each student contributed something to this piece...you can read more about the process here.
One year, we created a Village of Kindness as apart of our art show! Each student upcycled a milk carton that our cafeteria queen cleaned in the dishwasher. The students made little doors that opened and said kind words to those who peeked inside. Students worked together to create the landscape on the bulletin board.
I love to do collaboratives at the start of the school year. I especially like ones where students celebrate our school and that set a postive tone. That was the idea behind this collaborative! Another fun way to start the school year is with some selfies! We've created them for a monochromatic mural. You can check out the video here.
  Inspired by the artist Romero Britto, this mural was created by my students when I was out for jury duty! My sub just played the video and when I returned, I assembled the mural!
 A collaborative mural that definitely made the rounds was this one! The kids loved creating the feathers and it was a beautiful thing while in the hallway but I will say...it was a lot of work to assemble. All the details here.
  My fourth graders created this collaborative one year that lives at the front entrance of our school. We even 'wrapped' it for Christmas and brought out admin out for them to unwrap it as it was hung on the wall of our school.
  We kicked off this school year with our What a Wonderful World collaborative mural. Details and video tour here.
  During our field day one year, my students rotated through many art stations. One of them was this alphabet and number series. My librarian requested them and we just love how they turned out. Click here to see them framed and hung in our school library.
Much like our monochromatic collaborative, this map collaborative was created with a self-portrait of each of my students!
We are the tigers at my school so we do tiger-themed artwork every so often. This mural was created by first graders of all of their tiger drawings. You can find a how-to video right here!
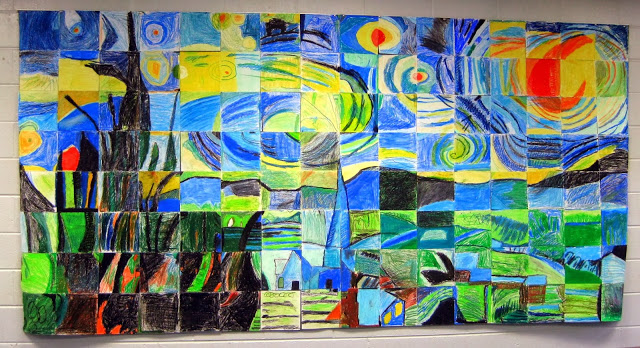 One year, we did super-sized works of art inspired by Andy Warhol and Vincent van Gogh! When these came together, they were stunning. All the details can be found here.


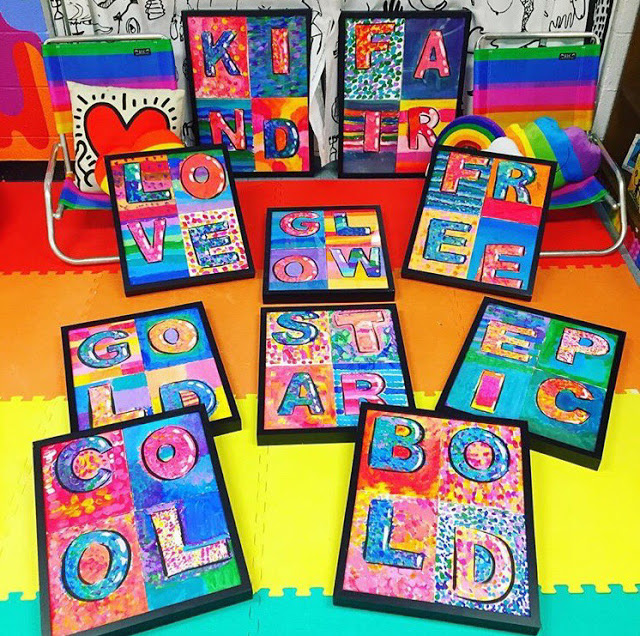
Students worked in table teams to create these positive four-letter words to describe our school!


A fun mural based on the book You Be You was created by nearly all of my students. You can learn about the process of creating our fish here. Read all about the making of the mural itself here!

Another book we used for inspiration is the book by Todd Parr called It's Okay to be Different. You can check out how we created these collages here!

The Our School Has Heart mural was a piece with a contribution from each student in the school. You can see the breakdown of who created what in this blog post.


One year, we created a Village of Kindness as apart of our art show! Each student upcycled a milk carton that our cafeteria queen cleaned in the dishwasher. The students made little doors that opened and said kind words to those who peeked inside. Students worked together to create the landscape on the bulletin board.

I love to do collaboratives at the start of the school year. I especially like ones where students celebrate our school and that set a postive tone. That was the idea behind this collaborative!


Much like our monochromatic collaborative, this map collaborative was created with a self-portrait of each of my students!

We are the tigers at my school so we do tiger-themed artwork every so often. This mural was created by first graders of all of their tiger drawings. You can find a how-to video right here!