Wednesday, January 30, 2013

In the Art Room: Cuckoo for Cuckoo Clocks

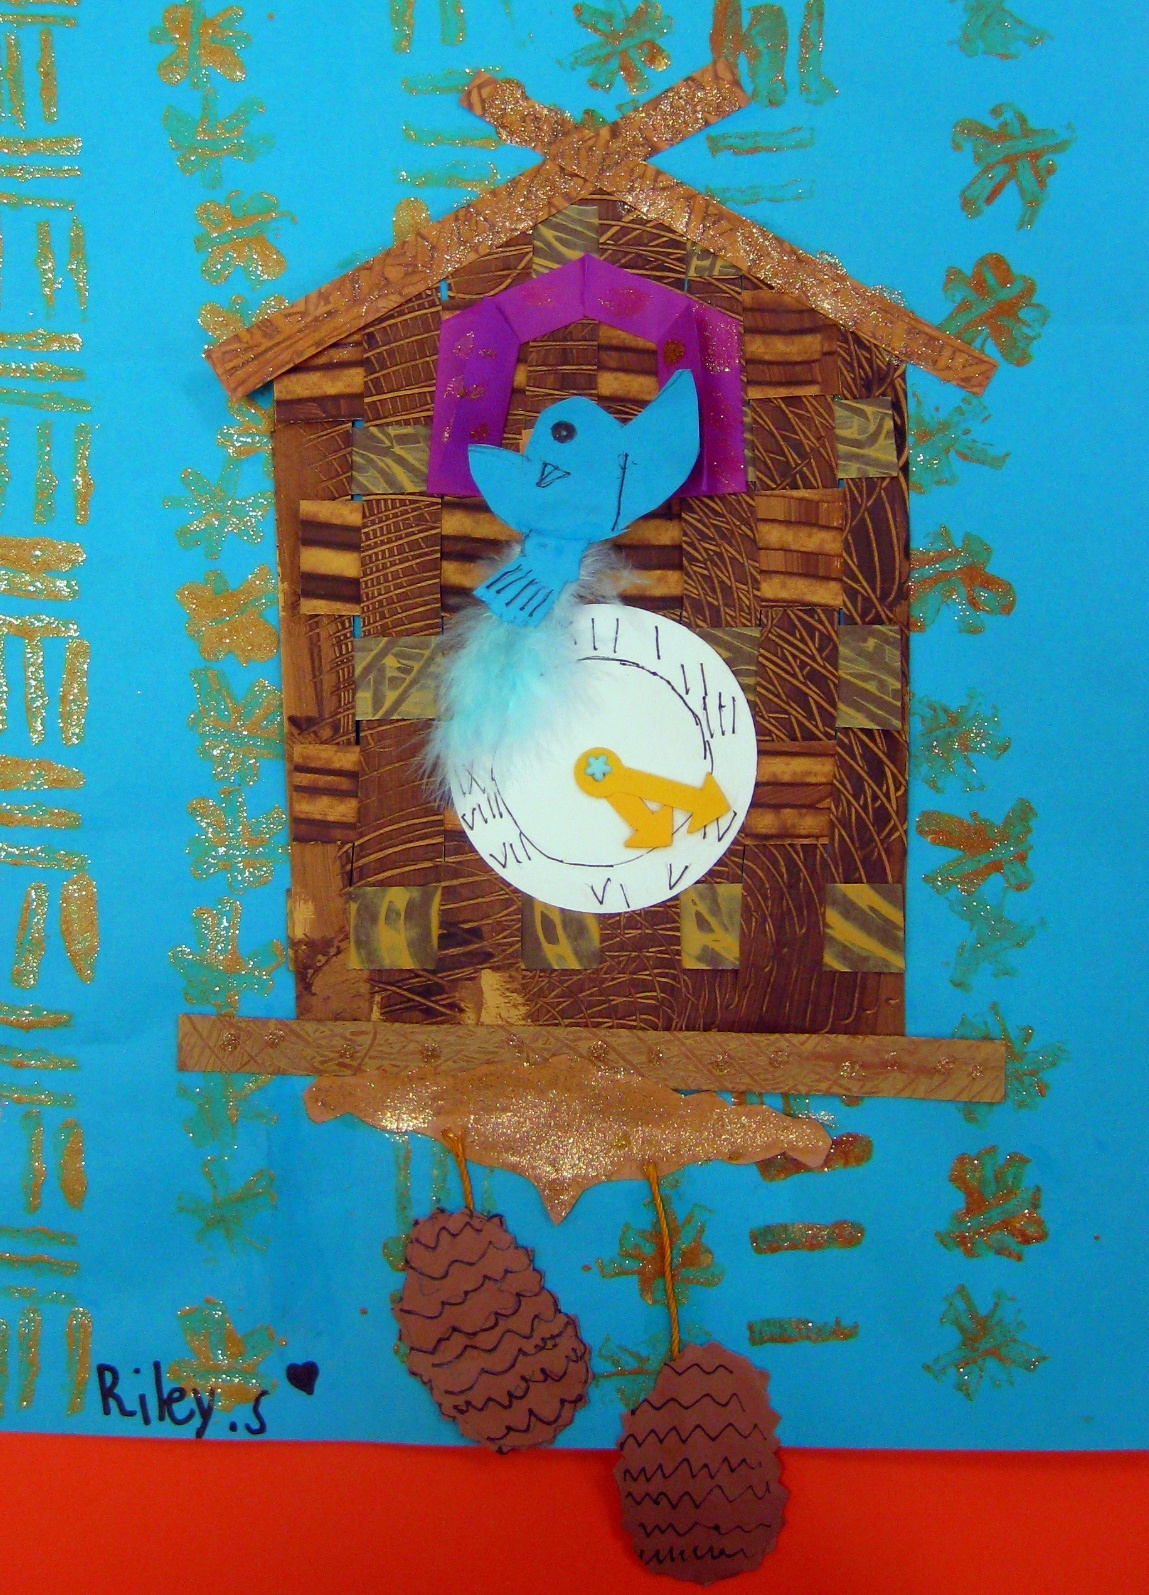
Ain't no doubt about it, that's one cuckoo bird.
Dunno what time your alarm clock sounded this morning, but I was awoken at 2:55 am by tornado sirens. I flew outta bed looking every bit as crazed as the little pink bird above to check the weather...and, okay, to see if quite possibly they cancelled school for a severe storm. No go. And doncha know I couldn't fall back asleep. Which left me feeling a little tired and blue kinda like the cuckoo bird below.

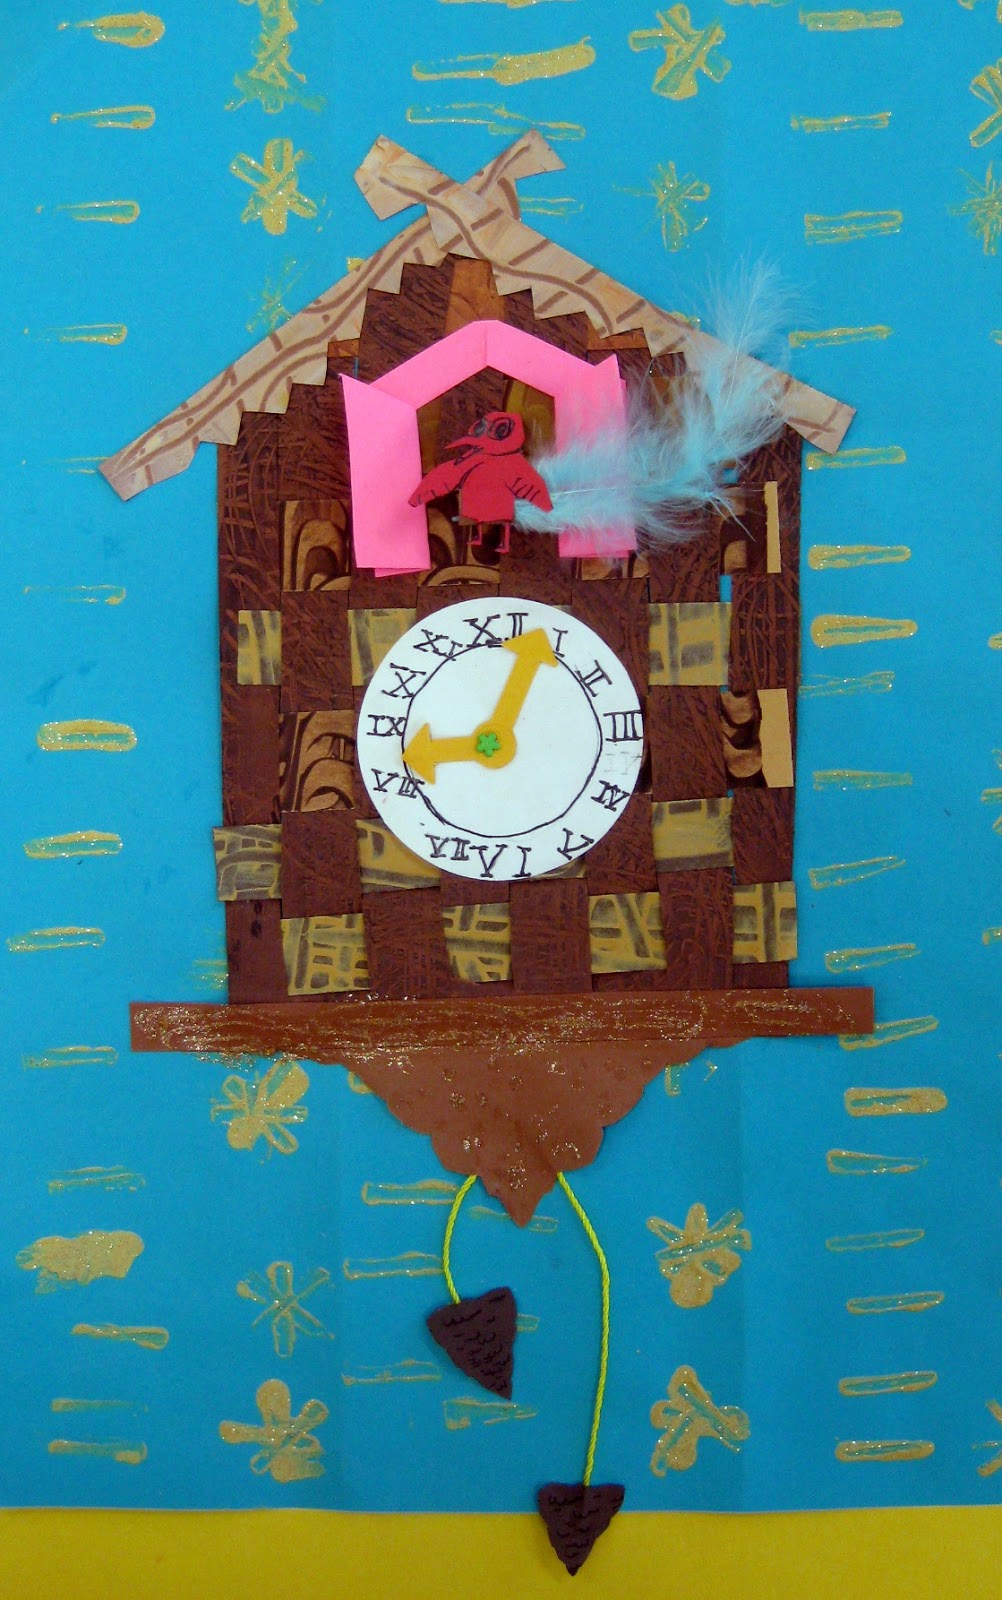
Now doncha go and take me the wrong way, I love that quite little bird. Especially since it's every bit the opposite as it's feisty young creator.
However, once my second grade students starting putting the finishing touches on their cuckoo clocks and they started filling the drying racks with their masterpieces, my attitude quickly changed. I mean, just look at these guys! It's been a long project but I'm totally nuts, er, cuckoo over it.

A flock of Cuckoo-Bird-tasticness.
We began this lesson before Christmas with an introduction to Germany. From there we chatted all about the history of cuckoo clocks which I shared on What I Wore this Week #43. Ya'll might also recall I even crafted a Cuckoo Clock Frock. To begin creating their own wooden cuckoo clocks, the students began by painting two faux wood papers with brown paint and texture combs.

The following art class, the students used one piece of paper to cut a loom and the other paper to weave with. This was pretty easy for them as these guys are the ones who wove the Croco'Nile Puppets last year.
 Once the weaving was complete, we began working on our Roman Numeral clock faces. This was a big time math lesson for the kids and they enjoyed it. I'm lucky that my school has a dye cut machine for the clock hands as cutting out miniature clock hands would have driven us all cuckoo.
 The next couple of art classes were spent in Cardboard Printing Town. The students used 1" X 2" pieces of cardboard and some yellow paint that I added gold glitter to (I'm currently on this kick where I add that super fine glitter to all of the paint. I want everything to be sparkly!).
 We had a big time chat about patterns. I had tri-folded their 12" X 18" piece of construction paper and explained to them that what ever pattern they printed in the first column had to be repeated in the following two. We also had to have a chat about the dif between printing and painting as some of us were using our pieces of cardboard like a palette knife and just painting the paper gold (I'm not the only one addicted to sparkle). I have found the best way to explain the dif is this: printing is when you put something down and you pick it back up; painting is when you put something down and you move it all around. Or something like that.
 Once all of the pieces were complete, we were ready to assemble our clocks. We began by cutting the top of our weaving so it would resemble a house and glued it to the center of our printed paper. From there, we added our roof, a door for our birds and our clocks. The kids had a lot of fun coming up with what their version of a cuckoo bird would look like. Some added a feather for the tale. All of them zigzag folded a piece of paper that served as their pop out.
 After that, a symmetrically cut piece of paper (which we called the "bottom decoration") and a bottom ledge was added. Some kids were inspired by the cuckoo clock visuals I had hanging up to create a little Black Forest scene to the bottom ledge.
I love the flapping wings and the wonky pine cones.
 For our final step of adding the pine cones, I brought in some pine cones from my yard. I placed several on the tables to inspire the kids. These were attached by a couple of strings and, viola! our Cuckoo Clocks were complete. 

The kids were so thrilled by the end result that several asked if we were now going to create real clocks. You know, like with whittled birds and working clock mechanisms. Yeah, um, no. I do believe I'm cuckoo'ed out.

 And now I believe Ima go and catch up on some much needed sleep. Until next time, enjoy the rest of your week!

Monday, January 28, 2013

DIY: Fulla Hot Air Frock

Oh, you know. Just another photo of me standing next to my kitchen window. In a mucho belated DIY.

You know those people that just talk and talk and talk, interrupt you when you try to get a word in edgewise, and talk some more? And it's always the same stories, isn't it? Same jokes, same "hey, did I tell you about this one time..." while you attempt to look at your watch and gauge how much longer you have to sit and listen before you can politely excuse yourself. You know the type, right?

Yeah. That's me.

So how appropriate that I'd create a Fulla Hot Air Frock.
The "before" photo on the left is from  What I Wore this Week #23 on my last day in Germany. Of course the "after" photo is the result of my most recent DIY.

 Oh, this dress. I first spotted it when shopping in Nuremburg, Germany and, even though I loved the vintage-esque cut of the dress, I just didn't spring for it. From which point on I was haunted by the silly thing. Does that happen to you? Do you ever have shoulda-shopping remorse? Well, I knew it was a mistake when I couldn't get it outta my head. Which is why when I saw it again in Amsterdam, I bought it in a blink.
And then proceeded to never ever wear it. Every time I put it on it was just too short for my taste. There's a lot of bending, reaching, squatting and crawling on the floor in the art room, believe it or not. And this dress just wasn't suited for the task.

That's why, way way waaaaaaay back in October, I decided to DIY this little number. And the first thing I did was lengthen the hem with this sweet soft buttery yellow. Do you see the yellow zipper sticking out of the top of the dress? The dress came with it and I was attempted to match it.
So, you heard me say that I began this back in October right? If you are good at math, then you know that was, like, four months ago or something. I had originally began it to coincide with my first graders Hot Air Balloons over Paris and my third graders Parisian Silhouettes.
But what I thought would be the easy/fun part turned out to be a big fat headache. I don't know why I struggled with what patterns of fabric to put together. I usually enjoy playing with pattern and color. But when this just didn't come together easily for me, I put it on the back burner until it was smoking, smoldering, burnt to a crisp and then complete ashes. At which point I thought: does the dress even need the balloons?
In true pro-Cass-tination style, I crafted these light bulb/hot air balloons while hiding from the dress in my sewing room. The Christmas tree should date these ornaments just a bit.
This weekend, with hubs gone and the cat sitting with me on my sewing stool, I decided that it did indeed. Cuz if I hated it, I could just seam rip them out, right? So using my zigzag stitch, I set to work. 

Applique is one of my fave ways to revamp clothing. I've used it on an Urban Outfitters dress, a felted floral sweater, my Rock Star apron and my 1970's art teacher skirt. Since I'm a regular pro (insert sarcasm here), lemme give you the following tips:
  • Tack your pieces down with some stitch witchery. This iron-on stuff will keep your pieces in place without pins sticking out in every direction.
  • If you can, applique light fabrics onto heavier ones. Which I didn't do in this case. And what happens is that the fabric you are adding the applique to has a tendency to pucker. You might notice that in some of my photos despite my ironing. 
  • When sewing, be sure the needle goes from the inside of the piece being appliqued to the edge of said piece. Can you see that in the photo above? Because if you go beyond that edge, the needle will pull the fabric you are appliquing onto thus causing puckers. And no one likes a pucker.
The back and front. You'll notice I did nothing to the back. I usually don't. Because I like my DIY's like a mullet cut: Business in the front, don't give a toot about the back.
Now originally I had plans of adding lines to attach the basket to the balloon but, honestly, I don't think it needs it. I also left some of the balloons basket-less. I just didn't think the fabric (or my patience) could take any more of the heavy stitching. So I skipped it and back-from-the-back-burner ashes, this dress was done.
Outfit Details: Okay, truth? That belt I scooped up at an Anthropologie sale is the real reason I finished this dress. I just couldn't wait to pair it with the dress! tights: Target; shoes: Miss Albright
And there you have it. Yet another long-winded, going-on-and-on-forever, Fulla Hot Air blog post. You can stop checking your watch now, I'm all done. 

Maybe. 

Oh, wait! Did I tell you about this one time...(no, not at Band Camp)...

Seriously, thanks for dropping by. Chat with you soon.


Sunday, January 27, 2013

What the Art Teacher Wore #52

Tuesday is the New Monday: We had Monday off which completely confused me all week as to what/when/where/why/how I was teaching. I never did get it sorted out. Surprised? sweater and skirt: Four Seasons Vintage in Knoxville; necklace and fishnets: Target; shoes: Dolls by Nina
 Well hello dere. Whatcha been up to this week? Ah, that sounds delightful. Me? Funny you should ask cuz I was just about to tell you. My dear ole hubs has been out of town and I've been livin' it up. And by that I mean, hosting a mini-dinner party, dinner'ing and brunch'ing with long-lost-friends and throwing a craftastic afternoon party. It's been so much fun but I gotta tell ya, me and the cat are starting to miss The Bearded One. Thankfully he returns Monday.

This week I also visited Nashville's art museum, The Frist Center for Visual Arts. They currently have an exhibit on German Expressionism and I fell in love with that group of painters and their work all over again. I was a big fan of that bunch in college, especially Paula Modersohn Becker. I thought I'd share her work and life story with you. But, I gotta warn you, have some tissues handy as her life was a sad one.
Photo of Paula Modersohn-Becker and Self-Portrait with Red Hat and Veil, 1906 Paula was born in Germany,  the third child of seven. At the age of 12, she had her first drawing instruction and was hooked. At 22, she encountered the artistic community of Worpswede (a northwestern part of Germany famous for its long tradition as an artists' colony). In this area, artists had retreated to protest against the domination of the art academy and life in the big city

It Might As Well Be Spring Wednesday: In my art room in the mornings, I've been playing a CD of music from 1945. One of the songs is "It Might as Well be Spring". Check out this rendition by Clifford Brown, you'll like it. dress: vintage; fishnets: Target; shoes: John Fluevog
Little Blonde Girl, 1905. It was in Worpswede that Paula met and married the artist Otto Modersohn and became a stepmother to his daughter. Soon after, she began making numerous trips to Paris and was strongly influenced by such post-impressionists as Paul Gauguin and Vincent van Gogh.
Girl with Flowers. In 1906, Paula took her last trip to Paris. She began painting many nude self-portraits which was unheard of at the time. Personally, I am in love with the color palette in this painting. That icy blue and coral pink is such a beautiful combination.
New Background Thursday: My art room is currently in such a state of chaos that this is the only clean clutter-free place I could find to snap a photo. Yowza, I need me a maid! And a life coach. Probably some therapy. Maybe a tête-à-tête with Dr. Phil? sweater: my put-a-bird-on-it number, DIY here; dress, belt and booties: Anthropologie; tights: Target

Girl with a Cat. One of the things I really love about her paintings is the density in her artwork. Objects look heavy yet there is an air around them. I'm trying to figure out how she is creating that look. Is it the strong outlines around objects? I'm not sure, but I love it.
Fluffy Friday: I cannot stop wearing my crinoline under my dress! Even if I did knock some clay projects off a shelf (no worries, they were just my old examples I'd been hoarding). Not only do I love the added fluff but it's also pretty warm. sailboat shirt: Old Navy; dress: Issac Mizrahi, thrifted; tights, booties, belt: Anthropologie

 Farmer's Wife and Portrait of a Girl in Brown Dress and Black Hat, 1907. After returning to Germany from Paris, Paula discovered that she and her husband were pregnant. After many years of trying to conceive, this was an extremely happy time for Paula. Many of her nude portraits were of her growing belly.
  Saturday Brunchin: I had the chance to spend the afternoon with my first student teacher. I've been so lucky to meet such great young women. jacket: Lucky Brand; scarf: Urban Outfitters; dress: vintage, gift from a friend; tights: Target; booties: geez, I love these things! Anthropologie

 Self-Portrait, 1900. Sadly, 18 days after her daughter was born, Paula died at the age of 31. She died of something called embolism which, in her case, may have been related to her pregnancy. When I initially heard this at the art museum, I was so sad. However, when you see what joyous paintings she created when she was pregnant and even after giving birth, you know that Paula would not have had it any other way. She was meant to be a mother even if only for 18 days.
Paula painted these portraits of her good friend poet and writer Rainer Maria Rilke. When Paula passed, Rilke wrote the poem "Requiem for a Friend". If you've ever lost someone, this poem (it's called a poem, but it's more like prose) will most certainly strike a chord.

Geesh. Sorry to leave on you such a sad note. Thankfully, Paula Modersohn-Becker left behind an enormous body of work that I find to be just beautiful. I hope you've enjoyed it as well. 

Until I get a chance to share my students latest masterpieces (the fourth grader's castles are amazing!) and my newest DIY (one that I began two months ago and finally finished!), enjoy your week.

Thursday, January 24, 2013

DIY: Anthro-Inspired Sweater and Skirt

What's this?! A DIY Double-Header? That's right, just for your DIY'ing pleasure, I bring to you a double dose: my felt -n- applique sweater along with my tulle-tastic skirt.
You know that whole "you can do anything you set your mind to" crap they tell you when you are a kid? I remember the very moment I realized that was all a lie.

 I grew up a pretty lanky and unsightly teen. Adolescence painted a particularly ugly picture complete with those giant round glasses all the hipsters now wear, braces/headgear and a feeble attempt at 1980's tidal wave hair all on a flat chested 72 lbs frame. There was not doubt: I was Freak Show Fugly. And, like some cruel joke, my family decided I should send in photos for Seventeen Magazine's Teen Model competition. 

Needless to say, setting my mind to becoming Seventeen's Next American Super Hot Top Pre-Teen Model just wasn't enough to make it a reality. After such a traumatic experience, you'd think a relatively intelligent person would have learned their lesson and stop wishing on a star. Since there is no intelligent life here on this blog, the wishful thinking continues in the form of the bottom half of this Anthropologie knock-off: The Tulle Skirt.
 When I first spotted this skirt in Anthropologie, I knew I had to have it in my life. I mean, look at it, it's all fluffy and soft like some sort of magical 1950's cotton candy skirt. However, the $188 price tag was enough to make me slap my mama. It was then I knew I had to attempt my own version.

When I purchased the tulle at the local craft joint, I asked for all that was on the bolt. After measuring, the fabric cuttin' gal informed me that I'd be purchasing 17 yards of the fluffy stuff. That's when this convo transpired: 

Fab Cuttin' Gal: 17 yards is a lot (duh, lady). Are you sure you need that much?
Me: Well, yeah. And it's only like a dollar a yard so I'll just take it all.
FCG: What are you making? (do they pay them to ask that question?)
Me: Oh, a tulle skirt! I'm so excited.
FCG: Oh, for some little girls? That will be so cute. Little girls just love their tutus!
Me: Oh, I know. Don't they though?!

Humph. Tulle skirts are for kids?! Me thinks not. 
After some serious trouble shooting, I decided to create my skirt using the same pattern I did for this DIY skirt. I layered seven pieces of tulle for each of the three pattern pieces (one large front panel and two back panels) with a gathered-waisted slip underneath. Now the thing about working with tulle is that is should come with some warning labels. Might I recommend the following:

WARNING: So Super Staticy. Like, super duper. A close look at my skirt and you'll find thread, bits of paper and maybe a cat hair or twenty between the layers of tulle-tasticness.
WARNING: Do Not Iron. Okay, really, I know I should have known this but I thought a quick hit on a low setting would be okay. Turns out it's not. 
WARNING: No Tools Should Work with Tulle. And I am a serious tool. I realized that when I was seam-ripping the waist band, my hand slipped and I put a hole in the front of this skirt. It was then that I put down the seam ripper and said, "Tulle, you've won." And I decided the skirt was complete.
Thus ending my long-winded story of my DIY tulle skirt. I'm happy-ish with the end result but most excited that I never-ever-ever have to work on it again. 

Can we please talk about happy DIY's now? Like my latest felted sweater (you can see my other felted creations here and here). I know it doesn't look a think like the Anthro-version (which I spotted on the sale rack for the still-too-high price of $69) but I wasn't in love with that one anyway. I mean, those little gold thinger-mabobbers just look awkward. To me. Pardon me if you are a proud owner of said Gold Thinger-Mabobber Sweater. 

But I do love the idea of having three-dimensional flowers on an otherwise boring gray cardi. Which is how my version came to be.
 AND just in time for Valentine's Day I decided to add a little love to the back of my sweater. What's that Gold Thinger-Mabobber Sweater? You don't have anything on the backside? Oh, too bad.


 Because this sweater was pretty easy and trouble-shooting free to complete, I thought I'd share the process with you. I began by purchasing a couple of 100% wool sweaters at the thrift store. I scored a green sweater for the leaves and a dark gray sweater that I used for the flower pedals. I washed them both in hot water which felted the fibers. This made it so I could cut out the leaf and petal shapes and without fraying. From there I used 100% wool yarn and needle-felted the veins of the leaves as shown above.
 I felted some buttons for the sweater also. For this process I took an inch wide button and wrapped wool roving around it. Then I began the process of wet felting it. Using hot water and soap, I gently rubbed the button between my hands until I felt it shrink. Those dried overnight.
 After crafting a dozen leaves, a half dozen flower petals and a couple buttons, I set to work adding them to my thrift store cardi. Using an applique stitch, I added the flower petals and leaves. I was concerned as I sewed because the the shapes looked warped. Thankfully a hit with a hot iron flattened it all back out.
 Felting the spiral design and the word love were relatively easy. I had originally picked up this wool yarn back in the day I had the silly notion I could knit. Turns out I can't knit but I can felt. As you can see above, I just spelled out the letters of the word and started punching it into place. If you are new to this lil ole blog and you'd like to see a more detailed description of needle felting, please read here.
 Ya see those spirally lines on the sweater front? Those were needle felted in the same way.
 And Ta-Da! This Tutu Skirt -n- Sweater Combo is done. And I think I'm finally ready for my Seventeen Magazine Mid-Aged-Lady Who Thinks She Can Sew closeup!

When I showed my skirt off to hubs, he said, "Oh, is that something you'll wear under your skirt like a tutu?"

Why do I suddenly think that he and FCG are in cahoots together? 

Wow, sorry for the long-winded post, ya'll! If you made it this far...thank you for reading and enjoy the rest of your week.